
有沒有想過建立像 GitHub Copilot 這樣的程式碼完成工具很複雜?令人驚訝的是,它並沒有看起來那麼難!
身為工程師,我一直對程式碼完成工具的幕後工作方式著迷。因此,我對這個過程進行了逆向工程,看看我是否可以自己建造一個。
這是我自己建造並發布的一個 - LLM-Autocompleter
隨著 AI 輔助工具成為軟體開發的常態,創建自己的程式碼完成工具是了解語言伺服器協定 (LSP)、API 以及與 OpenAI 的 GPT 等高階模型整合的好方法。另外,這是一個非常有價值的項目。
程式碼補全工具本質上將語言伺服器協定 (LSP) 伺服器與來自 VS Code 等平台的內嵌程式碼補全機制結合。在本教程中,我們將利用 VS Code 的內聯完成 API 並建立我們自己的 LSP 伺服器。
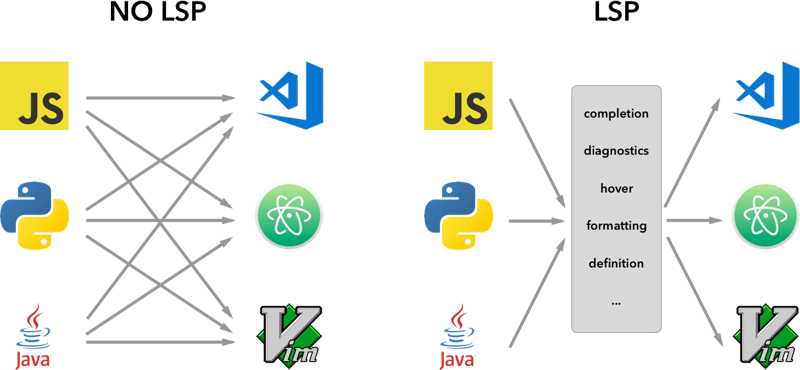
在深入討論之前,讓我們先了解什麼是 LSP 伺服器。
LSP 伺服器是一種後端服務,為文字編輯器或整合開發環境 (IDE) 提供特定於語言的功能。它充當編輯器(客戶端)和特定於語言的工具之間的橋樑,提供以下功能:
程式碼完成(在您鍵入時建議程式碼片段),
前往定義(導航到定義符號的程式碼部分),
錯誤檢查(即時反白顯示語法錯誤)。
語言伺服器協定(LSP)背後的想法是標準化此類伺服器和開發工具如何通訊的協定。這樣,單一語言伺服器就可以在多個開發工具中重複使用,LSP 只是一個協定。
透過標準化這些伺服器透過 LSP 與編輯器的通訊方式,開發人員可以創建跨各種平台無縫工作的特定於語言的功能,例如 VS Code、Sublime Text,甚至 Vim。
現在您已經了解了 LSP 的基礎知識,讓我們逐步深入建立我們自己的程式碼完成工具。
我們將首先使用 VS Code 提供的範例內聯完成擴充。您可以直接從 GitHub 複製它:
vscode-sample-inlinecompletion
現在讓我們開始設定lsp伺服器,您可以按照以下結構
.
├── client // Language Client
│   ├── src
│   │   ├── test // End to End tests for Language Client / Server
│   │   └── extension.ts // Language Client entry point
├── package.json // The extension manifest.
└── server // Language Server
    └── src
        └── server.ts // Language Server entry point
有關更多信息,您還可以查看 lsp-sample
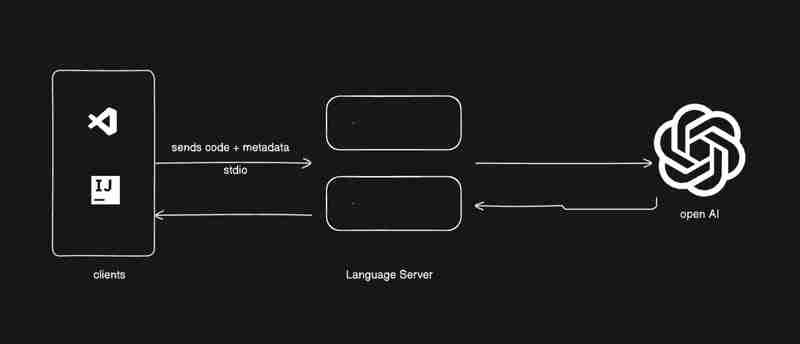
我會給你們一些程式碼,你們必須將一些東西縫合在一起,我希望你們能夠學習。下圖顯示了我們要建立的內容。
讓我們前往 client/src/extension.ts 並刪除激活函數中的所有內容
export function activate(context: ExtensionContext) {
}
讓我們開始設定
副檔名.ts
export function activate(context: ExtensionContext) {
    const serverModule = context.asAbsolutePath(
        path.join("server", "out", "server.js")
    );

    const debugOptions = { execArgv: ['--nolazy', '--
 inspect=6009'] };

  // communication with the server using Stdio
    const serverOptions: ServerOptions = {
        run: {
            module: serverModule,
            transport: TransportKind.stdio,
        },
        debug: {
            module: serverModule,
            transport: TransportKind.stdio,
            options: debugOptions
        }
    };

        const clientOptions: LanguageClientOptions = {
        documentSelector: [{ scheme: 'file' }],
        initializationOptions: serverConfiguration
    };


     client = new LanguageClient(
        'LSP Server Name',
        serverOptions,
        clientOptions
    );

  client.start();
}
一些資訊
我們可以遵循不同類型的協定來在伺服器和客戶端之間進行通訊。
欲了解更多信息,您可以訪問 microsoft-lsp-docs
為什麼是stdio? Stdio 是客戶端和伺服器之間支援最廣泛的通訊協定之一。它允許我們建立的 LSP 伺服器不僅可以在 VS Code 中運作,還可以在 Vim 和 Sublime Text 等其他編輯器中運作。
server.ts
const methodStore: Record<string, any> = {
  exit,
  initialize,
  shutdown,
};

process.stdin.on("data", async (bufferChuck) => {
    buffer += bufferChuck;

    while (true) {
        try {
            // Check for the Content-Length line
            const lengthMatch = buffer.match(/Content-Length: (\d+)\r\n/);
            if (!lengthMatch) break;

            const contentLength = parseInt(lengthMatch[1], 10);
            const messageStart = buffer.indexOf("\r\n\r\n") + 4;

            // Continue unless the full message is in the buffer
            if (buffer.length < messageStart + contentLength) break;

            const rawMessage = buffer.slice(messageStart, messageStart + contentLength);
            const message = JSON.parse(rawMessage);


            const method = methodStore[message.method];

            if (method) {
                const result = await method(message);

                if (result !== undefined) {
                    respond(message.id, result);
                }
            }
            buffer = buffer.slice(messageStart + contentLength);
        } catch (error: any) {

            const errorMessage = {
                jsonrpc: "2.0",
                method: "window/showMessage",
                params: {
                    type: 1, // Error type
                    message: `Error processing request: ${error.message}`
                }
            };

            const errorNotification = JSON.stringify(errorMessage);
            const errorNotificationLength = Buffer.byteLength(errorNotification, "utf-8");
            const errorHeader = `Content-Length: ${errorNotificationLength}\r\n\r\n`;

            process.stdout.write(errorHeader + errorNotification);
        }
    }
});
初始化.ts
export const initialize = (message: RequestMessage): InitializeResult => {

    return {
        capabilities: {
            completionProvider: {
                resolveProvider: true
            },
            textDocumentSync: TextDocumentSyncKind.Incremental,
            codeActionProvider: {
                resolveProvider: true
            }
        },
        serverInfo: {
            name: "LSP-Server",
            version: "1.0.0",
        },
    };
};
退出.ts
export const exit = () => {
    process.exit(0);
  };
shutdown.ts
export const shutdown = () => {
    return null;
  };
完成基本功能後,您現在可以使用鍵盤上的 F5 鍵或按照偵錯指南在偵錯模式下執行 vscode
現在讓我們從新增內聯提供者開始,並根據
取得請求和回應讓我們在 methodStore 中加入一個新方法
server.ts
const methodStore: Record<string, any> = {
  exit,
  initialize,
  shutdown,
  "textDocument/generation": generation
};
一代.ts
export const generation = async (message: any) => {
    if(!message && message !== undefined) return {};

    const text = message.params.textDocument.text as string;

    if(!text) return {};

        const cursorText = getNewCursorText(text, message.params.position.line, message.params.position.character);

  const response = await getResponseFromOpenAI(cursorText, message.params.fsPath);

 return {
    generatedText: response,
  }

}

function getNewCursorText(text: string, line: number, character: number): string {
    const lines = text.split('\n');
    if (line < 0 || line >= lines.length) return text;

    const targetLine = lines[line];
    if (character < 0 || character > targetLine.length) return text;

    lines[line] = targetLine.slice(0, character) + '<CURSOR>' + targetLine.slice(character);
    return lines.join('\n');
}


const getResponseFromOpenAI = async (text: string, fsPath: stiring): Promise<string> => {
     const message = {
          "role": "user",
          "content": text
    };

   const systemMetaData: Paramaters = {
    max_token: 128,
    max_context: 1024,
    messages: [],
    fsPath: fsPath
   }

   const messages = [systemPrompt(systemMetaData), message]

   const chatCompletion: OpenAI.Chat.ChatCompletion | undefined = await this.open_ai_client?.chat.completions.create({
            messages: messages,
            model: "gpt-3.5-turbo",
            max_tokens: systemMetaData?.max_tokens ?? 128,
        });


        if (!chatCompletion) return "";

        const generatedResponse = chatCompletion.choices[0].message.content;

        if (!generatedResponse) return "";

        return generatedResponse;
}
模板.ts
interface Parameters {
    max_tokens: number;
    max_context: number;
    messages: any[];
    fsPath: string;
}

 export const systemPrompt = (paramaters: Parameters | null) => {
    return {
        "role": "system",
        "content": `
        Instructions:
            - You are an AI programming assistant.
            - Given a piece of code with the cursor location marked by <CURSOR>, replace <CURSOR> with the correct code.
            - First, think step-by-step.
            - Describe your plan for what to build in pseudocode, written out in great detail.
            - Then output the code replacing the <CURSOR>.
            - Ensure that your completion fits within the language context of the provided code snippet.
            - Ensure, completion is what ever is needed, dont write beyond 1 or 2 line, unless the <CURSOR> is on start of a function, class or any control statment(if, switch, for, while).

            Rules:
            - Only respond with code.
            - Only replace <CURSOR>; do not include any previously written code.
            - Never include <CURSOR> in your response.
            - Handle ambiguous cases by providing the most contextually appropriate completion.
            - Be consistent with your responses.
            - You should only generate code in the language specified in the META_DATA.
            - Never mix text with code.
            - your code should have appropriate spacing.

            META_DATA:
            ${paramaters?.fsPath}`
    };
};
現在讓我們註冊內聯供應商
副檔名.ts
import {languages} from "vscode";


function getConfiguration(configName: string) {
    if(Object.keys(workspace.getConfiguration(EXTENSION_ID).get(configName)).length > 0){
        return workspace.getConfiguration(EXTENSION_ID).get(configName);
    }
    return null;
}

const inLineCompletionConfig = getConfiguration("inlineCompletionConfiguration");

export function activate(context: ExtensionContext) {
 // OTHER CODE

  languages.registerInlineCompletionItemProvider(
        { pattern: "**" },
        {
            provideInlineCompletionItems: (document: TextDocument, position: Position) => {
                const mode = inLineCompletionConfig["mode"] || 'slow';
                return provideInlineCompletionItems(document, position, mode);
            },
        }

    );

}


let lastInlineCompletion = Date.now();
let lastPosition: Position | null = null;
let inlineCompletionRequestCounter = 0;

const provideInlineCompletionItems = async (document: TextDocument, position: Position, mode: 'fast' | 'slow') => {
    const params = {
        textDocument: {
            uri: document.uri.toString(),
            text: document.getText(),
        },
        position: position,
        fsPath: document.uri.fsPath.toString()
    };

    inlineCompletionRequestCounter += 1;
    const localInCompletionRequestCounter = inlineCompletionRequestCounter;
    const timeSinceLastCompletion = (Date.now() - lastInlineCompletion) / 1000;
    const minInterval = mode === 'fast' ? 0 : 1 / inLineCompletionConfig["maxCompletionsPerSecond"];

    if (timeSinceLastCompletion < minInterval) {
        await new Promise(r => setTimeout(r, (minInterval - timeSinceLastCompletion) * 1000));
    }

    if (inlineCompletionRequestCounter === localInCompletionRequestCounter) {
        lastInlineCompletion = Date.now();

        let cancelRequest = CancellationToken.None;
        if (lastPosition && position.isAfter(lastPosition)) {
            cancelRequest = CancellationToken.Cancelled;
        }
        lastPosition = position;

        try {
            const result = await client.sendRequest("textDocument/generation", params, cancelRequest);


            const snippetCode = new SnippetString(result["generatedText"]);
            return [new InlineCompletionItem(snippetCode)];
        } catch (error) {
            console.error("Error during inline completion request", error);
            client.sendNotification("window/showMessage", {
                type: 1, // Error type
                message: "An error occurred during inline completion: " + error.message
            });
            return [];
        }
    } else {
        return [];
    }
};
本部落格為您提供了建立自己的程式碼完成工具所需的基礎,但旅程並沒有就此結束。我鼓勵您嘗試、研究和改進此程式碼,探索 LSP 和 AI 的不同功能,以根據您的需求自訂工具。
無論是誰嘗試實現這一點,我都希望他們能夠學習、研究並將東西整合在一起。
了解 LSP 伺服器:您已經了解了 LSP 伺服器是什麼、它如何為特定於語言的工具提供支持,以及為什麼它對於跨編輯器支援至關重要。
建立 VS Code 擴充:您已經探索如何使用 API 將程式碼完成整合到 VS Code 中。
AI 驅動的程式碼完成:透過連接到 OpenAI 的 GPT 模型,您已經了解了機器學習如何透過智慧建議提高開發人員的工作效率。
如果你到達這裡,我很想知道你學到了什麼。
如果您今天從我的部落格中學到了新東西,請按讚。
與我聯絡- linked-In
以上是建立您自己的 GitHub Copilot:程式碼完成工具逐步指南的詳細內容。更多資訊請關注PHP中文網其他相關文章!


