
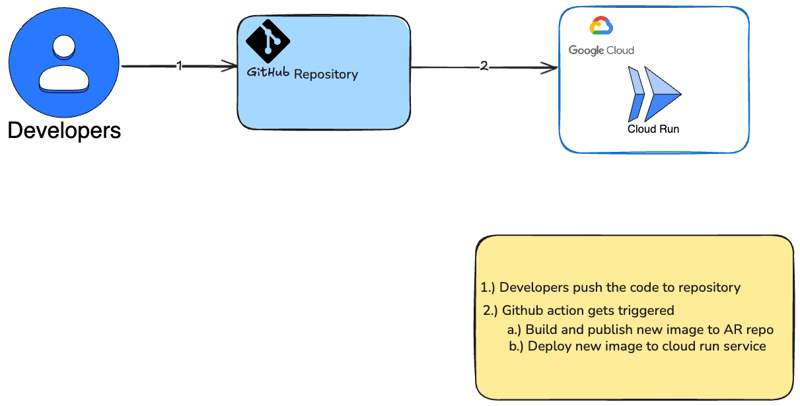
我將示範如何在cloud run上部署一個簡單的容器。
Cloud Run 是一個完全託管的平台,可讓您直接在 Google 可擴展的基礎架構之上運行程式碼。 Cloud Run 簡單、自動化,旨在提高您的工作效率。
我按照官方 fastapi 文件啟動了一個 hello world 應用程式
建立requirements.txt檔案
fastapi[standard]
pydantic>=2.7.0,<3.0.0
from typing import Union

from fastapi import FastAPI

app = FastAPI()


@app.get("/")
def read_root():
    return {"Hello": "World"}


@app.get("/items/{item_id}")
def read_item(item_id: int, q: Union[str, None] = None):
    return {"item_id": item_id, "q": q}
建立 Dockerfile
FROM python:3.9

WORKDIR /code

COPY ./requirements.txt /code/requirements.txt

RUN pip install --no-cache-dir --upgrade -r /code/requirements.txt

COPY ./app /code/app

CMD ["fastapi", "run", "app/main.py", "--port", "80"]
GitHub 操作
為了讓 GitHub 操作流程能夠取得 YAML 文件,它需要有特定的儲存位置。每個使用操作的儲存庫都需要一個名為 /.github/workflows
*使用 GCP 更多資訊配置此工作流程 *
# This workflow build and push a Docker container to Google Artifact Registry
# and deploy it on Cloud Run when a commit is pushed to the $default-branch
# branch.
#
# To configure this workflow:
#
# 1. Enable the following Google Cloud APIs:
#
#    - Artifact Registry (artifactregistry.googleapis.com)
#    - Cloud Run (run.googleapis.com)
#    - IAM Credentials API (iamcredentials.googleapis.com)
#
#    You can learn more about enabling APIs at
#    https://support.google.com/googleapi/answer/6158841.
#
# 2. Create and configure a Workload Identity Provider for GitHub:
#    https://github.com/google-github-actions/auth#preferred-direct-workload-identity-federation.
#
#    Depending on how you authenticate, you will need to grant an IAM principal
#    permissions on Google Cloud:
#
#    - Artifact Registry Administrator (roles/artifactregistry.admin)
#    - Cloud Run Developer (roles/run.developer)
#
#    You can learn more about setting IAM permissions at
#    https://cloud.google.com/iam/docs/manage-access-other-resources
#
# 3. Change the values in the "env" block to match your values.
建立檔案 google-cloudrun-docker.yml
name: 'Build and Deploy to Cloud Run'

on:
  push:
    branches:
      - '$default-branch'

env:
  PROJECT_ID: 'my-project' # TODO: update to your Google Cloud project ID
  REGION: 'us-central1' # TODO: update to your region
  SERVICE: 'my-service' # TODO: update to your service name
  WORKLOAD_IDENTITY_PROVIDER: 'projects/123456789/locations/global/workloadIdentityPools/my-pool/providers/my-provider' # TODO: update to your workload identity provider

jobs:
  deploy:
    runs-on: 'ubuntu-latest'

    permissions:
      contents: 'read'
      id-token: 'write'

    steps:
      - name: 'Checkout'
        uses: 'actions/checkout@692973e3d937129bcbf40652eb9f2f61becf3332' # actions/checkout@v4

      # Configure Workload Identity Federation and generate an access token.
      #
      # See https://github.com/google-github-actions/auth for more options,
      # including authenticating via a JSON credentials file.
      - id: 'auth'
        name: 'Authenticate to Google Cloud'
        uses: 'google-github-actions/auth@f112390a2df9932162083945e46d439060d66ec2' # google-github-actions/auth@v2
        with:
          workload_identity_provider: '${{ env.WORKLOAD_IDENTITY_PROVIDER }}'

      # BEGIN - Docker auth and build
      #
      # If you already have a container image, you can omit these steps.
      - name: 'Docker Auth'
        uses: 'docker/login-action@9780b0c442fbb1117ed29e0efdff1e18412f7567' # docker/login-action@v3
        with:
          username: 'oauth2accesstoken'
          password: '${{ steps.auth.outputs.auth_token }}'
          registry: '${{ env.REGION }}-docker.pkg.dev'

      - name: 'Build and Push Container'
        run: |-
          DOCKER_TAG="$${{ env.REGION }}-docker.pkg.dev/${{ env.PROJECT_ID }}/${{ env.SERVICE }}:${{ github.sha }}"
          docker build --tag "${DOCKER_TAG}" .
          docker push "${DOCKER_TAG}"
      - name: 'Deploy to Cloud Run'

        # END - Docker auth and build

        uses: 'google-github-actions/deploy-cloudrun@33553064113a37d688aa6937bacbdc481580be17' # google-github-actions/deploy-cloudrun@v2
        with:
          service: '${{ env.SERVICE }}'
          region: '${{ env.REGION }}'
          # NOTE: If using a pre-built image, update the image name below:

          image: '${{ env.REGION }}-docker.pkg.dev/${{ env.PROJECT_ID }}/${{ env.SERVICE }}:${{ github.sha }}'
      # If required, use the Cloud Run URL output in later steps
      - name: 'Show output'
        run: |2-

          echo ${{ steps.deploy.outputs.url }}
目錄結構
您現在應該具有以下目錄結構:
├── app
│   ├── __init__.py
│   └── main.py
├── Dockerfile
└── requirements.txt
└── requirements.txt
├── .github
│   ├── workflows
         ├── google-cloudrun-docker.yml
> 1. Create a new repo in gitHUb
> 2. Push your exisisting code to new repository on default branch
以上是在雲端運行部署無狀態容器的詳細內容。更多資訊請關注PHP中文網其他相關文章!


