

Heroku 中的 Playwright 和 Chrome 瀏覽器測試

我一直喜歡觀看我的單元測試運行(並通過)。它們速度很快,透過測試讓我確信我的個人作品表現得像他們應該的那樣。相反,我經常很難確定瀏覽器端到端測試的優先級,因為編寫和運行它們的速度非常慢。
幸運的是,多年來,用於端到端瀏覽器內測試的工具已經變得更好更快。透過無頭瀏覽器設置,我可以執行瀏覽器測試作為 CI 的一部分。
最近,我看到這篇 Heroku 部落格文章,討論在 Heroku CI 中使用無頭 Chrome 進行自動化瀏覽器內測試。 Heroku 有一個安裝 headless Chrome 的建置包,您可以在 CI 管道中呼叫它來進行測試。
部落格文章中的範例設定是使用 Puppeteer 和 Jest 測試的 React 應用程式。這是一個很好的開始…但是如果我使用 Playwright 而不是 Puppeteer 呢?可以嗎?
我決定調查一下。事實證明 — 是的,您也可以使用 Playwright 來做到這一點!因此,我捕獲了在 Heroku CI 中使用的無頭 Chrome 瀏覽器上運行 Playwright 測試所需的步驟。在這篇文章中,我將引導您完成設定步驟。
關於端到端測試的瀏覽器自動化的簡短介紹
端到端測試擷取使用者如何在瀏覽器中實際與您的應用程式交互,從而驗證完整的工作流程。 Playwright 透過在 Chrome、Firefox 和 Safari 中進行測試,使這一過程變得非常無縫。當然,在 CI 中執行完整的瀏覽器測試非常繁重,這就是無頭模式有幫助的原因。
Heroku 的用於測試的 Chrome 建置套件將 Chrome 安裝在 Heroku 應用程式上,因此您可以透過非常輕量級的設定在 Heroku CI 中執行 Playwright 測試。
測試申請簡介
因為我只是嘗試這個,所以我分叉了最初在 Heroku 部落格文章中引用的 GitHub 儲存庫。該應用程式是一個簡單的 React 應用程序,帶有連結、文字輸入和提交按鈕。共有三個測驗:
驗證連結是否有效並重定向到正確的位置。
驗證文字輸入是否正確顯示使用者輸入。
驗證提交表單是否會更新頁面上顯示的文字。
非常簡單。現在,我只需更改程式碼以使用 Playwright 而不是 Puppeteer 和 Jest。哦,我還想使用 pnpm 而不是 npm。這是我分叉的 GitHub 儲存庫的連結。
修改程式碼以使用 Playwright
讓我們看看我修改程式碼的步驟。我從我的分叉存儲庫開始,與 heroku-examples 存儲庫相同。
使用pnpm
我想使用 pnpm 而不是 npm。 (個人喜好。)所以,這就是我首先做的:
~/project$ corepack enable pnpm


~/project$ corepack use pnpm@latest

Installing pnpm@9.12.3 in the project…
…
Progress: resolved 1444, reused 1441, downloaded 2, added 1444, done
…
Done in 14.4s

~/project$ rm package-lock.json


~/project$ pnpm install # just to show everything's good


Lockfile is up to date, resolution step is skipped
Already up to date
Done in 1.3s
將劇作家加入項目中
接下來,我刪除了 Puppeteer 和 Jest,並新增了 Playwright。
~/project$ pnpm remove \
           babel-jest jest jest-puppeteer @testing-library/jest-dom

~/project$ $ pnpm create playwright
Getting started with writing end-to-end tests with Playwright:
Initializing project in '.'
✔ Do you want to use TypeScript or JavaScript? · JavaScript
✔ Where to put your end-to-end tests? · tests
✔ Add a GitHub Actions workflow? (y/N) · false
✔ Install Playwright browsers (can be done manually via 'pnpm exec playwright install')? (Y/n) · false
✔ Install Playwright operating system dependencies (requires sudo / root - can be done manually via 'sudo pnpm exec playwright install-deps')? (y/N) · false

Installing Playwright Test (pnpm add --save-dev @playwright/test)…
…
Installing Types (pnpm add --save-dev @types/node)…
…
Done in 2.7s
Writing playwright.config.js.
Writing tests/example.spec.js.
Writing tests-examples/demo-todo-app.spec.js.
Writing package.json.
我還從 package.json 中刪除了 Jest 設定部分。
將 Playwright 配置為僅使用 Chromium
您可以在 Chrome、Firefox 和 Safari 中執行 Playwright 測試。由於我專注於 Chrome,因此我從生成的 playwright.config.js 檔案的專案部分中刪除了其他瀏覽器:
  /* Configure projects for major browsers */
  projects: [
    {
      name: 'chromium',
      use: { ...devices['Desktop Chrome'] },
    },

//    {
//      name: 'firefox',
//      use: { ...devices['Desktop Firefox'] },
//    },
//
//    {
//      name: 'webkit',
//      use: { ...devices['Desktop Safari'] },
//    },


  ],
…
將 Puppeteer 測試程式碼交換為 Playwright 測試程式碼
原始程式碼有一個 Puppeteer 測試文件,位於 src/tests/puppeteer.test.js。我將該檔案移至tests/playwright.spec.js。然後,我更新了測試以使用劇作家的約定,它映射得相當乾淨。新的測試文件如下所示:
const ROOT_URL = 'http://localhost:8080';
const { test, expect } = require('@playwright/test');

const inputSelector = 'input[name="name"]';
const submitButtonSelector = 'button[type="submit"]';
const greetingSelector = 'h5#greeting';
const name = 'John Doe';

test.beforeEach(async ({ page }) => {
  await page.goto(ROOT_URL);
});

test.describe('Playwright link', () => {
  test('should navigate to Playwright documentation page', async ({ page }) => {
    await page.click('a[href="https://playwright.dev/"]');
    await expect(page.title()).resolves.toMatch('| Playwright');
  });
});

test.describe('Text input', () => {
  test('should display the entered text in the text input', async ({ page }) => {
    await page.fill(inputSelector, name);

    // Verify the input value
    const inputValue = await page.inputValue(inputSelector);
    expect(inputValue).toBe(name);
  });
});

test.describe('Form submission', () => {
  test('should display the "Hello, X" message after form submission', async ({ page }) => {
    const expectedGreeting = `Hello, ${name}.`;
    await page.fill(inputSelector, name);
    await page.click(submitButtonSelector);

    await page.waitForSelector(greetingSelector);
    const greetingText = await page.textContent(greetingSelector);
    expect(greetingText).toBe(expectedGreeting);
  });
});
刪除 start-server-and-test,改用 Playwright 的 webServer
為了測試我的 React 應用程序,我需要先在一個單獨的進程中啟動它(在 http://localhost:8080),然後我可以執行我的測試。無論我使用 Puppeteer 還是 Playwright,都會發生這種情況。對於 Puppeteer,Heroku 範例使用了 start-server-and-test 套件。但是,您可以配置 Playwright 在執行測試之前啟動應用程式。這真是太方便了!
我從我的專案中刪除了 start-server-and-test。
~/project$ pnpm remove start-server-and-test
在 playwright.config.js 中,我取消了底部 webServer 部分的註釋,將其修改為如下所示:
  /* Run your local dev server before starting the tests */
  webServer: {
     command: 'pnpm start',
     url: 'http://127.0.0.1:8080',
     reuseExistingServer: !process.env.CI,
  },
然後,我從原始 package.json 檔案中刪除了 test:ci 腳本。相反,我的測試腳本如下所示:
  "scripts": {
    …
    "test": "playwright test --project=chromium --reporter list"
  },
在我的本機上安裝 Playwright 瀏覽器
Playwright 安裝最新的瀏覽器二進位檔案以用於其測試。因此,在我的本機電腦上,我需要 Playwright 安裝其版本的 Chromium。
~/project$ pnpm playwright install chromium


Downloading Chromium 130.0.6723.31 (playwright build v1140)
from https://playwright.azureedge.net/builds/chromium/1140/chromium-linux.zip
164.5 MiB [====================] 100%
注意: Heroku 上的用於測試的 Chrome 建置套件安裝了我們將用於測試的瀏覽器。我們將設定 CI,以便 Playwright 使用該瀏覽器,而不是花費時間和資源安裝自己的瀏覽器。
在本地運行測試
這樣,我就一切準備就緒了。是時候在本地嘗試我的測試了。
~/project$ pnpm test

> playwright test --project=chromium --reporter list

Running 3 tests using 3 workers

  ✓  1 [chromium] > playwright.spec.js:21:3 > Text input > should display the entered text in the text input (911ms)
  ✘  2 [chromium] > playwright.spec.js:14:3 > Playwright link > should navigate to Playwright documentation page (5.2s)
  ✓  3 [chromium] > playwright.spec.js:31:3 > Form submission > should display the "Hello, X" message after form submission (959ms)

...
      - waiting for locator('a[href="https://playwright.dev/"]')


      13 | test.describe('Playwright link', () => {
      14 |   test('should navigate to Playwright documentation page', async ({ page }) => {
    > 15 |     await page.click('a[href="https://playwright.dev/"]');
         |                ^
      16 |     await expect(page.title()).resolves.toMatch('| Playwright');
      17 |   });
      18 | });
哦!這是正確的。我修改了測試,期望應用程式中的連結將我帶到 Playwright 的文檔而不是 Puppeteer 的文檔。我需要在第 19 行更新 src/App.js:
<Link href="https://playwright.dev/" rel="noopener">
  Playwright Documentation
</Link>
現在,是時候再次執行測試了...
~/project$ pnpm test

> playwright test --project=chromium --reporter list

Running 3 tests using 3 workers

  ✓  1 [chromium] > playwright.spec.js:21:3 > Text input > should display the entered text in the text input (1.1s)
  ✓  2 [chromium] > playwright.spec.js:14:3 > Playwright link > should navigate to Playwright documentation page (1.1s)
  ✓  3 [chromium] > playwright.spec.js:31:3 > Form submission > should display the "Hello, X" message after form submission (1.1s)

  3 passed (5.7s)
測試通過了!接下來,是時候讓我們進入 Heroku CI 了。
部署到 Heroku 以使用 CI 管道
我按照 Heroku 部落格文章中的說明在 Heroku CI 管道中設定了我的應用程式。
建立 Heroku 管道
在 Heroku 中,我建立了一個新管道並將其連接到我分叉的 GitHub 儲存庫。

接下來,我將我的應用程式加入了 staging。

然後,我轉到 測試 標籤並點擊 啟用 Heroku CI。

最後,我修改了 app.json 檔案以刪除設定為呼叫 npm test:ci 的測試腳本。我已經從我的 package.json 檔案中刪除了 test:ci 腳本。現在要使用 package.json 中的測試腳本,Heroku CI 將預設尋找該腳本。
我的 app.json 檔案確保使用 Chrome 進行測試建置包,如下所示:
~/project$ corepack enable pnpm


~/project$ corepack use pnpm@latest

Installing pnpm@9.12.3 in the project…
…
Progress: resolved 1444, reused 1441, downloaded 2, added 1444, done
…
Done in 14.4s

~/project$ rm package-lock.json


~/project$ pnpm install # just to show everything's good


Lockfile is up to date, resolution step is skipped
Already up to date
Done in 1.3s
初始測試運行
我將程式碼推送到 GitHub,這觸發了 Heroku CI 中的測試運行。

試運轉失敗了,但我並不擔心。我知道需要做一些 Playwright 配置。
在測試日誌中挖掘,我發現了這個:
~/project$ pnpm remove \
           babel-jest jest jest-puppeteer @testing-library/jest-dom

~/project$ $ pnpm create playwright
Getting started with writing end-to-end tests with Playwright:
Initializing project in '.'
✔ Do you want to use TypeScript or JavaScript? · JavaScript
✔ Where to put your end-to-end tests? · tests
✔ Add a GitHub Actions workflow? (y/N) · false
✔ Install Playwright browsers (can be done manually via 'pnpm exec playwright install')? (Y/n) · false
✔ Install Playwright operating system dependencies (requires sudo / root - can be done manually via 'sudo pnpm exec playwright install-deps')? (y/N) · false

Installing Playwright Test (pnpm add --save-dev @playwright/test)…
…
Installing Types (pnpm add --save-dev @types/node)…
…
Done in 2.7s
Writing playwright.config.js.
Writing tests/example.spec.js.
Writing tests-examples/demo-todo-app.spec.js.
Writing package.json.
Playwright 正在尋找 Chrome 瀏覽器實例。我可以使用 playwright install chromium 命令安裝它,作為我的 CI 測試設定的一部分。但這將違背 Chrome 測試建置包的全部目的。 Chrome 已安裝;我只需要正確指出它。
回顧 Heroku 的測試設定日誌,我發現了這些行:
  /* Configure projects for major browsers */
  projects: [
    {
      name: 'chromium',
      use: { ...devices['Desktop Chrome'] },
    },

//    {
//      name: 'firefox',
//      use: { ...devices['Desktop Firefox'] },
//    },
//
//    {
//      name: 'webkit',
//      use: { ...devices['Desktop Safari'] },
//    },


  ],
…
所以,我想使用的瀏覽器位於/app/.chrome-for-testing/chrome-linux64/chrome。我只需要劇作家去那裡尋找它。
協助 Playwright 找到已安裝的 Chrome 瀏覽器
注意:如果您對此處的具體細節不感興趣,您可以跳過此部分,只需將完整的 app.json 複製到下方即可。這應該為您提供在 Heroku CI 上使用 Playwright 啟動和運行所需的資訊。
在 Playwright 的文檔中,我發現您可以設定一個環境變量,告訴 Playwright 您是否為其所有瀏覽器安裝使用了自訂位置。此環境變數是 PLAYWRIGHT_BROWSERS_PATH。我決定從這裡開始。
在 app.json 中,我設定了一個這樣的環境變數:
const ROOT_URL = 'http://localhost:8080';
const { test, expect } = require('@playwright/test');

const inputSelector = 'input[name="name"]';
const submitButtonSelector = 'button[type="submit"]';
const greetingSelector = 'h5#greeting';
const name = 'John Doe';

test.beforeEach(async ({ page }) => {
  await page.goto(ROOT_URL);
});

test.describe('Playwright link', () => {
  test('should navigate to Playwright documentation page', async ({ page }) => {
    await page.click('a[href="https://playwright.dev/"]');
    await expect(page.title()).resolves.toMatch('| Playwright');
  });
});

test.describe('Text input', () => {
  test('should display the entered text in the text input', async ({ page }) => {
    await page.fill(inputSelector, name);

    // Verify the input value
    const inputValue = await page.inputValue(inputSelector);
    expect(inputValue).toBe(name);
  });
});

test.describe('Form submission', () => {
  test('should display the "Hello, X" message after form submission', async ({ page }) => {
    const expectedGreeting = `Hello, ${name}.`;
    await page.fill(inputSelector, name);
    await page.click(submitButtonSelector);

    await page.waitForSelector(greetingSelector);
    const greetingText = await page.textContent(greetingSelector);
    expect(greetingText).toBe(expectedGreeting);
  });
});
我將程式碼推送到 GitHub,看看 CI 中的測試會發生什麼。
果然,又失敗了。然而,日誌錯誤顯示:
~/project$ corepack enable pnpm


~/project$ corepack use pnpm@latest

Installing pnpm@9.12.3 in the project…
…
Progress: resolved 1444, reused 1441, downloaded 2, added 1444, done
…
Done in 14.4s

~/project$ rm package-lock.json


~/project$ pnpm install # just to show everything's good


Lockfile is up to date, resolution step is skipped
Already up to date
Done in 1.3s
這讓我非常接近。我決定這麼做:
- 建立 Playwright 期望 Chrome 瀏覽器所在位置所需的資料夾。那將會是一個像這樣的命令:
~/project$ pnpm remove \
           babel-jest jest jest-puppeteer @testing-library/jest-dom

~/project$ $ pnpm create playwright
Getting started with writing end-to-end tests with Playwright:
Initializing project in '.'
✔ Do you want to use TypeScript or JavaScript? · JavaScript
✔ Where to put your end-to-end tests? · tests
✔ Add a GitHub Actions workflow? (y/N) · false
✔ Install Playwright browsers (can be done manually via 'pnpm exec playwright install')? (Y/n) · false
✔ Install Playwright operating system dependencies (requires sudo / root - can be done manually via 'sudo pnpm exec playwright install-deps')? (y/N) · false

Installing Playwright Test (pnpm add --save-dev @playwright/test)…
…
Installing Types (pnpm add --save-dev @types/node)…
…
Done in 2.7s
Writing playwright.config.js.
Writing tests/example.spec.js.
Writing tests-examples/demo-todo-app.spec.js.
Writing package.json.
- 在此資料夾中建立一個符號連結以指向 Heroku buildpack 安裝的 Chrome 二進位。那看起來像這樣:
  /* Configure projects for major browsers */
  projects: [
    {
      name: 'chromium',
      use: { ...devices['Desktop Chrome'] },
    },

//    {
//      name: 'firefox',
//      use: { ...devices['Desktop Firefox'] },
//    },
//
//    {
//      name: 'webkit',
//      use: { ...devices['Desktop Safari'] },
//    },


  ],
…
但是,我擔心這是否能經得起未來的考驗。最終,Playwright 將使用新版本的 Chromium,而且它不會再出現在 chromium-1140 資料夾中。我怎麼知道劇作家會看哪裡?
就在那時我發現你可以進行瀏覽器安裝試運行。
const ROOT_URL = 'http://localhost:8080';
const { test, expect } = require('@playwright/test');

const inputSelector = 'input[name="name"]';
const submitButtonSelector = 'button[type="submit"]';
const greetingSelector = 'h5#greeting';
const name = 'John Doe';

test.beforeEach(async ({ page }) => {
  await page.goto(ROOT_URL);
});

test.describe('Playwright link', () => {
  test('should navigate to Playwright documentation page', async ({ page }) => {
    await page.click('a[href="https://playwright.dev/"]');
    await expect(page.title()).resolves.toMatch('| Playwright');
  });
});

test.describe('Text input', () => {
  test('should display the entered text in the text input', async ({ page }) => {
    await page.fill(inputSelector, name);

    // Verify the input value
    const inputValue = await page.inputValue(inputSelector);
    expect(inputValue).toBe(name);
  });
});

test.describe('Form submission', () => {
  test('should display the "Hello, X" message after form submission', async ({ page }) => {
    const expectedGreeting = `Hello, ${name}.`;
    await page.fill(inputSelector, name);
    await page.click(submitButtonSelector);

    await page.waitForSelector(greetingSelector);
    const greetingText = await page.textContent(greetingSelector);
    expect(greetingText).toBe(expectedGreeting);
  });
});
「安裝位置」這一行至關重要。而且,如果我們設定 PLAYWRIGHT_BROWSERS_PATH,我們將看到以下內容:
~/project$ pnpm remove start-server-and-test
這就是我想要的。借助一點 awk 的魔力,我做到了:
  /* Run your local dev server before starting the tests */
  webServer: {
     command: 'pnpm start',
     url: 'http://127.0.0.1:8080',
     reuseExistingServer: !process.env.CI,
  },
弄清楚這一切後,我只需要在 app.json 中新增一個測試設定腳本。因為 PLAYWRIGHT_BROWSERS_PATH 已經在 env 中設置,所以我的腳本會更簡單一些。這是我最終的 app.json 檔案:
  "scripts": {
    …
    "test": "playwright test --project=chromium --reporter list"
  },
我將簡單介紹一下測試設定的作用:
考慮到 PLAYWRIGHT_BROWSERS_PATH,使用 playwright install -- dry-run 和 awk 來確定 Playwright 將在其中尋找 Chrome 瀏覽器的根資料夾。將其設定為 CHROMIUM_PATH 變數的值。
在 CHROMIUM_PATH/chrome-linux 中建立一個新資料夾(以及任何必要的父資料夾),這是 Playwright 將在其中尋找 chrome 二進位檔案的實際資料夾。
在該資料夾中建立一個符號鏈接,以便 chrome 指向 Chrome 的 Heroku buildpack 安裝 (/app/.chrome-for-testing/chrome-linux64/chrome)。
再次運行測試
透過我更新的 app.json 文件,Playwright 應該可以使用 buildpack 中的 Chrome 安裝。是時候再次執行測試了。

成功!
測試設定腳本如預期運作。
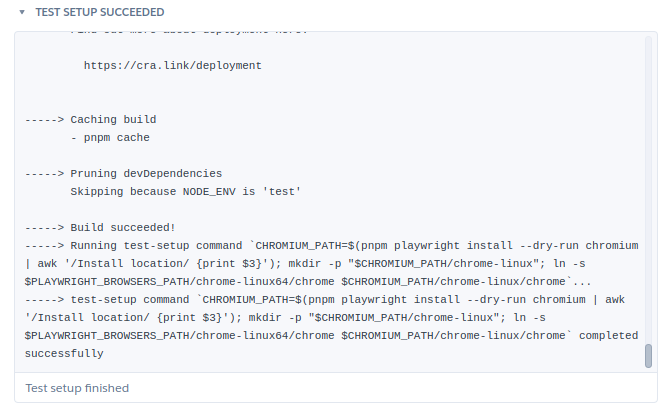
Playwright 能夠存取 chrome 二進位檔案並執行測試,並且通過了。

結論
我的 Web 應用程式的端到端測試變得不再那麼麻煩,因此我越來越優先考慮它。最近幾天,這意味著更多地使用劇作家。它靈活且快速。現在我已經完成了工作(對我和你!),在 Heroku CI 中使用 Chrome for Test 構建包啟動並運行它,我可以開始構建我的瀏覽器自動化測試套件了再次。
本演練的程式碼可在我的 GitHub 儲存庫中找到。
編碼愉快!
以上是Heroku 中的 Playwright 和 Chrome 瀏覽器測試的詳細內容。更多資訊請關注PHP中文網其他相關文章!

熱AI工具

Undresser.AI Undress
人工智慧驅動的應用程序,用於創建逼真的裸體照片

AI Clothes Remover
用於從照片中去除衣服的線上人工智慧工具。

Undress AI Tool
免費脫衣圖片

Clothoff.io
AI脫衣器

Video Face Swap
使用我們完全免費的人工智慧換臉工具,輕鬆在任何影片中換臉!

熱門文章
熱工具

記事本++7.3.1
好用且免費的程式碼編輯器

SublimeText3漢化版
中文版,非常好用

禪工作室 13.0.1
強大的PHP整合開發環境

Dreamweaver CS6
視覺化網頁開發工具

SublimeText3 Mac版
神級程式碼編輯軟體(SublimeText3)


 神秘的JavaScript:它的作用以及為什麼重要
Apr 09, 2025 am 12:07 AM
神秘的JavaScript:它的作用以及為什麼重要
Apr 09, 2025 am 12:07 AM
JavaScript是現代Web開發的基石,它的主要功能包括事件驅動編程、動態內容生成和異步編程。 1)事件驅動編程允許網頁根據用戶操作動態變化。 2)動態內容生成使得頁面內容可以根據條件調整。 3)異步編程確保用戶界面不被阻塞。 JavaScript廣泛應用於網頁交互、單頁面應用和服務器端開發,極大地提升了用戶體驗和跨平台開發的靈活性。
 JavaScript的演變:當前的趨勢和未來前景
Apr 10, 2025 am 09:33 AM
JavaScript的演變:當前的趨勢和未來前景
Apr 10, 2025 am 09:33 AM
JavaScript的最新趨勢包括TypeScript的崛起、現代框架和庫的流行以及WebAssembly的應用。未來前景涵蓋更強大的類型系統、服務器端JavaScript的發展、人工智能和機器學習的擴展以及物聯網和邊緣計算的潛力。
 JavaScript引擎:比較實施
Apr 13, 2025 am 12:05 AM
JavaScript引擎:比較實施
Apr 13, 2025 am 12:05 AM
不同JavaScript引擎在解析和執行JavaScript代碼時,效果會有所不同,因為每個引擎的實現原理和優化策略各有差異。 1.詞法分析:將源碼轉換為詞法單元。 2.語法分析:生成抽象語法樹。 3.優化和編譯:通過JIT編譯器生成機器碼。 4.執行:運行機器碼。 V8引擎通過即時編譯和隱藏類優化,SpiderMonkey使用類型推斷系統,導致在相同代碼上的性能表現不同。
 JavaScript:探索網絡語言的多功能性
Apr 11, 2025 am 12:01 AM
JavaScript:探索網絡語言的多功能性
Apr 11, 2025 am 12:01 AM
JavaScript是現代Web開發的核心語言,因其多樣性和靈活性而廣泛應用。 1)前端開發:通過DOM操作和現代框架(如React、Vue.js、Angular)構建動態網頁和單頁面應用。 2)服務器端開發:Node.js利用非阻塞I/O模型處理高並發和實時應用。 3)移動和桌面應用開發:通過ReactNative和Electron實現跨平台開發,提高開發效率。
 Python vs. JavaScript:學習曲線和易用性
Apr 16, 2025 am 12:12 AM
Python vs. JavaScript:學習曲線和易用性
Apr 16, 2025 am 12:12 AM
Python更適合初學者,學習曲線平緩,語法簡潔;JavaScript適合前端開發,學習曲線較陡,語法靈活。 1.Python語法直觀,適用於數據科學和後端開發。 2.JavaScript靈活,廣泛用於前端和服務器端編程。
 如何使用Next.js(前端集成)構建多租戶SaaS應用程序
Apr 11, 2025 am 08:22 AM
如何使用Next.js(前端集成)構建多租戶SaaS應用程序
Apr 11, 2025 am 08:22 AM
本文展示了與許可證確保的後端的前端集成,並使用Next.js構建功能性Edtech SaaS應用程序。 前端獲取用戶權限以控制UI的可見性並確保API要求遵守角色庫
 從C/C到JavaScript:所有工作方式
Apr 14, 2025 am 12:05 AM
從C/C到JavaScript:所有工作方式
Apr 14, 2025 am 12:05 AM
從C/C 轉向JavaScript需要適應動態類型、垃圾回收和異步編程等特點。 1)C/C 是靜態類型語言,需手動管理內存,而JavaScript是動態類型,垃圾回收自動處理。 2)C/C 需編譯成機器碼,JavaScript則為解釋型語言。 3)JavaScript引入閉包、原型鍊和Promise等概念,增強了靈活性和異步編程能力。
 使用Next.js(後端集成)構建多租戶SaaS應用程序
Apr 11, 2025 am 08:23 AM
使用Next.js(後端集成)構建多租戶SaaS應用程序
Apr 11, 2025 am 08:23 AM
我使用您的日常技術工具構建了功能性的多租戶SaaS應用程序(一個Edtech應用程序),您可以做同樣的事情。 首先,什麼是多租戶SaaS應用程序? 多租戶SaaS應用程序可讓您從唱歌中為多個客戶提供服務
