

使用MLOPS的比特幣價格預測

>對比特幣或其價格波動了解不多,而是想做出投資決定來獲利嗎?該機器學習模型有您的支持。它可以比占星家更好地預測價格。在本文中,我們將使用ZenML和MLFlow構建一個用於預測和預測比特幣價格的ML模型。因此,讓我們開始我們的旅程,了解任何人如何使用ML和MLOPS工具來預測未來。
學習目標- 學會有效地使用API獲取實時數據。
- > 了解Zenml是什麼,為什麼我們使用MLFLOW以及如何將其與Zenml集成。
- >探索從想法到生產的機器學習模型的部署過程。
- > >發現如何為交互式機器學習模型預測創建用戶友好的簡化應用程序。
- >
>本文是> > data Science Blogathon的一部分。 內容表>
問題語句- >項目實現
- 步驟1:訪問API
- 步驟2:使用mongodb
- 5:數據清潔
- 步驟6:特徵工程
- 步驟7:數據拆分
- 步驟8:型號培訓
- 步驟9:型號評估
- 步驟10:模型部署 問題
- 問題語句
>項目實施
讓我們從訪問API開始。
我們為什麼要這樣做?您可以從不同的數據集中獲取歷史比特幣價格數據,但是使用API,我們可以訪問Live Market Data。
 >步驟1:訪問API
>註冊API訪問:
-
在以下代碼的情況下,您可以從CCDATA API獲取比特幣價格數據,並將其轉換為PANDAS DataFrame。另外,將API密鑰保留在.env文件中。
步驟2:使用mongodb - 連接到數據庫
MongoDB是一個NOSQL數據庫,以其適應性,可擴展性和以JSON式格式存儲非結構化數據的能力。
import requests import pandas as pd from dotenv import load_dotenv import os # Load the .env file load_dotenv() def fetch_crypto_data(api_uri): response = requests.get( api_uri, params={ "market": "cadli", "instrument": "BTC-USD", "limit": 5000, "aggregate": 1, "fill": "true", "apply_mapping": "true", "response_format": "JSON" }, headers={"Content-type": "application/json; charset=UTF-8"} ) if response.status_code == 200: print('API Connection Successful! \nFetching the data...') data = response.json() data_list = data.get('Data', []) df = pd.DataFrame(data_list) df['DATE'] = pd.to_datetime(df['TIMESTAMP'], unit='s') return df # Return the DataFrame else: raise Exception(f"API Error: {response.status_code} - {response.text}")登入後複製登入後複製登入後複製此代碼連接到MongoDB,通過API檢索比特幣價格數據,並在最新記錄日期後使用所有新條目更新數據庫。
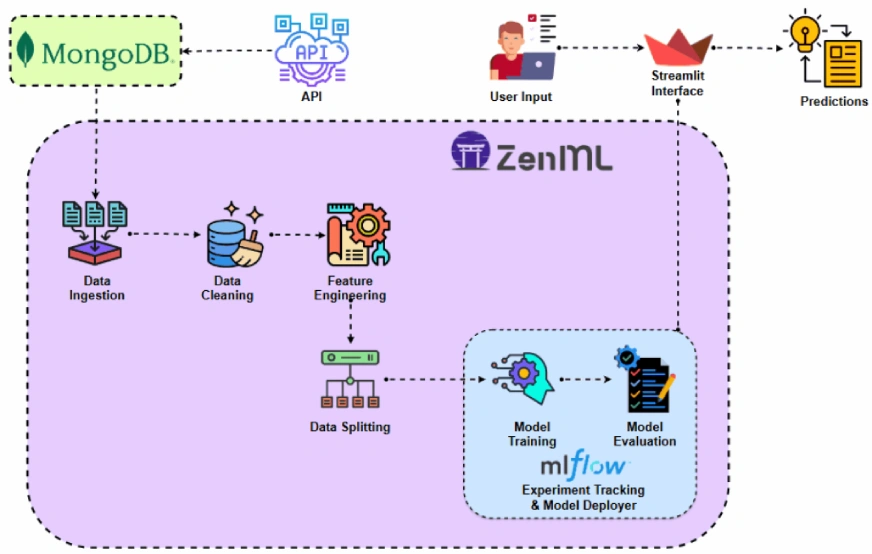
介紹Zenml
> Zenmlis是一個針對機器學習操作量身定制的開源平台,支持了靈活和生產就緒的管道的創建。此外,Zenml與多個機器學習工具集成了LokeMlFlow,Bentoml等,以創建無縫的ML Pipelines。⚠️如果您是Windows用戶,請嘗試在系統上安裝WSL。 Zenml不支持Windows。
在此項目中,我們將實施使用Zenml的傳統管道,並將MLFlow與Zenml集成進行實驗跟踪。> >前提條件和基本zenml命令> python 3.12或更高:
您可以從這裡獲得:https://www.python.org/downloads/- 激活您的虛擬環境: >
import os from pymongo import MongoClient from dotenv import load_dotenv from data.management.api import fetch_crypto_data # Import the API function import pandas as pd load_dotenv() MONGO_URI = os.getenv("MONGO_URI") API_URI = os.getenv("API_URI") client = MongoClient(MONGO_URI, ssl=True, ssl_certfile=None, ssl_ca_certs=None) db = client['crypto_data'] collection = db['historical_data'] try: latest_entry = collection.find_one(sort=[("DATE", -1)]) # Find the latest date if latest_entry: last_date = pd.to_datetime(latest_entry['DATE']).strftime('%Y-%m-%d') else: last_date = '2011-03-27' # Default start date if MongoDB is empty print(f"Fetching data starting from {last_date}...") new_data_df = fetch_crypto_data(API_URI) if latest_entry: new_data_df = new_data_df[new_data_df['DATE'] > last_date] if not new_data_df.empty: data_to_insert = new_data_df.to_dict(orient='records') result = collection.insert_many(data_to_insert) print(f"Inserted {len(result.inserted_ids)} new records into MongoDB.") else: print("No new data to insert.") except Exception as e: print(f"An error occurred: {e}")登入後複製登入後複製登入後複製-
>所有核心Zenml命令及其功能如下:
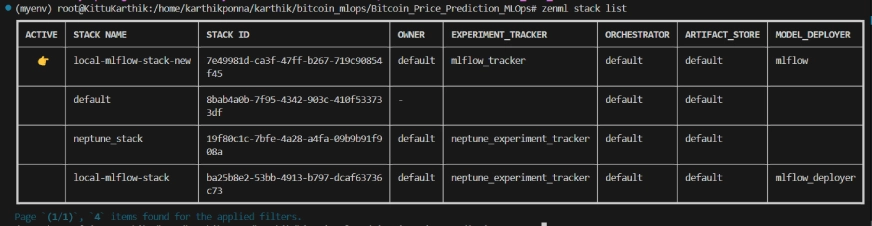
我們正在使用MLFlow進行實驗跟踪,以跟踪我們的模型,工件,指標和超參數值。我們正在註冊MLFLOW以進行實驗跟踪和模型部署者:
> zenml堆棧列表#create a virtual environment python3 -m venv venv #Activate your virtual environmnent in your project folder source venv/bin/activate
登入後複製登入後複製登入後複製項目結構#Install zenml pip install zenml #To Launch zenml server and dashboard locally pip install "zenml[server]" #To check the zenml Version: zenml version #To initiate a new repository zenml init #To run the dashboard locally: zenml login --local #To know the status of our zenml Pipelines zenml show #To shutdown the zenml server zenml clean
登入後複製登入後複製登入後複製
>在這裡,您可以看到項目的佈局。現在讓我們詳細討論它。>
步驟4:數據攝入
我們首先將數據從API攝取到MongoDB,然後將其轉換為PANDAS DATAFRAME。#Integrating mlflow with ZenML zenml integration install mlflow -y #Register the experiment tracker zenml experiment-tracker register mlflow_tracker --flavor=mlflow #Registering the model deployer zenml model-deployer register mlflow --flavor=mlflow #Registering the stack zenml stack register local-mlflow-stack-new -a default -o default -d mlflow -e mlflow_tracker --set #To view the stack list zenml stack --list
登入後複製登入後複製登入後複製
我們將作為裝飾器添加到> ingest_data()
函數中,以將其聲明為我們訓練管道的一步。以同樣的方式,我們將在項目體系結構中為每個步驟編寫代碼並創建管道。>要查看我如何使用bitcoin_price_prediction_mlops/ # Project directory ├── data/ │ └── management/ │ ├── api_to_mongodb.py # Code to fetch data and save it to MongoDB │ └── api.py # API-related utility functions │ ├── pipelines/ │ ├── deployment_pipeline.py # Deployment pipeline │ └── training_pipeline.py # Training pipeline │ ├── saved_models/ # Directory for storing trained models ├── saved_scalers/ # Directory for storing scalers used in data preprocessing │ ├── src/ # Source code │ ├── data_cleaning.py # Data cleaning and preprocessing │ ├── data_ingestion.py # Data ingestion │ ├── data_splitter.py # Data splitting │ ├── feature_engineering.py # Feature engineering │ ├── model_evaluation.py # Model evaluation │ └── model_training.py # Model training │ ├── steps/ # ZenML steps │ ├── clean_data.py # ZenML step for cleaning data │ ├── data_splitter.py # ZenML step for data splitting │ ├── dynamic_importer.py # ZenML step for importing dynamic data │ ├── feature_engineering.py # ZenML step for feature engineering │ ├── ingest_data.py # ZenML step for data ingestion │ ├── model_evaluation.py # ZenML step for model evaluation │ ├── model_training.py # ZenML step for training the model │ ├── prediction_service_loader.py # ZenML step for loading prediction services │ ├── predictor.py # ZenML step for prediction │ └── utils.py # Utility functions for steps │ ├── .env # Environment variables file ├── .gitignore # Git ignore file │ ├── app.py # Streamlit user interface app │ ├── README.md # Project documentation ├── requirements.txt # List of required packages ├── run_deployment.py # Code for running deployment and prediction pipeline ├── run_pipeline.py # Code for running training pipeline └── .zen/ # ZenML directory (created automatically after ZenML initialization)
登入後複製登入後複製登入後複製@Step 裝飾器,請查看下面的github鏈接(步驟文件夾)以瀏覽管道其他步驟的代碼,即數據清潔,功能工程,數據拆分,模型培訓和模型評估。 >>>>>>>>。 步驟5:數據清潔 在此步驟中,我們將創建清潔攝入數據的不同策略。我們將在數據中刪除不需要的列和缺失值。 >
import requests import pandas as pd from dotenv import load_dotenv import os # Load the .env file load_dotenv() def fetch_crypto_data(api_uri): response = requests.get( api_uri, params={ "market": "cadli", "instrument": "BTC-USD", "limit": 5000, "aggregate": 1, "fill": "true", "apply_mapping": "true", "response_format": "JSON" }, headers={"Content-type": "application/json; charset=UTF-8"} ) if response.status_code == 200: print('API Connection Successful! \nFetching the data...') data = response.json() data_list = data.get('Data', []) df = pd.DataFrame(data_list) df['DATE'] = pd.to_datetime(df['TIMESTAMP'], unit='s') return df # Return the DataFrame else: raise Exception(f"API Error: {response.status_code} - {response.text}")登入後複製登入後複製登入後複製>步驟6:功能工程
>此步驟從較早的data_cleaning步驟中獲取已清潔的數據。我們正在創建新功能,例如簡單的移動平均值(SMA),指數移動平均值(EMA)以及滯後和滾動統計數據,以捕獲趨勢,減少噪聲並從時間序列數據中做出更可靠的預測。此外,我們使用MinMax縮放縮放特徵和目標變量。
> 步驟7:數據拆分import os from pymongo import MongoClient from dotenv import load_dotenv from data.management.api import fetch_crypto_data # Import the API function import pandas as pd load_dotenv() MONGO_URI = os.getenv("MONGO_URI") API_URI = os.getenv("API_URI") client = MongoClient(MONGO_URI, ssl=True, ssl_certfile=None, ssl_ca_certs=None) db = client['crypto_data'] collection = db['historical_data'] try: latest_entry = collection.find_one(sort=[("DATE", -1)]) # Find the latest date if latest_entry: last_date = pd.to_datetime(latest_entry['DATE']).strftime('%Y-%m-%d') else: last_date = '2011-03-27' # Default start date if MongoDB is empty print(f"Fetching data starting from {last_date}...") new_data_df = fetch_crypto_data(API_URI) if latest_entry: new_data_df = new_data_df[new_data_df['DATE'] > last_date] if not new_data_df.empty: data_to_insert = new_data_df.to_dict(orient='records') result = collection.insert_many(data_to_insert) print(f"Inserted {len(result.inserted_ids)} new records into MongoDB.") else: print("No new data to insert.") except Exception as e: print(f"An error occurred: {e}")登入後複製登入後複製登入後複製
>現在,我們將處理的數據分為培訓和測試數據集的比例為80:20。步驟8:模型培訓#create a virtual environment python3 -m venv venv #Activate your virtual environmnent in your project folder source venv/bin/activate
登入後複製登入後複製登入後複製
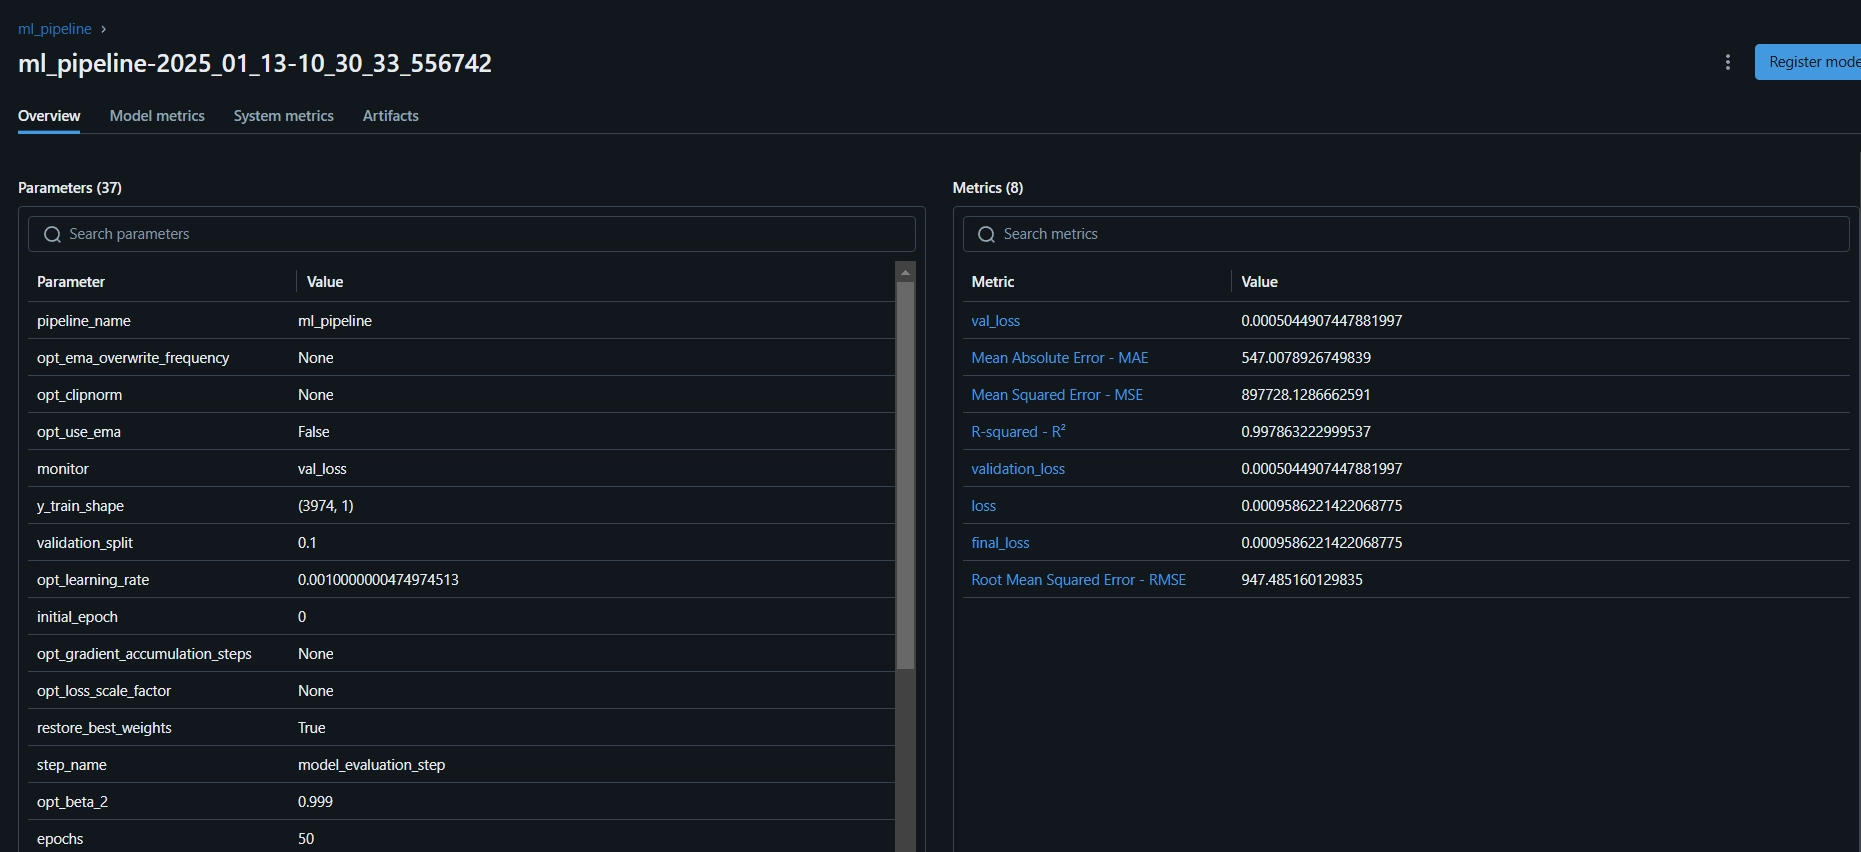
在此步驟中,我們以早期停止訓練Thelstm模型以防止過度擬合,並使用MLFlow的自動日誌記錄來跟踪我們的模型和實驗,並將受過訓練的模型保存為。 >步驟9:模型評估 這是一個回歸問題,我們正在使用評估指標,例如均方誤差(MSE),均方根誤差(MSE),均值絕對誤差(MAE)和R-squared。#Install zenml pip install zenml #To Launch zenml server and dashboard locally pip install "zenml[server]" #To check the zenml Version: zenml version #To initiate a new repository zenml init #To run the dashboard locally: zenml login --local #To know the status of our zenml Pipelines zenml show #To shutdown the zenml server zenml clean
登入後複製登入後複製登入後複製現在,我們將在管道中組織上述所有步驟。讓我們創建一個新的文件triench_pipeline.py。
>
>在這裡,@pipeline#Integrating mlflow with ZenML zenml integration install mlflow -y #Register the experiment tracker zenml experiment-tracker register mlflow_tracker --flavor=mlflow #Registering the model deployer zenml model-deployer register mlflow --flavor=mlflow #Registering the stack zenml stack register local-mlflow-stack-new -a default -o default -d mlflow -e mlflow_tracker --set #To view the stack list zenml stack --list
登入後複製登入後複製登入後複製decorator用於將functionml_pipeline()定義為zenml中的管道。
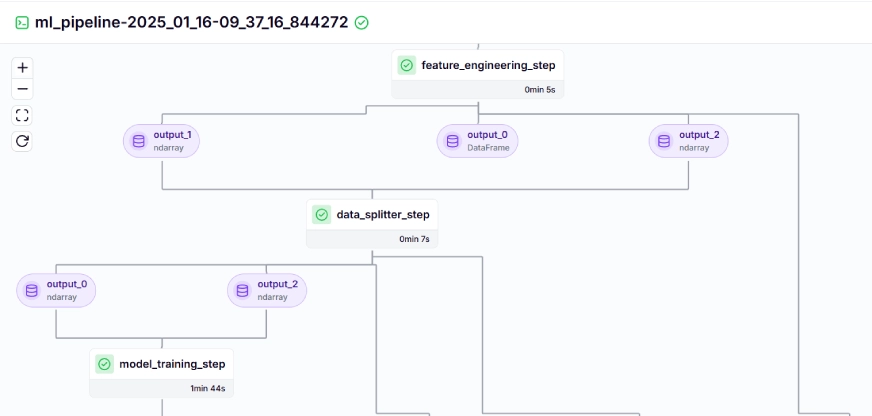
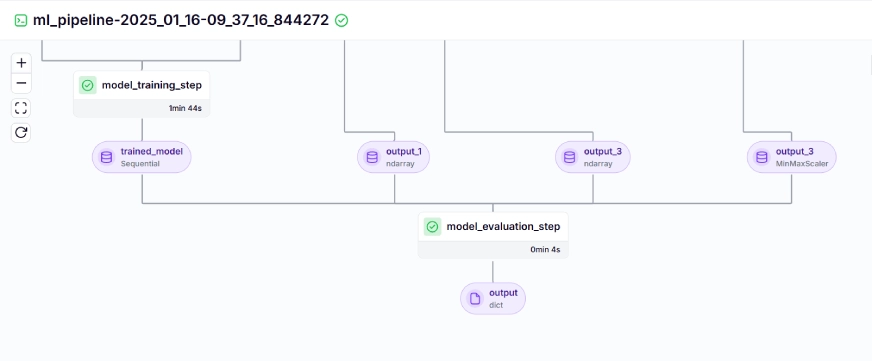
要查看訓練管道的儀表板,只需運行run_pipeline.py腳本即可。讓我們創建一個run_pipeline.py文件。>bitcoin_price_prediction_mlops/ # Project directory ├── data/ │ └── management/ │ ├── api_to_mongodb.py # Code to fetch data and save it to MongoDB │ └── api.py # API-related utility functions │ ├── pipelines/ │ ├── deployment_pipeline.py # Deployment pipeline │ └── training_pipeline.py # Training pipeline │ ├── saved_models/ # Directory for storing trained models ├── saved_scalers/ # Directory for storing scalers used in data preprocessing │ ├── src/ # Source code │ ├── data_cleaning.py # Data cleaning and preprocessing │ ├── data_ingestion.py # Data ingestion │ ├── data_splitter.py # Data splitting │ ├── feature_engineering.py # Feature engineering │ ├── model_evaluation.py # Model evaluation │ └── model_training.py # Model training │ ├── steps/ # ZenML steps │ ├── clean_data.py # ZenML step for cleaning data │ ├── data_splitter.py # ZenML step for data splitting │ ├── dynamic_importer.py # ZenML step for importing dynamic data │ ├── feature_engineering.py # ZenML step for feature engineering │ ├── ingest_data.py # ZenML step for data ingestion │ ├── model_evaluation.py # ZenML step for model evaluation │ ├── model_training.py # ZenML step for training the model │ ├── prediction_service_loader.py # ZenML step for loading prediction services │ ├── predictor.py # ZenML step for prediction │ └── utils.py # Utility functions for steps │ ├── .env # Environment variables file ├── .gitignore # Git ignore file │ ├── app.py # Streamlit user interface app │ ├── README.md # Project documentation ├── requirements.txt # List of required packages ├── run_deployment.py # Code for running deployment and prediction pipeline ├── run_pipeline.py # Code for running training pipeline └── .zen/ # ZenML directory (created automatically after ZenML initialization)
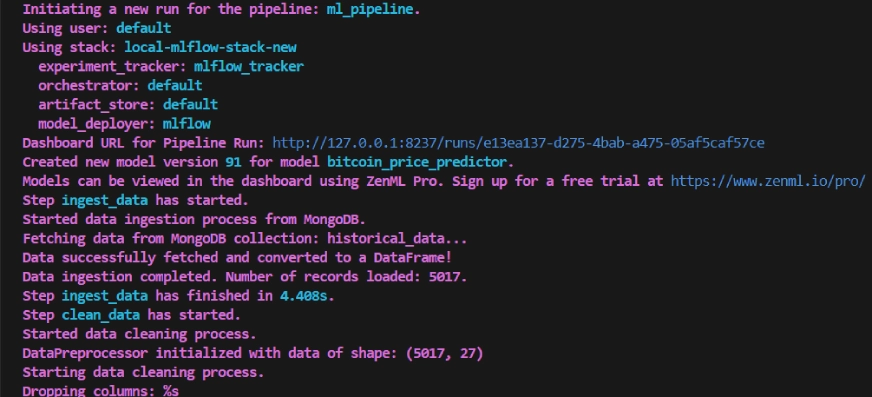
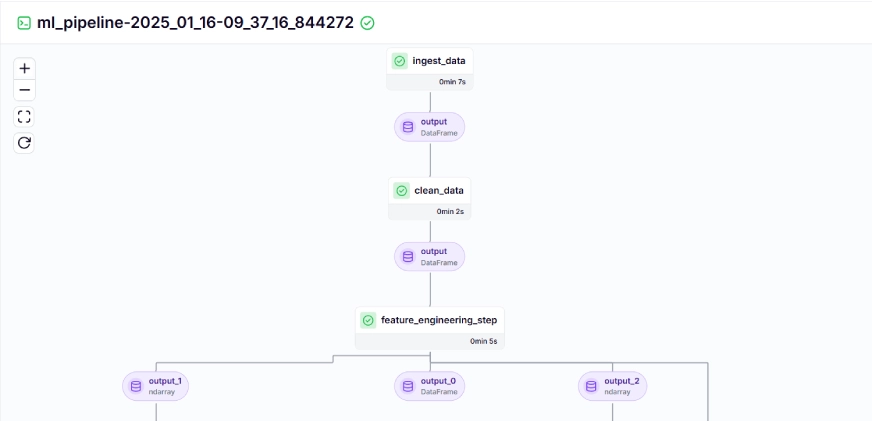
登入後複製登入後複製登入後複製>現在我們已經完成了創建管道。在下面運行命令以查看管道儀表板。
在運行上述命令後,它將返回跟踪儀表板URL,看起來像這樣。
import os import logging from pymongo import MongoClient from dotenv import load_dotenv from zenml import step import pandas as pd # Load the .env file load_dotenv() # Get MongoDB URI from environment variables MONGO_URI = os.getenv("MONGO_URI") def fetch_data_from_mongodb(collection_name:str, database_name:str): """ Fetches data from MongoDB and converts it into a pandas DataFrame. collection_name: Name of the MongoDB collection to fetch data. database_name: Name of the MongoDB database. return: A pandas DataFrame containing the data """ # Connect to the MongoDB client client = MongoClient(MONGO_URI) db = client[database_name] # Select the database collection = db[collection_name] # Select the collection # Fetch all documents from the collection try: logging.info(f"Fetching data from MongoDB collection: {collection_name}...") data = list(collection.find()) # Convert cursor to a list of dictionaries if not data: logging.info("No data found in the MongoDB collection.") # Convert the list of dictionaries into a pandas DataFrame df = pd.DataFrame(data) # Drop the MongoDB ObjectId field if it exists (optional) if '_id' in df.columns: df = df.drop(columns=['_id']) logging.info("Data successfully fetched and converted to a DataFrame!") return df except Exception as e: logging.error(f"An error occurred while fetching data: {e}") raise e @step(enable_cache=False) def ingest_data(collection_name: str = "historical_data", database_name: str = "crypto_data") -> pd.DataFrame: logging.info("Started data ingestion process from MongoDB.") try: # Use the fetch_data_from_mongodb function to fetch data df = fetch_data_from_mongodb(collection_name=collection_name, database_name=database_name) if df.empty: logging.warning("No data was loaded. Check the collection name or the database content.") else: logging.info(f"Data ingestion completed. Number of records loaded: {len(df)}.") return df except Exception as e: logging.error(f"Error while reading data from {collection_name} in {database_name}: {e}") raise e登入後複製登入後複製培訓管道在儀表板上看起來像這樣,給出了以下內容:class DataPreprocessor: def __init__(self, data: pd.DataFrame): self.data = data logging.info("DataPreprocessor initialized with data of shape: %s", data.shape) def clean_data(self) -> pd.DataFrame: """ Performs data cleaning by removing unnecessary columns, dropping columns with missing values, and returning the cleaned DataFrame. Returns: pd.DataFrame: The cleaned DataFrame with unnecessary and missing-value columns removed. """ logging.info("Starting data cleaning process.") # Drop unnecessary columns, including '_id' if it exists columns_to_drop = [ 'UNIT', 'TYPE', 'MARKET', 'INSTRUMENT', 'FIRST_MESSAGE_TIMESTAMP', 'LAST_MESSAGE_TIMESTAMP', 'FIRST_MESSAGE_VALUE', 'HIGH_MESSAGE_VALUE', 'HIGH_MESSAGE_TIMESTAMP', 'LOW_MESSAGE_VALUE', 'LOW_MESSAGE_TIMESTAMP', 'LAST_MESSAGE_VALUE', 'TOTAL_INDEX_UPDATES', 'VOLUME_TOP_TIER', 'QUOTE_VOLUME_TOP_TIER', 'VOLUME_DIRECT', 'QUOTE_VOLUME_DIRECT', 'VOLUME_TOP_TIER_DIRECT', 'QUOTE_VOLUME_TOP_TIER_DIRECT', '_id' # Adding '_id' to the list ] logging.info("Dropping columns: %s") self.data = self.drop_columns(self.data, columns_to_drop) # Drop columns where the number of missing values is greater than 0 logging.info("Dropping columns with missing values.") self.data = self.drop_columns_with_missing_values(self.data) logging.info("Data cleaning completed. Data shape after cleaning: %s", self.data.shape) return self.data def drop_columns(self, data: pd.DataFrame, columns: list) -> pd.DataFrame: """ Drops specified columns from the DataFrame. Returns: pd.DataFrame: The DataFrame with the specified columns removed. """ logging.info("Dropping columns: %s", columns) return data.drop(columns=columns, errors='ignore') def drop_columns_with_missing_values(self, data: pd.DataFrame) -> pd.DataFrame: """ Drops columns with any missing values from the DataFrame. Parameters: data: pd.DataFrame The DataFrame from which columns with missing values will be removed. Returns: pd.DataFrame: The DataFrame with columns containing missing values removed. """ missing_columns = data.columns[data.isnull().sum() > 0] if not missing_columns.empty: logging.info("Columns with missing values: %s", missing_columns.tolist()) else: logging.info("No columns with missing values found.") return data.loc[:, data.isnull().sum() == 0]登入後複製>
步驟10:模型部署
>
到目前為止,我們已經構建了模型和管道。現在,讓我們將管道推入用戶可以做出預測的生產中。 連續部署管道
該管道負責連續部署訓練有素的模型。它首先從
> triagn_pipeline.py.py文件訓練模型,然後使用
mlflow模型exployer來部署訓練有素的模型,使用
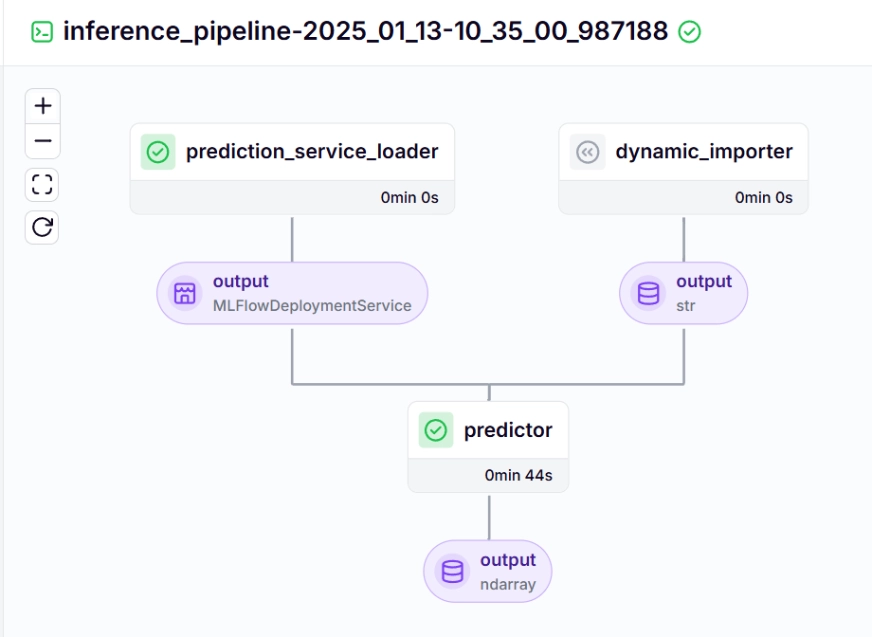
推理管道 >我們使用推理管道使用已部署的模型對新數據進行預測。讓我們看一下我們如何在項目中實施該管道的方式。
>import requests import pandas as pd from dotenv import load_dotenv import os # Load the .env file load_dotenv() def fetch_crypto_data(api_uri): response = requests.get( api_uri, params={ "market": "cadli", "instrument": "BTC-USD", "limit": 5000, "aggregate": 1, "fill": "true", "apply_mapping": "true", "response_format": "JSON" }, headers={"Content-type": "application/json; charset=UTF-8"} ) if response.status_code == 200: print('API Connection Successful! \nFetching the data...') data = response.json() data_list = data.get('Data', []) df = pd.DataFrame(data_list) df['DATE'] = pd.to_datetime(df['TIMESTAMP'], unit='s') return df # Return the DataFrame else: raise Exception(f"API Error: {response.status_code} - {response.text}")登入後複製登入後複製登入後複製>讓我們查看下面的推理管道中調用的每個功能:
> dynamic_importer()
此功能加載新數據,執行數據處理並返回數據。prediction_service_loader()import os from pymongo import MongoClient from dotenv import load_dotenv from data.management.api import fetch_crypto_data # Import the API function import pandas as pd load_dotenv() MONGO_URI = os.getenv("MONGO_URI") API_URI = os.getenv("API_URI") client = MongoClient(MONGO_URI, ssl=True, ssl_certfile=None, ssl_ca_certs=None) db = client['crypto_data'] collection = db['historical_data'] try: latest_entry = collection.find_one(sort=[("DATE", -1)]) # Find the latest date if latest_entry: last_date = pd.to_datetime(latest_entry['DATE']).strftime('%Y-%m-%d') else: last_date = '2011-03-27' # Default start date if MongoDB is empty print(f"Fetching data starting from {last_date}...") new_data_df = fetch_crypto_data(API_URI) if latest_entry: new_data_df = new_data_df[new_data_df['DATE'] > last_date] if not new_data_df.empty: data_to_insert = new_data_df.to_dict(orient='records') result = collection.insert_many(data_to_insert) print(f"Inserted {len(result.inserted_ids)} new records into MongoDB.") else: print("No new data to insert.") except Exception as e: print(f"An error occurred: {e}")登入後複製登入後複製登入後複製>此功能以
@Step裝飾。我們加載了基於pipeline_name的部署服務W.R.T和step_name,我們的部署模型可以處理新數據的預測查詢。 > line 現有_services = mlflow_model_deployer_component.find_model_server()
>>基於諸如pipeline名稱和管道名稱的給定參數,搜索可用的部署服務。如果沒有可用的服務,則表明部署管道要么沒有進行或遇到部署管道問題,因此它會拋出RuntimeError。
preditionor()#create a virtual environment python3 -m venv venv #Activate your virtual environmnent in your project folder source venv/bin/activate
登入後複製登入後複製登入後複製該函數通過MLFlowDeploymentservice和新數據採用MLFlow部署模型。進一步處理數據以匹配模型的預期格式以進行實時推斷。 為了可視化連續部署和推理管道,我們需要運行run_deployment.py腳本,在此將定義部署和預測配置。 (請在下面給出的github中檢查run_deployment.py代碼)。 >
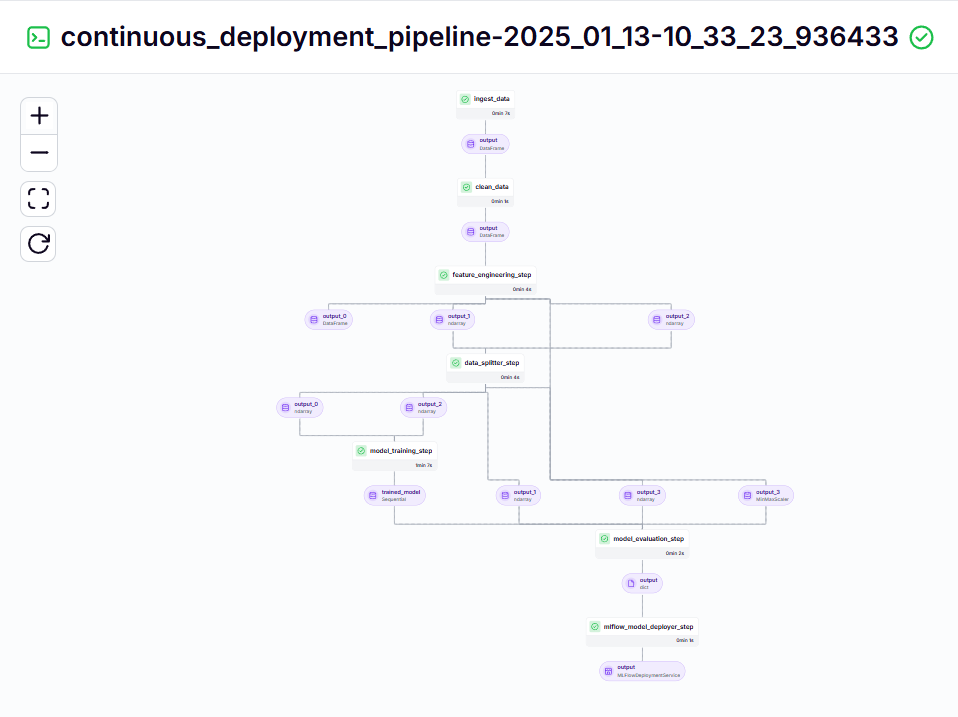
現在,讓我們運行run_deployment.py文件以查看連續部署管道和推理管道的儀表板。
#Install zenml
pip install zenml

#To Launch zenml server and dashboard locally
pip install "zenml[server]"

#To check the zenml Version:
zenml version

#To initiate a new repository
zenml init

#To run the dashboard locally:
zenml login --local

#To know the status of our zenml Pipelines
zenml show

#To shutdown the zenml server
zenml clean
登入後複製登入後複製登入後複製連續部署管道 - 輸出
#Integrating mlflow with ZenML
zenml integration install mlflow -y

#Register the experiment tracker
zenml experiment-tracker register mlflow_tracker --flavor=mlflow

#Registering the model deployer
zenml model-deployer register mlflow --flavor=mlflow

#Registering the stack
zenml stack register local-mlflow-stack-new -a default -o default -d mlflow -e mlflow_tracker --set

#To view the stack list
zenml stack --list
登入後複製登入後複製登入後複製>推理管道 - 輸出bitcoin_price_prediction_mlops/ # Project directory ├── data/ │ └── management/ │ ├── api_to_mongodb.py # Code to fetch data and save it to MongoDB │ └── api.py # API-related utility functions │ ├── pipelines/ │ ├── deployment_pipeline.py # Deployment pipeline │ └── training_pipeline.py # Training pipeline │ ├── saved_models/ # Directory for storing trained models ├── saved_scalers/ # Directory for storing scalers used in data preprocessing │ ├── src/ # Source code │ ├── data_cleaning.py # Data cleaning and preprocessing │ ├── data_ingestion.py # Data ingestion │ ├── data_splitter.py # Data splitting │ ├── feature_engineering.py # Feature engineering │ ├── model_evaluation.py # Model evaluation │ └── model_training.py # Model training │ ├── steps/ # ZenML steps │ ├── clean_data.py # ZenML step for cleaning data │ ├── data_splitter.py # ZenML step for data splitting │ ├── dynamic_importer.py # ZenML step for importing dynamic data │ ├── feature_engineering.py # ZenML step for feature engineering │ ├── ingest_data.py # ZenML step for data ingestion │ ├── model_evaluation.py # ZenML step for model evaluation │ ├── model_training.py # ZenML step for training the model │ ├── prediction_service_loader.py # ZenML step for loading prediction services │ ├── predictor.py # ZenML step for prediction │ └── utils.py # Utility functions for steps │ ├── .env # Environment variables file ├── .gitignore # Git ignore file │ ├── app.py # Streamlit user interface app │ ├── README.md # Project documentation ├── requirements.txt # List of required packages ├── run_deployment.py # Code for running deployment and prediction pipeline ├── run_pipeline.py # Code for running training pipeline └── .zen/ # ZenML directory (created automatically after ZenML initialization)
登入後複製登入後複製登入後複製
運行run_deployment.py文件後,您可以看到看起來像這樣的mlflow儀表板鏈接。
現在,您需要在命令行中復制並粘貼上述MLFLOW UI鏈接並運行它。
這是MLFlow儀表板,您可以在其中看到評估指標和模型參數:
import os import logging from pymongo import MongoClient from dotenv import load_dotenv from zenml import step import pandas as pd # Load the .env file load_dotenv() # Get MongoDB URI from environment variables MONGO_URI = os.getenv("MONGO_URI") def fetch_data_from_mongodb(collection_name:str, database_name:str): """ Fetches data from MongoDB and converts it into a pandas DataFrame. collection_name: Name of the MongoDB collection to fetch data. database_name: Name of the MongoDB database. return: A pandas DataFrame containing the data """ # Connect to the MongoDB client client = MongoClient(MONGO_URI) db = client[database_name] # Select the database collection = db[collection_name] # Select the collection # Fetch all documents from the collection try: logging.info(f"Fetching data from MongoDB collection: {collection_name}...") data = list(collection.find()) # Convert cursor to a list of dictionaries if not data: logging.info("No data found in the MongoDB collection.") # Convert the list of dictionaries into a pandas DataFrame df = pd.DataFrame(data) # Drop the MongoDB ObjectId field if it exists (optional) if '_id' in df.columns: df = df.drop(columns=['_id']) logging.info("Data successfully fetched and converted to a DataFrame!") return df except Exception as e: logging.error(f"An error occurred while fetching data: {e}") raise e @step(enable_cache=False) def ingest_data(collection_name: str = "historical_data", database_name: str = "crypto_data") -> pd.DataFrame: logging.info("Started data ingestion process from MongoDB.") try: # Use the fetch_data_from_mongodb function to fetch data df = fetch_data_from_mongodb(collection_name=collection_name, database_name=database_name) if df.empty: logging.warning("No data was loaded. Check the collection name or the database content.") else: logging.info(f"Data ingestion completed. Number of records loaded: {len(df)}.") return df except Exception as e: logging.error(f"Error while reading data from {collection_name} in {database_name}: {e}") raise e登入後複製登入後複製
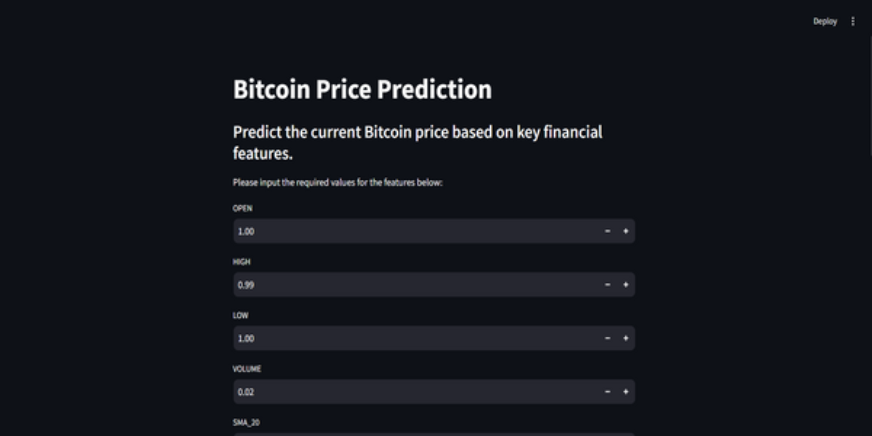
>步驟11:構建簡易應用
> Sparlit是一個令人驚嘆的開源,基於Python的框架,用於創建Interactive UI,我們可以使用Sparlit快速構建Web應用程序,而無需知道後端或前端開發。首先,我們需要在系統上安裝精簡。
再次,您可以在github上找到“簡化應用”的代碼。
>這是對項目的GitHub代碼和視頻說明,以便您更好地理解。
結論
在本文中,我們成功地建立了一個端到端的,可提供生產的比特幣價格預測MLOPS項目。從通過API獲取數據並預處理數據到模型培訓,評估和部署,我們的項目突出了MLOP在將開發與生產聯繫起來的關鍵作用。我們距離實時預測比特幣價格的未來更近了一步。 API提供了對外部數據的平穩訪問,例如CCDATA API的比特幣價格數據,消除了對預先存在的數據集的需求。
鑰匙要點
API啟用對外部數據的無縫訪問,例如來自CCDATA API的比特幣價格數據,消除了對預先存在的數據集的需求。- >
- > zenml和mlflow是可靠的工具,可促進現實世界應用程序中機器學習模型的開發,跟踪和部署。
- >我們遵循最佳實踐,通過正確執行數據攝入,清潔,功能工程,模型培訓和評估。 >連續部署和推理管道對於確保模型保持有效且在生產環境中可用。
- 常見問題
- > Q1。 Zenml可以免費使用嗎?是的,Zenml是一個完全開源的MLOPS框架,它使從本地開發到生產管道的過渡與1行代碼一樣容易。
Q2。 mlflow用於什麼? MLFlow通過提供用於跟踪實驗,版本控制模型和部署的工具來使機器學習開髮變得更加容易。
Q3。如何調試服務器守護程序沒有運行錯誤?這是您將在項目中面臨的常見錯誤。只需運行`Zenml註銷–Local`然後`Zenml clean'',然後再運行管道。它將得到解決。
 到目前為止,我們已經構建了模型和管道。現在,讓我們將管道推入用戶可以做出預測的生產中。
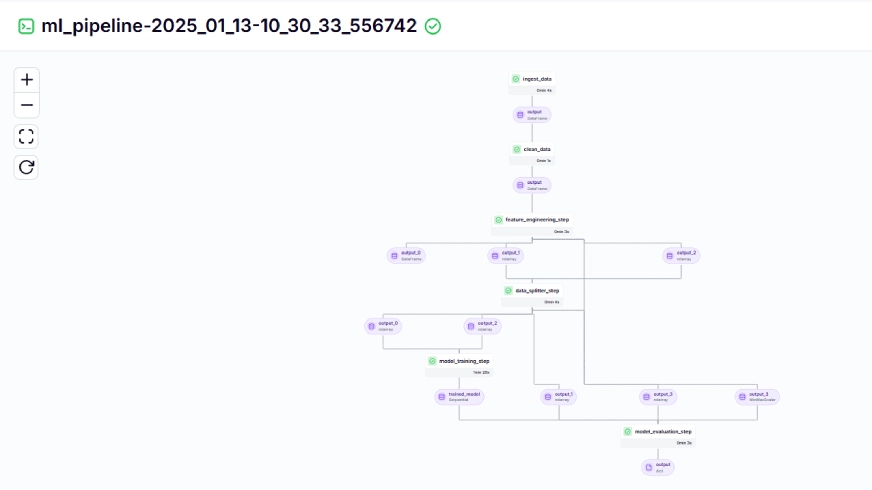
以上是使用MLOPS的比特幣價格預測的詳細內容。更多資訊請關注PHP中文網其他相關文章!

熱AI工具

Undresser.AI Undress
人工智慧驅動的應用程序,用於創建逼真的裸體照片

AI Clothes Remover
用於從照片中去除衣服的線上人工智慧工具。

Undress AI Tool
免費脫衣圖片

Clothoff.io
AI脫衣器

Video Face Swap
使用我們完全免費的人工智慧換臉工具,輕鬆在任何影片中換臉!

熱門文章
熱工具

記事本++7.3.1
好用且免費的程式碼編輯器

SublimeText3漢化版
中文版,非常好用

禪工作室 13.0.1
強大的PHP整合開發環境

Dreamweaver CS6
視覺化網頁開發工具

SublimeText3 Mac版
神級程式碼編輯軟體(SublimeText3)


 開始使用Meta Llama 3.2 -Analytics Vidhya
Apr 11, 2025 pm 12:04 PM
開始使用Meta Llama 3.2 -Analytics Vidhya
Apr 11, 2025 pm 12:04 PM
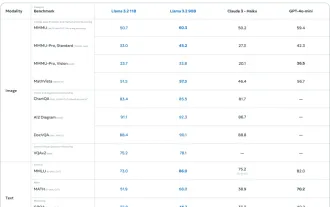
Meta的Llama 3.2:多模式和移動AI的飛躍 Meta最近公佈了Llama 3.2,這是AI的重大進步,具有強大的視覺功能和針對移動設備優化的輕量級文本模型。 以成功為基礎
 10個生成AI編碼擴展,在VS代碼中,您必須探索
Apr 13, 2025 am 01:14 AM
10個生成AI編碼擴展,在VS代碼中,您必須探索
Apr 13, 2025 am 01:14 AM
嘿,編碼忍者!您當天計劃哪些與編碼有關的任務?在您進一步研究此博客之前,我希望您考慮所有與編碼相關的困境,這是將其列出的。 完畢? - 讓&#8217
 AV字節:Meta' llama 3.2,Google的雙子座1.5等
Apr 11, 2025 pm 12:01 PM
AV字節:Meta' llama 3.2,Google的雙子座1.5等
Apr 11, 2025 pm 12:01 PM
本週的AI景觀:進步,道德考慮和監管辯論的旋風。 OpenAI,Google,Meta和Microsoft等主要參與者已經釋放了一系列更新,從開創性的新車型到LE的關鍵轉變
 向員工出售AI策略:Shopify首席執行官的宣言
Apr 10, 2025 am 11:19 AM
向員工出售AI策略:Shopify首席執行官的宣言
Apr 10, 2025 am 11:19 AM
Shopify首席執行官TobiLütke最近的備忘錄大膽地宣布AI對每位員工的基本期望是公司內部的重大文化轉變。 這不是短暫的趨勢。這是整合到P中的新操作範式
 視覺語言模型(VLMS)的綜合指南
Apr 12, 2025 am 11:58 AM
視覺語言模型(VLMS)的綜合指南
Apr 12, 2025 am 11:58 AM
介紹 想像一下,穿過美術館,周圍是生動的繪畫和雕塑。現在,如果您可以向每一部分提出一個問題並獲得有意義的答案,該怎麼辦?您可能會問:“您在講什麼故事?
 GPT-4O vs OpenAI O1:新的Openai模型值得炒作嗎?
Apr 13, 2025 am 10:18 AM
GPT-4O vs OpenAI O1:新的Openai模型值得炒作嗎?
Apr 13, 2025 am 10:18 AM
介紹 Openai已根據備受期待的“草莓”建築發布了其新模型。這種稱為O1的創新模型增強了推理能力,使其可以通過問題進行思考
 最新的最佳及時工程技術的年度彙編
Apr 10, 2025 am 11:22 AM
最新的最佳及時工程技術的年度彙編
Apr 10, 2025 am 11:22 AM
對於那些可能是我專欄新手的人,我廣泛探討了AI的最新進展,包括體現AI,AI推理,AI中的高科技突破,及時的工程,AI培訓,AI,AI RE RE等主題
 如何在SQL中添加列? - 分析Vidhya
Apr 17, 2025 am 11:43 AM
如何在SQL中添加列? - 分析Vidhya
Apr 17, 2025 am 11:43 AM
SQL的Alter表語句:動態地將列添加到數據庫 在數據管理中,SQL的適應性至關重要。 需要即時調整數據庫結構嗎? Alter表語句是您的解決方案。本指南的詳細信息添加了Colu
