

基於React.js實作原生js拖曳效果引發的思考_javascript技巧

一、起因&思路
一直想寫一個原生js拖曳效果,又加上近來學react學得比較嗨。所以就用react來實現這個拖曳效果。
首先,其實拖曳效果的思路是很簡單的。主要就是三個步驟:
1.onmousedown的時候,啟動可拖曳事件,記錄被拖曳元素的原始座標參數。
2.onmousemove的時候,即時記錄滑鼠移動的距離,結合被拖曳元素第一階段的座標參數,計算並設定新的座標值。
3.onmouseup的時候,關閉可拖曳事件,記錄新的座標值。
注意:這裡主要是透過絕對定位的top和left來確定元素的位置的,因此被拖曳元素的css一定要設定絕對定位。
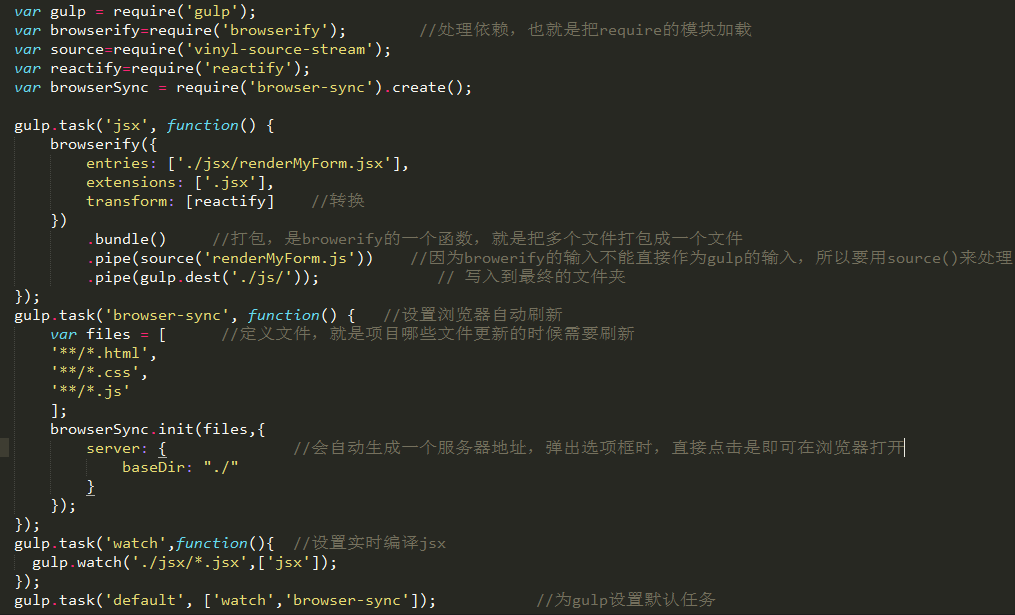
二、輔助工具
輔助工具主要就是是開發過程變得高效,而且酷炫的。在這個demo中,要給大家推薦一個gulp+browser-sync的開發工具,gulp有很多功能,在這個demo中gulp的作用主要是可以設定實時編譯react中的jsx文件,當然如果你寫css用的是sass,也可以設定即時編譯sass。用browser-sync這個呢,主要就是可以自動即時刷新頁面,我們平常會做頁面,看效果的時候,通常都是透過F5來刷新瀏覽器,然後看到頁面的。但是用了這個插件,你寫完程式碼的時候,只要按下,ctrl+s儲存,新的效果就會自動在瀏覽器中刷新,然後看得到了。
用法詳解:
安裝:
1.在node的環境下,安裝gulp,這裡就不詳說了,具體過程可參考我的博文《react.js入門必須知道的那些事》
2.安裝gulp-livereload,在命令列或git bash ,輸入npm install --save-dev gulp-livereload
3.安裝gulp-watch,在命令列或git bash ,輸入npm install --save-dev gulp-watch
4.安裝browser-sync,在命令列或git bash ,輸入npm install --save-dev browser-sync
配置及解釋如圖:
三、定義元件建置頁
備註:這裡的程式碼說明皆在react相關模組安裝好的情況下,安裝過程見我的博文《react.js入門必須知道的那些事》.
效果圖:
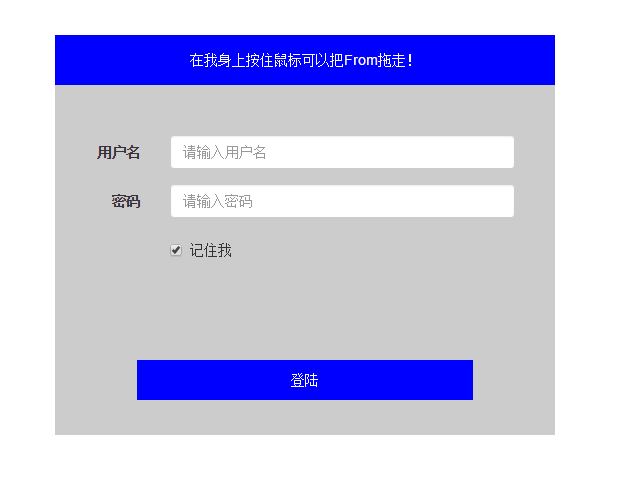
組件拆分思路:
我當時覺得組件分得細一點好,所以我把input、button分別做成了一個組件:
var React=require('react');

var MyInput=React.createClass({
 render:function(){
  return (
  <div className="form-group">
    <label htmlFor={this.props.labelId} className="col-sm-2 control-label{this.props.labelTip</label>
    <div className="col-sm-10">
       <input name={this.props.name} type={this.props.type} onChange={this.props.onChange} className="form-control" id={this.props.labelId} placeholder={this.props.placeholder}/>
    </div>
  </div>
 );
 }
});

module.exports=MyInput;
var React=require('react');

var Button=React.createClass({

  render:function(){
    return (
      <button type={this.props.type} className="loginButton">{this.props.ButtonTip}</button>
    );
  }
})
module.exports=Button;
由於input有很多都是需要指定的,這種情況下,如果像我這樣定義需要傳太多參數,而且其實登陸的input大多都是固定且沒必要復用的,所以這樣其實不大好。這裡的input直接寫比較好。
寫好之後的父組件:
render:function(){
  return (
  <form className="form-horizontal" id="form" ref="dragBox" onSubmit={this.submitHandler} onMouseMove={this.move} onMouseUp={this.endDrag}>
  <DragArea callbackParent={this.onChildChanged} />
  <div id="form-wrap">
  <MyInput name="username" labelId={"userId"} labelTip={"用户名"} type={"text"} placeholder={"请输入用户名"} value={this.state.username} onChange={this.handleChange}/>
  <MyInput name="password" labelId={"pw"} labelTip={"密码"} type={"password"} placeholder={"请输入密码"} value={this.state.password} onChange={this.handleChange}/>
  <div className="form-group">
  <div className="col-sm-offset-2 col-sm-10">
  <div className="checkbox">
  <label>
  <input name="checked" type="checkbox" checked={this.state.checked} onChange={this.handleChange} /> 记住我
  </label>
  </div>
  </div>
  </div>
  <MyButton type={"submit"} ButtonTip={"登陆"}/>
  </div>
  </form>
  );
備註:因為demo中需要取得真實的dom節點,所以定義了ref。
再加上css樣式,頁面就完成囉!最後,重點來啦! ! !
四、父子組件間通訊實現拖曳
說明:由於我要實現的效果是,滑鼠按住子元件DragArea的時候,拖曳的是整個form,所以啟動拖曳的是DragArea,而回應的是form。所以,一開始必須把父元件的一些狀態屬性傳給子元件,然後滑鼠在DragArea按下的時候,必須透過子元件DragArea找到父元件的原始座標參數,然後更新父元件裡面的狀態屬性,並且告訴父組件可以進行拖曳了。父組件給子組件傳參就是直接傳遞的。而子元件給父元件傳參需要透過事件。所以在父元件中定義這麼一個函數:
onChildChanged:function(newState){ //因为参数过多,所以把参数放到对象里面,通过对象来传
  this.setState(newState);
},
而子元件需要綁定這個函數,如上面的程式碼:callbackParent={this.onChildChanged}
在子組件中,響應的函數為:
startDrag:function(e){
  var dragBox=document.getElementById('form');
    var newState={};
    var event=e||window.event;
    event.preventDefault();
    var computedStyle=document.defaultView.getComputedStyle(dragBox,null);
    newState.left=computedStyle.left;
    newState.top=computedStyle.top;
    newState.currentX=event.clientX;
    newState.currentY=event.clientY;
    newState.flag=true;
  <span style="color: #0000ff;">  this.props.callbackParent(newState);</span>
}
這樣,在子元件中就啟動了拖曳開關,並且已經更新了from的相關參數,from的兩外兩個事件,move和endDrag分別為:
move:function(event){
  var e = event ? event : window.event; //兼容IE的写法
  if (this.state.flag) {
    var nowX = e.clientX, nowY = e.clientY;
    var disX = nowX - this.state.currentX, disY = nowY - this.state.currentY;
    ReactDOM.findDOMNode(this.refs.dragBox).style.left = parseInt(this.state.left) + disX + "px";
    ReactDOM.findDOMNode(this.refs.dragBox).style.top = parseInt(this.state.top) + disY + "px";
  }
},
endDrag:function(){
  var computedStyle=document.defaultView.getComputedStyle(ReactDOM.findDOMNode(this.refs.dragBox),null);
  this.setState({
    left:computedStyle.left,
    top:computedStyle.top,
    flag:false
  });
}At this point, drag and drop is implemented!
5. Reflection
1. Theoretically, the drag effect can be realized in any element, and the idea of drag is the same, so theoretically, the functions of each drag process can be extracted and made into a Mixin, and then Can be called repeatedly. This was my initial idea, but I always made mistakes when passing parameters, responding, and binding elements. After searching for information, I couldn't find information on the simple writing methods of react and drag and drop. There were only some special plug-ins for react, and they were written in ES6. I can't understand them at my current level. So I gave up this way of writing for the time being. I hope that experts who have relevant ideas can share with me.
2. When the subcomponent in the article obtains the parameters from, it uses var dragBox=document.getElementById('form'); to find the dom, which seems to violate some concepts of react. But I'm not very familiar with how to get the dom of the parent component from the child component. I've tried defining refs=this.refs.dragBox in the parent component. Then it is passed to the sub-component, but I don’t know why the browser keeps reporting an error saying that this is not a dom node. Ask God for guidance.
3. The general way to write drag and drop events is to define mousemove and mouseup events on the document, but these two events are associated with the parameters of from. In this case, if I define them in the document in react, I cannot track the related events. parameter. So I defined it on from. Is there a better way? Please share!
4. The revolution has not yet succeeded, comrades still need to work hard!
This demo has been uploaded to: https://github.com/LuckyWinty/dragDemo
The above is the entire content of this article, I hope it will be helpful to everyone’s study.

熱AI工具

Undresser.AI Undress
人工智慧驅動的應用程序,用於創建逼真的裸體照片

AI Clothes Remover
用於從照片中去除衣服的線上人工智慧工具。

Undress AI Tool
免費脫衣圖片

Clothoff.io
AI脫衣器

Video Face Swap
使用我們完全免費的人工智慧換臉工具,輕鬆在任何影片中換臉!

熱門文章
熱工具

記事本++7.3.1
好用且免費的程式碼編輯器

SublimeText3漢化版
中文版,非常好用

禪工作室 13.0.1
強大的PHP整合開發環境

Dreamweaver CS6
視覺化網頁開發工具

SublimeText3 Mac版
神級程式碼編輯軟體(SublimeText3)


 React父元件怎麼呼叫子元件的方法
Dec 27, 2022 pm 07:01 PM
React父元件怎麼呼叫子元件的方法
Dec 27, 2022 pm 07:01 PM
呼叫方法:1、類別元件中的呼叫可以利用React.createRef()、ref的函數式宣告或props自訂onRef屬性來實作;2、函式元件、Hook元件中的呼叫可以利用useImperativeHandle或forwardRef拋出子組件ref來實作。
 深入理解React的自訂Hook
Apr 20, 2023 pm 06:22 PM
深入理解React的自訂Hook
Apr 20, 2023 pm 06:22 PM
React 自訂 Hook 是將元件邏輯封裝在可重複使用函數中的方式,它們提供了一種在不編寫類別的情況下重複使用狀態邏輯的方式。本文將詳細介紹如何自訂封裝 hook。
 怎麼調試React源碼?多種工具下的除錯方法介紹
Mar 31, 2023 pm 06:54 PM
怎麼調試React源碼?多種工具下的除錯方法介紹
Mar 31, 2023 pm 06:54 PM
怎麼調試React源碼?以下這篇文章帶大家聊聊多種工具下的調試React源碼的方法,介紹一下在貢獻者、create-react-app、vite專案中如何debugger React的真實源碼,希望對大家有所幫助!
 react怎麼設定div高度
Jan 06, 2023 am 10:19 AM
react怎麼設定div高度
Jan 06, 2023 am 10:19 AM
react設定div高度的方法:1、透過css方式實現div高度;2、在state中宣告一個物件C,並在該物件中存放更換按鈕的樣式,然後取得A並重新設定C中的「marginTop」即可。
 React為什麼不將Vite作為構建應用的首選
Feb 03, 2023 pm 06:41 PM
React為什麼不將Vite作為構建應用的首選
Feb 03, 2023 pm 06:41 PM
React為什麼不將Vite作為建置應用的首選?以下這篇文章就來帶大家聊聊React不將Vite當作預設推薦的原因,希望對大家有幫助!
 7 個很棒且實用的React 元件庫(壓箱底分享)
Nov 04, 2022 pm 08:00 PM
7 個很棒且實用的React 元件庫(壓箱底分享)
Nov 04, 2022 pm 08:00 PM
這篇文章跟大家整理分享7 個很棒又實用的React 元件庫,日常開發中常會用到的,快來收藏試試看吧!

 聊聊Vuex與Pinia在設計與實作上的差別
Dec 07, 2022 pm 06:24 PM
聊聊Vuex與Pinia在設計與實作上的差別
Dec 07, 2022 pm 06:24 PM
在進行前端專案開發時,狀態管理始終是一個繞不開的話題,Vue 與 React 框架本身提供了一部分能力去解決這個問題。但在開發大型應用程式時往往有其他考慮,例如需要更規範更完善的操作日誌、整合在開發者工具中的時間旅行能力、服務端渲染等。本文以 Vue 架構為例,介紹 Vuex 與 Pinia 這兩種狀態管理工具在設計與實作上的差異。
