JavaScript html5 canvas畫布中刪除一個區塊區域的方法_javascript技巧
canvas
html5
javascript
畫布
本文實例講述了html5 canvas畫布中刪除一個區塊區域的方法。分享給大家參考,具體如下:
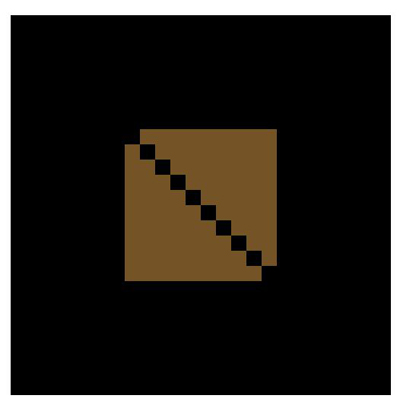
運作效果截圖如下:

附:圖中,黑色小方塊即為刪除掉的區塊區域
具體程式碼如下:
index.html:
<!DOCTYPE html>
<html>
 <head>
  <meta http-equiv="Content-type" content="text/html;charset=UTF-8" />
  <title>canvas中删除一块区域</title>
  <style type="text/css">
   #canvas {
    background:black; margin-top:100px; margin-left:200px;
   }
  </style>
 </head>
 <body>
  <canvas id="canvas" width="500px" height="500px" ></canvas>
 </body>
 <script type="text/javascript" src="canvas.js"></script>
 <script type="text/javascript">
  cache = {};
  var offsetX = 50,
   offsetY = 20;
  cache.context = dyl.createContext('canvas');
  dyl.rect(dyl.createColor(), 150, 150, 200, 200, 0.5);
  for(var i=0; i<10; i++) {
   dyl.clearRect(150 + i*20, 150 + i*20, 20, 20);
  }
 </script>
</html>
登入後複製
canvas.js:
(function() {
  var dyl = {cache: {}};
  dyl.setContext = function(context) {
    dyl.cache._context = context;
    return context;
  };
  dyl.getDom = function(id) {
    return document.getElementById(id);
  };
  dyl._getContext = function() {
    return dyl.cache._context;
  };
  dyl.save = function() {
    var context = dyl._getContext();
    context ? context.save() : void(0);
  };
  dyl.restore = function() {
    var context = dyl._getContext();
    context ? context.restore() : void(0);
  };
  dyl.createContext = function(canvasID) {
    var canvas = this.getDom(canvasID);
    if(!canvas) {
      return null;
    }
    return dyl.setContext(canvas.getContext("2d"));
  };
  dyl.createColor = function() {
    var color = "rgb(";
    color += Math.round(Math.random()*255);
    color += ",";
    color += Math.round(Math.random()*255);
    color += ",";
    color += Math.round(Math.random()*255);
    color += ")";
    return color;
  };
  dyl.addImg = function(img, x, y) {
    var context = dyl._getContext();
    if(!img || !context) {
      return;
    }
    if(typeof img === "string") {
      var oImg = new Image();
      oImg.src = img;
      oImg.onload = function() {
        context.drawImage(oImg, x, y);
      }
      return;
    }
    context.drawImage(img, x, y);
  };
  dyl.rect = function(color, x, y, width, height, alpha) {
    var context = dyl._getContext();
    if(!context) {
      return;
    }
    context.save();
    context.fillStyle = color;
    context.globalAlpha = alpha ? alpha : 1;
    context.fillRect(x, y, width, height);
    context.restore();
  };
  dyl.circle = function(color, x, y, r, alpha) {
    var context = dyl._getContext();
    context.save();
    context.fillStyle = color;
    context.beginPath();
    context.globalAlpha = alpha ? alpha : 1;
    context.arc(x, y, r, 0, 2*Math.PI);
    context.fill();
    context.stroke();
  };
  dyl.clearRect = function(x, y, width, height) {
    var context = dyl._getContext();
    if(!context) {
      return;
    }
    context.clearRect(x, y, width, height);
  };
  dyl.scale = function(x, y) {
    var context = dyl._getContext();
    if(!context) {
      return;
    }
    x = x ? x : 1;
    y = y ? y : 1;
    context.scale(x, y);
  };
  if(!window.dyl) {
    window.dyl = dyl;
  }
})();
登入後複製
希望本文所述對大家JavaScript程式設計有所幫助。
本網站聲明
本文內容由網友自願投稿,版權歸原作者所有。本站不承擔相應的法律責任。如發現涉嫌抄襲或侵權的內容,請聯絡admin@php.cn

熱AI工具

Undresser.AI Undress
人工智慧驅動的應用程序,用於創建逼真的裸體照片

AI Clothes Remover
用於從照片中去除衣服的線上人工智慧工具。

Undress AI Tool
免費脫衣圖片

Clothoff.io
AI脫衣器

AI Hentai Generator
免費產生 AI 無盡。

熱門文章
R.E.P.O.能量晶體解釋及其做什麼(黃色晶體)
3 週前
By 尊渡假赌尊渡假赌尊渡假赌
R.E.P.O.最佳圖形設置
3 週前
By 尊渡假赌尊渡假赌尊渡假赌
刺客信條陰影:貝殼謎語解決方案
2 週前
By DDD
R.E.P.O.如果您聽不到任何人,如何修復音頻
3 週前
By 尊渡假赌尊渡假赌尊渡假赌
WWE 2K25:如何解鎖Myrise中的所有內容
4 週前
By 尊渡假赌尊渡假赌尊渡假赌

熱工具

記事本++7.3.1
好用且免費的程式碼編輯器

SublimeText3漢化版
中文版,非常好用

禪工作室 13.0.1
強大的PHP整合開發環境

Dreamweaver CS6
視覺化網頁開發工具

SublimeText3 Mac版
神級程式碼編輯軟體(SublimeText3)


