
本章節介紹一下比較常用的效果,那就是當滑鼠滑過連結的時候,能夠出現跟隨滑鼠指標移動的圖層,在實際應用中,一般是對於連結的一些說明文字或圖片等等,
我們先來看個示範圖
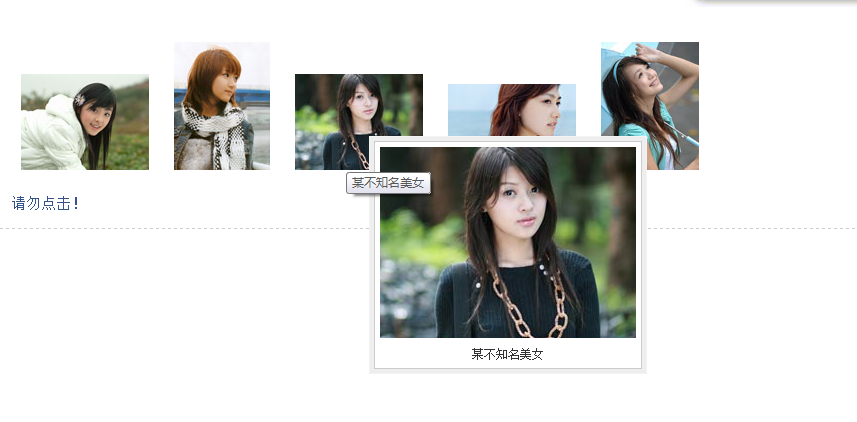
下面是程式碼實例:
<link rel="stylesheet" href="../css/common.css" type="text/css" />
<script type="text/javascript" src="../js/jquery-1.2.6.pack.js"></script>
<script type="text/javascript" src="../js/jquery.imagePreview.1.0.js"></script>
<script type="text/javascript">
$(function(){
	$("a.preview").preview();
});
</script>
<style type="text/css">
html{overflow-y:scroll;}
a.preview,a.preview:hover{text-decoration:none;}
a.preview img{margin:20px 10px;}
</style>
</head>

<body>
<div class="zxx_out_box">
 <div class="zxx_in_box">
  <h3 class="zxx_title">图片放大显示的jQuery插件演示页面</h3>
  <div class="zxx_main_con">
			<div class="zxx_test_list">
   	<a class="preview" href="http://image.jb51.net/image/study/s/s256/mm1.jpg" title="张含韵">
    	<img src="http://image.jb51.net/image/study/s/s128/mm1.jpg" />
    </a>
    <a class="preview" href="http://image.jb51.net/image/study/s/s256/mm2.jpg" title="某不知名美女">
    	<img src="http://image.jb51.net/image/study/s/s128/mm2.jpg" />
    </a>
    <a class="preview" href="http://image.jb51.net/image/study/s/s256/mm3.jpg" title="某不知名美女">
    	<img src="http://image.jb51.net/image/study/s/s128/mm3.jpg" />
    </a>
    <a class="preview" href="http://image.jb51.net/image/study/s/s256/mm4.jpg" title="某不知名美女">
    	<img src="http://image.jb51.net/image/study/s/s128/mm4.jpg" />
    </a>
    <a class="preview" href="http://image.jb51.net/image/study/s/s256/mm5.jpg" title="某不知名美女">
    	<img src="http://image.jb51.net/image/study/s/s128/mm5.jpg" />
    </a>
   </div>
  </div>

 </div>
</div>
</body>
</html>以上程式碼實現了我們的要求,小夥伴們覺著怎麼樣呢
接下來我們來看看使用方法簡單說明:
1.需要藉助a標籤的href屬性,此jQuery插件的原理是當滑鼠移至縮圖(或連結文字時),會載入一段含有href指向路徑的大圖html片段,該片段根據滑鼠的位置絕對定位。於是產生了滑鼠移到縮圖上顯示大圖的效果。大圖的位址就是a標籤的href屬性的內容。例如:縮圖 如果此a標籤含有顯示大圖的方法,則頁面就會顯示href所指向的「xx.jpg」這個圖片。
2.使用的方法是:目標選擇器.preview();例如上面的縮圖就可以使用$(“a”).preview() ;這段程式碼實作滑鼠移到「縮圖」這個文字連結上顯示xx.jpg這張圖片的效果。
3.僅支援png,gif,jpg,bmp四種格式的圖片,您可以修改插件程式碼的正規表示式擴充支援的圖片格式類型。
下面簡單介紹一下實作過程:
一.程式碼註解:
1.this.screenshotPreview=function(){ },宣告一個函數用來實現跟隨效果,在本效果中,this其實是可以省略,它指向window。
2.xOffset=10,宣告一個變量,用來規定滑鼠指標距離彈出圖片的橫向距離。
3.yOffset=30,宣告一個變量,用來規定滑鼠指標距離彈出圖片的縱向距離。
4.$("a.screenshot").hover(function(e){},function(e){}),規定當滑鼠移到連結和離開連結所要執行的函數。
5.this.t = this.title,將連結的title屬性值賦值給t屬性,這裡的this是指向目前滑鼠懸浮的連結物件。
6.var c = (this.t != "") ? "
" + this.t : "",如果this.t不為空,也就是存在title屬性值,那麼插入一個換行符並且連接目前標題內容,否則將c設為空白。
7.$("body").append("
"+ c +"
8.$("#screenshot").css("top",(e.pageY-xOffset)+"px").css("left",(e.pageX+yOffset)+"px") .fadeIn("fast"),設定p元素的top和left屬性值,並且採用淡入效果展現。
9.this.title=this.t,將title內容賦值給this.title,其實不要這句話也沒有任何問題,有點多餘。
10.$("#screenshot").remove(),移出p元素。
11.$("a.screenshot").mousemove(function(e){}),用來設定當滑鼠指標移動時,圖片能夠跟隨。
12.$("#screenshot").css("top",(e.pageY-xOffset)+"px") .css("left",(e.pageX+yOffset)+"px") ,設定p元素的top和left屬性值,能夠實現跟隨效果。
二.相關閱讀:
1.hover()函數可以參考jQuery的hover事件一章節。
2.append()函數可以參考jQuery的append()方法一章節。
3.css()函數可以參考jQuery的css()方法一章節。
4.pageY屬性可以參考jQuery的event.pageY屬性一章節。
5.fadeIn()函數可以參考jQuery的fadeIn()方法一章節。
6.remove()函數可以參考jQuery的remove()方法一章節。
7.mousemove事件可以參考jQuery的mousemove事件一章節。


