

深入解析Python的Tornado框架中內建的模板引擎

template中的_parse方法是模板文法的解析器,而这个文件中一坨一坨的各种node以及block,就是解析结果的承载者,也就是说在经过parse处理过后,我们输入的tornado的html模板就变成了各种block的集合。
这些block和node的祖宗就是这个“抽象”类, _Node,它定义了三个方法定义,其中generate方法是必须由子类提供实现的(所以我叫它“抽象”类)。
理论上来说,当一个类成为祖宗类时,必定意味着这个类包含了一些在子类中通用的行为,那么,从_Node暴露出来的方法来看,即所有的子类理论上都会有如下特征:
1. 可作为容器 (each_child, find_named_blocks)
2. generate
当然了,理想总是丰满的,现实也总有那么点儿不对劲,对于某些子孙,它们的特征看上去不是那么靠谱,比如_Text。
_Text这个类只用到了generate这个方法,用于将文字(Html, JS)经过trim后添加到输入流中,如果调用它的each_child or find_named_blocks,当然你能这么做,但是没有什么意义。
前面反复说到_Parse方法,它返回的结果是一个_ChunkList的实例,而_ChunkList继承与_Node。这是一个体现了_Node容器特点的类,重写了generate方法和each_child方法,而基本上就是依次调用容器内所有元素的相关方法而已。
_Nodes众多子子孙孙中比较奇葩的是_ExtendsBlock这个类,丫什么事情都没做(That is true),看上去像是另外一个“抽象类”,但是居然会被_Parse初始化,用于处理Extends这个token(tornado术语)。我就纳闷了,一旦这货被generate,难道不会抛一个异常出来木?
真正有意思的是另外几个方法,它们有共通的模式,用_ApplyBlock来举例
在_ApplyBlock中,有趣的是generate方法
def generate(self, writer):
  method_name = "apply%d" % writer.apply_counter
  writer.apply_counter += 1
  writer.write_line("def %s():" % method_name, self.line)
  with writer.indent():
    writer.write_line("_buffer = []", self.line)
    writer.write_line("_append = _buffer.append", self.line)
    self.body.generate(writer)
    writer.write_line("return _utf8('').join(_buffer)", self.line)
  writer.write_line("_append(%s(%s()))" % (
    self.method, method_name), self.line)
简单来说,这个函数做了两件事情:
定义了一个python文件全局函数叫做applyXXX():,其中的XXX是一个整形的,自增的值,返回值是一个utf8字符串。
执行这个applyXXX函数,将此函数的输出再作为self.method这个函数的输入。
所以,如果一个类似于这样的模板
{%apply linkify%} {{address}} {%end%}
会得到一个类似于如下的输出:
r = applyXXX()
r = linkify(r)
_append(r)
tornado的template机制,本质上讲,就是允许开发者已HTML + template marker的方式来编写视图模板,但是在背后,tornado会把这些视图模板通过template的处理,变成可编译的python代码。
拿autumn-sea上面的代码作为例子,比较容易理解:
View Template
<html>
  <head>
    <title>{{ title }}</title>
  </head>
  <body>
    hello! {{ name }}
  </body>
</html> 处理后
_buffer = []
_buffer.append('<html>\\n<head>\\n<title>')

_tmp = title
if isinstance(_tmp, str): _buffer.append(_tmp)
elif isinstance(_tmp, unicode): _buffer.append(_tmp.encode('utf-8'))
else: _buffer.append(str(_tmp))

_buffer.append('</title>\\n</head>\\n<body>\\n')
_buffer.append('hello! ')

_tmp = name
if isinstance(_tmp, str): _buffer.append(_tmp)
elif isinstance(_tmp, unicode): _buffer.append(_tmp.encode('utf-8'))
else: _buffer.append(str(_tmp))

_buffer.append('\\n</body>\\n</html>\\n')
return ''.join(_buffer)\n"
实例剖析
tornado的模板基本都在template.py这个文件中,短短800多行代码就实现了基本可用的模板,让我们慢慢揭开她的面纱。
首先我们看看tornado是如何编译模板的,下面是个简单的模板
t = Template("""\
{%if names%}
  {% for name in names %}
    {{name}}
  {%end%}
{%else%}
no one
{%end%}
""")
tornado最后编译代码如下:
def _tt_execute(): # <string>:0
  _tt_buffer = [] # <string>:0
  _tt_append = _tt_buffer.append # <string>:0
  if names: # <string>:1
    _tt_append('\n  ') # <string>:2
    for name in names: # <string>:2
      _tt_append('\n    ') # <string>:3
      _tt_tmp = name # <string>:3
      if isinstance(_tt_tmp, _tt_string_types): _tt_tmp = _tt_utf8(_tt_tmp) # <string>:3
      else: _tt_tmp = _tt_utf8(str(_tt_tmp)) # <string>:3
      _tt_tmp = _tt_utf8(xhtml_escape(_tt_tmp)) # <string>:3
      _tt_append(_tt_tmp) # <string>:3
      _tt_append('\n  ') # <string>:4
      pass # <string>:2
    _tt_append('\n') # <string>:5
    pass # <string>:5
  else: # <string>:5
    _tt_append('\nno one\n') # <string>:7
    pass # <string>:1
  _tt_append('\n') # <string>:8
  return _tt_utf8('').join(_tt_buffer) # <string>:0
是的,你没看错,tornado编译就是将之翻译成一个个代码块,最后通exec传递我们给的参数命名空间执行_tt_execute函数。
在我们上面的模板中包含了4种预定义的NODE节点,_ControlBlock,_Expression,_TEXT,每种Node节点都有自己的生成方式。
比如说_Expression表达式节点,也就是我们模板中的{{name}},当_parse解析时发现'{'后面还是'{'就认为是表达式节点,
class _Expression(_Node):
  def __init__(self, expression, line, raw=False):
    self.expression = expression
    self.line = line
    self.raw = raw

  def generate(self, writer):
    writer.write_line("_tt_tmp = %s" % self.expression, self.line)
    writer.write_line("if isinstance(_tt_tmp, _tt_string_types):"
             " _tt_tmp = _tt_utf8(_tt_tmp)", self.line)
    writer.write_line("else: _tt_tmp = _tt_utf8(str(_tt_tmp))", self.line)
    if not self.raw and writer.current_template.autoescape is not None:
      # In python3 functions like xhtml_escape return unicode,
      # so we have to convert to utf8 again.
      writer.write_line("_tt_tmp = _tt_utf8(%s(_tt_tmp))" %
               writer.current_template.autoescape, self.line)
    writer.write_line("_tt_append(_tt_tmp)", self.line)
最后生成时会调用节点的generate方法,self.expression就是上面的name,所以当exec的时候就会把name的值append到内部的列表中。
像if,for等都是控制节点,他们的定义如下:
class _ControlBlock(_Node):
  def __init__(self, statement, line, body=None):
    self.statement = statement
    self.line = line
    self.body = body

  def each_child(self):
    return (self.body,)

  def generate(self, writer):
    writer.write_line("%s:" % self.statement, self.line)
    with writer.indent():
      self.body.generate(writer)
      # Just in case the body was empty
      writer.write_line("pass", self.line)
控制节点的generate方法有点意义,因为if,for等是下一行是需要缩进的,所以调用了with writer.indent继续缩进控制,可以看下
_CodeWriter的indent方法。
节点中比较有意思的是_ExtendsBlock,这是实现目标基础的节点,
class _ExtendsBlock(_Node):
  def __init__(self, name):
    self.name = name
我们发现并没有定义generate方法,那当生成继承节点时不是会报错吗?让我们看一段事例
loader = Loader('.')
t=Template("""\
{% extends base.html %}
{% block login_name %}hello world! {{ name }}{% end %}
""",loader=loader)
当前目录下base.html如下:
<html>
<head>
<title>{{ title }}</title>
</head>
<body>
{% block login_name %}hello! {{ name }}{% end %}
</body>
</html> 我们可以看看解析后的节点,
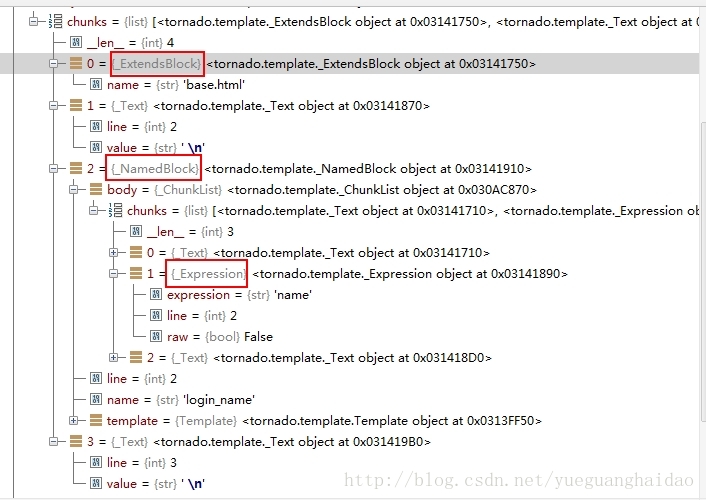
由于我们继承了base.html,所以我们的应该以base.html的模板生成,并使用新定义的block代替base.html中的block,
这是很正常的思路,tornado也的确是这么干的,只不过处理的并不是在_ExtendsBlock。
而实在Template的_generate_python中
def _generate_python(self, loader, compress_whitespace):
   buffer = StringIO()
   try:
     # named_blocks maps from names to _NamedBlock objects
     named_blocks = {}
     ancestors = self._get_ancestors(loader)
     ancestors.reverse()
     for ancestor in ancestors:
       ancestor.find_named_blocks(loader, named_blocks)
     writer = _CodeWriter(buffer, named_blocks, loader, ancestors[0].template,
               compress_whitespace)
     ancestors[0].generate(writer)
     return buffer.getvalue()
   finally:
     buffer.close()

 def _get_ancestors(self, loader):
   ancestors = [self.file]
   for chunk in self.file.body.chunks:
     if isinstance(chunk, _ExtendsBlock):
       if not loader:
         raise ParseError("{% extends %} block found, but no "
                 "template loader")
       template = loader.load(chunk.name, self.name)
       ancestors.extend(template._get_ancestors(loader))
   return ancestors
_generate_python中调用_get_ancestors获取当前模板的父模板,我们看到如果当前模板的_FILE节点中有_ExtendsBlock就代表有父模板并通过loader.load加载父模板,此时父模板已经是解析过的_FILE节点了。所以,在上面的模板中,ancestors是[当前模板_FILE节点,父模板_FILE节点],ancestors.reverse()后其实ancestors[0]就是父模板,我们看到最后是通过ancestors[0].generate(writer)来生成代码的。那当前模板是如何替换父模板的block内容呢?
看上图,block login_name通过解析为_NamedBlock,在_generate_python中通过调用ancestor.find_named_blocks来替换
父模板的_NamedBlock的。
for ancestor in ancestors:
    ancestor.find_named_blocks(loader, named_blocks)
ancestor其实就是_FILE节点,find_named_blocks将遍历_FILE节点中所有节点并调用find_named_blocks

class _NamedBlock(_Node):
  def find_named_blocks(self, loader, named_blocks):
    named_blocks[self.name] = self
    _Node.find_named_blocks(self, loader, named_blocks)
其它节点find_named_blocks都没有做什么事,_NamedBlock通过named_blocks[self.name] = self替换为当前模板的_NamedBlock,因为ancestors父模板在前,当前模板在后,所以最后使用的是当前模板的_NamedBlock。
生成代码后generate将在给定的命名空间中exec代码
def generate(self, **kwargs):
  """Generate this template with the given arguments."""
  namespace = {
    "escape": escape.xhtml_escape,
    "xhtml_escape": escape.xhtml_escape,
    "url_escape": escape.url_escape,
    "json_encode": escape.json_encode,
    "squeeze": escape.squeeze,
    "linkify": escape.linkify,
    "datetime": datetime,
    "_tt_utf8": escape.utf8, # for internal use
    "_tt_string_types": (unicode_type, bytes_type),
    # __name__ and __loader__ allow the traceback mechanism to find
    # the generated source code.
    "__name__": self.name.replace('.', '_'),
    "__loader__": ObjectDict(get_source=lambda name: self.code),
  }
  namespace.update(self.namespace)
  namespace.update(kwargs)
  exec_in(self.compiled, namespace)
  execute = namespace["_tt_execute"]
  # Clear the traceback module's cache of source data now that
  # we've generated a new template (mainly for this module's
  # unittests, where different tests reuse the same name).
  linecache.clearcache()
  return execute()
所以在模板中可以使用datetime等,都是通过在这里注入到模板中的,当然还有其它的是通过
web.py 中get_template_namespace注入的
 def get_template_namespace(self):
   """Returns a dictionary to be used as the default template namespace.

   May be overridden by subclasses to add or modify values.

   The results of this method will be combined with additional
   defaults in the `tornado.template` module and keyword arguments
   to `render` or `render_string`.
   """
   namespace = dict(
     handler=self,
     request=self.request,
     current_user=self.current_user,
     locale=self.locale,
     _=self.locale.translate,
     static_url=self.static_url,
     xsrf_form_html=self.xsrf_form_html,
     reverse_url=self.reverse_url
   )
   namespace.update(self.ui)
   return namespace
我们再来看看tornado的模板是如何对UI模块的支持的。
{% for entry in entries %}
 {% module Entry(entry) %}
{% end %}
在使用module时将会生成_Module节点
class _Module(_Expression):
  def __init__(self, expression, line):
    super(_Module, self).__init__("_tt_modules." + expression, line,
                   raw=True)
我们看到其实_Module节点是继承自_Expression节点,所以最后执行的是_tt_modules.Entry(entry)
_tt_modules定义在web.py的RequestHandler中
self.ui["_tt_modules"] = _UIModuleNamespace(self,application.ui_modules)
并通过上文的get_template_namespace中注入到模板中。
class _UIModuleNamespace(object):
  """Lazy namespace which creates UIModule proxies bound to a handler."""
  def __init__(self, handler, ui_modules):
    self.handler = handler
    self.ui_modules = ui_modules

  def __getitem__(self, key):
    return self.handler._ui_module(key, self.ui_modules[key])

  def __getattr__(self, key):
    try:
      return self[key]
    except KeyError as e:
      raise AttributeError(str(e))
所以当执行_tt_modules.Entry(entry)时先访问_UIModuleNamespace的__getattr__,后访问__getitem__,最后调用
handler._ui_module(key, self.ui_modules[key]),
def _ui_module(self, name, module):
  def render(*args, **kwargs):
    if not hasattr(self, "_active_modules"):
      self._active_modules = {}
    if name not in self._active_modules:
      self._active_modules[name] = module(self)
    rendered = self._active_modules[name].render(*args, **kwargs)
    return rendered
  return render
_tt_modules.Entry(entry)中entry将会传给_ui_module内部的render,也就是args=entry
self._active_modules[name] = module(self)此时就是实例化后的UIModule,调用render获取渲染后的内容
class Entry(tornado.web.UIModule):
  def render(self, entry, show_comments=False):
    return self.render_string(
"module-entry.html", entry=entry, show_comments=show_comments) 当然如果你觉得这么做费事,也可以使用tornado自带的TemplateModule,它继承自UIModule,
你可以这么用
{% module Template("module-entry.html", show_comments=True) %}
在module_entry.html中可以通过set_resources引用需要的静态文件
{{ set_resources(embedded_css=".entry { margin-bottom: 1em; }") }}
这里需要注意的是:只能在Template引用的html文件中使用set_resources函数,因为set_resources是TemplateModule.render的内部函数
class TemplateModule(UIModule):
  """UIModule that simply renders the given template.

  {% module Template("foo.html") %} is similar to {% include "foo.html" %},
  but the module version gets its own namespace (with kwargs passed to
  Template()) instead of inheriting the outer template's namespace.

  Templates rendered through this module also get access to UIModule's
  automatic javascript/css features. Simply call set_resources
  inside the template and give it keyword arguments corresponding to
  the methods on UIModule: {{ set_resources(js_files=static_url("my.js")) }}
  Note that these resources are output once per template file, not once
  per instantiation of the template, so they must not depend on
  any arguments to the template.
  """
  def __init__(self, handler):
    super(TemplateModule, self).__init__(handler)
    # keep resources in both a list and a dict to preserve order
    self._resource_list = []
    self._resource_dict = {}

  def render(self, path, **kwargs):
    def set_resources(**kwargs):
      if path not in self._resource_dict:
        self._resource_list.append(kwargs)
        self._resource_dict[path] = kwargs
      else:
        if self._resource_dict[path] != kwargs:
          raise ValueError("set_resources called with different "
                   "resources for the same template")
      return ""
    return self.render_string(path, set_resources=set_resources,
**kwargs) 
熱AI工具

Undresser.AI Undress
人工智慧驅動的應用程序,用於創建逼真的裸體照片

AI Clothes Remover
用於從照片中去除衣服的線上人工智慧工具。

Undress AI Tool
免費脫衣圖片

Clothoff.io
AI脫衣器

Video Face Swap
使用我們完全免費的人工智慧換臉工具,輕鬆在任何影片中換臉!

熱門文章
熱工具

記事本++7.3.1
好用且免費的程式碼編輯器

SublimeText3漢化版
中文版,非常好用

禪工作室 13.0.1
強大的PHP整合開發環境

Dreamweaver CS6
視覺化網頁開發工具

SublimeText3 Mac版
神級程式碼編輯軟體(SublimeText3)


 PHP和Python:解釋了不同的範例
Apr 18, 2025 am 12:26 AM
PHP和Python:解釋了不同的範例
Apr 18, 2025 am 12:26 AM
PHP主要是過程式編程,但也支持面向對象編程(OOP);Python支持多種範式,包括OOP、函數式和過程式編程。 PHP適合web開發,Python適用於多種應用,如數據分析和機器學習。
 在PHP和Python之間進行選擇:指南
Apr 18, 2025 am 12:24 AM
在PHP和Python之間進行選擇:指南
Apr 18, 2025 am 12:24 AM
PHP適合網頁開發和快速原型開發,Python適用於數據科學和機器學習。 1.PHP用於動態網頁開發,語法簡單,適合快速開發。 2.Python語法簡潔,適用於多領域,庫生態系統強大。
 sublime怎麼運行代碼python
Apr 16, 2025 am 08:48 AM
sublime怎麼運行代碼python
Apr 16, 2025 am 08:48 AM
在 Sublime Text 中運行 Python 代碼,需先安裝 Python 插件,再創建 .py 文件並編寫代碼,最後按 Ctrl B 運行代碼,輸出會在控制台中顯示。
 PHP和Python:深入了解他們的歷史
Apr 18, 2025 am 12:25 AM
PHP和Python:深入了解他們的歷史
Apr 18, 2025 am 12:25 AM
PHP起源於1994年,由RasmusLerdorf開發,最初用於跟踪網站訪問者,逐漸演變為服務器端腳本語言,廣泛應用於網頁開發。 Python由GuidovanRossum於1980年代末開發,1991年首次發布,強調代碼可讀性和簡潔性,適用於科學計算、數據分析等領域。
 Python vs. JavaScript:學習曲線和易用性
Apr 16, 2025 am 12:12 AM
Python vs. JavaScript:學習曲線和易用性
Apr 16, 2025 am 12:12 AM
Python更適合初學者,學習曲線平緩,語法簡潔;JavaScript適合前端開發,學習曲線較陡,語法靈活。 1.Python語法直觀,適用於數據科學和後端開發。 2.JavaScript靈活,廣泛用於前端和服務器端編程。
 Golang vs. Python:性能和可伸縮性
Apr 19, 2025 am 12:18 AM
Golang vs. Python:性能和可伸縮性
Apr 19, 2025 am 12:18 AM
Golang在性能和可擴展性方面優於Python。 1)Golang的編譯型特性和高效並發模型使其在高並發場景下表現出色。 2)Python作為解釋型語言,執行速度較慢,但通過工具如Cython可優化性能。
 vscode在哪寫代碼
Apr 15, 2025 pm 09:54 PM
vscode在哪寫代碼
Apr 15, 2025 pm 09:54 PM
在 Visual Studio Code(VSCode)中編寫代碼簡單易行,只需安裝 VSCode、創建項目、選擇語言、創建文件、編寫代碼、保存並運行即可。 VSCode 的優點包括跨平台、免費開源、強大功能、擴展豐富,以及輕量快速。
 notepad 怎麼運行python
Apr 16, 2025 pm 07:33 PM
notepad 怎麼運行python
Apr 16, 2025 pm 07:33 PM
在 Notepad 中運行 Python 代碼需要安裝 Python 可執行文件和 NppExec 插件。安裝 Python 並為其添加 PATH 後,在 NppExec 插件中配置命令為“python”、參數為“{CURRENT_DIRECTORY}{FILE_NAME}”,即可在 Notepad 中通過快捷鍵“F6”運行 Python 代碼。
