PHP設計模式之適配器模式
簡介
適配器模式(有時候也稱包裝樣式或包裝)將一個類別的介面適配成使用者所期待的。一個適配允許通常因為介面不相容而不能在一起工作的類別工作在一起。
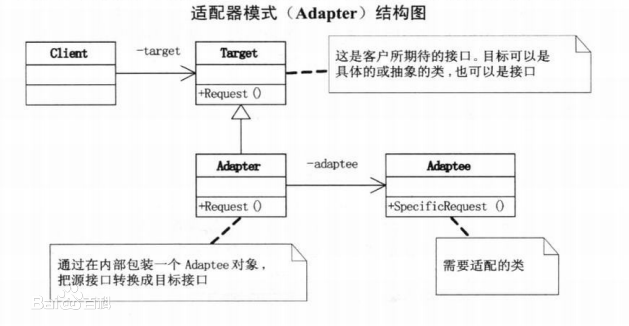
UML
角色
Target適配目標 : 此角色定義把其他類別轉換為何種接口,也就是我們的期望接口。
Adaptee被適配者 :就是需要被適配的介面。
Adapter適配器:其他的兩個角色都是已經存在的角色,而適配器角色是需要新建立的,它用來對Adaptee與Target介面進行適配器。

應用場景
如程式資料庫有關聯mysql、mysqli、pdo、sqlite、postgresql等操作,而你需要根據情況換資料庫操作時,可以使用適配器模式統一接口,這樣程式碼中除了資料庫配置之外,就不需要做而外的更改。
同理cache(快取)的場景也是,無論使用memcache還是redis等,更換的時候都會很方便,節省時間。
註:在一些流行框架中都可以看到此模式,詳情請自行參閱框架源碼。
實作
程式碼:
<?php
header('Content-Type:text/html;charset=utf-8');
/**
* 适配器模式演示代码
* Target适配目标: IDataBase接口
* Adaptee被适配者: mysql和mysql_i、postgresql的数据库操作函数
* Adapter适配器 :mysql类和mysql_i、postgresql类
*/
/**
* Interface IDatabase 适配目标,规定的接口将被适配对象实现
* 约定好统一的api行为
*/
interface IDatabase
{
// 定义数据库连接方法
public function connect($host, $username, $password, $database);
// 定义数据库查询方法
public function query($sql);
// 关闭数据库
public function close();
}
/**
* Class Mysql 适配器
*/
class Mysql implements IDatabase
{
protected $connect; // 连接资源
/**
* 实现连接方法
*
* @param $host host
* @param $username 用户名
* @param $password 密码
* @param $database 数据库名
*/
public function connect($host, $username, $password, $database)
{
$connect = mysql_connect($host, $username, $password);
mysql_select_db($database, $connect);
$this->connect = $connect;
//其他操作
}
/**
* 实现查询方法
*
* @param $sql 需要被查询的sql语句
* @return mi
*/
public function query($sql)
{
return mysql_query($sql);
}
// 实现关闭方法
public function close()
{
mysql_close();
}
}
/**
* Class Mysql 适配器
*/
class Mysql_i implements IDatabase
{
protected $connect; // 连接资源
/**
* 实现连接方法
*
* @param $host host
* @param $username 用户名
* @param $password 密码
* @param $database 数据库名
*/
public function connect($host, $username, $password, $database)
{
$connect = mysqli_connect($host, $username, $password, $database);
$this->connect = $connect;
//其他操作
}
/**
* 实现查询方法
*
* @param $sql 需要被查询的sql语句
*/
public function query($sql)
{
return mysqli_query($this->connect, $sql);
}
// 实现关闭
public function close()
{
mysqli_close($this->connect);
}
}
/**
* Class Postgresql 适配器
*/
class Postgresql implements IDatabase
{
protected $connect; // 连接资源
/**
* 实现连接方法
*
* @param $host
* @param $username
* @param $password
* @param $database
*/
public function connect($host, $username, $password, $database)
{
$this->connect = pg_connect("host=$host dbname=$database user=$username password=$password");
//其他操作
}
/**
* 实现查询方法
*
* @param $sql 需要被查询的sql语句
*/
public function query($sql)
{
// 其他操作
}
// 实现关闭方法
public function close()
{
}
}
/**
* 客户端使用演示
* 这里以mysql为例
* 只要模式设计好,不论有多少种数据库,实现和调用方式都是一样的
* 因为都是实现的同一个接口,所以都是可以随意切换的
*/
$host = 'localhost';
$username = 'root';
$password = 'root';
$database = 'mysql';
//$client = new Postgresql();
//$client = new Mysql();
$client = new Mysql_i();
$client->connect($host, $username, $password, $database);
$result = $client->query("select * from db");
while ($rows = mysqli_fetch_array($result)) {
var_dump($rows);
}
$client->close();運作結果:
array(44) {
  [0]=>
  string(1) "%"
  ["Host"]=>
  string(1) "%"
  [1]=>
  string(4) "test"
  ["Db"]=>
  string(4) "test"
  [2]=>
  string(0) ""
  ["User"]=>
  string(0) ""
  [3]=>
  string(1) "Y"
  ["Select_priv"]=>
  string(1) "Y"
  [4]=>
  string(1) "Y"
  ["Insert_priv"]=>
  string(1) "Y"
  [5]=>
  string(1) "Y"
  ["Update_priv"]=>
  string(1) "Y"
  [6]=>
  string(1) "Y"
  ["Delete_priv"]=>
  string(1) "Y"
  [7]=>
  string(1) "Y"
  ["Create_priv"]=>
  string(1) "Y"
  [8]=>
  string(1) "Y"
  ["Drop_priv"]=>
  string(1) "Y"
  [9]=>
  string(1) "N"
  ["Grant_priv"]=>
  string(1) "N"
  [10]=>
  string(1) "Y"
  ["References_priv"]=>
  string(1) "Y"
  [11]=>
  string(1) "Y"
  ["Index_priv"]=>
  string(1) "Y"
  [12]=>
  string(1) "Y"
  ["Alter_priv"]=>
  string(1) "Y"
  [13]=>
  string(1) "Y"
  ["Create_tmp_table_priv"]=>
  string(1) "Y"
  [14]=>
  string(1) "Y"
  ["Lock_tables_priv"]=>
  string(1) "Y"
  [15]=>
  string(1) "Y"
  ["Create_view_priv"]=>
  string(1) "Y"
  [16]=>
  string(1) "Y"
  ["Show_view_priv"]=>
  string(1) "Y"
  [17]=>
  string(1) "Y"
  ["Create_routine_priv"]=>
  string(1) "Y"
  [18]=>
  string(1) "N"
  ["Alter_routine_priv"]=>
  string(1) "N"
  [19]=>
  string(1) "N"
  ["Execute_priv"]=>
  string(1) "N"
  [20]=>
  string(1) "Y"
  ["Event_priv"]=>
  string(1) "Y"
  [21]=>
  string(1) "Y"
  ["Trigger_priv"]=>
  string(1) "Y"
}從以上結果可看出,資料庫連線以及查詢語句都已經成功執行。

熱AI工具

Undresser.AI Undress
人工智慧驅動的應用程序,用於創建逼真的裸體照片

AI Clothes Remover
用於從照片中去除衣服的線上人工智慧工具。

Undress AI Tool
免費脫衣圖片

Clothoff.io
AI脫衣器

AI Hentai Generator
免費產生 AI 無盡。

熱門文章

熱工具

記事本++7.3.1
好用且免費的程式碼編輯器

SublimeText3漢化版
中文版,非常好用

禪工作室 13.0.1
強大的PHP整合開發環境

Dreamweaver CS6
視覺化網頁開發工具

SublimeText3 Mac版
神級程式碼編輯軟體(SublimeText3)

熱門話題
 適用於 Ubuntu 和 Debian 的 PHP 8.4 安裝和升級指南
Dec 24, 2024 pm 04:42 PM
PHP 8.4 帶來了多項新功能、安全性改進和效能改進,同時棄用和刪除了大量功能。 本指南介紹如何在 Ubuntu、Debian 或其衍生版本上安裝 PHP 8.4 或升級到 PHP 8.4
 如何設定 Visual Studio Code (VS Code) 進行 PHP 開發
Dec 20, 2024 am 11:31 AM
Visual Studio Code,也稱為 VS Code,是一個免費的原始碼編輯器 - 或整合開發環境 (IDE) - 可用於所有主要作業系統。 VS Code 擁有大量針對多種程式語言的擴展,可以輕鬆編寫
 您如何在PHP中解析和處理HTML/XML?
Feb 07, 2025 am 11:57 AM
本教程演示瞭如何使用PHP有效地處理XML文檔。 XML(可擴展的標記語言)是一種用於人類可讀性和機器解析的多功能文本標記語言。它通常用於數據存儲
 php程序在字符串中計數元音
Feb 07, 2025 pm 12:12 PM
字符串是由字符組成的序列,包括字母、數字和符號。本教程將學習如何使用不同的方法在PHP中計算給定字符串中元音的數量。英語中的元音是a、e、i、o、u,它們可以是大寫或小寫。 什麼是元音? 元音是代表特定語音的字母字符。英語中共有五個元音,包括大寫和小寫: a, e, i, o, u 示例 1 輸入:字符串 = "Tutorialspoint" 輸出:6 解釋 字符串 "Tutorialspoint" 中的元音是 u、o、i、a、o、i。總共有 6 個元
 在PHP API中說明JSON Web令牌(JWT)及其用例。
Apr 05, 2025 am 12:04 AM
JWT是一種基於JSON的開放標準,用於在各方之間安全地傳輸信息,主要用於身份驗證和信息交換。 1.JWT由Header、Payload和Signature三部分組成。 2.JWT的工作原理包括生成JWT、驗證JWT和解析Payload三個步驟。 3.在PHP中使用JWT進行身份驗證時,可以生成和驗證JWT,並在高級用法中包含用戶角色和權限信息。 4.常見錯誤包括簽名驗證失敗、令牌過期和Payload過大,調試技巧包括使用調試工具和日誌記錄。 5.性能優化和最佳實踐包括使用合適的簽名算法、合理設置有效期、
 解釋PHP中的晚期靜態綁定(靜態::)。
Apr 03, 2025 am 12:04 AM
靜態綁定(static::)在PHP中實現晚期靜態綁定(LSB),允許在靜態上下文中引用調用類而非定義類。 1)解析過程在運行時進行,2)在繼承關係中向上查找調用類,3)可能帶來性能開銷。
 什麼是PHP魔術方法(__ -construct,__destruct,__call,__get,__ set等)並提供用例?
Apr 03, 2025 am 12:03 AM
PHP的魔法方法有哪些? PHP的魔法方法包括:1.\_\_construct,用於初始化對象;2.\_\_destruct,用於清理資源;3.\_\_call,處理不存在的方法調用;4.\_\_get,實現動態屬性訪問;5.\_\_set,實現動態屬性設置。這些方法在特定情況下自動調用,提升代碼的靈活性和效率。


