python 操作sql
pymsql是Python中操作MySQL的模組,其使用方法和MySQLdb幾乎相同
一、下載安裝
pip3 install pymysql
二、作業使用
資料、建立新1、執行新資料、建立新自增ID#!/usr/bin/env python
# -*- coding:utf-8 -*-
import pymysql
# 创建连接
conn = pymysql.connect(host='127.0.0.1', port=3306, user='root', passwd='123', db='t1')
# 创建游标
cursor = conn.cursor()
# 执行SQL,并返回收影响行数
effect_row = cursor.execute("update hosts set host = '1.1.1.2'")
# 执行SQL,并返回受影响行数
#effect_row = cursor.execute("update hosts set host = '1.1.1.2' where nid > %s", (1,))
# 执行SQL,并返回受影响行数
#effect_row = cursor.executemany("insert into hosts(host,color_id)values(%s,%s)", [("1.1.1.11",1),("1.1.1.11",2)])
# 提交,不然无法保存新建或者修改的数据
conn.commit()
# 关闭游标
cursor.close()
# 关闭连接
conn.close()#!/usr/bin/env python
# -*- coding:utf-8 -*-
import pymysql
conn = pymysql.connect(host='127.0.0.1', port=3306, user='root', passwd='123', db='t1')
cursor = conn.cursor()
cursor.executemany("insert into hosts(host,color_id)values(%s,%s)", [("1.1.1.11",1),("1.1.1.11",2)])
conn.commit()
cursor.close()
conn.close()
# 获取最新自增ID
new_id = cursor.lastrowid#!/usr/bin/env python
# -*- coding:utf-8 -*-
import pymysql
conn = pymysql.connect(host='127.0.0.1', port=3306, user='root', passwd='123', db='t1')
cursor = conn.cursor()
cursor.execute("select * from hosts")
# 获取第一行数据
row_1 = cursor.fetchone()
# 获取前n行数据
# row_2 = cursor.fetchmany(3)
# 获取所有数据
# row_3 = cursor.fetchall()
conn.commit()
cursor.close()
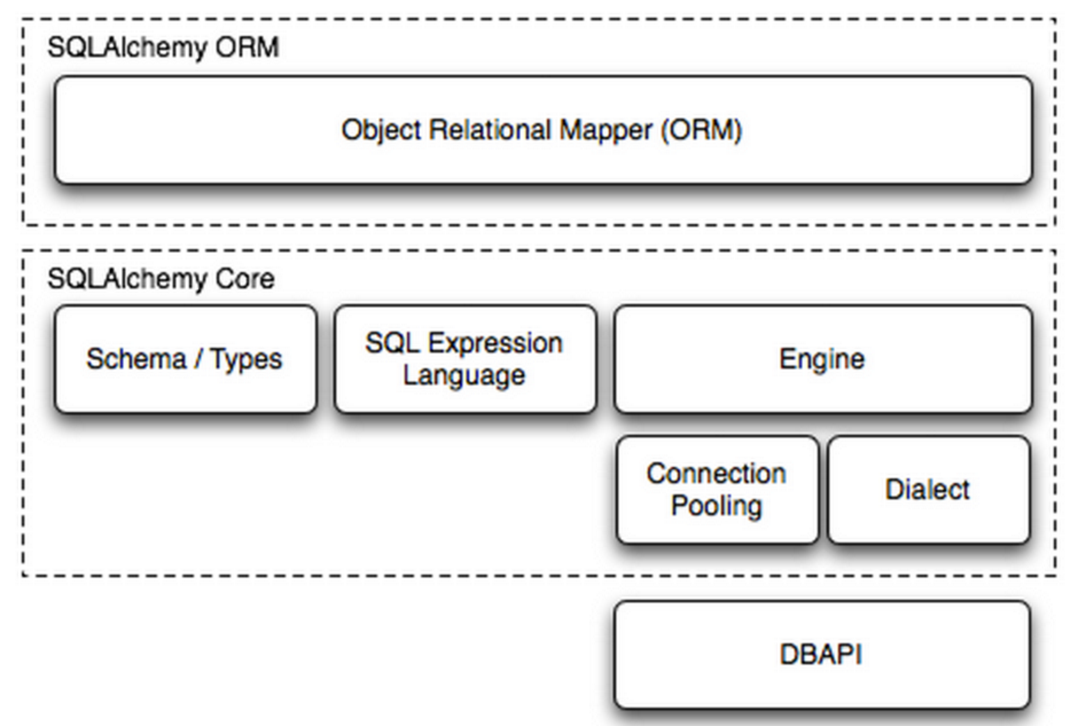
conn.close()SQLAlchemy本身無法操作資料庫,其必須以來pymsql等第三方插件,Dialect用於和資料API進行交流,根據配置文件的不同的資料庫API從而實現對資料庫的操作,如:
#!/usr/bin/env python
# -*- coding:utf-8 -*-
import pymysql

conn = pymysql.connect(host='127.0.0.1', port=3306, user='root', passwd='123', db='t1')

# 游标设置为字典类型
cursor = conn.cursor(cursor=pymysql.cursors.DictCursor)
r = cursor.execute("call p1()")

result = cursor.fetchone()

conn.commit()
cursor.close()
conn.close()MySQL-Python
mysql+mysqldb://<user>:<password>@<host>[:<port>]/<dbname>
pymysql
mysql+pymysql://<username>:<password>@<host>/<dbname>[?<options>]
MySQL-Connector
mysql+mysqlconnector://<user>:<password>@<host>[:<port>]/<dbname>
cx_Oracle
oracle+cx_oracle://user:pass@host:port/dbname[?key=value&key=value...]#!/usr/bin/env python
# -*- coding:utf-8 -*-
from sqlalchemy import create_engine
engine = create_engine("mysql+pymysql://root:123@127.0.0.1:3306/t1", max_overflow=5)
# 执行SQL
# cur = engine.execute(
# "INSERT INTO hosts (host, color_id) VALUES ('1.1.1.22', 3)"
# )
# 新插入行自增ID
# cur.lastrowid
# 执行SQL
# cur = engine.execute(
# "INSERT INTO hosts (host, color_id) VALUES(%s, %s)",[('1.1.1.22', 3),('1.1.1.221', 3),]
# )
# 执行SQL
# cur = engine.execute(
# "INSERT INTO hosts (host, color_id) VALUES (%(host)s, %(color_id)s)",
# host='1.1.1.99', color_id=3
# )
# 执行SQL
# cur = engine.execute('select * from hosts')
# 获取第一行数据
# cur.fetchone()
# 获取第n行数据
# cur.fetchmany(3)
# 获取所有数据
# cur.fetchall()#!/usr/bin/env python
# -*- coding:utf-8 -*-
from sqlalchemy.ext.declarative import declarative_base
from sqlalchemy import Column, Integer, String, ForeignKey, UniqueConstraint, Index
from sqlalchemy.orm import sessionmaker, relationship
from sqlalchemy import create_engine
engine = create_engine("mysql+pymysql://root:123@127.0.0.1:3306/t1", max_overflow=5)
Base = declarative_base()
# 创建单表
class Users(Base):
__tablename__ = 'users'
id = Column(Integer, primary_key=True)
name = Column(String(32))
extra = Column(String(16))
__table_args__ = (
UniqueConstraint('id', 'name', name='uix_id_name'),
Index('ix_id_name', 'name', 'extra'),
)
# 一对多
class Favor(Base):
__tablename__ = 'favor'
nid = Column(Integer, primary_key=True)
caption = Column(String(50), default='red', unique=True)
class Person(Base):
__tablename__ = 'person'
nid = Column(Integer, primary_key=True)
name = Column(String(32), index=True, nullable=True)
favor_id = Column(Integer, ForeignKey("favor.nid"))
# 多对多
class Group(Base):
__tablename__ = 'group'
id = Column(Integer, primary_key=True)
name = Column(String(64), unique=True, nullable=False)
port = Column(Integer, default=22)
class Server(Base):
__tablename__ = 'server'
id = Column(Integer, primary_key=True, autoincrement=True)
hostname = Column(String(64), unique=True, nullable=False)
class ServerToGroup(Base):
__tablename__ = 'servertogroup'
nid = Column(Integer, primary_key=True, autoincrement=True)
server_id = Column(Integer, ForeignKey('server.id'))
group_id = Column(Integer, ForeignKey('group.id'))
def init_db():
Base.metadata.create_all(engine)
def drop_db():
Base.metadata.drop_all(engine)
注:设置外检的另一种方式 ForeignKeyConstraint(['other_id'], ['othertable.other_id'])#!/usr/bin/env python
# -*- coding:utf-8 -*-
from sqlalchemy.ext.declarative import declarative_base
from sqlalchemy import Column, Integer, String, ForeignKey, UniqueConstraint, Index
from sqlalchemy.orm import sessionmaker, relationship
from sqlalchemy import create_engine
engine = create_engine("mysql+pymysql://root:123@127.0.0.1:3306/t1", max_overflow=5)
Base = declarative_base()
# 创建单表
class Users(Base):
__tablename__ = 'users'
id = Column(Integer, primary_key=True)
name = Column(String(32))
extra = Column(String(16))
__table_args__ = (
UniqueConstraint('id', 'name', name='uix_id_name'),
Index('ix_id_name', 'name', 'extra'),
)
def __repr__(self):
return "%s-%s" %(self.id, self.name)
# 一对多
class Favor(Base):
__tablename__ = 'favor'
nid = Column(Integer, primary_key=True)
caption = Column(String(50), default='red', unique=True)
def __repr__(self):
return "%s-%s" %(self.nid, self.caption)
class Person(Base):
__tablename__ = 'person'
nid = Column(Integer, primary_key=True)
name = Column(String(32), index=True, nullable=True)
favor_id = Column(Integer, ForeignKey("favor.nid"))
# 与生成表结构无关,仅用于查询方便
favor = relationship("Favor", backref='pers')
# 多对多
class ServerToGroup(Base):
__tablename__ = 'servertogroup'
nid = Column(Integer, primary_key=True, autoincrement=True)
server_id = Column(Integer, ForeignKey('server.id'))
group_id = Column(Integer, ForeignKey('group.id'))
group = relationship("Group", backref='s2g')
server = relationship("Server", backref='s2g')
class Group(Base):
__tablename__ = 'group'
id = Column(Integer, primary_key=True)
name = Column(String(64), unique=True, nullable=False)
port = Column(Integer, default=22)
# group = relationship('Group',secondary=ServerToGroup,backref='host_list')
class Server(Base):
__tablename__ = 'server'
id = Column(Integer, primary_key=True, autoincrement=True)
hostname = Column(String(64), unique=True, nullable=False)
def init_db():
Base.metadata.create_all(engine)
def drop_db():
Base.metadata.drop_all(engine)
Session = sessionmaker(bind=engine)
session = Session()obj = Users(name="alex0", extra='sb')
session.add(obj)
session.add_all([
Users(name="alex1", extra='sb'),
Users(name="alex2", extra='sb'),
])
session.commit()session.query(Users).filter(Users.id > 2).delete() session.commit()
session.query(Users).filter(Users.id > 2).update({"name" : "099"})
session.query(Users).filter(Users.id > 2).update({Users.name: Users.name + "099"}, synchronize_session=False)
session.query(Users).filter(Users.id > 2).update({"num": Users.num + 1}, synchronize_session="evaluate")
session.commit()ret = session.query(Users).all() ret = session.query(Users.name, Users.extra).all() ret = session.query(Users).filter_by(name='alex').all() ret = session.query(Users).filter_by(name='alex').first()

熱AI工具

Undresser.AI Undress
人工智慧驅動的應用程序,用於創建逼真的裸體照片

AI Clothes Remover
用於從照片中去除衣服的線上人工智慧工具。

Undress AI Tool
免費脫衣圖片

Clothoff.io
AI脫衣器

Video Face Swap
使用我們完全免費的人工智慧換臉工具,輕鬆在任何影片中換臉!

熱門文章

熱工具

記事本++7.3.1
好用且免費的程式碼編輯器

SublimeText3漢化版
中文版,非常好用

禪工作室 13.0.1
強大的PHP整合開發環境

Dreamweaver CS6
視覺化網頁開發工具

SublimeText3 Mac版
神級程式碼編輯軟體(SublimeText3)
 PHP和Python:解釋了不同的範例
Apr 18, 2025 am 12:26 AM
PHP主要是過程式編程,但也支持面向對象編程(OOP);Python支持多種範式,包括OOP、函數式和過程式編程。 PHP適合web開發,Python適用於多種應用,如數據分析和機器學習。
 在PHP和Python之間進行選擇:指南
Apr 18, 2025 am 12:24 AM
PHP適合網頁開發和快速原型開發,Python適用於數據科學和機器學習。 1.PHP用於動態網頁開發,語法簡單,適合快速開發。 2.Python語法簡潔,適用於多領域,庫生態系統強大。
 sublime怎麼運行代碼python
Apr 16, 2025 am 08:48 AM
在 Sublime Text 中運行 Python 代碼,需先安裝 Python 插件,再創建 .py 文件並編寫代碼,最後按 Ctrl B 運行代碼,輸出會在控制台中顯示。
 Python vs. JavaScript:學習曲線和易用性
Apr 16, 2025 am 12:12 AM
Python更適合初學者,學習曲線平緩,語法簡潔;JavaScript適合前端開發,學習曲線較陡,語法靈活。 1.Python語法直觀,適用於數據科學和後端開發。 2.JavaScript靈活,廣泛用於前端和服務器端編程。
 PHP和Python:深入了解他們的歷史
Apr 18, 2025 am 12:25 AM
PHP起源於1994年,由RasmusLerdorf開發,最初用於跟踪網站訪問者,逐漸演變為服務器端腳本語言,廣泛應用於網頁開發。 Python由GuidovanRossum於1980年代末開發,1991年首次發布,強調代碼可讀性和簡潔性,適用於科學計算、數據分析等領域。
 Golang vs. Python:性能和可伸縮性
Apr 19, 2025 am 12:18 AM
Golang在性能和可擴展性方面優於Python。 1)Golang的編譯型特性和高效並發模型使其在高並發場景下表現出色。 2)Python作為解釋型語言,執行速度較慢,但通過工具如Cython可優化性能。
 vscode在哪寫代碼
Apr 15, 2025 pm 09:54 PM
在 Visual Studio Code(VSCode)中編寫代碼簡單易行,只需安裝 VSCode、創建項目、選擇語言、創建文件、編寫代碼、保存並運行即可。 VSCode 的優點包括跨平台、免費開源、強大功能、擴展豐富,以及輕量快速。
 notepad 怎麼運行python
Apr 16, 2025 pm 07:33 PM
在 Notepad 中運行 Python 代碼需要安裝 Python 可執行文件和 NppExec 插件。安裝 Python 並為其添加 PATH 後,在 NppExec 插件中配置命令為“python”、參數為“{CURRENT_DIRECTORY}{FILE_NAME}”,即可在 Notepad 中通過快捷鍵“F6”運行 Python 代碼。


