分分鐘帶你玩Vue.js組件
元件簡介
元件系統是Vue.js其中一個重要的概念,它提供了一種抽象,讓我們可以使用獨立可重複使用的小元件來建立大型應用,任意類型的應用介面都可以抽象化為一個組件樹:
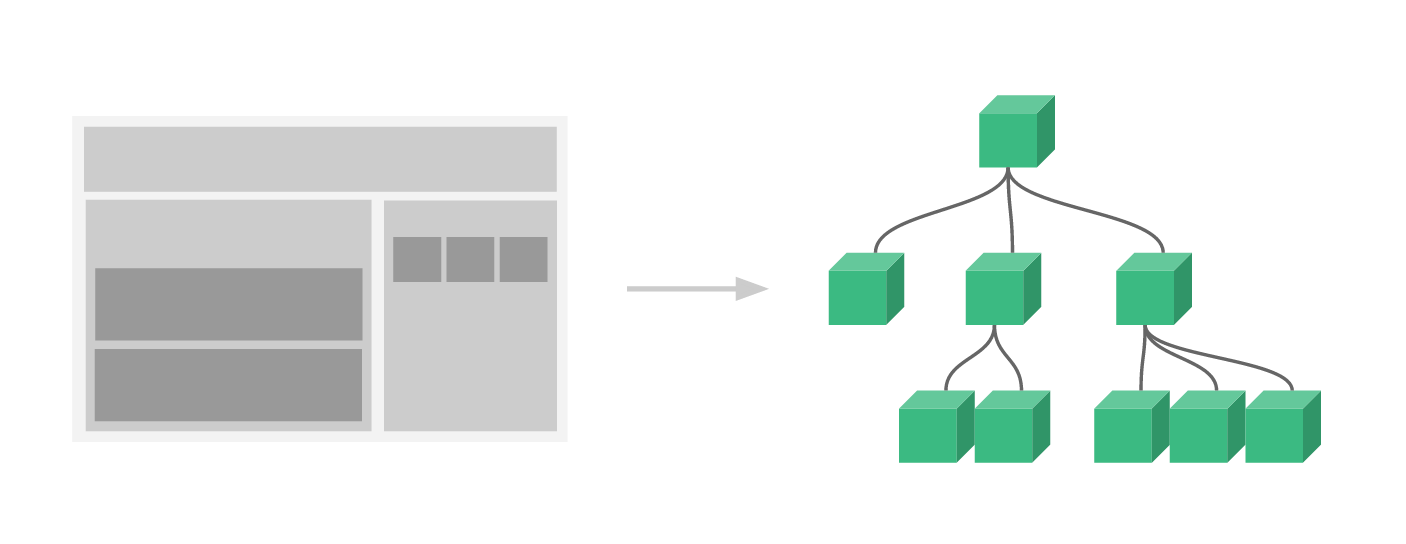
那麼什麼是組件呢?
元件可以擴充HTML元素,封裝可重複使用的HTML程式碼,我們可以將元件視為自訂的HTML元素。
元件的建立和註冊
基本步驟
Vue.js的元件的使用有3個步驟:建立元件建構器、註冊元件和使用元件。
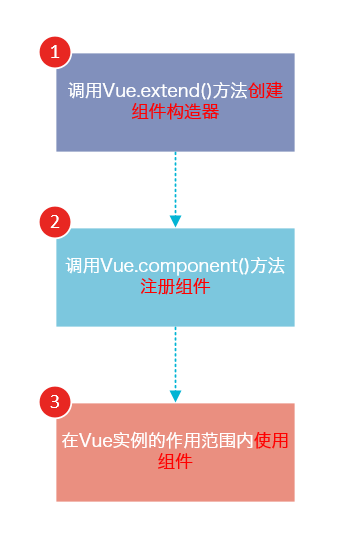
下面的程式碼示範了這3個步驟:
<!DOCTYPE html>
<html>
<body>
<p id="app">
<!-- 3. #app是Vue实例挂载的元素,应该在挂载元素范围内使用组件-->
<my-component></my-component>
</p>
</body>
<script src="js/vue.js"></script>
<script>
// 1.创建一个组件构造器
var myComponent = Vue.extend({
template: '<p>This is my first component!</p>'
})
// 2.注册组件,并指定组件的标签,组件的HTML标签为<my-component>
Vue.component('my-component', myComponent)
new Vue({
el: '#app'
});
</script>
</html>運作結果如下:

可以看到,使用元件和使用普通的HTML元素沒什麼區別。
理解組件的創建和註冊
我們用以下幾個步驟來理解組件的創建和註冊:
1. Vue.extend()是Vue構造器的擴展,調用Vue.extend()創建的是一個組件構造器,而不是一個特定的組件實例。
2. Vue.extend()建構器有一個選項對象,選項對象的template屬性用來定義元件要渲染的HTML。
3. 使用Vue.component()註冊元件時,需提供2個參數,第1個參數時元件的標籤,第2個參數是元件建構器。
4. Vue.component()方法內部會呼叫元件建構器,建立一個元件實例。
5. 元件應該掛載到某個Vue實例下,否則它不會生效。
請注意第5點,以下程式碼在3個地方使用了my-component標籤,但只有#app1和#app2下的my-component標籤才發揮作用。
<!DOCTYPE html>
<html>
<body>
<p id="app1">
<my-component></my-component>
</p>
<p id="app2">
<my-component></my-component>
</p>
<!--该组件不会被渲染-->
<my-component></my-component>
</body>
<script src="js/vue.js"></script>
<script>
var myComponent = Vue.extend({
template: '<p>This is a component!</p>'
})
Vue.component('my-component', myComponent)
var app1 = new Vue({
el: '#app1'
});
var app2 = new Vue({
el: '#app2'
})
</script>
</html>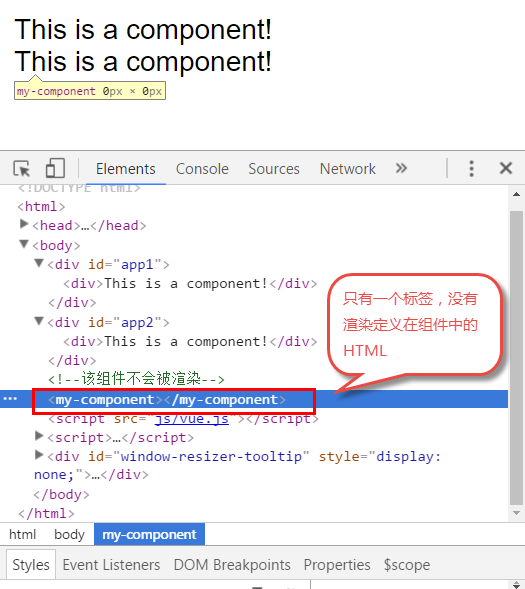
全域註冊和局部註冊
呼叫Vue.component()註冊元件時,元件的註冊是全域的,這表示該元件可以在任意Vue範例下使用。
如果不需要全域註冊,或是讓元件使用在其它元件內,可以用選項物件的components屬性實現局部註冊。
上面的範例可以改為局部註冊的方式:
<!DOCTYPE html>
<html>
<body>
<p id="app">
<!-- 3. my-component只能在#app下使用-->
<my-component></my-component>
</p>
</body>
<script src="js/vue.js"></script>
<script>
// 1.创建一个组件构造器
var myComponent = Vue.extend({
template: '<p>This is my first component!</p>'
})
new Vue({
el: '#app',
components: {
// 2. 将myComponent组件注册到Vue实例下
'my-component' : myComponent
}
});
</script>
</html>
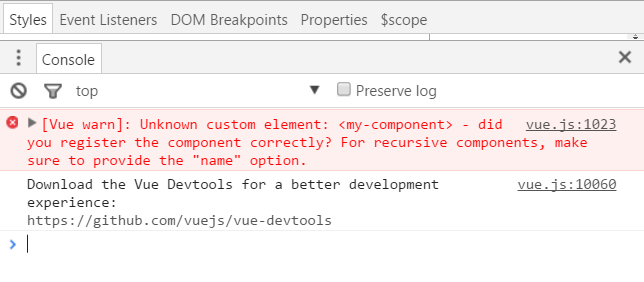
由于my-component组件是注册在#app元素对应的Vue实例下的,所以它不能在其它Vue实例下使用。
<p id="app2">
<!-- 不能使用my-component组件,因为my-component是一个局部组件,它属于#app-->
<my-component></my-component>
</p>
<script>
new Vue({
el: '#app2'
});
</script>如果你這樣做了,瀏覽器會提示一個錯誤:
父組件和子組件
我們可以在組件中定義並使用其他元件中定義並使用其他元件,這就構成了父子組件的關係。
<!DOCTYPE html>
<html>
<body>
<p id="app">
<parent-component>
</parent-component>
</p>
</body>
<script src="js/vue.js"></script>
<script>
var Child = Vue.extend({
template: '<p>This is a child component!</p>'
})
var Parent = Vue.extend({
// 在Parent组件内使用<child-component>标签
template :'<p>This is a Parent component</p><child-component></child-component>',
components: {
// 局部注册Child组件,该组件只能在Parent组件内使用
'child-component': Child
}
})
// 全局注册Parent组件
Vue.component('parent-component', Parent)
new Vue({
el: '#app'
})
</script>
</html>這段程式碼的運作結果如下:
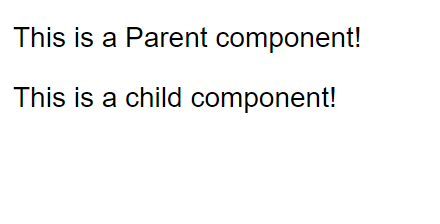
我們分幾個步驟來理解這段程式碼:
我們分幾個步驟來理解這段程式碼:
var Child = Vue.extend(…)定义一了个Child组件构造器
var Parent = Vue.extend(…)定义一个Parent组件构造器
components: { ‘child-component': Child },将Child组件注册到Parent组件,
并将Child组件的标签设置为child-component。
template :'<p>This is a Parent component</p>
<child-component></child-component>',在Parent组件内以标签的形式使用Child组件。
Vue.component(‘parent-component', Parent) 全局注册Parent组件在頁面中使用標籤渲染Parent元件的內容,同時Child元件的內容也被渲染出來
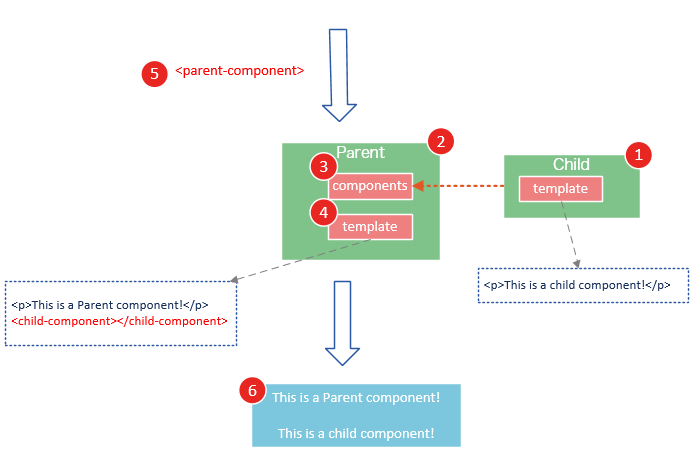
Child元件是在Parent元件中註冊的,它只能在Parent元件中使用,確切地說:子元件只能在父元件的template中使用。
請注意以下兩種子組件的使用方式是錯誤的:
1. 以子標籤的形式在父組件中使用
<p id="app">
 <parent-component>
 <child-component></child-component>
 </parent-component>
</p>
為什麼這種方式無效呢?因為當子元件註冊到父元件時,Vue.js會編譯好父元件的模板,模板的內容已經決定了父元件將要渲染的HTML。
parent-component相當於運行時,它的一些子標籤只會被當作普通的HTML來執行,child-component不是標準的HTML標籤,會被瀏覽器直接忽視掉。
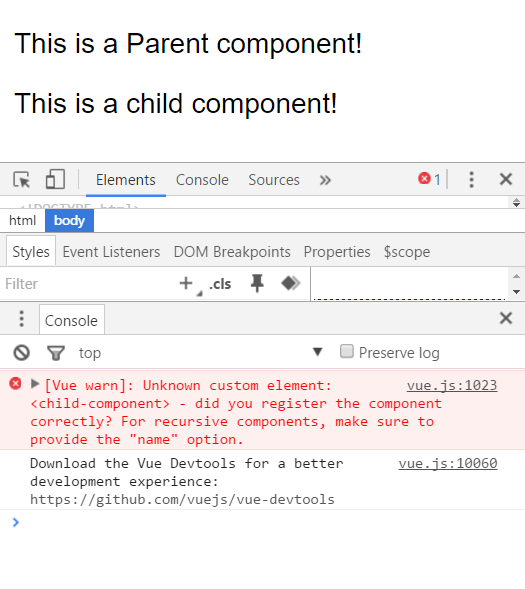
2. 在父元件標籤外使用子元件
<p id="app">
 <parent-component>
 </parent-component>
 <child-component>
 </child-component>
</p>
執行這段程式碼,瀏覽器會提示以下錯誤
元件註冊語法糖
以上元件註冊的方式有些繁瑣,Vue.js這個過程,提供了註冊語法糖。
使用Vue.component()直接建立和註冊元件:
// 全局注册,my-component1是标签名称
Vue.component('my-component1',{
template: '<p>This is the first component!</p>'
})
var vm1 = new Vue({
el: '#app1'
})Vue.component()的第1個參數是標籤名稱,第2個參數是一個選項對象,使用選項對象的template屬性定義元件模板。
使用這種方式,Vue在背後會自動地呼叫Vue.extend()。
在選項物件的components屬性中實現局部註冊:
var vm2 = new Vue({
el: '#app2',
components: {
// 局部注册,my-component2是标签名称
'my-component2': {
template: '<p>This is the second component!</p>'
},
// 局部注册,my-component3是标签名称
'my-component3': {
template: '<p>This is the third component!</p>'
}
}
})使用script或template標籤
尽管语法糖简化了组件注册,但在template选项中拼接HTML元素比较麻烦,这也导致了HTML和JavaScript的高耦合性。
庆幸的是,Vue.js提供了两种方式将定义在JavaScript中的HTML模板分离出来
使用script标签
<!DOCTYPE html>
<html>
<body>
<p id="app">
<my-component></my-component>
</p>
<script type="text/x-template" id="myComponent">
<p>This is a component!</p>
</script>
</body>
<script src="js/vue.js"></script>
<script>
Vue.component('my-component',{
template: '#myComponent'
})
new Vue({
el: '#app'
})
</script>
</html>template选项现在不再是HTML元素,而是一个id,Vue.js根据这个id查找对应的元素,然后将这个元素内的HTML作为模板进行编译。
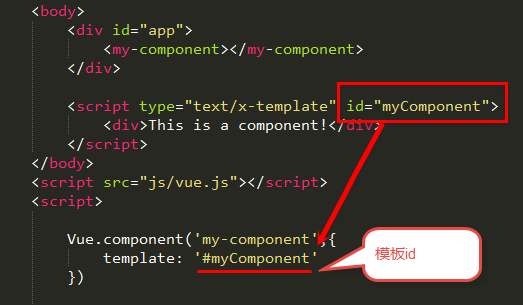
注意:使用script标签时,type指定为text/x-template,意在告诉浏览器这不是一段js脚本,浏览器在解析HTML文档时会忽略script标签内定义的内容。

使用template标签
如果使用template>标签,则不需要指定type属性。
<!DOCTYPE html>
<html>
<head>
<meta charset="UTF-8">
<title></title>
</head>
<body>
<p id="app">
<my-component></my-component>
</p>
<template id="myComponent">
<p>This is a component!</p>
</template>
</body>
<script src="js/vue.js"></script>
<script>
Vue.component('my-component',{
template: '#myComponent'
})
new Vue({
el: '#app'
})
</script>
</html>在理解了组件的创建和注册过程后,我建议使用script>或template>标签来定义组件的HTML模板。
这使得HTML代码和JavaScript代码是分离的,便于阅读和维护。
另外,在Vue.js中,可创建.vue后缀的文件,在.vue文件中定义组件,这个内容我会在后面的文章介绍
组件的el和data选项
传入Vue构造器的多数选项也可以用在 Vue.extend() 或Vue.component()中,不过有两个特例: data 和el。
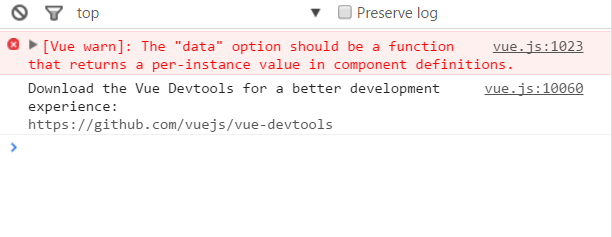
Vue.js规定:在定义组件的选项时,data和el选项必须使用函数。
下面的代码在执行时,浏览器会提出一个错误
Vue.component('my-component', {
 data: {
 a: 1
 }
}) 
另外,如果data选项指向某个对象,这意味着所有的组件实例共用一个data。
我们应当使用一个函数作为 data 选项,让这个函数返回一个新对象:
Vue.component('my-component', {
 data: function(){
 return {a : 1}
 }
})
使用props
组件实例的作用域是孤立的。这意味着不能并且不应该在子组件的模板内直接引用父组件的数据。可以使用 props 把数据传给子组件。
props基础示例
下面的代码定义了一个子组件my-component,在Vue实例中定义了data选项。
var vm = new Vue({
 el: '#app',
 data: {
 name: 'keepfool',
 age: 28
 },
 components: {
 'my-component': {
  template: '#myComponent',
  props: ['myName', 'myAge']
 }
 }
})为了便于理解,你可以将这个Vue实例看作my-component的父组件。
如果我们想使用父组件的数据,则必须先在子组件中定义props属性,也就是props: [‘myName', ‘myAge']这行代码。
定义子组件的HTML模板:
 <template id="myComponent">
 <table>
 <tr>
  <th colspan="2">
  子组件数据
  </th>
 </tr>
 <tr>
  <td>my name</td>
  <td>{{ myName }}</td>
 </tr>
 <tr>
  <td>my age</td>
  <td>{{ myAge }}</td>
 </tr>
 </table>
</template>将父组件数据通过已定义好的props属性传递给子组件:
<p id="app">
 <my-component v-bind:my-name="name" v-bind:my-age="age"></my-component>
</p>
注意:在子组件中定义prop时,使用了camelCase命名法。由于HTML特性不区分大小写,camelCase的prop用于特性时,需要转为 kebab-case(短横线隔开)。例如,在prop中定义的myName,在用作特性时需要转换为my-name。
这段程序的运行结果如下:

父组件是如何将数据传给子组件的呢?相信看了下面这图,也许你就能很好地理解了。
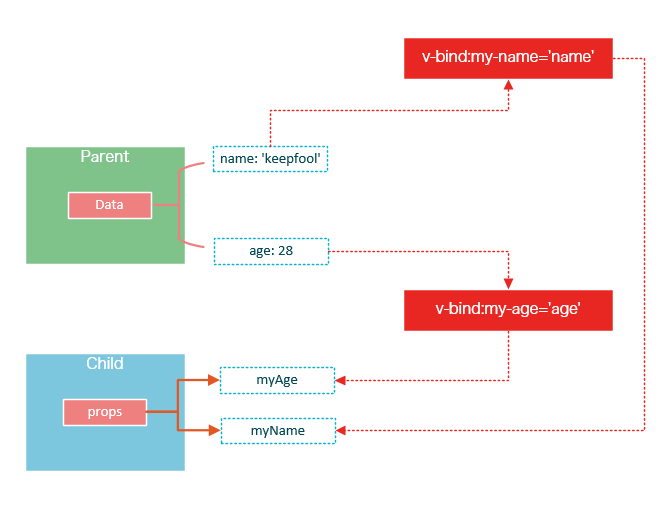
在父组件中使用子组件时,通过以下语法将数据传递给子组件:
<child-component v-bind:子组件prop="父组件数据属性"></child-component>
prop的绑定类型
单向绑定
既然父组件将数据传递给了子组件,那么如果子组件修改了数据,对父组件是否会有所影响呢?
我们将子组件模板和页面HTML稍作更改:
<p id="app">

 <table>
  <tr>
   <th colspan="3">父组件数据</td>
  </tr>
  <tr>
   <td>name</td>
   <td>{{ name }}</td>
   <td><input type="text" v-model="name" /></td>
  </tr>
  <tr>
   <td>age</td>
   <td>{{ age }}</td>
   <td><input type="text" v-model="age" /></td>
  </tr>
 </table>

 <my-component v-bind:my-name="name" v-bind:my-age="age"></my-component>
</p>

<template id="myComponent">
 <table>
  <tr>
   <th colspan="3">子组件数据</td>
  </tr>
  <tr>
   <td>my name</td>
   <td>{{ myName }}</td>
   <td><input type="text" v-model="myName" /></td>
  </tr>
  <tr>
   <td>my age</td>
   <td>{{ myAge }}</td>
   <td><input type="text" v-model="myAge" /></td>
  </tr>
 </table>
</template>运行这个页面,我们做两个小试验:
1. 在页面上修改子组件的数据
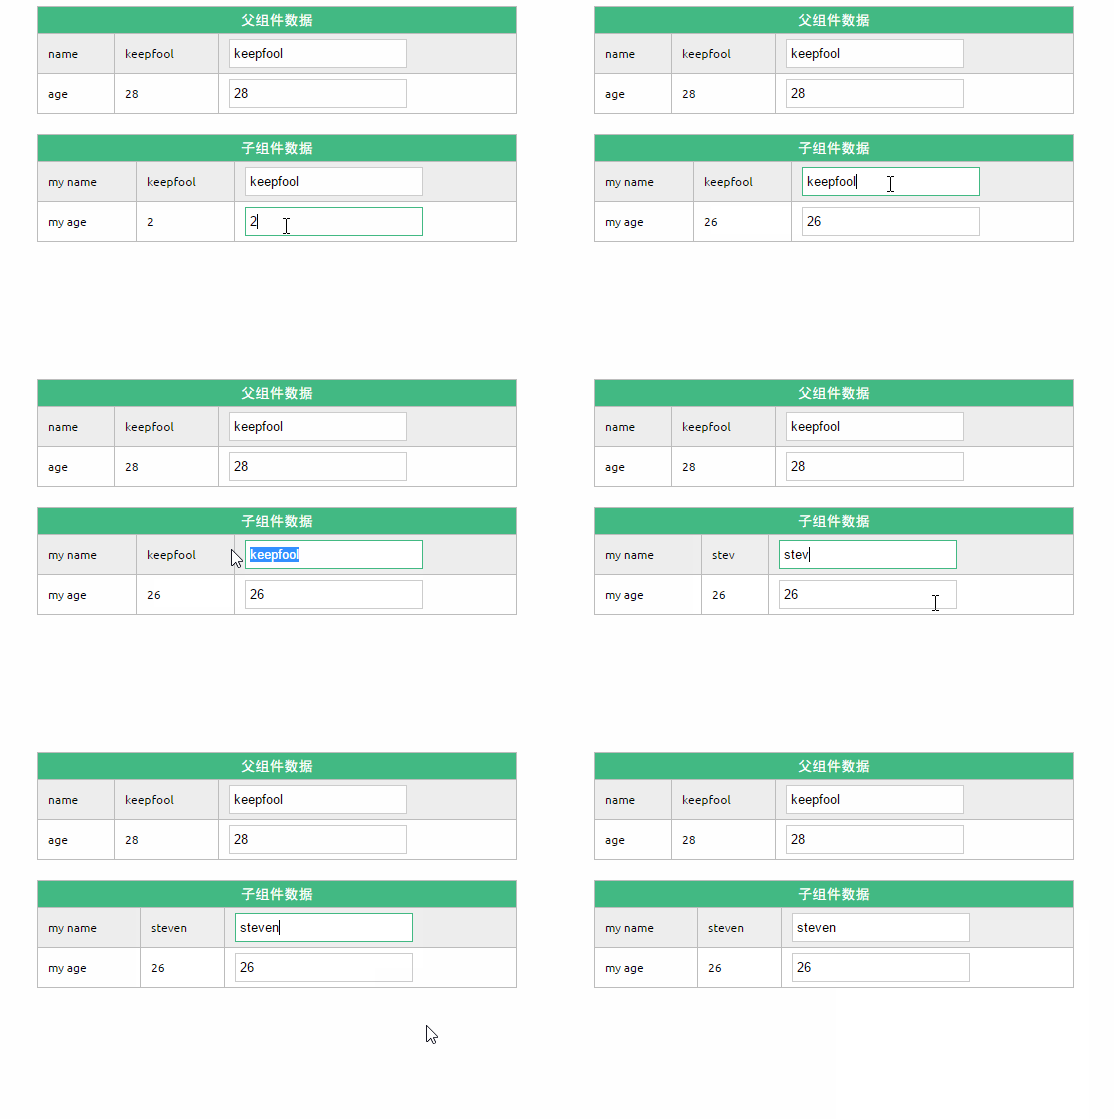
修改了子组件的数据,没有影响父组件的数据。
2. 在页面上修改父组件的数据
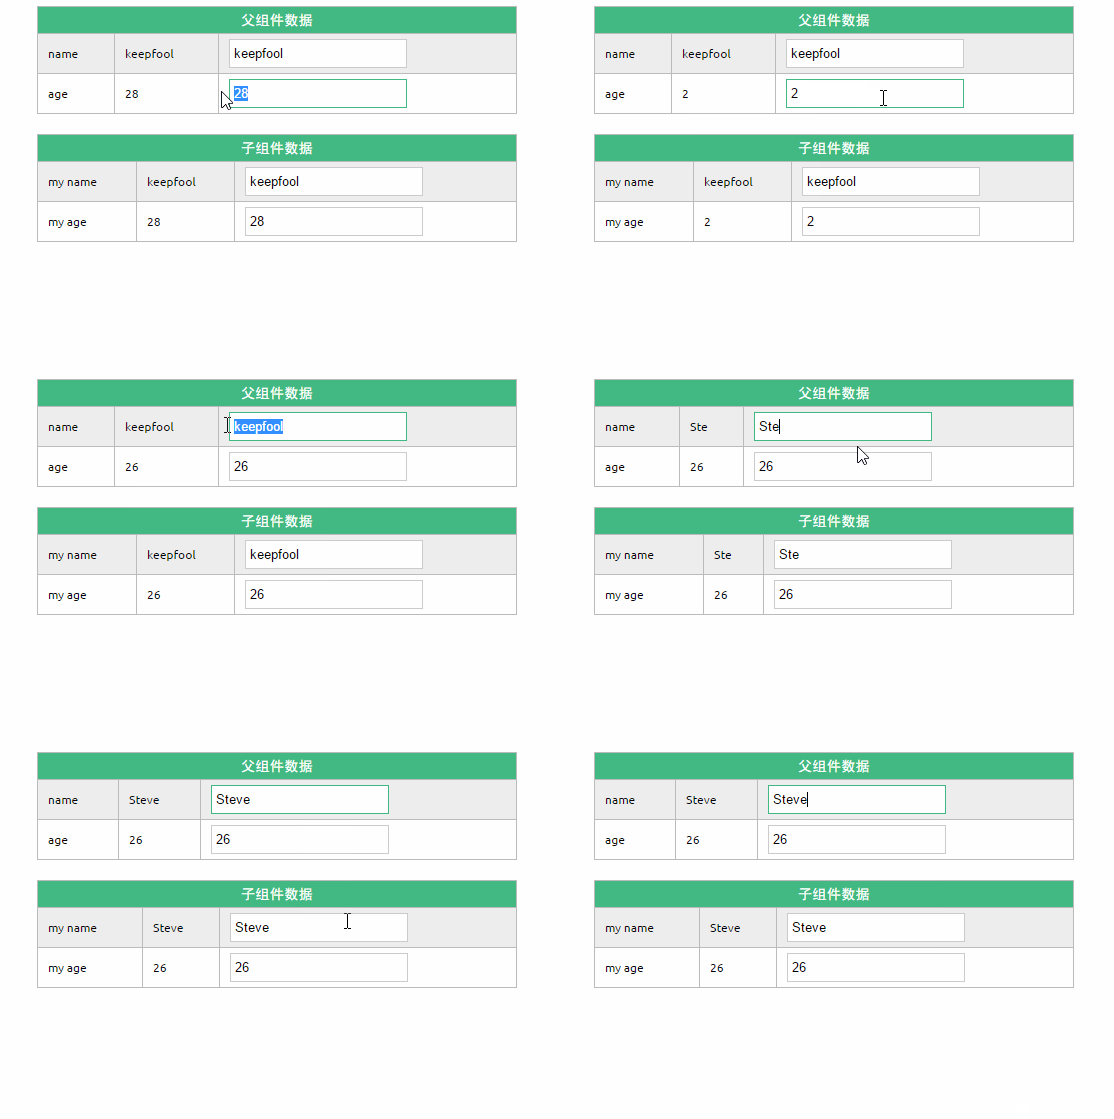
修改了父组件的数据,同时影响了子组件。
prop默认是单向绑定:当父组件的属性变化时,将传导给子组件,但是反过来不会。这是为了防止子组件无意修改了父组件的状态
双向绑定
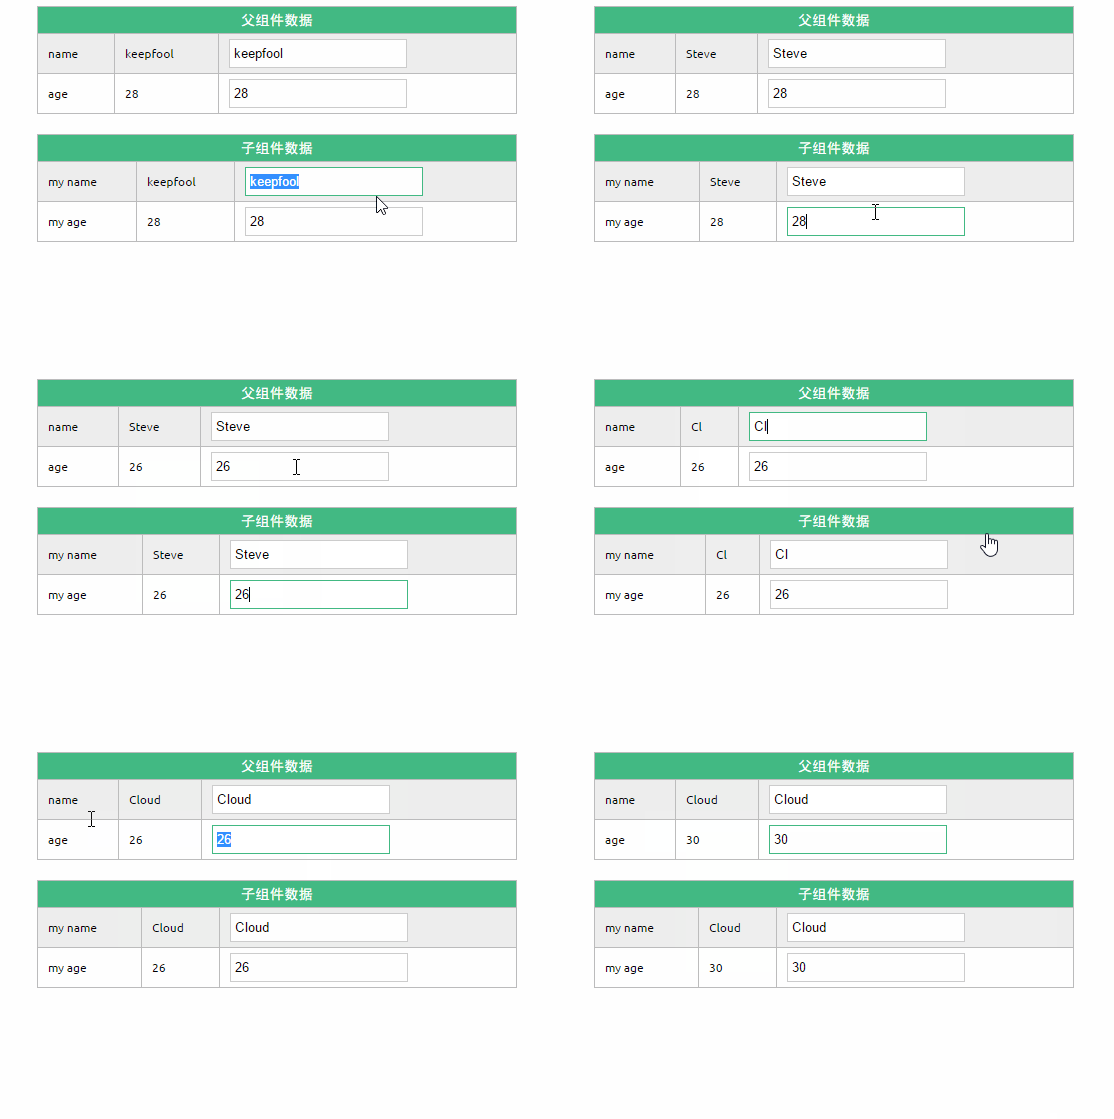
可以使用.sync显式地指定双向绑定,这使得子组件的数据修改会回传给父组件。
单次绑定
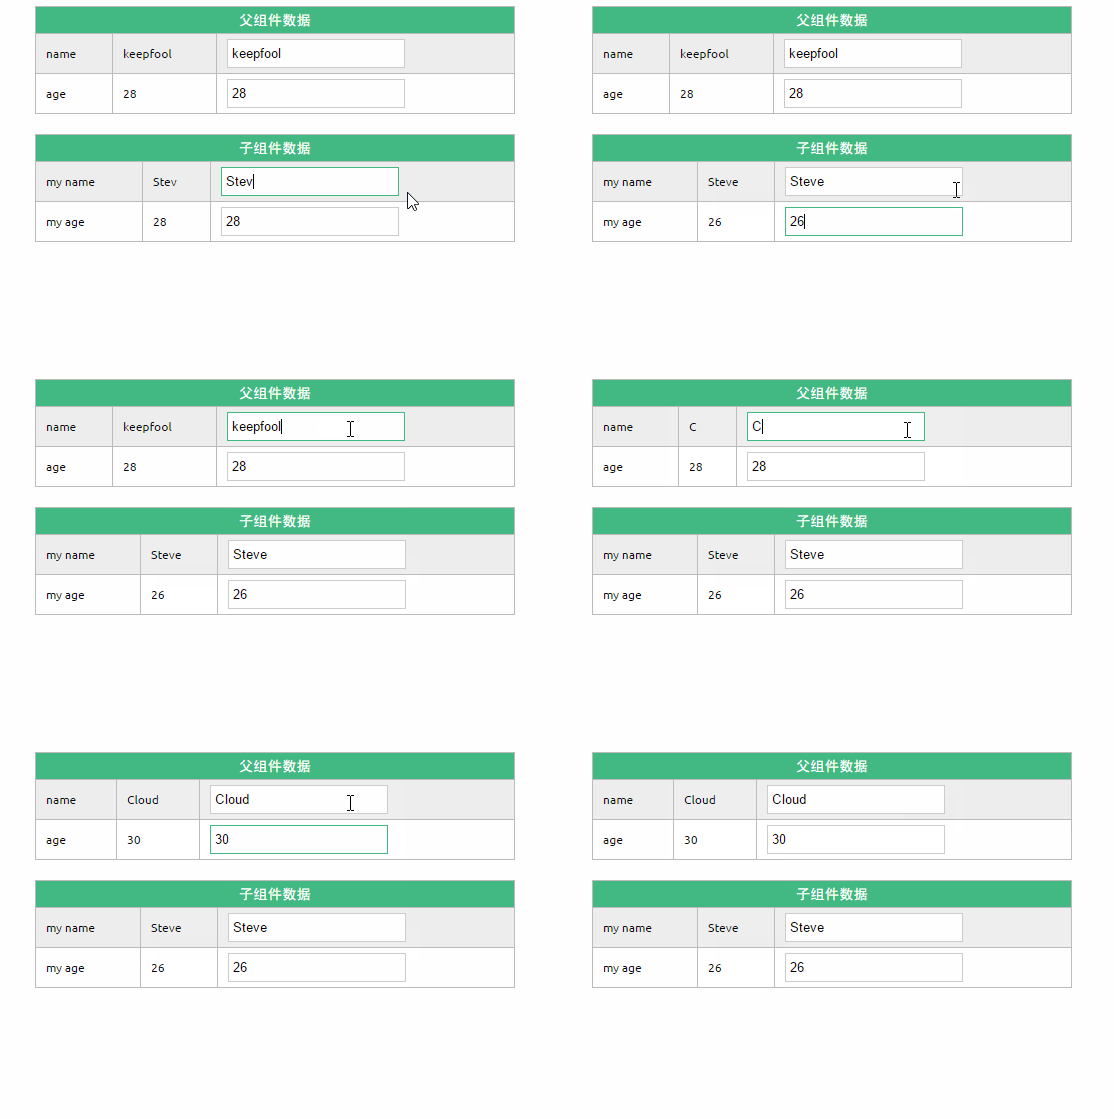
可以使用.once显式地指定单次绑定,单次绑定在建立之后不会同步之后的变化,这意味着即使父组件修改了数据,也不会传导给子组件。
示例
为了尽快消化这些知识,我们来做一个小示例吧。
<!DOCTYPE html>
<html>
<head>
<meta charset="UTF-8">
<title></title>
<link rel="stylesheet" href="styles/demo.css" />
</head>
<body>
<p id="app">
<p id="searchBar">
Search <input type="text" v-model="searchQuery" />
</p>
<simple-grid :data="gridData" :columns="gridColumns" :filter-key="searchQuery">
</simple-grid>
</p>
<template id="grid-template">
<table>
<thead>
<tr>
<th v-for="col in columns">
{{ col | capitalize}}
</th>
</tr>
</thead>
<tbody>
<tr v-for="entry in data | filterBy filterKey">
<td v-for="col in columns">
{{entry[col]}}
</td>
</tr>
</tbody>
</table>
</template>
</body>
<script src="js/vue.js"></script>
<script>
Vue.component('simple-grid', {
template: '#grid-template',
props: {
 data: Array,
 columns: Array,
 filterKey: String
}
})
var demo = new Vue({
el: '#app',
data: {
searchQuery: '',
gridColumns: ['name', 'age', 'sex'],
gridData: [{
name: 'Jack',
age: 30,
sex: 'Male'
}, {
name: 'Bill',
age: 26,
sex: 'Male'
}, {
name: 'Tracy',
age: 22,
sex: 'Female'
}, {
name: 'Chris',
age: 36,
sex: 'Male'
}]
}
})
</script>
</html>
除了以上介绍的知识点,这个示例还用到了两个知识点:
1. prop验证
props: {
data: Array,
columns: Array,
filterKey: String
}
这段代码表示:父组件传递过来的data和columns必须是Array类型,filterKey必须是字符串类型。
更多prop验证的介绍,请参考:官方文档prop验证
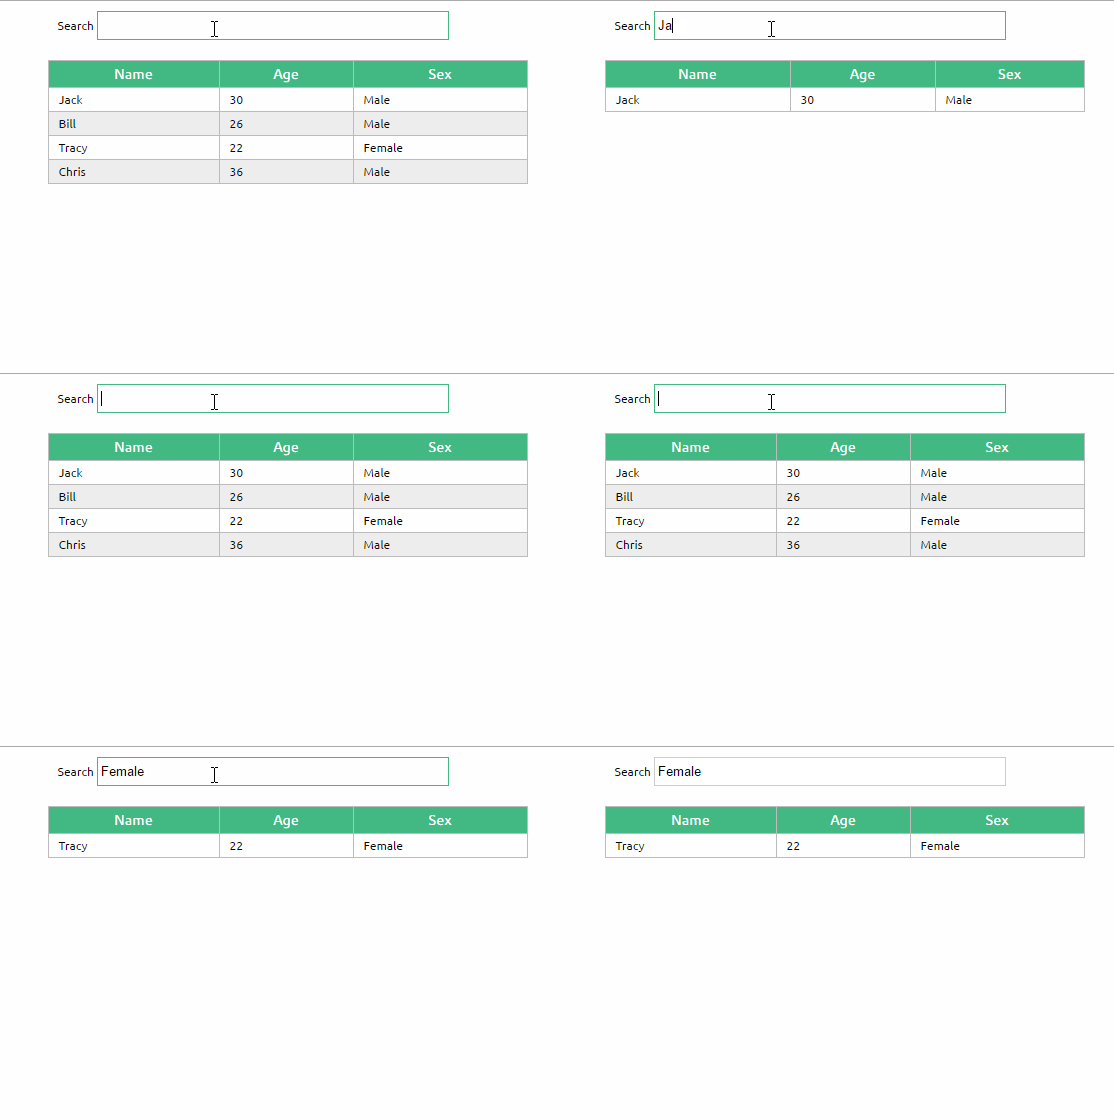
2. filterBy过滤器
可以根据指定的字符串过滤数据。
总结
使用组件的前提是创建并注册组件,本篇文章详细介绍了组件从创建到使用的步骤,并介绍了几种不同的方式去创建和注册组件;然后介绍了组件的props选项,它用于将父组件的数据传递给子组件,最后我们用一个小的示例演示了这些知识点。
相关文章:

熱AI工具

Undresser.AI Undress
人工智慧驅動的應用程序,用於創建逼真的裸體照片

AI Clothes Remover
用於從照片中去除衣服的線上人工智慧工具。

Undress AI Tool
免費脫衣圖片

Clothoff.io
AI脫衣器

AI Hentai Generator
免費產生 AI 無盡。

熱門文章

熱工具

記事本++7.3.1
好用且免費的程式碼編輯器

SublimeText3漢化版
中文版,非常好用

禪工作室 13.0.1
強大的PHP整合開發環境

Dreamweaver CS6
視覺化網頁開發工具

SublimeText3 Mac版
神級程式碼編輯軟體(SublimeText3)

熱門話題
 vue.js怎麼引用js文件
Apr 07, 2025 pm 11:27 PM
在 Vue.js 中引用 JS 文件的方法有三種:直接使用 <script> 標籤指定路徑;利用 mounted() 生命週期鉤子動態導入;通過 Vuex 狀態管理庫進行導入。
 vue怎麼給按鈕添加函數
Apr 08, 2025 am 08:51 AM
可以通過以下步驟為 Vue 按鈕添加函數:將 HTML 模板中的按鈕綁定到一個方法。在 Vue 實例中定義該方法並編寫函數邏輯。
 vue中的watch怎麼用
Apr 07, 2025 pm 11:36 PM
Vue.js 中的 watch 選項允許開發者監聽特定數據的變化。當數據發生變化時,watch 會觸發一個回調函數,用於執行更新視圖或其他任務。其配置選項包括 immediate,用於指定是否立即執行回調,以及 deep,用於指定是否遞歸監聽對像或數組的更改。
 vue中怎麼用bootstrap
Apr 07, 2025 pm 11:33 PM
在 Vue.js 中使用 Bootstrap 分為五個步驟:安裝 Bootstrap。在 main.js 中導入 Bootstrap。直接在模板中使用 Bootstrap 組件。可選:自定義樣式。可選:使用插件。
 vue返回上一頁的方法
Apr 07, 2025 pm 11:30 PM
Vue.js 返回上一頁有四種方法:$router.go(-1)$router.back()使用 <router-link to="/"> 組件window.history.back(),方法選擇取決於場景。
 Vue 實現跑馬燈/文字滾動效果
Apr 07, 2025 pm 10:51 PM
在 Vue 中實現跑馬燈/文字滾動效果,可以使用 CSS 動畫或第三方庫。本文介紹了使用 CSS 動畫的方法:創建滾動文本,用 <div> 包裹文本。定義 CSS 動畫,設置 overflow: hidden、width 和 animation。定義關鍵幀,設置動畫開始和結束時的 transform: translateX()。調整動畫屬性,如持續時間、滾動速度和方向。
 怎樣查詢vue的版本
Apr 07, 2025 pm 11:24 PM
可以通過以下方法查詢 Vue 版本:使用 Vue Devtools 在瀏覽器的控制台中查看“Vue”選項卡。使用 npm 運行“npm list -g vue”命令。在 package.json 文件的“dependencies”對像中查找 Vue 項。對於 Vue CLI 項目,運行“vue --version”命令。檢查 HTML 文件中引用 Vue 文件的 <script> 標籤中的版本信息。
 vue遍歷怎麼用
Apr 07, 2025 pm 11:48 PM
Vue.js 遍歷數組和對像有三種常見方法:v-for 指令用於遍歷每個元素並渲染模板;v-bind 指令可與 v-for 一起使用,為每個元素動態設置屬性值;.map 方法可將數組元素轉換為新數組。


