Android使用DrawerLayout實現仿QQ雙向側滑選單
1、概述
之前寫了一個Android 高仿QQ5.0 側滑選單效果自訂控制來襲,恰逢QQ5.2又加了一個右側選單,剛好好看了下DrawerLayout,一方面官方的東西,我都比較感興趣;另一方面,這玩意用起來的確方便,於是簡單寫了個demo,高仿QQ5.2雙向側滑,分享給大家。
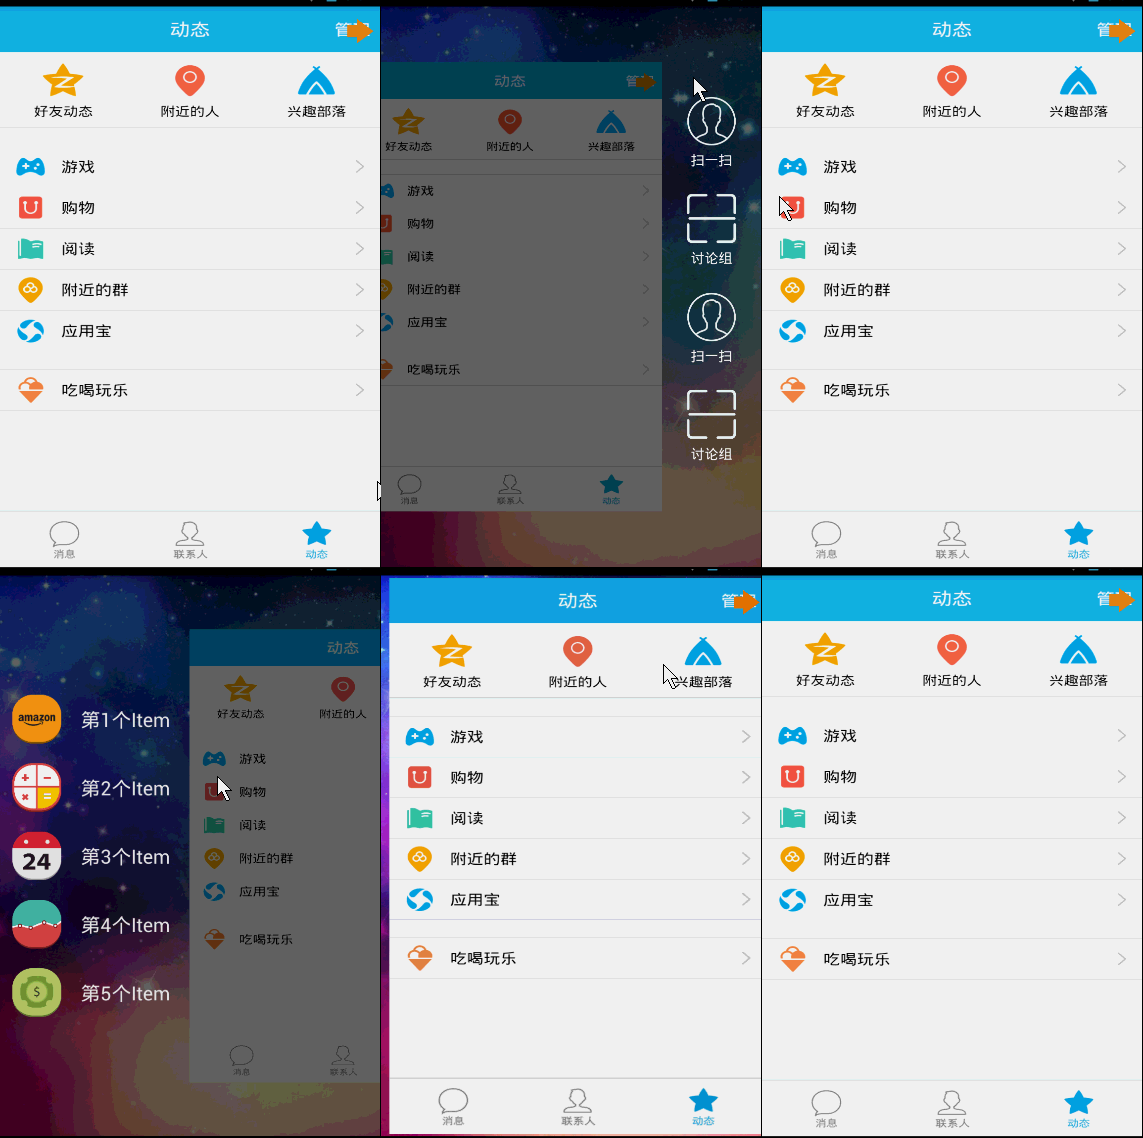
首先看看效果圖:

DrawerLayout用起來真的很方便,下面一起看看用法~
2、DrawerLayout的使用
直接將DrawerLayout View為內容區域,第二個View為左側選單,第三個View為右側側滑選單,目前第三個是可選的。
第一個View的寬高應當設定為match_parent,當然了,這也理所當然。
第二、三個View需要設定android:layout_gravity="left",和android:layout_gravity="right"且一搬高度設定為match_parent,寬度為固定值,即側滑選單的寬度。
按照上面的描述寫個佈局文件,然後設置給Activity就添加好了左右側滑了,是不是很簡單~~~
比如我們的佈局文件:
<android.support.v4.widget.DrawerLayout xmlns:android="http://schemas.android.com/apk/res/android"
  xmlns:tools="http://schemas.android.com/tools"
  android:id="@+id/id_drawerLayout"
  android:layout_width="match_parent"
  android:layout_height="match_parent"
  android:background="@drawable/img_frame_background" >

  <RelativeLayout
    android:layout_width="match_parent"
    android:layout_height="match_parent"
    android:background="@drawable/qq" >

    <Button
      android:layout_width="40dp"
      android:layout_height="30dp"
       android:layout_marginTop="10dp"
      android:layout_alignParentRight="true"
      android:background="@drawable/youce"
      android:onClick="OpenRightMenu" />
  </RelativeLayout>

  <fragment
    android:id="@+id/id_left_menu"
    android:name="com.zhy.demo_zhy_17_drawerlayout.MenuLeftFragment"
    android:layout_width="200dp"
    android:layout_height="match_parent"
    android:layout_gravity="left"
    android:tag="LEFT" />

  <fragment
    android:id="@+id/id_right_menu"
    android:name="com.zhy.demo_zhy_17_drawerlayout.MenuRightFragment"
    android:layout_width="100dp"
    android:layout_height="match_parent"
    android:layout_gravity="right"
    android:tag="RIGHT" />

</android.support.v4.widget.DrawerLayout>1、MenuLeftFragment
package com.zhy.demo_zhy_17_drawerlayout;

import android.os.Bundle;
import android.support.v4.app.Fragment;
import android.view.LayoutInflater;
import android.view.View;
import android.view.ViewGroup;

public class MenuLeftFragment extends Fragment
{

  @Override
  public View onCreateView(LayoutInflater inflater, ViewGroup container,
      Bundle savedInstanceState)
  {
    return inflater.inflate(R.layout.layout_menu, container, false);
  }
}對應的版面檔案:
<?xml version="1.0" encoding="utf-8"?>
<RelativeLayout xmlns:android="http://schemas.android.com/apk/res/android"
  android:layout_width="match_parent"
  android:layout_height="match_parent"
  android:background="#00000000" >

  <LinearLayout
    android:layout_width="match_parent"
    android:layout_height="wrap_content"
    android:layout_centerVertical="true"
    android:orientation="vertical" >

    <RelativeLayout
      android:layout_width="match_parent"
      android:layout_height="wrap_content" >

      <ImageView
        android:id="@+id/one"
        android:layout_width="50dp"
        android:layout_height="50dp"
        android:layout_centerVertical="true"
        android:layout_marginLeft="20dp"
        android:layout_marginTop="20dp"
        android:src="@drawable/img_1" />

      <TextView
        android:layout_width="fill_parent"
        android:layout_height="wrap_content"
        android:layout_centerVertical="true"
        android:layout_marginLeft="20dp"
        android:layout_toRightOf="@id/one"
        android:text="第1个Item"
        android:textColor="#f0f0f0"
        android:textSize="20sp" />
    </RelativeLayout>

    <RelativeLayout
      android:layout_width="match_parent"
      android:layout_height="wrap_content" >

      <ImageView
        android:id="@+id/two"
        android:layout_width="50dp"
        android:layout_height="50dp"
        android:layout_centerVertical="true"
        android:layout_marginLeft="20dp"
        android:layout_marginTop="20dp"
        android:src="@drawable/img_2" />

      <TextView
        android:layout_width="fill_parent"
        android:layout_height="wrap_content"
        android:layout_centerVertical="true"
        android:layout_marginLeft="20dp"
        android:layout_toRightOf="@id/two"
        android:text="第2个Item"
        android:textColor="#f0f0f0"
        android:textSize="20sp" />
    </RelativeLayout>

    <RelativeLayout
      android:layout_width="match_parent"
      android:layout_height="wrap_content" >

      <ImageView
        android:id="@+id/three"
        android:layout_width="50dp"
        android:layout_height="50dp"
        android:layout_centerVertical="true"
        android:layout_marginLeft="20dp"
        android:layout_marginTop="20dp"
        android:src="@drawable/img_3" />

      <TextView
        android:layout_width="fill_parent"
        android:layout_height="wrap_content"
        android:layout_centerVertical="true"
        android:layout_marginLeft="20dp"
        android:layout_toRightOf="@id/three"
        android:text="第3个Item"
        android:textColor="#f0f0f0"
        android:textSize="20sp" />
    </RelativeLayout>

    <RelativeLayout
      android:layout_width="match_parent"
      android:layout_height="wrap_content" >

      <ImageView
        android:id="@+id/four"
        android:layout_width="50dp"
        android:layout_height="50dp"
        android:layout_centerVertical="true"
        android:layout_marginLeft="20dp"
        android:layout_marginTop="20dp"
        android:src="@drawable/img_4" />

      <TextView
        android:layout_width="fill_parent"
        android:layout_height="wrap_content"
        android:layout_centerVertical="true"
        android:layout_marginLeft="20dp"
        android:layout_toRightOf="@id/four"
        android:text="第4个Item"
        android:textColor="#f0f0f0"
        android:textSize="20sp" />
    </RelativeLayout>

    <RelativeLayout
      android:layout_width="match_parent"
      android:layout_height="wrap_content" >

      <ImageView
        android:id="@+id/five"
        android:layout_width="50dp"
        android:layout_height="50dp"
        android:layout_centerVertical="true"
        android:layout_marginLeft="20dp"
        android:layout_marginTop="20dp"
        android:src="@drawable/img_5" />

      <TextView
        android:layout_width="fill_parent"
        android:layout_height="wrap_content"
        android:layout_centerVertical="true"
        android:layout_marginLeft="20dp"
        android:layout_toRightOf="@id/five"
        android:text="第5个Item"
        android:textColor="#f0f0f0"
        android:textSize="20sp" />
    </RelativeLayout>
  </LinearLayout>

</RelativeLayout>其實就是堆出來的版面沒撒意思~ :
package com.zhy.demo_zhy_17_drawerlayout;

import android.os.Bundle;
import android.support.v4.app.Fragment;
import android.view.LayoutInflater;
import android.view.View;
import android.view.ViewGroup;

public class MenuRightFragment extends Fragment
{

  @Override
  public View onCreateView(LayoutInflater inflater, ViewGroup container,
      Bundle savedInstanceState)
  {
    return inflater.inflate(R.layout.menu_layout_right, container, false);
  }
}MainActivity的版面檔案已經貼過了~~
<?xml version="1.0" encoding="utf-8"?>
<LinearLayout xmlns:android="http://schemas.android.com/apk/res/android"
  android:layout_width="match_parent"
  android:layout_height="match_parent"
  android:gravity="center_vertical"
  android:orientation="vertical" >

  <LinearLayout
    android:layout_width="match_parent"
    android:layout_height="wrap_content"
    android:layout_centerVertical="true"
    android:layout_gravity="center_vertical"
    android:layout_marginBottom="20dp"
    android:orientation="vertical" >

    <ImageView
      android:layout_width="60dp"
      android:layout_height="60dp"
      android:layout_gravity="center"
      android:src="@drawable/wode" />

    <TextView
      android:layout_width="fill_parent"
      android:layout_height="wrap_content"
      android:gravity="center"
      android:text="扫一扫"
      android:textColor="#ffffff" />
  </LinearLayout>

  <LinearLayout
    android:layout_width="match_parent"
    android:layout_height="wrap_content"
    android:layout_centerVertical="true"
    android:layout_gravity="center_vertical"
    android:layout_marginBottom="20dp"
    android:orientation="vertical" >

    <ImageView
      android:layout_width="60dp"
      android:layout_height="60dp"
      android:layout_gravity="center"
      android:src="@drawable/saoma" />

    <TextView
      android:layout_width="fill_parent"
      android:layout_height="wrap_content"
      android:gravity="center"
      android:text="讨论组"
      android:textColor="#ffffff" />
  </LinearLayout>

  <LinearLayout
    android:layout_width="match_parent"
    android:layout_height="wrap_content"
    android:layout_centerVertical="true"
    android:layout_gravity="center_vertical"
    android:layout_marginBottom="20dp"
    android:orientation="vertical" >

    <ImageView
      android:layout_width="60dp"
      android:layout_height="60dp"
      android:layout_gravity="center"
      android:src="@drawable/wode" />

    <TextView
      android:layout_width="fill_parent"
      android:layout_height="wrap_content"
      android:gravity="center"
      android:text="扫一扫"
      android:textColor="#ffffff" />
  </LinearLayout>

  <LinearLayout
    android:layout_width="match_parent"
    android:layout_height="wrap_content"
    android:layout_centerVertical="true"
    android:layout_gravity="center_vertical"
    android:layout_marginBottom="20dp"
    android:orientation="vertical" >

    <ImageView
      android:layout_width="60dp"
      android:layout_height="60dp"
      android:layout_gravity="center"
      android:src="@drawable/saoma" />

    <TextView
      android:layout_width="fill_parent"
      android:layout_height="wrap_content"
      android:gravity="center"
      android:text="讨论组"
      android:textColor="#ffffff" />
  </LinearLayout>

</LinearLayout>嗯,程式碼基本上沒什麼註解~~維撒呢?是因為的確沒什麼好註解的。
提幾點:
1、為了模擬QQ的右側選單需要點擊才能出現,所以在初始化DrawerLayout的時候,使用了mDrawerLayout.setDrawerLockMode(DrawerLayout.LOCK_MODE_LOCKED_CLOSED,Gravity.RJIGHT);其彈出。
然後在彈出以後,需要讓手勢可以滑動回去,所以在OpenRightMenu中又編寫了:
mDrawerLayout.setDrawerLockMode(DrawerLayout.LOCK_MODE_UNLOCKED,Gravity.RIGHT); UNLOCK.RIGHT); UNLOCK。
最後在上Android 高仿QQ5.0 側滑選單效果自訂控制項來襲基本上是一致的,唯一的不同的地方,給Content設定了ViewHelper.setTranslationX(mContent, mMenu.getMeasuredWidth() * (1 - scale));讓Content在選單的右側,預設Menu在選單之上,所以我們根據選單劃出的距離給Content設定X方向的偏移。
好了,其實看到可以這麼做,基本上任何的側滑選單效果都能寫出來了。有興趣的話,可以拿DrawerLayout實現這篇部落格的所有效果:Android 實作形態各異的雙向側滑選單 自訂控制來襲 。
3、setDrawerListener
也能透過程式碼看出來,可以使用setDrawerListener監聽選單的開啟與關閉等等。這裡對於目前操作是哪個選單的判斷是透過TAG判斷的,我覺得使用gravity應該也能判斷出來~~
好了,沒撒了,由於DrawerLayout預設只能從邊界劃出選單,但是QQ劃出菜單的手勢區域比較大,大家有興趣,可以重寫Activity的onTouchEvent,在裡面判斷,如果是左右滑動手勢神馬的,彈出菜單,應該不麻煩~~~
更多Android使用DrawerLayout實現仿QQ雙向側滑選單相關文章請關注PHP中文網!

熱AI工具

Undresser.AI Undress
人工智慧驅動的應用程序,用於創建逼真的裸體照片

AI Clothes Remover
用於從照片中去除衣服的線上人工智慧工具。

Undress AI Tool
免費脫衣圖片

Clothoff.io
AI脫衣器

Video Face Swap
使用我們完全免費的人工智慧換臉工具,輕鬆在任何影片中換臉!

熱門文章

熱工具

記事本++7.3.1
好用且免費的程式碼編輯器

SublimeText3漢化版
中文版,非常好用

禪工作室 13.0.1
強大的PHP整合開發環境

Dreamweaver CS6
視覺化網頁開發工具

SublimeText3 Mac版
神級程式碼編輯軟體(SublimeText3)
 公司安全軟件導致應用無法運行?如何排查和解決?
Apr 19, 2025 pm 04:51 PM
公司安全軟件導致部分應用無法正常運行的排查與解決方法許多公司為了保障內部網絡安全,會部署安全軟件。 ...
 如何使用MapStruct簡化系統對接中的字段映射問題?
Apr 19, 2025 pm 06:21 PM
系統對接中的字段映射處理在進行系統對接時,常常會遇到一個棘手的問題:如何將A系統的接口字段有效地映�...
 如何優雅地獲取實體類變量名構建數據庫查詢條件?
Apr 19, 2025 pm 11:42 PM
在使用MyBatis-Plus或其他ORM框架進行數據庫操作時,經常需要根據實體類的屬性名構造查詢條件。如果每次都手動...
 如何將姓名轉換為數字以實現排序並保持群組中的一致性?
Apr 19, 2025 pm 11:30 PM
將姓名轉換為數字以實現排序的解決方案在許多應用場景中,用戶可能需要在群組中進行排序,尤其是在一個用...
 IntelliJ IDEA是如何在不輸出日誌的情況下識別Spring Boot項目的端口號的?
Apr 19, 2025 pm 11:45 PM
在使用IntelliJIDEAUltimate版本啟動Spring...
 Java對像如何安全地轉換為數組?
Apr 19, 2025 pm 11:33 PM
Java對象與數組的轉換:深入探討強制類型轉換的風險與正確方法很多Java初學者會遇到將一個對象轉換成數組的�...
 使用TKMyBatis進行數據庫查詢時,如何優雅地獲取實體類變量名構建查詢條件?
Apr 19, 2025 pm 09:51 PM
在使用TKMyBatis進行數據庫查詢時,如何優雅地獲取實體類變量名以構建查詢條件,是一個常見的難題。本文將針...
 電商平台SKU和SPU數據庫設計:如何兼顧用戶自定義屬性和無屬性商品?
Apr 19, 2025 pm 11:27 PM
電商平台SKU和SPU表設計詳解本文將探討電商平台中SKU和SPU的數據庫設計問題,特別是如何處理用戶自定義銷售屬...


