Nodejs+express+html5 實作拖曳上傳
一、前言
檔案上傳是比較常見的功能,傳統的選擇方式的上傳比較麻煩,需要先點選上傳按鈕,然後再找到檔案的路徑,然後上傳。給用戶體驗帶來很大問題。 html5開始支援拖曳上傳的需要的api。 nodejs也是最近越來越流行的技術,這也是自己第一次接觸nodejs,在nodejs開發中,最常用的開發框架之一是expess,它是一個類似mvc模式的框架。結合html5、nodejs express實現了拖曳上傳的功能。
二、基礎知識普及
1、NodeJs基礎知識
二、基礎知識普及1、NodeJs基礎知識nodejs簡單來說就是一個可以讓js在服務端也能運作的開發平台,nodejs發展非常很快,很多國內公司也已經開始使用比如淘寶等。傳統的web應用程式開發平台依靠多執行緒來實現高並發請求的回應。而nodejs採用了單執行緒、非同步式IO、事件驅動的設計模型,為nodejs帶來了巨大的效能提升。這也是nodejs最大的特點,在nodejs中,所有的IO操作都是透過回呼的方式進行,nodejs在執行IO操作時會把IO請求推送一個事件隊列,等待程式處理,等待處理完IO,然後調用回調函數傳回結果。 例如在查詢資料庫操作如下:mysql.query("SELECT * FROM myTable",function(res){
callback(res);
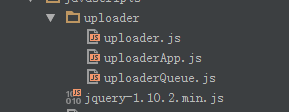
}); 先來看下前端js的檔案目錄:
js主要實作html5支援的上傳功能的封裝。
uploaderQueue.js主要實現上傳檔案佇列的管理,以及檔案上傳對象,把檔案佇列中的檔案上傳到伺服器。
uploaderApp.js主要檔案上傳的入口,主要實現上傳視窗對拖曳事件的監聽並把拖曳檔案推進上傳檔案佇列,啟動檔案上傳程式。
下面對核心程式碼(需要)做簡單的解釋,全都程式碼可以到這裡下載: FileUploader
首先對html5提供的檔案上傳做簡單的封裝uploader.js
function uploader(url, data, files) {
this._files = files;
this._data = data;
this._url = url;
this._xhr = null;
this.onloadstart = {};
this.onload = {};
this.onloadend = {};
this.onprogress = {};
this.onerror = {};
this.ontimeout = {};
this.callback = {};//请求完成后回调
_self = this;
}
uploader.prototype = {
init: function () {
if (!isValid()) {
throw e;
}
this._xhr = new XMLHttpRequest();
this._bindEvents();
},
send: function () {
if (this._xhr == null) {
this.init();
}
var formData = this._createFormData();
this._xhr.open('post', this._url, true);
this._xhr.send(formData);
},
_bindEvents: function () {
_self = this;
this._xhr.upload.loadstart = function (e) {
evalFunction(_self.onloadstart, e);
}
this._xhr.upload.onload = function (e) {
evalFunction(_self.onload, e);
};
this._xhr.upload.onloadend = function (e) {
evalFunction(_self.onloadend, e);
}
this._xhr.upload.onprogress = function (e) {
evalFunction(_self.onprogress, e)
};
this._xhr.upload.onerror = function (e) {
evalFunction(_self.onerror, e);
};
this._xhr.upload.ontimeout = function (e) {
evalFunction(_self.ontimeout, e);
}
this._xhr.onreadystatechange = function () {
if (_self._xhr.readyState == 4) {
if (typeof _self.callback === 'function') {
var status = _self._xhr.status;
var data = _self._xhr.responseText;
_self.callback(status, data);
}
}
}
},
_createFormData: function () {
var formData = new FormData();
this._addDataToFormData(formData);
this._addFileToFormData(formData);
return formData;
},
_addDataToFormData: function (formData) {
if (this._data) {
for (var item in this._data) {
formData.append(item, this._data[item]);
}
}
},
_addFileToFormData: function (formData) {
if (this._files) {
for (var i = 0; i < this._files.length; i++) {
var file = this._files[i];
formData.append('file[' + i + ']', this._files[i]);
}
}
}
};
View Code
var uploaderFactory = {
send: function (url, data, files, callback) {
var insUploader = new uploader(url, data, files);
insUploader.callback = function (status, resData) {
if (typeof callback === 'function') {
callback(status, resData);
}
}
insUploader.send();
return insUploader;
}
};uploader物件主要是對html5提供的原生api進行簡單的封裝。 uploaderFactory提供一個簡單的接口,使用它可以像jquery的ajax方法一樣完成,檔案上傳呼叫。 html5中提供的文件上傳的支持,是在原來XMLHttpRequest基礎之上擴展一些屬性和方法,提供了FormData對象,來支持文件上傳操作。
檔案上傳佇列(uploaderQueue.js)也是一個比較重要的對象,它包含兩個物件一個是Queue,檔案佇列對象,主要負責管理檔案佇列的增刪改查詢等操作,另一個物件是UploadEngine,檔案上傳引擎,它的功能主要是負責從文件佇列中取出文件對象,呼叫uploader對像上傳文件,然後更新文件佇列中的文件狀態。 Queue以及UploadEngine都是單例物件。
首先來看下文件隊列對象:
(function (upladerQueue) {

 var Status = {
  Ready: 0,
  Uploading: 1,
  Complete: 2
 }

 var _self = null;

 var instance = null;

 function Queue() {
  this._datas = [];
  this._curSize = 0;//当前长度


  _self = this;
 }

 Queue.prototype = {
  add: function (data) {
   var key = new Date().getTime();
   this._datas.push({key: key, data: data, status: Status.Ready});
   this._curSize = this._datas.length;
   return key;
  },
  remove: function (key) {
   var index = this._getIndexByKey(key);
   this._datas.splice(index, 1);
   this._curSize = this._datas.length;
  },
  get: function (key) {
   var index = this._getIndexByKey(key);
   return index != -1 ? this._datas[index].data : null;
  },
  clear: function () {
   this._datas = [];
   this._curSize = this._datas.length;
  },
  size: function () {
   return this._curSize;
  },
  setItemStatus: function (key, status) {
   var index = this._getIndexByKey(key);
   if (index != -1) {
    this._datas[index].status = status;
   }
  },
  nextReadyingIndex: function () {
   for (var i = 0; i < this._datas.length; i++) {
    if (this._datas[i].status == Status.Ready) {
     return i;
    }
   }
   return -1;
  },
  getDataByIndex: function (index) {
   if (index < 0) {
    return null;
   }
   return this._datas[index];
  },
  _getIndexByKey: function (key) {
   for (var i = 0; i < this._datas.length; i++) {
    if (this._datas[i].key == key) {
     return i;
    }
   }
   return -1;
  }
 };

 function getInstace() {
  if (instance === null) {
   instance = new Queue();
   return instance;
  } else {
   return instance;
  }
 }


 upladerQueue.Queue = getInstace();
 upladerQueue.UploadStatus = Status;
})(window.uploaderQueue);上傳文件隊列使用一個數組管理每個文件對象信息,每個文件對像有key,data,status三個屬性,該對象主要負責文件對象的增加、刪除、更新、尋找的功能。
🎜上傳檔案佇列中另一個比較重要的物件是上傳引擎物件(uploadEngine.js)🎜(function (upladerQueue) {
var instance = null;
var _self;
function uploadEngine() {
this._url = null;
this._curUploadingKey = -1;//标志
this.uploadStatusChanged = {};
this.uploadItemProgress={};
_self = this;
}
uploadEngine.prototype = {
setUrl: function (url) {
this._url = url;
},
run: function () {
if (this._curUploadingKey === -1 && this._url) {
this._startUpload();
}
},
_startUpload: function () {
_self = this;
var index = upladerQueue.Queue.nextReadyingIndex();
if (index != -1) {
this._uploadItem(index);
} else {
this._curUploadingKey = -1;
return null;
}
},
_uploadItem: function (index) {
var data = upladerQueue.Queue.getDataByIndex(index).data;
_self = this;
this._readyUploadItem(index);
var upload = uploaderFactory.send(this._url, null, data.files, function (status, data) {
_self._completedUploadItem.call(_self, status, data);
});
this._uploadItemProgress(upload);
},
_uploadItemProgress: function (upload) {
upload.onprogress = function (e) {
_self.uploadItemProgress(_self._curUploadingKey,e);
}
},
_readyUploadItem: function (index) {
this._curUploadingKey = upladerQueue.Queue.getDataByIndex(index).key;
if (typeof this.uploadStatusChanged === 'function') {
this.uploadStatusChanged(this._curUploadingKey, upladerQueue.UploadStatus.Uploading);
}
upladerQueue.Queue.setItemStatus(this._curUploadingKey, upladerQueue.UploadStatus.Uploading);
},
_completedUploadItem: function (status, data) {
if (typeof this.uploadStatusChanged === 'function') {
this.uploadStatusChanged(this._curUploadingKey, upladerQueue.UploadStatus.Complete);
}
upladerQueue.Queue.setItemStatus(this._curUploadingKey, upladerQueue.UploadStatus.Complete);
this._startUpload();
}
};
function getInstace() {
if (instance === null) {
instance = new uploadEngine();
}
return instance;
}
upladerQueue.Engine = getInstace();
})(window.uploaderQueue);该对象比较简单主要提供一个run以及setUrl方法,用于启动上传引擎,以及设置上传路径的功能。内部使用递归的方法把文件队列中的方法全部上传到服务端。使用uploadItemProgress通知外部上传的进度,使用uploadStatusChanged通知文件上传状态,以便更新UI.
uploaderApp.js中主要包括三个对象,一个是类似jquery的一个简单的jquery对象(App$)。主要用于绑定事件。一个是uploaderArea对象,是拖曳上传的窗口区域,另一个是入口对象uploaderMain对象。主要用于初始化对象,对外部提供一个init方法,来初始化整个对象。
了解关于App$以及uploaderArea对象的代码请下载 源代码 ,下面仅对uploaderMain对象做简单的说明。
(function (app) {
 var _self;

 function uploaderMain(id) {
  this._id = id;
  this._area = null;
  this.uploaders = [];

  this._URL = 'file/uploader';
 }

 uploaderMain.prototype = {
  init: function () {
   _self = this;
   this._initArea();
   this._initQueueEng();
  },
  _initQueueEng: function () {
   uploaderQueue.Engine.setUrl(this._URL);
   uploaderQueue.Engine.uploadStatusChanged = function (key, status) {
    if (status === uploaderQueue.UploadStatus.Uploading) {
     _self._area.hideItemCancel(key);
    } else if (status === uploaderQueue.UploadStatus.Complete) {
     _self._area.completeItem(key);
     _self._area.showItemCancel(key);
    }
   }
   uploaderQueue.Engine.uploadItemProgress = function (key, e) {
    var progress = e.position / e.total;
    _self._area.changeItemProgress(key, Math.round(progress * 100));
   }
  },
  _initArea: function () {
   this._area = new app.area(this._id);
   this._area.init();
   this._area.drop = function (e) {
    var key = uploaderQueue.Queue.add({files: e.dataTransfer.files});
    uploaderQueue.Engine.run();
    return key;
   }
   this._area.cancelItem = function (key) {
    uploaderQueue.Queue.remove(key);
   }
  }
 };


 app.main = uploaderMain;
})(window.uploaderApp);在uploaderMain对象,相当于各个对象之间的中介,主要就是做对象的初始化功能、以及对象之间相互调用。使各个对象之间相互协作完成整个模块的功能。对外提供一个init方法来初始化整个程序,在html页面中只需如下代码:
<script type="text/javascript"> var main=new uploaderApp.main('container'); main.init(); </script>
以上代码就是创建一个入口对象,然后使用init方法来启动整个程序。
以上是对前端js的主要方法做的简单解释,如果想详细了解请下载源代码。下面简单看下后端js(nodejs)端实现的主要代码。
在express基础知识时,已经讲过在express已经对文件上传功能做了完整的封装,当路由到action时,文件已经完成上传只是文件上传到了一个临时目录,这个临时目录我们可以在app.js中配置的,配置方式如下:
app.use(express.bodyParser({
  uploadDir:__dirname+'/public/temp'
}));这样在文件上传后文件就存放在/public/temp目录下,文件名也是express通过一定的算法随机获取的。在我们写的action中只需要把存在临时目录中的文件移动到服务端存放文件的目录下,然后删除临时目录下的文件即可。具体代码如下:
function uploader(req, res) {
 if (req.files != 'undifined') {
  console.dir(req.files);
  utils.mkDir().then(function (path) {
   uploadFile(req, res, path, 0);
  });

 }
}

function uploadFile(req, res, path, index) {
 var tempPath = req.files.file[index].path;
 var name = req.files.file[index].name;
 if (tempPath) {
  var rename = promise.denodeify(fs.rename);
  rename(tempPath, path + name).then(function () {
   var unlink = promise.denodeify(fs.unlink);
   unlink(tempPath);
  }).then(function () {
    if (index == req.files.file.length - 1) {
     var res = {
      code: 1,
      des: '上传成功'
     };
     res.send(res);
    } else {
     uploadFile(req, res, path, index + 1);
    }
   });
 }
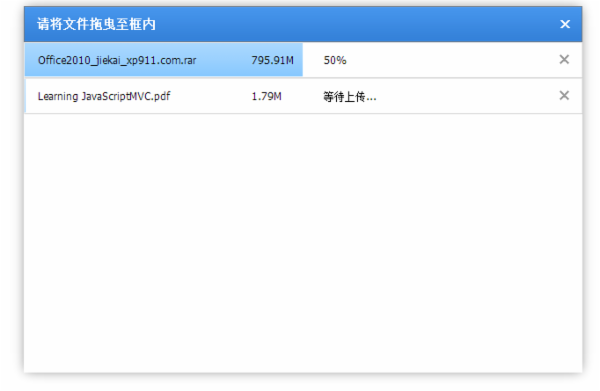
}2、实现效果

更多Nodejs+express+html5 实现拖拽上传相关文章请关注PHP中文网!

熱AI工具

Undresser.AI Undress
人工智慧驅動的應用程序,用於創建逼真的裸體照片

AI Clothes Remover
用於從照片中去除衣服的線上人工智慧工具。

Undress AI Tool
免費脫衣圖片

Clothoff.io
AI脫衣器

Video Face Swap
使用我們完全免費的人工智慧換臉工具,輕鬆在任何影片中換臉!

熱門文章

熱工具

記事本++7.3.1
好用且免費的程式碼編輯器

SublimeText3漢化版
中文版,非常好用

禪工作室 13.0.1
強大的PHP整合開發環境

Dreamweaver CS6
視覺化網頁開發工具

SublimeText3 Mac版
神級程式碼編輯軟體(SublimeText3)
 h5項目怎麼運行
Apr 06, 2025 pm 12:21 PM
運行 H5 項目需要以下步驟:安裝 Web 服務器、Node.js、開發工具等必要工具。搭建開發環境,創建項目文件夾、初始化項目、編寫代碼。啟動開發服務器,使用命令行運行命令。在瀏覽器中預覽項目,輸入開發服務器 URL。發布項目,優化代碼、部署項目、設置 Web 服務器配置。
 H5頁面製作究竟指什麼
Apr 06, 2025 am 07:18 AM
H5 頁面製作是指使用 HTML5、CSS3 和 JavaScript 等技術,創建跨平台兼容的網頁。其核心在於瀏覽器解析代碼,渲染結構、樣式和交互功能。常見技術包括動畫效果、響應式設計和數據交互。為避免錯誤,應使用開發者工具調試;而性能優化和最佳實踐則包括圖像格式優化、減少請求和代碼規範等,以提高加載速度和代碼質量。
 h5怎麼製作點擊圖標
Apr 06, 2025 pm 12:15 PM
製作 H5 點擊圖標的步驟包括:在圖像編輯軟件中準備方形源圖像。在 H5 編輯器中添加交互性,設置點擊事件。創建覆蓋整個圖標的熱點。設置點擊事件的操作,如跳轉頁面或觸發動畫。導出 H5 文檔為 HTML、CSS 和 JavaScript 文件。將導出的文件部署到網站或其他平台。
 H5指的是什麼?探索上下文
Apr 12, 2025 am 12:03 AM
H5referstoHTML5,apivotaltechnologyinwebdevelopment.1)HTML5introducesnewelementsandAPIsforrich,dynamicwebapplications.2)Itsupportsmultimediawithoutplugins,enhancinguserexperienceacrossdevices.3)SemanticelementsimprovecontentstructureandSEO.4)H5'srespo
 什麼是H5編程語言?
Apr 03, 2025 am 12:16 AM
H5不是獨立編程語言,而是HTML5、CSS3和JavaScript的集合,用於構建現代Web應用。 1.HTML5定義網頁結構和內容,提供新標籤和API。 2.CSS3控製樣式和佈局,引入動畫等新特性。 3.JavaScript實現動態交互,通過DOM操作和異步請求增強功能。
 h5怎麼製作彈窗
Apr 06, 2025 pm 12:12 PM
H5 彈窗製作步驟:1. 確定觸發方式(點擊式、時間式、退出式、滾動式);2. 設計內容(標題、正文、行動按鈕);3. 設置樣式(大小、顏色、字體、背景);4. 實現代碼(HTML、CSS、JavaScript);5. 測試和部署。
 H5頁面製作的優勢有哪些
Apr 05, 2025 pm 11:48 PM
H5 頁面製作的優勢包括:輕量級體驗,加載速度快,提升用戶留存率。跨平台兼容性,無需針對不同平台適配,提升開發效率。靈活性和動態更新,無需審核,便於內容修改和更新。成本效益,開發成本比原生 App 低。
 H5頁面製作適合哪些應用場景
Apr 05, 2025 pm 11:36 PM
H5(HTML5)適合應用於輕量級應用,如營銷活動頁面、產品展示頁面和企業宣傳微網站。它優勢在於跨平台性和豐富的交互性,但局限性在於復雜的交互和動畫、本地資源訪問和離線功能。


