本文實例講述了Android程式實作ViewPager多頁面滑動切換及動畫效果的方法。分享給大家參考,具體如下:
一、首先,我們來看看效果圖,這是新浪微博的Tab滑動效果。我們可以手勢滑動,也可以點擊上面的頭標切換。與此同方式,
白色橫條會移到對應的頁卡頭標下。這是一個動畫效果,白條是緩慢滑動過去的。好了,接下來我們就來實現它。

二、在開始前,我們先要認識一個控件,ViewPager。它是google SDk中自帶的一個附加包的一個類,可以用來實現螢幕間的切換。
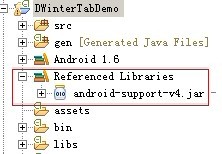
這個附加包是android-support-v4.jar,在最後的源碼中會提供給大家,在libs資料夾中。當然你也可以自己從網路上搜尋最新的版本。
找到它後,我們需要在專案中加入

三、我們先做介面
介面設計很簡單,第一行三個頭標,第二行動畫圖片,第三行頁卡內容展示。
<?xml version="1.0" encoding="utf-8"?>
<LinearLayout xmlns:android="http://schemas.android.com/apk/res/android"
 xmlns:umadsdk="http://schemas.android.com/apk/res/com.LoveBus"
 android:layout_width="fill_parent"
 android:layout_height="fill_parent"
 android:orientation="vertical" >
 <LinearLayout
  android:id="@+id/linearLayout1"
  android:layout_width="fill_parent"
  android:layout_height="100.0dip"
  android:background="#FFFFFF" >
  <TextView
   android:id="@+id/text1"
   android:layout_width="fill_parent"
   android:layout_height="fill_parent"
   android:layout_weight="1.0"
   android:gravity="center"
   android:text="页卡1"
   android:textColor="#000000"
   android:textSize="22.0dip" />
  <TextView
   android:id="@+id/text2"
   android:layout_width="fill_parent"
   android:layout_height="fill_parent"
   android:layout_weight="1.0"
   android:gravity="center"
   android:text="页卡2"
   android:textColor="#000000"
   android:textSize="22.0dip" />
  <TextView
   android:id="@+id/text3"
   android:layout_width="fill_parent"
   android:layout_height="fill_parent"
   android:layout_weight="1.0"
   android:gravity="center"
   android:text="页卡3"
   android:textColor="#000000"
   android:textSize="22.0dip" />
 </LinearLayout>
 <ImageView
  android:id="@+id/cursor"
  android:layout_width="fill_parent"
  android:layout_height="wrap_content"
  android:scaleType="matrix"
  android:src="@drawable/a" />
 <android.support.v4.view.ViewPager
  android:id="@+id/vPager"
  android:layout_width="wrap_content"
  android:layout_height="wrap_content"
  android:layout_gravity="center"
  android:layout_weight="1.0"
  android:background="#000000"
  android:flipInterval="30"
  android:persistentDrawingCache="animation" />
</LinearLayout>
我們要展示三個頁卡,所以還需要三個頁卡內容的介面設計,這裡我們只設定了背景顏色,能起到區別作用即可。
<?xml version="1.0" encoding="utf-8"?>
<LinearLayout xmlns:android="http://schemas.android.com/apk/res/android"
 android:layout_width="fill_parent"
 android:layout_height="fill_parent"
 android:orientation="vertical"
 android:background="#158684" >
</LinearLayout>
四、程式碼部分要進行初始化的工作
(1) 先來變數的定義
private ViewPager mPager;//页卡内容
private List<View> listViews; // Tab页面列表
private ImageView cursor;// 动画图片
private TextView t1, t2, t3;// 页卡头标
private int offset = 0;// 动画图片偏移量
private int currIndex = 0;// 当前页卡编号
private int bmpW;// 动画图片宽度
(2) 初始化頭標
/**
  * 初始化头标
*/
 private void InitTextView() {
  t1 = (TextView) findViewById(R.id.text1);
  t2 = (TextView) findViewById(R.id.text2);
  t3 = (TextView) findViewById(R.id.text3);
  t1.setOnClickListener(new MyOnClickListener(0));
  t2.setOnClickListener(new MyOnClickListener(1));
  t3.setOnClickListener(new MyOnClickListener(2));
 }
/**
  * 头标点击监听
*/
public class MyOnClickListener implements View.OnClickListener {
  private int index = 0;
  public MyOnClickListener(int i) {
   index = i;
  }
  @Override
  public void onClick(View v) {
   mPager.setCurrentItem(index);
  }
};相信大家看後都沒什麼問題,點擊第幾個,就展示第點擊幾個頁卡內容。
(3) 初始化頁卡內容區
/**
  * 初始化ViewPager
*/
private void InitViewPager() {
  mPager = (ViewPager) findViewById(R.id.vPager);
  listViews = new ArrayList<View>();
  LayoutInflater mInflater = getLayoutInflater();
  listViews.add(mInflater.inflate(R.layout.lay1, null));
  listViews.add(mInflater.inflate(R.layout.lay2, null));
  listViews.add(mInflater.inflate(R.layout.lay3, null));
  mPager.setAdapter(new MyPagerAdapter(listViews));
  mPager.setCurrentItem(0);
  mPager.setOnPageChangeListener(new MyOnPageChangeListener());
}我們將三個頁卡介面裝入其中,預設顯示第一個頁卡。這裡我們還需要實作一個適配器。
/**
  * 初始化动画
*/
private void InitImageView() {
  cursor = (ImageView) findViewById(R.id.cursor);
  bmpW = BitmapFactory.decodeResource(getResources(), R.drawable.a)
    .getWidth();// 获取图片宽度
  DisplayMetrics dm = new DisplayMetrics();
  getWindowManager().getDefaultDisplay().getMetrics(dm);
  int screenW = dm.widthPixels;// 获取分辨率宽度
  offset = (screenW / 3 - bmpW) / 2;// 计算偏移量
  Matrix matrix = new Matrix();
  matrix.postTranslate(offset, 0);
  cursor.setImageMatrix(matrix);// 设置动画初始位置
}/**
* 页卡切换监听
*/
public class MyOnPageChangeListener implements OnPageChangeListener {
int one = offset * 2 + bmpW;// 页卡1 -> 页卡2 偏移量
int two = one * 2;// 页卡1 -> 页卡3 偏移量
@Override
public void onPageSelected(int arg0) {
Animation animation = null;
switch (arg0) {
case 0:
if (currIndex == 1) {
animation = new TranslateAnimation(one, 0, 0, 0);
} else if (currIndex == 2) {
animation = new TranslateAnimation(two, 0, 0, 0);
}
break;
case 1:
if (currIndex == 0) {
animation = new TranslateAnimation(offset, one, 0, 0);
} else if (currIndex == 2) {
animation = new TranslateAnimation(two, one, 0, 0);
}
break;
case 2:
if (currIndex == 0) {
animation = new TranslateAnimation(offset, two, 0, 0);
} else if (currIndex == 1) {
animation = new TranslateAnimation(one, two, 0, 0);
}
break;
}
currIndex = arg0;
animation.setFillAfter(true);// True:图片停在动画结束位置
animation.setDuration(300);
cursor.startAnimation(animation);
}
@Override
public void onPageScrolled(int arg0, float arg1, int arg2) {
}
@Override
public void onPageScrollStateChanged(int arg0) {
}
}希望本文所述對大家Android程式設計有幫助。
更多Android實作ViewPager多頁面滑動切換及動畫效果的方法相關文章請關注PHP中文網! 


