作為編碼者,美工基礎是偏弱的。我們可以參考一些成熟的網頁PS教程,提升自身的設計能力。套用一句話,「熟讀唐詩三百首,不會作詩也會吟」。
本系列的教程來自網路上的PS教程,都是國外的,全英文的。本人嘗試翻譯這些優秀的教學。因為翻譯能力有限,翻譯的細節上還有待推敲,希望廣大網友不吝賜教。
約定:
1、本文的軟體是Photoshop CS5版本
2、原教程的截圖是英文的,本人在重新製作的基礎上,重新截了中文版的圖
3、原文中有些操作沒有給定參數。本人在反覆測試的情況下測定了一些參數,以紅色的文字顯示。有些錯誤的參數,直接以紅色文字顯示正確的參數
例如:(90,22,231,77),表示矩形的左上角的座標是(90,22),寬231,高77
例如:(90,22),表示矩形的左上角的座標是(90,22),矩形的其他兩個參數教程裡已經指定
4、在教程的最後會附上本人的心得。有些是對教程中的一些步驟的最佳化等。
Let's start the tutorial.
讓我們開始教學
Open Photoshop and create a new document 1020 by 1550px

白色的橢圓形:
 For each of this shape I will apply a Gaussian Blur of about 50 – 60px. To apply a Gaussian Blur go to Filter>Blur> apa sooo sooo oi ayle a hsoian Youlah Youlone s> needed.
(在做高斯模糊前,會提示柵格化形狀,確定即可)
(基本上不需要再降低不透明度了)
這是我的結果(漂亮的漸隱光效):
Step 3ool
Step 3ool
ŜNow I will 和 lectNow those 2 lines. Please see the screenshot. For the first line I have used this color: #669495 and for the second one, this color: #9cd8d9步驟3參考樣條,選擇直線工具建立直線工具建立222張直線工具。第一條直線,顏色: #669495 ,第二條直線,顏色: #9cd8d9
I will select Type Tool and I will Step willo.D.al ” .

healthy的字體設定如下:原教程中的字體沒有找到,字體只能找了一個比較接近的字體
🎜
tips的字體設定如下:也是找了一個接近的字體替換原教程的字體,字體的顏色: # fcf30b

Here's
 Here's my my 做的效果。
Step 5
Having Type Tool selected I will add the links for navigation. I have use the same layer styles and the same font used for the word “healthy”?工具添加導航連結。使用和healthy相同的圖層樣式和相同的字體。
實際上,我用的是Brush Script MT字體。
 Step 6
I will select Rectangle Tool and I will create this shape. Color used: #edec62
步驟。顏色: #edec62
Step 7
I will select Direct Selection Tool, and I will drag a little bit from the corbot – right cor Selection Tool, and I will drag a little bit from the corbot – right cor Selection Tool, and I will drag a little bit from the corbot – right cordition of theape的長方形,拖曳右下角的點往右下角的方向拖曳一點
雖然原文沒有說明,個人覺得這裡還是要加上投影

Step 8
With Type Tool I will add some text over this shape. I have applied the following layer styles: 的文字
的文字
。並加入以下的圖層樣式:


Step 9
With 類型 Tool I will continue to add some more text
步驟9
p
I will create a button , using again Rectangle Tool and Direct Selection Tool. For the text over the button I have applied the layer styles from step 8. My result
步驟10
用和步驟8相同的方法創建一個按鈕(
(347,447, ,140,20),顏色: #ffde00),按鈕的文字是see more …
 Step 11
On this step I will will Step. Fitness Vector Icons, I will download them and I will choose an icons showing an apple and I will place it on my document. I will play a little bit with Free Transform Tool (Ctrl +T) till I have something that I have somethinge that like is my result:
步驟11
在此步驟中,我會從Premium Files下載一些圖示。我將前往Health/Fitness Vector Icons,下載並會選擇一個蘋果圖示顯示在我的頁面上。我會使用自由變換工具 (Ctrl + T)做一些微調,直到我滿意為止。這裡有我的結果:
 Step 12
Here I will repeat Step 6, 7 and 8 and I will create this shapes.
,建立如下的形狀:
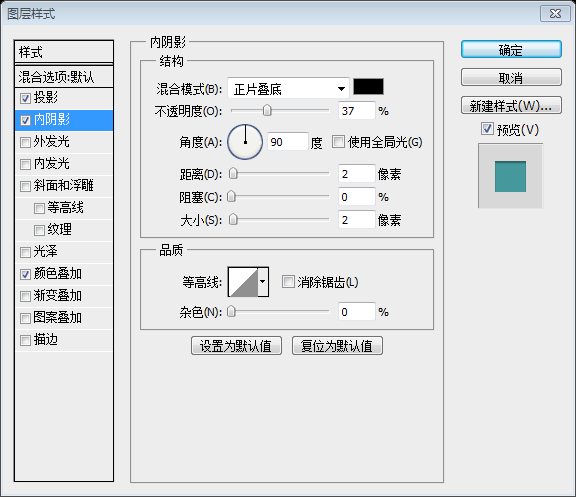
(45,490,926,47),顏色: #f1c96a (590,502,140,20),顏色: #f3f2d6,圖層樣式用內複製上面的形狀,旋轉180度,然後平移到適當位置,顏色: #f3f2d6,圖層樣式用內陰影,內陰影的參數設定如下:
(900,494,50, 20),顏色: #fedd02
(56,637,257,32),顏色: #ffde00
pwillmm
步驟13
 用文字工具在上面加上一些文字
For “Looking for more healthy tips? Subscribe now!” I have used “Adventure” font with the following layer styles:70 寫詞Subscribe now!,我用Adventure字體(實際使用Brush Script STD),並且採用下面的圖層樣式:
顏色疊加的顏色:# b3b303

For “Latest Articles” I have applied this layer styles:
對文字Latest Articles採用下面的圖層樣式


做好如下:

用文字工具加入一些文字

Step 14🜎希
工具建立如下的白色矩形: (48,693,298,194)
Step 15
With Pen Tool I will create this 2 black triangles and I will appabouts Gaisx 5
用鋼筆工具添加兩個黑色的三角形。

對黑色的三角形添加高斯模糊,參數是14px(
這個參數還是要斟酌一番,我用的是20px)
will
. create another 5 thumbnails步驟16 接下來重複創建另外5個,並且添加一些圖片的縮圖
 Step 17


我最後的結果如下:

心得:
如何在PS中畫出純色的直線?
一般在PS中畫直線,用的是直線工具。可是直線工具和矩形工具一樣,預設是以形狀圖層的形式出現的。形狀圖層的優點是抗鋸齒,會透過插值計算出陰影的顏色,這樣就不會有鋸齒的感覺。而且形狀圖層在縮放時,也能達到很好的抗鋸齒的效果。不過,抗鋸齒的效果用在水平線和垂直線上就沒有意義了(因為根本沒有鋸齒),PS在畫水平線(或垂直線)時,在直線的旁邊添加了一條陰影,這個就有點畫蛇添足,有點搗亂了。如下圖:

有人提到,可以在PS中關閉抗鋸齒的選項,我沒有找到,如有哪位網友知道,不妨告知。
在諮詢了一些人之後,給出了一個不錯的解決方法
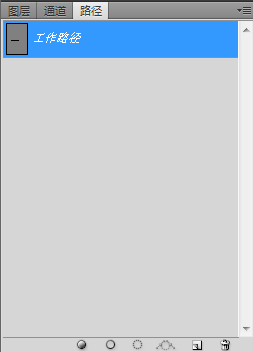
新建圖層》用鋼筆工具畫一條水平線》對鋼筆工具的水平線進行描邊,如圖:


