

Bootstrap輪播加上css3動畫,酷炫到底! _javascript技巧

很多時候,如果你的專案需要的是一個輕量級的輪播,不需要很多的功能。同時你的專案是採用Bootstrap,(一個最受歡迎的開源前端框架)的話。你可以參考一下bootstrap官方元件。
介紹Animate.css
為了讓我自己寫的動畫效果值得稱讚,我用一個非常有名的開源的CSS3動畫庫,被形象的稱為animate.css。 Dan Eden寫的。
這是讓我能專注於手邊的任務,而不是解釋CSS3動畫的程式碼。
用Animate.css 需要2個步驟:
在html文件中引入animate.min.css。
在網頁中要加動畫的元素上加入animated yourchosenanimation類別。
接下來你用Animate.css網站上的看到的關於動畫的類別名,取代yourchosenanimation。
引入Bootstrap輪播組件
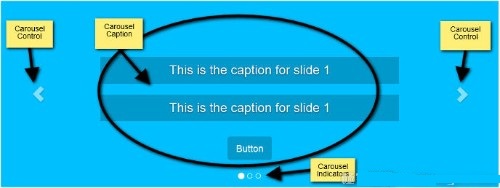
Bootstrap輪播組件有三個主要的部分。
- 輪播指示顯示幻燈的頁面數量,提供使用者一個視覺線索,並提供可以滑動的導航。
- 輪播條目,一個叫.carousel-inner的類,包含在外邊框的里邊。代表每一個獨立的滑塊。每個圖片裡邊的都可以放置圖片。也可以新增標題。也可以在html元素上加入carousel-caption類別名稱。 Bootstrap會有自備的樣式。我們可以透過這些元素來添加動畫。
- 最後,是輪播控制箭頭,功能是可以使用戶前後滑動。
如果想了解更多Bootstrap輪播組件的詳情,可以查看Syed Fazle Rahman的用Bootstrap3創建js輪播效果這篇文章。
為了簡單的展示demo,就先不加圖片了。焦點先放在輪播框架上作為動畫。
建構HTML結構
下邊是你需要引用到你項目當中的:
- jQuery
- Bootstrap's CSS and JavaScript
- Animate.css
- 一個樣式表和js文檔。
為了加快開發流程,從Bootstrap官網引用了範本和必要的檔案。
下邊是Bootstrap輪播代碼:
<div id="carousel-example-generic" class="carousel slide" data-ride="carousel">
 <!-- Indicators -->
 <ol class="carousel-indicators">
 <li data-target="#carousel-example-generic" data-slide-to="0" class="active">
 </li>
 <li data-target="#carousel-example-generic" data-slide-to="1"></li>
 <li data-target="#carousel-example-generic" data-slide-to="2"></li>
 </ol>
 <!-- Wrapper for slides -->
 <div class="carousel-inner" role="listbox">

 <!-- First slide -->
 <div class="item active">
  <div class="carousel-caption">
  <h3 data-animation="animated bounceInLeft">
   This is the caption for slide 1
  </h3>
  <h3 data-animation="animated bounceInRight">
   This is the caption for slide 1
  </h3>
  <button class="btn btn-primary btn-lg"
    data-animation="animated zoomInUp">Button</button>
  </div>
 </div><!-- /.item -->

 <!-- Second slide -->
 <div class="item">
  <div class="carousel-caption">
  <h3 class="icon-container" data-animation="animated bounceInDown">
   <span class="glyphicon glyphicon-heart"></span>
  </h3>
  <h3 data-animation="animated bounceInUp">
   This is the caption for slide 2
  </h3>
  <button class="btn btn-primary btn-lg"
    data-animation="animated zoomInRight">Button</button>
  </div>
 </div><!-- /.item -->

 <!-- Third slide -->
 <div class="item">
  <div class="carousel-caption">
  <h3 class="icon-container" data-animation="animated zoomInLeft">
   <span class="glyphicon glyphicon-glass"></span>
  </h3>
  <h3 data-animation="animated flipInX">
   This is the caption for slide 3
  </h3>
  <button class="btn btn-primary btn-lg"
    data-animation="animated lightSpeedIn">Button</button>
  </div>
 </div><!-- /.item -->
 </div><!-- /.carousel-inner -->

 <!-- Controls -->
 <a class="left carousel-control" href="#carousel-example-generic"
  role="button" data-slide="prev">
 <span class="glyphicon glyphicon-chevron-left" aria-hidden="true"></span>
 <span class="sr-only">Previous</span>
 </a>

 <a class="right carousel-control" href="#carousel-example-generic"
  role="button" data-slide="next">
 <span class="glyphicon glyphicon-chevron-right" aria-hidden="true"></span>
 <span class="sr-only">Next</span>
 </a>

</div><!-- /.carousel -->
如果以上程式碼沒有錯,你在瀏覽器開啟會看到一個可以運作的輪播,上邊的一切不包含一行javascript程式碼。如果你不添加任何圖像,只是在css文檔給.carousel .item這個類塊添加min-height值防止輪播塌陷。
在輪播標題內的元素加入一個動畫屬性data-animation,用這個特別的動畫類別庫作為他們的值。
如果你想從Animate.css庫體驗其他的動畫,用你選擇的動畫類別名稱來代替data-animation屬性值。
我們在javascript程式碼中用data-animation屬性值。
雖然一個簡單的自動輪播在一些案例中可以找到,但是對於這個案例我們有更多的控制。
在這個方向的第一步,從元素中刪除data-ride="carousel"值,把data-ride屬性值初始化兒不用寫任何程式碼。但是,我們打算用js程式碼控制輪播,因此,這個data-ride屬性就不必要了。
給輪播加CSS樣式
現在依照自己的喜好,發揮創意為輪播標題添加樣式。我將要寫的樣式規則是能順暢工作的demo。
更具體的說,我們增加動畫延遲屬性的控制。定義每個動畫什麼時候開始(注意為了簡單演示,省略了瀏覽器前綴)
.carousel-caption h3:first-child {
 animation-delay: 1s;
}

.carousel-caption h3:nth-child(2) {
 animation-delay: 2s;
}

.carousel-caption button {
 animation-delay: 3s;
}上面的程式碼片段中確保元素動畫有序開始,還可以做其他的效果。例如,你可以選擇前兩個標題同時出現,然後是button按鈕,可以自己決定,享受樂趣。
寫jQuery程式碼:
我們開始初始化這個輪播,在你的自訂的javascript 檔案中加入一下程式碼:
var $myCarousel = $('#carousel-example-generic');
// Initialize carousel
$myCarousel.carousel();
我們已經動態的設定了輪播,接下來,我們來解決這個動畫。
為了讓第一個投影片的標題有動畫,當頁面在瀏覽器載入完後腳本得運行。隨後的幻燈片在動畫下進入到我們的視野,我們的程式碼在slide.bs.carousel 事件上運行。意味著同樣的程式碼運行兩次:頁面載入一次和slide.bs.carousel 事件一次。
因為我們喜歡遵循不重複的原則,我們打算把我們的程式碼封裝在函數中,並在適當的時候引用。
代碼:
function doAnimations(elems) {
 var animEndEv = 'webkitAnimationEnd animationend';
 elems.each(function () {
 var $this = $(this),
  $animationType = $this.data('animation');
 // Add animate.css classes to
 // the elements to be animated
 // Remove animate.css classes
 // once the animation event has ended
 $this.addClass($animationType).one(animEndEv, function () {
  $this.removeClass($animationType);
 });
 });
}
// Select the elements to be animated
// in the first slide on page load
var $firstAnimatingElems = $myCarousel.find('.item:first')
       .find('[data-animation ^= "animated"]');
// Apply the animation using our function
doAnimations($firstAnimatingElems);
// Pause the carousel
$myCarousel.carousel('pause');

// Attach our doAnimations() function to the
// carousel's slide.bs.carousel event
$myCarousel.on('slide.bs.carousel', function (e) {
 // Select the elements to be animated inside the active slide
 var $animatingElems = $(e.relatedTarget)
      .find("[data-animation ^= 'animated']");
 doAnimations($animatingElems);
});
上边的代码 我们来分析一下。
1、来看doAnimations()函数
这个doAnimations() 函数执行的任务如下。
它开始通过缓存变量中含有的animationend事件名称的字符串。这个事件告诉我们,你可能已经猜到,当每个动画结束。我们需要这个点的信息,因为每一次的动画结束后,我们将animate.css类移除。如果我们不做移除,轮播的标题将只有一次动画,也就是,只是在第一次轮播显示特定的幻灯片。
var animEndEv = 'webkitAnimationEnd animationend';
接来下,我们的函数循环遍历每一个我们想要有动画的元素,并获取data-animation的属性值。想上边所说的,这个值包含我们想要添加给元素的Animate.css类,以便有动画效果。
elems.each(function () {
 var $this = $(this),
  $animationType = $this.data('animation');
 // etc...
});
最后,这个doAnimations() 函数动态添加animate.css类的每个要执行动画的元素上,当动画结束的时候,还附加了一个事件监听。动画结束后我们移除从Animate.css添加的类。这样确保下一个轮播灯片回到当前的区域。(你试着删除这段代码,看看会发生什么)
$this.addClass($animationType).one(animEndEv, function () {
 $this.removeClass($animationType);
});
2、第一个标题的动画
当页面在浏览器中加载时,我们在第一个幻灯片中动画的内容:
var $firstAnimatingElems = $myCarousel.find('.item:first')
       .find("[data-animation ^= 'animated']");
doAnimations($firstAnimatingElems);
在这个代码中,我们找到第一张灯片,我们希望通过使用data-animation从动画的标题获取动画属性的值。然后我们把变量 $firstAnimatingElems 当做参数传给doAnimations()函数,然后执行函数。
3、轮播的停止功能
当第一张灯片内容执行完动画以后,我们停止这个轮播功能。
$myCarousel.carousel('pause');
这是Bootstrap轮播组件防止不停旋转的特征。不停的旋转,可能会让访客生厌。
在这种情况下,我建议确保轮播不直接循环到下一个灯片直到所有的动画运行完毕。可以通过设置在初始化代码中的“间隔”选项来控制这个:
$myCarousel.carousel({
 interval: 4000
});
在我看来,一个无限循环轮播标题跳跃每一次的滑动进入视线不理想。
4、轮播幻灯片标题的动画
为每张幻灯片的动画轮播标题变得可见需要以下描述的步骤。
首先,我们在slide.bs.carousel上添加一个事件监听器。
当幻灯片实例方法被调用时,该事件立即触发。
$myCarousel.on('slide.bs.carousel', function (e) {
 // do stuff...
});
接下来,我们选择当前的灯片,找到我们希望增加动画的元素。下边的代码用了slide.bs.carousel事件的.relatedTarget属性来绑定动画。
var $animatingElems = $(e.relatedTarget).find("[data-animation ^= 'animated']");
最后,我们调用doAnimations()函数,把$animatingElems当做参数传进去。
doAnimations($animatingElems);
正如你们许多人可能知道,轮播有一些需要开发者考虑的问题。
在这篇文章中,展示了如何添加一些额外的精力,用几行jQuery和animate.css库用在基本的Bootstrap轮播组件。然而,其他类似的css库,或者css3动画,我们会做的一样好,希望这篇文章可以给大家带来更多的启发,打开大家的学习思路。

熱AI工具

Undresser.AI Undress
人工智慧驅動的應用程序,用於創建逼真的裸體照片

AI Clothes Remover
用於從照片中去除衣服的線上人工智慧工具。

Undress AI Tool
免費脫衣圖片

Clothoff.io
AI脫衣器

AI Hentai Generator
免費產生 AI 無盡。

熱門文章
熱工具

記事本++7.3.1
好用且免費的程式碼編輯器

SublimeText3漢化版
中文版,非常好用

禪工作室 13.0.1
強大的PHP整合開發環境

Dreamweaver CS6
視覺化網頁開發工具

SublimeText3 Mac版
神級程式碼編輯軟體(SublimeText3)
熱門話題


 bootstrap搜索欄怎麼獲取
Apr 07, 2025 pm 03:33 PM
bootstrap搜索欄怎麼獲取
Apr 07, 2025 pm 03:33 PM
如何使用 Bootstrap 獲取搜索欄的值:確定搜索欄的 ID 或名稱。使用 JavaScript 獲取 DOM 元素。獲取元素的值。執行所需的操作。
 bootstrap垂直居中怎麼弄
Apr 07, 2025 pm 03:21 PM
bootstrap垂直居中怎麼弄
Apr 07, 2025 pm 03:21 PM
使用 Bootstrap 實現垂直居中:flexbox 法:使用 d-flex、justify-content-center 和 align-items-center 類,將元素置於 flexbox 容器內。 align-items-center 類法:對於不支持 flexbox 的瀏覽器,使用 align-items-center 類,前提是父元素具有已定義的高度。
 vue中怎麼用bootstrap
Apr 07, 2025 pm 11:33 PM
vue中怎麼用bootstrap
Apr 07, 2025 pm 11:33 PM
在 Vue.js 中使用 Bootstrap 分為五個步驟:安裝 Bootstrap。在 main.js 中導入 Bootstrap。直接在模板中使用 Bootstrap 組件。可選:自定義樣式。可選:使用插件。
 bootstrap怎麼寫分割線
Apr 07, 2025 pm 03:12 PM
bootstrap怎麼寫分割線
Apr 07, 2025 pm 03:12 PM
創建 Bootstrap 分割線有兩種方法:使用 標籤,可創建水平分割線。使用 CSS border 屬性,可創建自定義樣式的分割線。
 bootstrap怎麼調整大小
Apr 07, 2025 pm 03:18 PM
bootstrap怎麼調整大小
Apr 07, 2025 pm 03:18 PM
要調整 Bootstrap 中元素大小,可以使用尺寸類,具體包括:調整寬度:.col-、.w-、.mw-調整高度:.h-、.min-h-、.max-h-
 bootstrap怎麼插入圖片
Apr 07, 2025 pm 03:30 PM
bootstrap怎麼插入圖片
Apr 07, 2025 pm 03:30 PM
在 Bootstrap 中插入圖片有以下幾種方法:直接插入圖片,使用 HTML 的 img 標籤。使用 Bootstrap 圖像組件,可以提供響應式圖片和更多樣式。設置圖片大小,使用 img-fluid 類可以使圖片自適應。設置邊框,使用 img-bordered 類。設置圓角,使用 img-rounded 類。設置陰影,使用 shadow 類。調整圖片大小和位置,使用 CSS 樣式。使用背景圖片,使用 background-image CSS 屬性。
 bootstrap怎麼設置框架
Apr 07, 2025 pm 03:27 PM
bootstrap怎麼設置框架
Apr 07, 2025 pm 03:27 PM
要設置 Bootstrap 框架,需要按照以下步驟:1. 通過 CDN 引用 Bootstrap 文件;2. 下載文件並將其託管在自己的服務器上;3. 在 HTML 中包含 Bootstrap 文件;4. 根據需要編譯 Sass/Less;5. 導入定製文件(可選)。設置完成後,即可使用 Bootstrap 的網格系統、組件和样式創建響應式網站和應用程序。
 bootstrap怎麼看日期
Apr 07, 2025 pm 03:03 PM
bootstrap怎麼看日期
Apr 07, 2025 pm 03:03 PM
答案:可以使用 Bootstrap 的日期選擇器組件在頁面中查看日期。步驟:引入 Bootstrap 框架。在 HTML 中創建日期選擇器輸入框。 Bootstrap 將自動為選擇器添加樣式。使用 JavaScript 獲取選定的日期。
