PS網頁設計教學XIX-在Photoshop中創造一個優雅的作品集的網頁佈局
作為編碼者,美工基礎是偏弱的。我們可以參考一些成熟的網頁PS教程,提升自身的設計能力。套用一句話,「熟讀唐詩三百首,不會作詩也會吟」。
本系列的教程來自網路上的PS教程,都是國外的,全英文的。本人嘗試翻譯這些優秀的教學。因為翻譯能力有限,翻譯的細節上還有待推敲,希望廣大網友不吝賜教。
約定:
1、本文的軟體是Photoshop CS5版本
2、原教程的截圖是英文的,本人在重新製作的基礎上,重新截了中文版的圖
3、原文中有些操作沒有給定參數。本人在反覆測試的情況下測定了一些參數,以紅色的文字顯示。有些錯誤的參數,直接以紅色文字顯示正確的參數
例如:(90,22,231,77),表示矩形的左上角的座標是(90,22),寬231,高77
例如:(90,22),表示矩形的左上角的座標是(90,22),矩形的其他兩個參數教程裡已經指定
4、在教程的最後會附上本人的心得。有些是對教程中的一些步驟的最佳化等。
In this Photoshop web design tutorial, I would like to show you how to create a clean and elegant portfolio web layout that has numerous areas for common content types somon that posts amoet 集 types domon content types somon that posts soo. for featured works, social media information, and a thumbnail gallery. We will cover plenty of professional-grade web designing techniques in this Photoshop tutorial.
在本Photoshop設計教程中,我想向您展示瞭如何創建一個乾淨,優雅的作品集佈局。有許多領域常見的內容區域,如顯示部落格文章摘錄特色的作品,一個漂亮的圖像滑塊,社會化媒體的訊息,和縮圖畫廊。在這個Photoshop教學中,我們將涉及大量的專業級的網頁設計技術。
Step 1: Create a New Document
步驟1:新文件
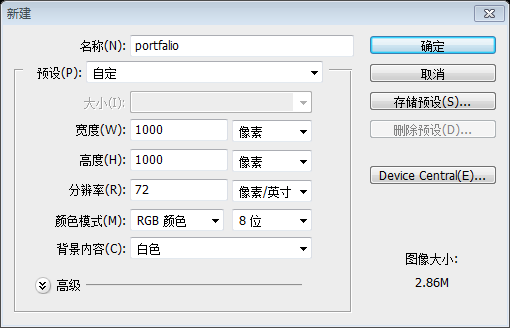
Start by creating a new docum 0px and with a White background.
先在PS中新建一個文件(Ctrl/Cmd + N)。文件的尺寸:1000px*1000px,用白色的背景
Step 2: Add Photoshop Guides
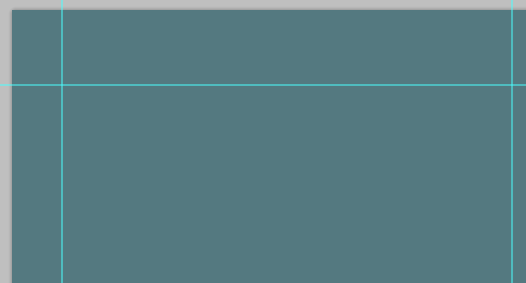
Step 2: Add the canvas in order to ensure proper alignment of the various web layout components. You can create guides accurately by going to View > New Guide.
現在在畫布上添加參考線,以確保正確對齊的各種網頁佈局的組件。您可以精確的建立參考線,點選:檢視 > 新建參考線
。Create vertical guides at 50px, 500px and 950px.
你可以在50px、500px、950px. 651px and 943px.你可以在75px、467px、651px、943px處建立水平參考線Step 3: Creating the Background
 Step 3: Creating the Background
Let's create a new group called "Background" (Layer > New > Group) that will contain all layers associated with our layout's background. Move the "BG" layers associated with our layout's background. Move the "BG" layers associated with our layout's background. Move the "BG" layers intothis 3.新建> 群組),將會包含所有佈局的背景。移動BG層到該組
Now, set your foreground color to teal (#547980) and fill your "BG" layer with the foreground color by pressing Alt/Option + Backspace.
現在,設定你的前景色為藍綠色(#547980),並按Alt/Option + Backspace用前景色填充BG圖層
Now add some noise to our background by going > Add Noise. In the Add Noise dialog window, set the Amount to 1%, Distribution to Uniform and check the Monochromatic option. Click OK to apply the filter.
現在給背景添加一些雜色,點擊:濾鏡> 雜色> 添加雜色。在新增雜色的視窗裡,設定數量為1%,分佈選擇平均分佈,並勾選上單色

Now set your foreground color to black (#000000), create a new layer (Shift + Ctrl/Cmd + N) and name it "Dark sections".
設定前景色為黑色(#000000),建立一個新圖層(Shift + Ctrl/Cmd + N),並命名為Dark sections
Reach for the Rectangular Marquee Tool (M), select the top part of the canvas (use our guides to make the proper selection), and press Alt/Option + Backspace to fill the selected area with our black foreground color.
用
用矩形選框工具(M),在畫布上選擇最上面的部分(使用我們的參考線做出正確的選擇),按Alt / Option + Backspace鍵用黑色前景色填充所選的區域。
Repeat the process for the middle section and bottom section so that you end up with three horizontal bars running across the canvas.重複選區同樣的過程在中部的選區和底部的選區,3個等級的區塊穿越整個畫布
Step 4: Creating Inset pider Lines

Now create a new group inside the "Background" layer group, above", aboveD." us call this group "Lines".
在Background群組中建立新群組,在BG和Drak sections圖層的上方。讓我們命名它為Line
Create a new layer inside the group called "Dark". Make sure that your foreground color is still set to black (#000000) and, with the Pencil Master 10 Diameter, draw a solid horizontal line above the first guide at the top.
在群組中建立新的圖層,命名為Dark。確保你的前景色仍然是黑色(#000000),用主直徑為1px
鉛筆工具在頂部的第一條水平參考線的上面畫一條水平線(下圖是放大到800%的圖)
也可以用直線工具
畫一條水平線(0,74,1000,1),顏色: #000000
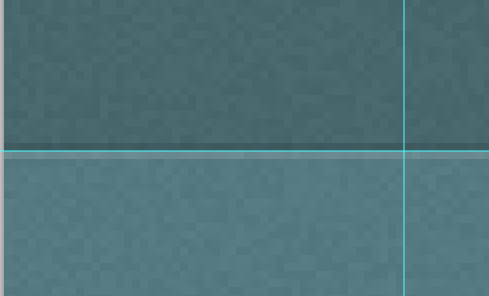
Create another layer inside the "Line namey pumm. white (#FFFFFF) and use the Pencil Tool again to draw a line right below the black one.
在Line群組中建立另一個圖層命名為Bright。改變你的前景色為白色(#FFFFFF),用鉛筆工具 在黑色的直線的下方畫一條水平線(下圖是放大到800%的圖)
也可以用
畫一條水平線(0,75,1000,1),顏色: #FFFFFF

Collapse the "Line" group by clicking on the small triangle next to the group's name so that we're keeping our Layers Panel manageable. Reduce the name so that we're keeping our Layers Panel manageable. Reduce the 7% Opacity to 12%收起Line組,保持我們的圖層面板可管理的。調整組的不透明度為12%(下圖是放大到800%的圖)
複製Line組(在圖層板上右鍵在出現的選單中選擇
),然後命名複製的組為Line 2
Move " Line 2" on our second horizontal guide using the Move Tool (V).
用移動工具移動Line 2到第二條水平參考線
Repeat the above method for
Repeat the above method for負 set 33 月4th horizontal guides.
重複上面的方法創建2條內陷分割線在第3條和第4條的水平參考線
:創建佈局的頭部區域
Before we go on, I would like to note that in this layout, we will be working with plenty of layers, which is good so that our work sois flex al. leads to a Layers Panel that can become quite large and unwieldy. Therefore, whenever we are finished with a component of our web design, we should collapse its layer group as well as ens. go ahead and collapse the "Background" group since we are now done with that component.
在我們繼續之前,我想請注意,在這種佈局中,我們將使用大量的層,使我們的工作是靈活的,這是很好的。然而,這也導致到圖層面板中可能會變得非常龐大和笨重。因此,每當我們完成了我們的網頁設計的一個組成部分,我們應該折疊群組以確保我們能直觀地命名圖層和群組。所以,讓我們繼續前進,因為我們現在完成了背景和折疊Background組。
Create a new layer group called "Header" on top of the "Background" group.
在Background組的上方創建新組Headers
科
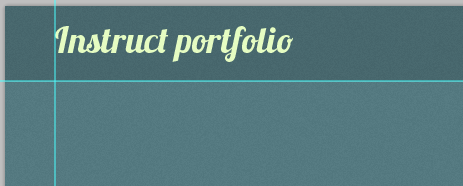
無詞-based logo that has a slick and stylish layer style. To begin, choose the Horizontal Type Tool (T) and set it to Lobster font at 36pt. Set the text color to light green (#E5FCC2) then write your Set the text color to light green (#E5FCC2) then write your name. this instance I wrote, "Instruct portfolio".讓我們創建網站的LOGO——這是非常簡單的文字LOGO,擁有光滑的和時尚的圖層樣式。一開始,選擇水平文字工具
(T),設定字體為Lobster,36pt。設定文字的顏色為亮綠色(#E5FCC2),然後書寫你的網站的名字。在這個實例中,我寫Instruct portfolio
 With the text layer selected in the Layers Panel, go to Layer > Layer Style > Blending Options. We will give our logo a Drop Shadow, Graions Over. We will give our logo a Drop Shadow, Graions Over.
在圖層面板裡選擇文字圖層,點選:
圖層> 圖層樣式> 混合選項


漸變編輯器,黑白的分界線為53%的位置


, Quicks The fpoured
, smpleThe fpey fal; you think?
Use the Horizontal Type Tool again for writing out the main navigation menu items. This time, set your text color to a light FCC color (#E552) and set your 1 color to a light FCC color (#E552), "E55"""""""""""""""""""e. About", "Blog", "Work", and "Contact" — but of course, you should feel free to write out other links.
再次用
水平文字工具書寫主導航選單的文字。這次,設定你的文字的顏色為亮綠色(#E5FCC2),字號18pt。我寫Home、About、Blog、Work、Contact——當然,你可以自由的寫一些其他的連結
Once done, use the Move Tool (V) to place the navigation menu text at the top right side of the header area.
當做完的時候,用 移動工具
移動工具
We will copy the layer style we applied to Right-click on the "Instruct portfolio" layer in the Layers Panel and choose Copy Layer Style from the menu that appears. Next, right-click on the navigation menu text layer and choose Paste Layer Style..層樣式到導航選單。在圖層面板中的Instruct portfolio圖層上右鍵,在出現的選單中選擇拷貝圖層樣式
。接下來,在導覽功能表文字的圖層上以滑鼠右鍵選擇貼上圖層樣式
Select the Rounded Rectangle Tool (U), set the Radius to 5px and draw the button behind your text. Shown below is the active link's background shape drawn behind the "Home" navigation menu text.
),設定半徑為5px,並在文字的後面繪製按鈕。如下所示,活動連結的背景繪製在Home導覽選單文字的後面。
Double-click on the "Button" layer in the Layers Panel to access the Layer Style dialog window. Let's give our active link's background shape a Drop), Gradient Overlay的Button的圖層開啟圖層樣式視窗。為活動連結的背景加上投影、漸層疊加和描邊的樣式
漸層疊加的分界的位置是50%

 在加入圖層樣式後,調低Button圖層的不透明度為10%
 6:創建Featured Work區域
Time to move on to another component of our layout. Remember: Collapse the "Header" layer group in the Layers Panel so that it's out of our way.一個佈局的元件。記住:收起圖層面板中的Header圖層群組,表示已經離開我們的流程
Next, create a new layer group called "Work". This group will contain the featured works in a 3D PS網頁設計教學XIX-在Photoshop中創造一個優雅的作品集的網頁佈局 slider.
接下來,新建組Work。該組將包含一個3D圖像滑動欄的Featured Work What we want to do first is locate three PS網頁設計教學XIX-在Photoshop中創造一個優雅的作品集的網頁佈局s (look through your work and pick ones you like) and open them in Photoshop. For this whatcial, For this Istial, For was simply use the final results from several Web Design tutorials here on Design Instruct, namely:首先確定要擺放的3張圖片(看看你過去的工作,挑選中意的圖片),並在PS中打開。在本教程,我最後要擺放的從Web Design上的教程的圖片 Place your selected PS網頁設計教學XIX-在Photoshop中創造一個優雅的作品集的網頁佈局s inside the "Work" group as separate layers. Use Free Transform (Ctrl/Cmd + T) to resize the ima提高as needed.擺放你選取的圖片在Work群組中的單獨的圖層。用自由變形工具(Ctrl/Cmd + T)調整你的圖片到適當的大小 Here is the first PS網頁設計教學XIX-在Photoshop中創造一個優雅的作品集的網頁佈局 placed at the middle of the canvas:這是我的第一張圖片擺放在畫布的中央:(圖片的大小為400px*300px,位置在(300,127)
) Place the other two PS網頁設計教學XIX-在Photoshop中創造一個優雅的作品集的網頁佈局s below the middle Place the other two PS網頁設計教學XIX-在Photoshop中創造一個優雅的作品集的網頁佈局s below the middlePlace the other two PS網頁設計教學XIX-在Photoshop中創造一個優雅的作品集的網頁佈局s below the m鍛煉張圖片在中間的圖片的下方的左右兩側
註:教程中沒有交代兩側圖片的擺放過程,這裡補充完整
用長方形工具新建一個長方形(130,127,400,300),長方形在中間圖片的下方

 比另一張
比另一張
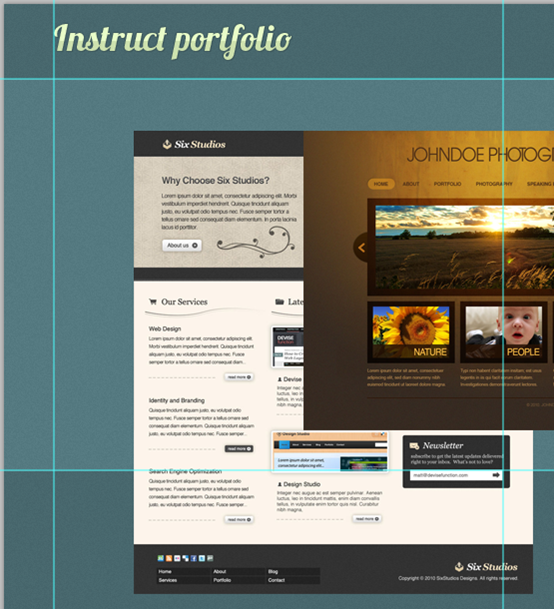

轉換為智慧型物件
,並在新的圖層上右鍵選擇柵格化圖層,新的圖層命名為Left Picture用同樣的方法在右側擺放一張圖片,長方形為(470,127,400,300),圖片的位置為(470,127)
 Click on the "Right
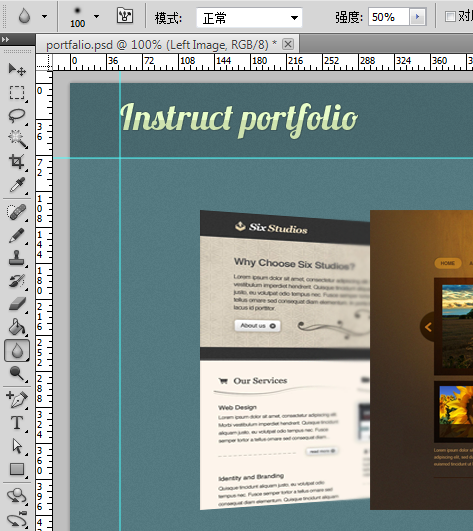
make it our active layer. Go to Edit > Transform > Perspective and transform the PS網頁設計教學XIX-在Photoshop中創造一個優雅的作品集的網頁佈局 (as shown below) so that it looks as if it is 3-dimensional.點擊圖層面板中的Right Picture的圖層,保證啟動圖層。點選:
編輯> 變換> 透視,變換圖片(照下圖),看起來就像是3D效果


When complete, this is how the featured PS網頁設計教學XIX-在Photoshop中創造一個優雅的作品集的網頁佈局s should look:

模糊工具(R)用100px的柔邊圓畫刷去模糊最接近的主圖像的那一邊。
註:效果不明顯的話,可以重複塗抹。另,沿著主影像的左邊沿效果最好
Do the same thing with the featured PS網頁設計教學XIX-在Photoshop中創造一個優雅的作品集的網頁佈局 on the right.
對右邊的特色圖像做同樣的操作。

We will now create a shadow being cast by the main PS網頁設計教學XIX-在Photoshop中創造一個優雅的作品集的網頁佈局 using a quick and easy technique. To start, create a new layer under the 電話圖片.的投影,使用一個快速和簡單的技術。首先,在Main Picture下方建立一個新的圖層。
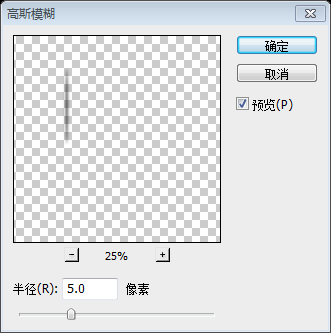
Choose the Ellipse Tool (U) from the Tools Panel and then draw a black (#000000) thin vertical ellipse towards the left. If > Blur > Gaussian Blur, set the Radius option to 5px and then press OK to apply the filter.
從工具面板中選擇
橢圓工具(U),然後在緊貼左邊的地方繪製一個黑色(#000000)(U),然後在緊貼左邊的地方繪製一個黑色(#橢圓(294,297,12,300)。如果做得正確,你應該只看到橢圓形的左半部。現在點選:濾鏡 > 模糊 > 高斯模糊,設定半徑為5px,然後按確定應用新增濾鏡。
o🜥 create the shadow shaowate the shadowl shadow shadowl shadow shadowimdion shadowimdimwion layer ( Ctrl/Cmd + J) and then use the Move Tool (V) to move it on the right.
要創建的主圖像在右邊的陰影,只是重複的左邊陰影層(按Ctrl / Cmd+
J),然後使用移動工具(V)將它放在右邊。

現在我想創建主圖像的一個漂亮的倒影效果- 這是很簡單的事。
層(按Ctrl / Cmd + J)。然後按Ctrl/ Cmd + T進入自由變換模式,並設定高度選項,在選項列裡填上:-100%,以達到垂直翻轉影像(你也可以使用:編輯> 變換> 垂直翻轉作為替代)。

Switch to the Move Tool (V) so that you can move the duplicated PS網頁設計教學XIX-在Photoshop中創造一個優雅的作品集的網頁佈局 down below the original iminalage. Leave a 1plic PS網頁設計教學XIX-在Photoshop中創造一個優雅的作品集的網頁佈局 down below the original PS網頁設計教學XIX-在Photoshop中創造一個優雅的作品集的網頁佈局.切換到
移動工具(V),這樣您就可以將複製的影像移動到低於原始影像的位置。在原始影像和翻轉複製的影像之間,保持1px的空隙(
精確的話,可以把複製好的圖層移到(300,428))。 We don't need the entire duplicated PS網頁設計教學XIX-在Photoshop中創造一個優雅的作品集的網頁佈局; we are just interested in the top part of it. So use the Rectangular Marquee Tool (M) to select the area that is below the earangular Marquee Tool (M) to select the area that is below the earnated on . press Delete to remove the selected area.
我們不需要整個複製的圖像,我們只關心它的上半部。因此,使用矩形選框工具(M),選擇低於我們先前建立的參考線的部分,然後按Delete鍵刪除所選區域。

So now, we only have a little bit of the duplicated PS網頁設計教學XIX-在Photoshop中創造一個優雅的作品集的網頁佈局. Next, we need a layer mask on it (click the Add layer mask button need a layer mask on it (click the Add layer mask button at the botown the Layers anh.
「新增圖層蒙版」按鈕,顯示為紅色)。
Make sure that the layer mask is the active layer. Switch to the Gradient Tool (G). Select a linear gradient that goes from black (#000000) to transparent. Apply the gradient from the black (#000000) to transparent. Apply the gradient from the black (#000000) to transparent。 off the reflection, reduce the layer's Opacity to 40%.
之前要按Ctrl/Cmd + D取消選擇)。切換到漸變工具(G)。選擇從黑色(#000000)到透明的線性漸變。應用從底部到頂端的簡單。要完成的倒影效果,降低圖層的不透明度為40%。

What we want to do now is to stylize the main PS網頁設計教學XIX-在Photoshop中創造一個優雅的作品集的網頁佈局 further by applying a simple glossy reflection on its surface。現在要做的是風格化的主圖像,進一步應用一個簡單的在其表面的光澤反射。首先,在Main Picture圖層上方建立新圖層Gloss。
使用
多邊形套索使用多邊形套索)
()Fill your polygonal lasso selection with white (#FFFFFF). Next, hold down Ctrl/Cmd and click on the "Main picture" layer's thumbnail in the Layers Panel to place a selection around it。 active layer, and if not, switch back to it without deselecting your current selection. Go to Select > Inverse (Shift + Ctrl/Cmd + I) to invert the current selection. Press Delete to remove the selected aloss. This ourures that our grea remains within the PS網頁設計教學XIX-在Photoshop中創造一個優雅的作品集的網頁佈局. You can now deselect your selection (Ctrl/Cmd + D).
新建圖層,前景色設定為#FFFFFF,按Alt + Backspace以前景色填滿選區
)。接下來,按住Ctrl/
在圖層面板上的main picture圖層的縮圖,使它周圍形成一個選取範圍。 你的Gloss層仍然應該是您的活動層,如果沒有,請切換回不取消目前的選擇。點選:選擇 > 反選(Shift + Ctrl / Cmd + I)實現反向的選擇。按下Delete鍵刪除所選區域。這確保了我們的光澤保持在主圖像內。現在,您可以取消選擇(按Ctrl / Cmd+ D)。
To finish off the effect, just set the "Gloss" layer’s Opacity to 7%.
要完成的效果,只需要設定Gloss圖層的不透明度為7%。

Moving on, we are now going to create the arrows that will control the movement of the 3D slider. Inside our "Works" layer group, create a new layer named "Righter group, create a new layer named "Righter group" gray (#1E1E1E) and pick the Custom Shape Tool (U) from the Tools Panel. In the Options Bar, there should be a Shape option dropdown menu. Locate the custom shape named Arrow 2 (this shape comes with Photoshop by default) and Photoshop by default) and Photoshop by default) and Photoshop by default) and use it to draw the right arrow (shown below).
繼續,我們現在要創建箭頭,將控制的3D滑塊的運動。在我們的Works群組中,建立一個新圖層,命名為Right Arrow。設定前景色為深灰色(#1E1E1E),並從工具面板中選擇自訂形狀工具(U)。在選項列上,應該有一個自訂形狀的下拉式選單。找到命名為Arrow 2的自定形狀(這種形狀在Photoshop預設情況下會有的),並用它來畫右箭頭(如下圖所示)。

Give the right arrow a Drop Shadow and Inner Shadow Layer style (suggested settings for each layer effect shown below).
層的效果如下圖)。


Reduce the "Right arrow" layer's Opacity to15%
 好了,我們也需要一個左箭頭- 不用擔心- 我們就可以複製Right Arrow圖層(Ctrl / Cmd+
和移動複製的到圖像的左側。然後,同樣的相對主影像的翻轉,我們將使用自由變換工具(Ctrl / Cmd的+
T)
(你應該複製的圖層重新命名為Left Arrow,以使我們的層組織清晰)。
 Step 7: Create the Social Media Area
步驟7:創建社會媒體區域
We are done with the "Work" layer group, so you can collapse it in the Layers Panel now.
我們完成了Work組,所以你現在可以在圖層面板中把它折疊,。
Go to Layer > New > Group and create a new layer group called "Social media". Set your foreground color to black (#000000) and then create a new layer called "Bubble" inside the new .group (U), set its Radius option to 5px and draw a rounded rectangle on the "Bubble" layer (as shown below). This rectangular box will contain your most recent Tweet.
點: 圖層 圖層> ,並建立新群組Social media。設定前景色為黑色(#000000),然後在新群組內建立一個新圖層Bubble。選擇圓角矩形工具(U),設定半徑為5px,並在Bubble層繪製一個圓角矩形(50,489,427,97)(如下圖)。此矩形框,將包含最新的Tweet。

Now pick the Custom Shape Tool (U) and set the Shape option in the Options Bar to Talk 10 (this custom shape comes bundled with Photoshop by default). Drawed the on the low rectangle box.
現在選擇自訂形狀工具(U),在選項列中設定形狀選項,選擇Talk 10(在Photoshop中選擇台詞框,使用這個自訂形狀)。繪製在圓角矩形的右下角。

I want to flip the tail of the talk bubble so that it is facing towards the right of the canvas. We bubble so that it is facing towards the right of the canvas。 ) then changing the Width option to -100%.
我要翻轉的談話框的尾巴,使它面向畫布的右側。我們將使用和以前一樣的技術,自由變換(Ctrl / Cmd + T),然後改變
寬度選項為:-100%。
After that, select both the "Bubble" and "Talk 10" layers in the Layers Panel. Right-click on one of them and choose Merge Layers (Ctrl/Cmd + E) to combineone of them and choose Merge Layers (Ctrl/Cmd + E) to combine the pwo. To finish off the talk bubble, just reduce the merged layer's Opacity to 15%.
E)使
兩個圖層合併。要完成通話框的製作,調整合併圖層的不透明度為15%。
Now set the foreground color to light green (#E5FCC2) and pick the Horizontal Type Tool (T) from the Tools Panel. Set your font to 18,0,orgia for wupic the Tools Panel. Set your font to 18,, n. our comp.
設定前景顏色為淺綠色(#E5FCC2),並從工具面板中選擇 水平
水平
文字工具
(T)。設定字體為18pt,Georgia(斜體)。為我們的對話框寫Twitter的訊息。
Then right-click on the Twitter message text layer in the Layers Panel and choose Blending Options from the menu that appears. Let's give our Twe -shadow property in our HTML/CSS template).
🎜在圖層面板中的Twitter 訊息文字圖層上右鍵單擊,然後從出現的選單中選擇混合選項。 🎜🎜讓我們為 Tweet 文字圖層設定投影圖層樣式 (這在我們的 HTML/CSS 範本中使用 CSS3 文字陰影屬性,我們可以重新建立物件)。 🎜🎜🎜
Let's incorporate some social media icons. For this web layout, I chose to go with the awesome and free Function Icon Set. Download that now and locate the followesome and free Function Icon Set. Download that now and locate the圖標,添加到網頁佈局
中,我選擇了awesome and free Function Icon Set。 立即下載,並找到以下文件:Open the first icon (twitter_48.png) in Photoshop and place it into our main document. Again, weould maintain our work'seat media Twitter", "Twitter Boxed", "Flickr", and so on.
在Photoshop 中開啟的第一個圖示(twitter_48.png),並將其放到我們的主文檔。
再次,我們應透過重新命名為Twitter、Twitter Boxed、Flickr等社群媒體層來保持我們的工作整潔。 Place the Twitter bird icon below the tail of our talk bubble using the Move Tool (V).
使用
移動工具(V) 移動對話框的 icon 到下面。
Before designing our social media icons, let's create a heading on the right-hand side of the talk bubble. To start, first switch your foreground color DELtalkgreen color switch” and then set it at 24pt, Georgia (Italic) font. Type something for your heading, such as "Add Me on These Social Networks…".
首先切換到顏色為綠色 (#9DE0AD) 的前景色、 選擇
橫排文字工具
鍵入您的標題,如Add Me on These Social Networks…。 Let's copy the drop shadow layer style from the Tweet message; just right-click on the Tweet message text layer in the Layers Panel, choose Copyright .
讓我們從Tweet 訊息文字圖層複製投影的圖層樣式,
只需在圖層面板中的Tweet 訊息文字圖層上右鍵單擊,選擇拷貝圖層樣式
,在標題圖層中,用滑鼠右鍵單擊,然後選擇貼上圖層樣式。
Position the other social media icons as shown below.
Change the foreground color to light green (#E5FCC2) and select the Horizontal Type Tool again. Set your font to 18pt, Georgia (Italic). Beside the social em. "Twitter", "Stumble Upon", etc.).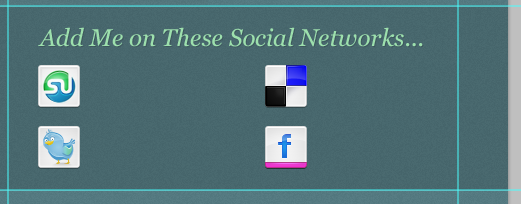
更改前景色,淡綠色(#E5FCC2) 並再次選擇
。 將您的字體設定為18pt,Georgia(斜體)。 在社群媒體圖示的旁邊寫的服務各自名稱 (例如Twitter、Stumble Upon等)。 Again, copy the drop shadow layer style from the heading or the Tweet message text layer and paste it onto the social media text layers message text layer and paste it onto the social media text layers.. ,並將其貼到社群媒體文字圖層上。

Let's give the texts a rounded rectangle background. You should be familiar with this technique since we have done it with the talk bubble。 the Radius option at 5px, draw a rounded rectangle below each of the text. You must also reduce the rounded rectangles' layer opacities to 15%. Below, you can see that I've performed this method on the "Stumble Upon"text.
讓我們為這些文字添加的圓角矩形背景。 因為我們做過對話框,您應該熟悉這種技術。 前景色設定為黑色 (#000000),選擇圓角矩形工具並設定半徑為 5px ,在每個文字的下方繪製圓角矩形。 您還必須調整圓角矩形圖層不透明度為15%。 下面,您可以看到我已經對Stumble Upon文本添加了背景(圓角矩形的位置是(592,530,130,32))。

Now just duplicate the rounded rectangle background's layer (Ctrl/Cmd + J) and move them behind the background's layer (Ctrl/Cmds. J) and move them behind the background's layer (Ctrl/Cmds.m) and move them behind the other reing textp. ,並將它們移到其他剩餘的文字的後面。
其它3個圓角矩形的位置分別是(819,530)、(592,592)、(819,592)

Design the B
步驟8:設計Latest from the Blog區域
This web portfolio also has a blog. What we can do is display the most recent post's procces post's 0left the frontdisplay the most recent post's 0cm post's. below the Tweet message.
此web 作品集也有部落格。
我們可以做的是在前端頁面中顯示最近的張貼摘錄。 ,我們可以做在左邊的列,在 Tweet 訊息的下面。
You can now collapse the "Social media" layer group. Create a new layer group called "Blog". Change the foreground color to green (#9DE0AD) and choose the Horizon. to 24pt, Georgia (Italic) and write out this section's heading; something like "Latest from the Blog" should do the trick. Copy and paste the drop shadow layer style that thatwe've used in text same consistent design element.
現在,您可以折疊Social media組。
建立一個新群組稱為Blog。更改前景色為綠色 (#9DE0AD) 並選擇水平文字工具 (T)。 將您的字體設為24pt,Georgia (斜體),並寫出此節的標題;Latest from the Blog層也應該可以做到,如我們一直採用其他文本層中一樣,複製和貼上投影圖層樣式,這樣,它們具有一致的設計元素。

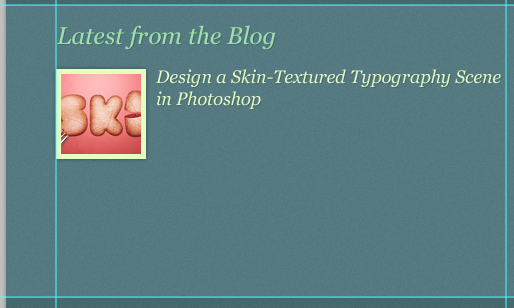
Below the heading of the "Latest from the Blog" area, we will display a thumbnail PS網頁設計教學XIX-在Photoshop中創造一個優雅的作品集的網頁佈局 associated with the blog post gincer Hour be gin, 硬) the commground forexcerco ite, 00 月) draw a 90×90px square box for the blog post excerpt's thumbnail background. You can use the Rectangular Tool (U) to draw the background.
在Latest from the Blog區域的標題的下面我們將顯示摘錄的部落格與其關聯的縮圖圖像。首現,切換到淺綠色 (#E5FCC2) 的前景色,然後繪製 90 × 90px 正方形為博客摘錄的縮圖背景。 您可以使用矩形工具 (U) 繪製背景矩形(50,715)。

After that, right-click on the layer and choose Blending Options to bring up the Layer Style dialog window。
之後,在圖層上右鍵單擊,選擇混合選項,彈出圖層樣式對話框的視窗。 讓我們給的縮圖背景外發光圖層樣式 (設定如下所示)。

Now find a nice 80×80px thumbnail PS網頁設計教學XIX-在Photoshop中創造一個優雅的作品集的網頁佈局 for your blog post (5px smaller on each side.com PS網頁設計教學XIX-在Photoshop中創造一個優雅的作品集的網頁佈局 from this Design Instruct tutorial: Design a Skin-Textured Typography Scene in Photoshop.
現在為你的博文( 相比的縮圖背景的每一側小5px) 找到好80 ×80px的縮圖圖像。 我只是用縮圖圖像設計指導教程: Design a Skin-Textured Typography Scene in Photoshop
註:如果圖片比較大,我們還可以對正方形添加內發光或者是描邊的圖層樣式,然後圖片移到正方形的上方,右鍵選擇新增剪貼蒙版,使得圖片只顯示正方形中的這一部分

使用相同的前景色,書寫前景色,寫上相同前景色,寫的前景色,寫上您的前景色,寫上相同前景色,寫好書的部落格貼文標題。標題的字體
它應該略小於Latest from the Blog的標題。象其他文字圖層一樣,複製並貼上到標題的文字圖層的投影的圖層樣式。
透過複製和貼上從它的另一個文字圖層的圖層樣式以及應用在這裡投影的圖層樣式。
Let us make the "Read more" link. We will change our font settings to 13pt, Georgia (Italic). Write "Read more" at the bottom of the post excerpt and apply the same drop shadow laybottom of the post onto it. Create a new layer under the "Read more" text layer, change the foreground color to black (#000000) and, using the Rounded Rectangular Tool (T) at 5px Radius, draw a rounded rectangle button background for theRead more" text. Finish it off by lowering the layer's Opacity to 15% just like with the other rounded rectangle backgrounds we've drawn.
讓我們創建Read more連結。 我們將字體設定為 13pt,Georgia (斜體)。在摘錄的底部寫Read more,和其他的文字圖層應用相同投影的圖層樣式。在Read more文字圖層下建立一個新圖層,更改前景色為黑色(#000000) 和使用5px 半徑的圓角矩形工具 (T),繪製Read more文字背景的圓角矩形( 415,904,85,19)。 降低不透明至15%,就像我們已經繪製的其他的圓角矩形的不透明度一樣。

Step 9: Creating the Thumbnail Gallery Area
步驟PS網頁設計教學XIX-在Photoshop中創造一個優雅的作品集的網頁佈局 gallery that can contain PS網頁設計教學XIX-在Photoshop中創造一個優雅的作品集的網頁佈局s pulled from your Flickr account or other portfolio pieces. Let's go ahead and collapse the "Blog" layer group to get it out of the way, and then create another layer group called "Gallery".
🜎庫可以包含從你的Flickr 帳號或其他作品集的圖像。
讓我們繼續和折疊Blog組,然後創建另一個組Gallery。
We'll start with the section's heading. Change your foreground color to green (#9DE0AD), and use the same settings as the "Latest from the Blog" AD), and use the same settings as the "Latest from the Blog" 頭—— write out "Gallery". Then, like before, just copy and paste the drop shadow layer style from another text layer that has it.
我們將開始書寫該節的標題。改變前景色為綠色 (#9DE0AD),並和Latest from the Blog使用相同的設定—— 24pt,格魯吉亞 (斜體) —— 寫Gallery。
Create another layer group inside the "Gallery" group called "Gallery item". This group will contain an 80×80px PS網頁設計教學XIX-在Photoshop中創造一個優雅的作品集的網頁佈局 and its back . Blog" layer group, locate the thumbnail background, duplicate it (Ctrl/Cmd + J) and then move the duplicated layer into the "Gallery item" group. Find an 80×80px photo and place it on top the ground the
在Gallery群組建立名為Gallery Item的群組。該組將包含 80 × 80px的圖像和它的背景。 
(530 ,716)
。
找到 80 × 80px的圖片並將其放置在縮圖的背景上。 Collapse the "Gallery item" group and make 7 copies of it by right-clicking on the layer group and choosing Duplicate Group from the menu that appears. Position the duplicated gallery items such that you end up with a 2-row by 4-column arrangement.
折疊Gallery item組並透過右鍵點選群組,並從出現的選單中選擇複製群組7次。 這樣您可以為 2 行 4 列安排所的位置複製的gallery items。
其餘7個方塊的位置分別是(640,716)、(750,716)、(860,716)、(530,833)、(640,833)、(750,833)、( 860,833)

Step 10: Create the Footer Area
步驟10:建立頁腳區域10:建立頁腳區域apsing the "Gallery" group and then creating a new group called "Footer". Change the foreground color to a bright green (#E5FCC2) and select the Horizontal Type Tool (T). Set your font settings to 13pt, Arial and write yourright footpy. After that, just paste in the drop shadow layer style from other text layers.
這是我們最後的一步。啟動折疊Gallery群組,然後新建組Footer。
更改前景色為明亮的綠色 (#E5FCC2),然後選擇
水平文字工具(T)。 設定您的字體設定為 13pt Arial 和寫入您的頁腳版權和其他資訊。 在此之後,從其他文字圖層貼上投影圖層樣式。
Tutorial Summary
我們介紹一些有用和時尚的技巧,如如何來創建好和詳細的紋理的背景,嵌入分隔線,手工,應用投影技術用於創建圖像以及更多,創建一個不錯的談話框圖形和更多。
最終的作品 最終的作品
 後記:
後記:
本篇的教程主要體現在2個方面,一個是中間光澤的圖片加欄效果3D效果。二是整個頁面的顏色用的少,用的巧,很多元素的顏色都是透過修改不透明度來達到效果。這樣,如果整個頁面要更改色系的話,只需更改背景色和文字的顏色即可。網頁的複用度比較高。
更多PS網頁設計教程XIX——在Photoshop中創建一個優雅的作品集的網頁佈局 相關文章請關注PHP中文網!

熱AI工具

Undresser.AI Undress
人工智慧驅動的應用程序,用於創建逼真的裸體照片

AI Clothes Remover
用於從照片中去除衣服的線上人工智慧工具。

Undress AI Tool
免費脫衣圖片

Clothoff.io
AI脫衣器

Video Face Swap
使用我們完全免費的人工智慧換臉工具,輕鬆在任何影片中換臉!

熱門文章

熱工具

記事本++7.3.1
好用且免費的程式碼編輯器

SublimeText3漢化版
中文版,非常好用

禪工作室 13.0.1
強大的PHP整合開發環境

Dreamweaver CS6
視覺化網頁開發工具

SublimeText3 Mac版
神級程式碼編輯軟體(SublimeText3)
 PS導出PDF如何設置密碼保護
Apr 06, 2025 pm 04:45 PM
在 Photoshop 中導出帶密碼保護的 PDF:打開圖像文件。點擊“文件”>“導出”>“導出為 PDF”。設置“安全性”選項,兩次輸入相同的密碼。點擊“導出”生成 PDF 文件。
 PS導出PDF有哪些常見問題
Apr 06, 2025 pm 04:51 PM
導出PS為PDF時常見問題及解決方法:字體嵌入問題:勾選"字體"選項,選擇"嵌入",或將字體轉換成曲線(路徑)。顏色偏差問題:將文件轉換成CMYK模式,並進行校色;直接用RGB導出需做好預覽和顏色偏差的心理準備。分辨率和文件大小問題:根據實際情況選擇分辨率,或使用壓縮選項優化文件體積。特殊效果問題:導出前將圖層合併(扁平化),或權衡利弊。
 ps鋼筆工具怎麼用
Apr 06, 2025 pm 10:15 PM
鋼筆工具是創建精確路徑和形狀的工具,使用方法為:選擇鋼筆工具(P)。設置路徑、填充、描邊和形狀選項。單擊創建錨點,拖動形成曲線,鬆開創建錨點。按 Ctrl/Cmd Alt/Opt 刪除錨點,拖動移動錨點,單擊調整曲線。單擊第一個錨點閉合路徑創建形狀,雙擊最後一個錨點創建開放路徑。
 PS一直顯示正在載入是什麼原因?
Apr 06, 2025 pm 06:39 PM
PS“正在載入”問題是由資源訪問或處理問題引起的:硬盤讀取速度慢或有壞道:使用CrystalDiskInfo檢查硬盤健康狀況並更換有問題的硬盤。內存不足:升級內存以滿足PS對高分辨率圖片和復雜圖層處理的需求。顯卡驅動程序過時或損壞:更新驅動程序以優化PS和顯卡之間的通信。文件路徑過長或文件名有特殊字符:使用簡短的路徑和避免使用特殊字符。 PS自身問題:重新安裝或修復PS安裝程序。
 Photoshop的價值:權衡成本與其功能
Apr 11, 2025 am 12:02 AM
Photoshop值得投資,因為它提供了強大的功能和廣泛的應用場景。 1)核心功能包括圖像編輯、圖層管理、特效製作和色彩調整。 2)適合專業設計師和攝影師,但業餘愛好者可考慮替代品如GIMP。 3)訂閱AdobeCreativeCloud可按需使用,避免一次性高額支出。
 PS執行操作時一直顯示正在載入如何解決?
Apr 06, 2025 pm 06:30 PM
PS卡在“正在載入”?解決方法包括:檢查電腦配置(內存、硬盤、處理器)、清理硬盤碎片、更新顯卡驅動、調整PS設置、重新安裝PS,以及養成良好的編程習慣。
 如何加快PS的載入速度?
Apr 06, 2025 pm 06:27 PM
解決 Photoshop 啟動慢的問題需要多管齊下,包括:升級硬件(內存、固態硬盤、CPU);卸載過時或不兼容的插件;定期清理系統垃圾和過多的後台程序;謹慎關閉無關緊要的程序;啟動時避免打開大量文件。
 專業人士的Photoshop:高級編輯和工作流技術
Apr 05, 2025 am 12:15 AM
Photoshop的高級編輯技巧包括頻率分離和HDR合成,優化工作流程可通過自動化實現。 1)頻率分離技術分離圖像的紋理和顏色細節。 2)HDR合成增強圖像的動態範圍。 3)自動化工作流程提高效率並確保一致性。


