Photoshop與WPF雙劍配合,打造酷炫個性的進度條控件
現在如果想打造一款專業的App,UI的設計和操作的簡單性相當重要。 UI設計可以藉助Photoshop或AI等設計工具,之前了解到WPF設計工具Expression Blend可以直接匯入PSD檔案或AI設計檔案(當然不是全部特徵支援),最近研究了一下,也費了一番周折,好在最後實現了預期的效果。以下將step by step用範例說明如何先用PS建立一個向量圖形模板,然後用Expression Blend匯入PSD文件,並取得PATH的Data值,為打造一款酷炫的個性進度條控制建構美觀UI。
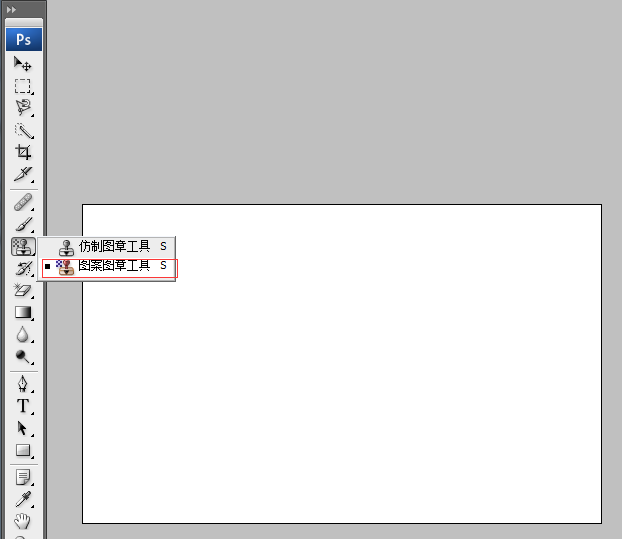
1、打開Photoshop,新建一個空白圖層,點選PS的圖案圖章工具:
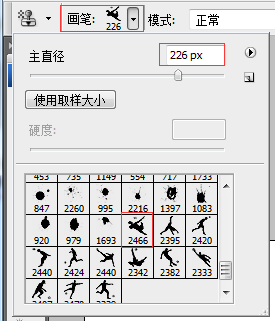
2、選擇上的筆刷筆刷),如下圖:
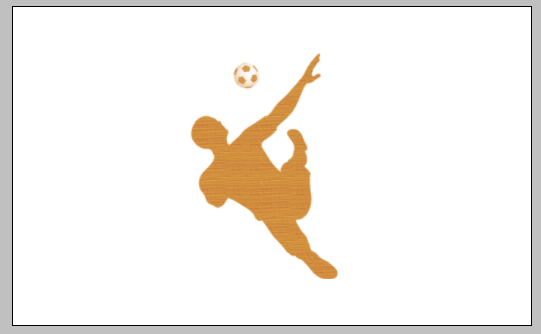
在適當位置點擊後,如下圖所示。
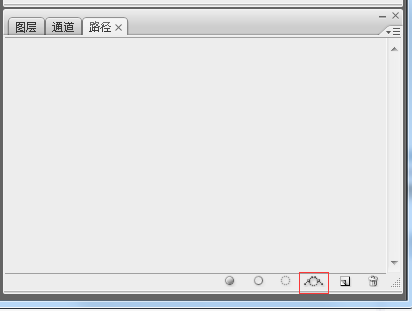
3、按住CTRL,選取圖層,切換到路徑面板,點選【從選取建立工作路徑】 按鈕,如下圖:
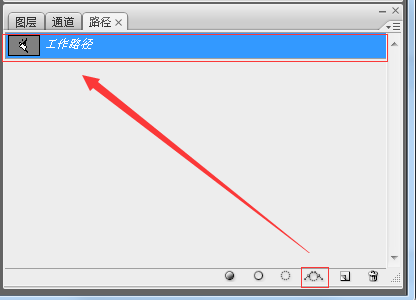
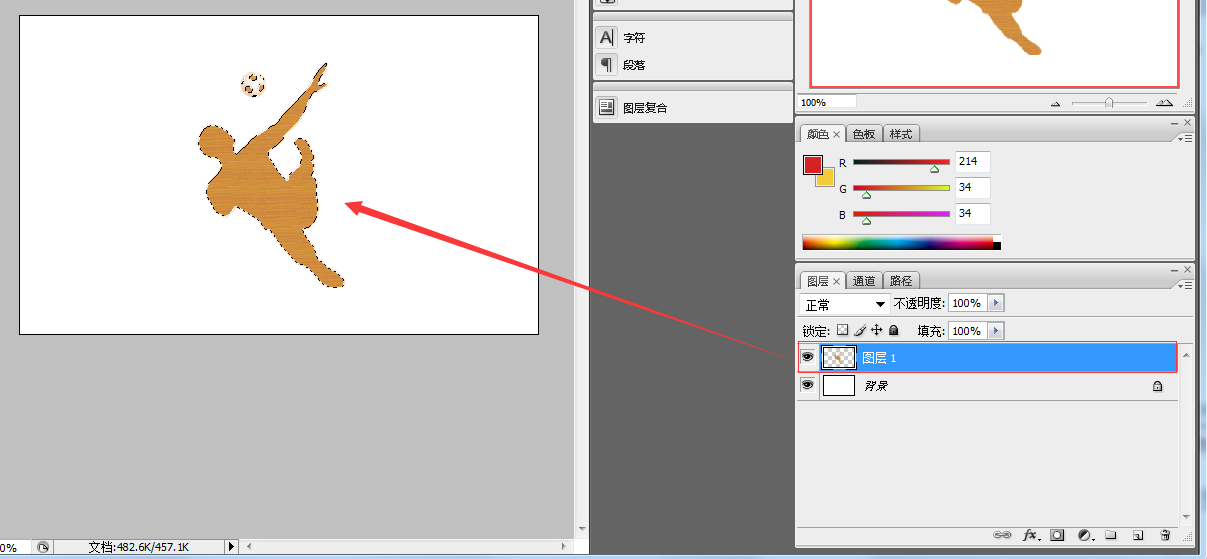 注意上圖的紅框按鈕,就是【從選取創建工作路徑】,點擊後出現下圖:
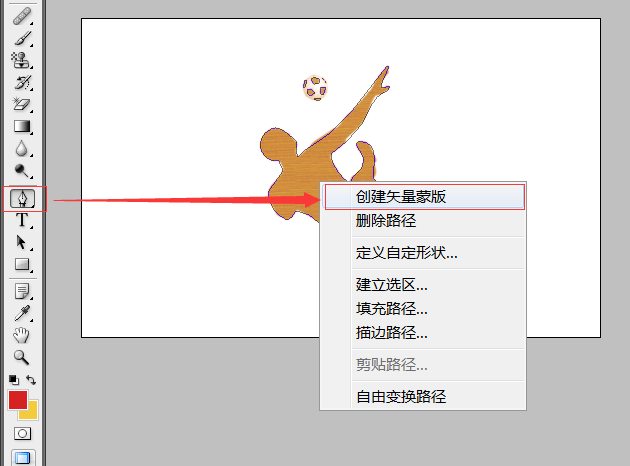
4、這是最關鍵的一步,創建向量蒙板,切換到圖圖層面板,點選【鋼筆】工具,在圖形上右鍵選單中選擇【建立向量蒙板】項,如下圖:
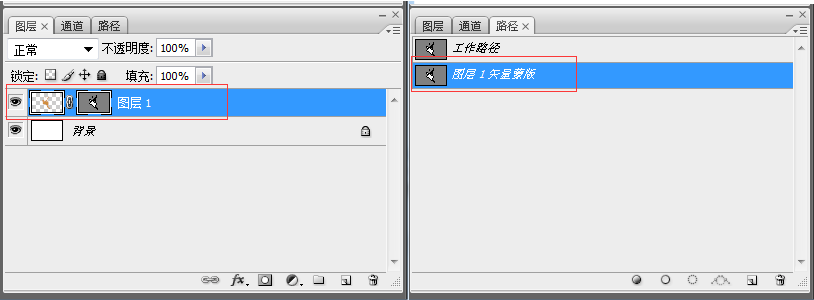
然後PS中可以看到下圖的效果,說明創建成功。
保存PS檔案為進度條.PSD檔案待用。
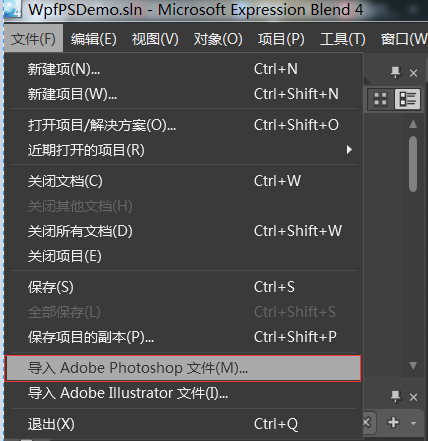
 5、打開Expression Blend 4新建一個WPF項目,然後導入PSD文件,如下圖:
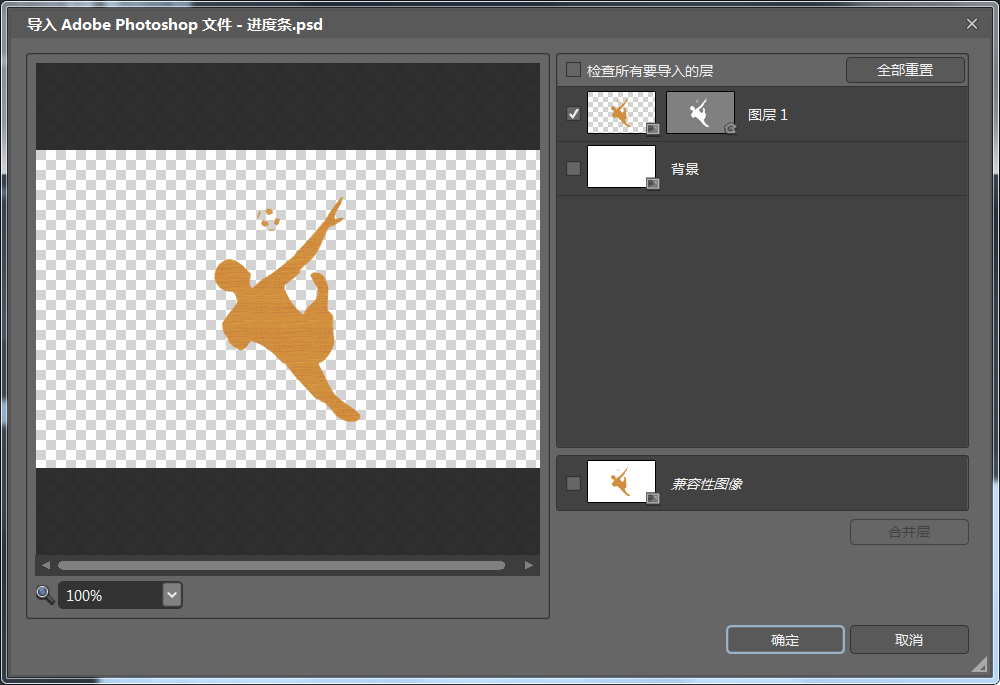
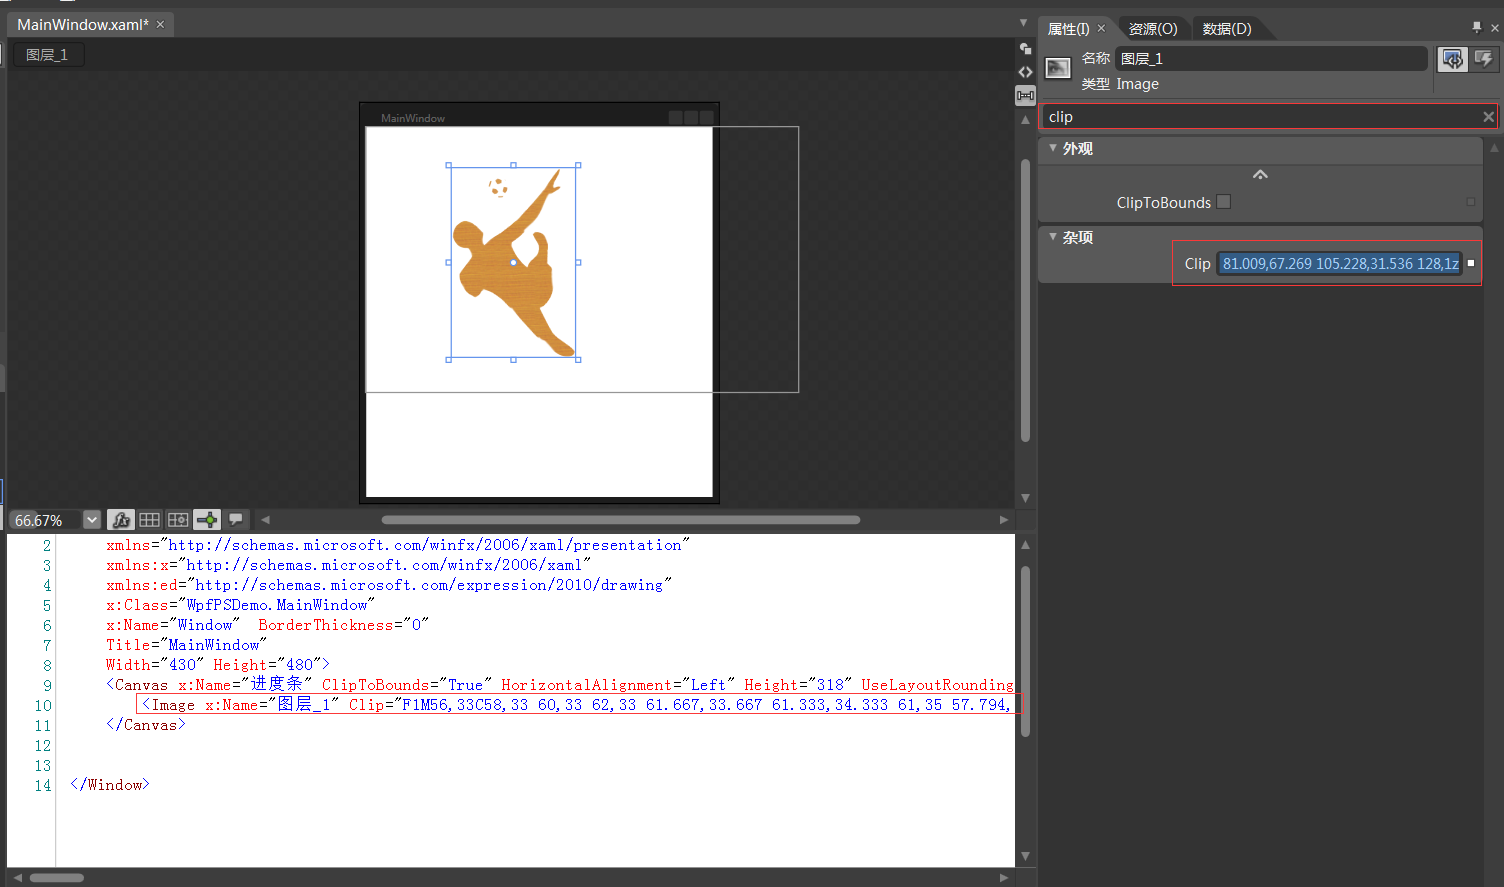
導入成功後,可以複製該圖形的clip數據,這就是WPF中PATH所需要的Data值。
下面來建立一個酷炫的WPF進度條控制。
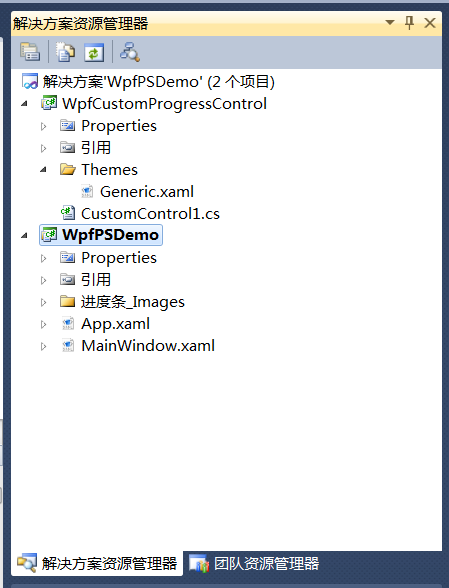
6、在VS2010中重新打開該項目,並添加一個WPF自訂控制項庫,如下圖:
17
<resourcedictionary>

    <style>
        <Setter Property="Template">
            <Setter.Value>
                <ControlTemplate TargetType="{x:Type local:CustomProgressControl}">
                    <Grid x:Name="PART_container"
                          Background="{TemplateBinding Background}"
                          Width="{TemplateBinding Width}"
                          Height="{TemplateBinding Height}">
                        <Path x:Name="PART_foreground_P"
                              Visibility="Collapsed"
                              Stretch="Fill"
                              Stroke="Transparent"
                              Fill="{TemplateBinding Foreground}"
                              StrokeThickness="2"
                              Data="F1M56,33C58,33 60,33 62,33 61.667,33.667 61.333,34.333 61,35 57.794,34.859 53.856,36.079 56,33z M49,24C54.364,24.735 53.554,24.821 56,28 53.807,30.696 55.287,29.902 51,31 50,30 49,29 48,28 48.333,26.667 48.667,25.333 49,24z M62,22C63.666,22.333 65.333,22.667 67,23 66.333,27.571 65.935,27.376 64,30 63,29.333 62,28.667 61,28 61,27.667 61,27.333 61,27 61.333,25.333 61.667,23.666 62,22z M46,15C46.667,15 47.333,15 48,15 47.333,17.333 46.667,19.667 46,22 45.333,22 44.667,22 44,22 44.667,19.667 45.333,17.333 46,15z M63,13C64.923,14.392 63.599,13.101 65,15 64.333,14.333 63.667,13.667 63,13z M55,12C56.666,12.667 58.333,13.333 60,14 60,15.333 60,16.667 60,18 59.333,18 58.667,18 58,18 54.722,21.928 52.838,16.561 52,14 53,13.333 54,12.667 55,12z M128,1C128.667,1 129.333,1 130,1 128.882,10.058 122.793,12.326 122,23 126.364,22.028 126.876,21.206 131,22 130,23.333 129,24.667 128,26 110.659,32.752 112.704,45.252 103,59 95.769,69.245 82.761,82.131 72,89 72.621,101.092 82.373,112.463 90,118 90.333,118 90.667,118 91,118 93.274,107.421 107.464,106.386 104,92 101.667,87.667 99.333,83.333 97,79 98,78 99,77 100,76 122.812,77.152 112.786,100.488 115,114 116.666,115.666 118.333,117.333 120,119 127.359,142.373 118.776,160.626 106,168 110.337,176.877 114.918,188.188 121,197 127.441,206.332 140.794,210.508 148,220 146.506,223.067 146.885,223.215 144,225 113.08,236.802 62.376,138.34 36,147 34.077,151.751 32.347,152.761 28,155 17.556,150.255 9.333,141.565 9,127 13.999,120.001 19,112.999 24,106 22.667,102.667 21.333,99.333 20,96 7.555,96.019 4.392,90.889 1,82 1.465,74.486 3.768,68.82 9,66 19.848,56.341 31.922,71.946 38,77 37.406,83.299 36.792,87.413 39,92 41.333,89.667 43.667,87.333 46,85 81.009,67.269 105.228,31.536 128,1z" />

                        <Rectangle x:Name="PART_mask"
                                   Fill="{TemplateBinding Background}"
                                   VerticalAlignment="Stretch"
                                   HorizontalAlignment="Stretch" />

                        <Path x:Name="PART_outline_P"
                              Visibility="Collapsed"
                              Stretch="Fill"
                              Stroke="{TemplateBinding BorderBrush}"
                              Fill="Transparent"
                              StrokeThickness="2"
                              Data="F1M56,33C58,33 60,33 62,33 61.667,33.667 61.333,34.333 61,35 57.794,34.859 53.856,36.079 56,33z M49,24C54.364,24.735 53.554,24.821 56,28 53.807,30.696 55.287,29.902 51,31 50,30 49,29 48,28 48.333,26.667 48.667,25.333 49,24z M62,22C63.666,22.333 65.333,22.667 67,23 66.333,27.571 65.935,27.376 64,30 63,29.333 62,28.667 61,28 61,27.667 61,27.333 61,27 61.333,25.333 61.667,23.666 62,22z M46,15C46.667,15 47.333,15 48,15 47.333,17.333 46.667,19.667 46,22 45.333,22 44.667,22 44,22 44.667,19.667 45.333,17.333 46,15z M63,13C64.923,14.392 63.599,13.101 65,15 64.333,14.333 63.667,13.667 63,13z M55,12C56.666,12.667 58.333,13.333 60,14 60,15.333 60,16.667 60,18 59.333,18 58.667,18 58,18 54.722,21.928 52.838,16.561 52,14 53,13.333 54,12.667 55,12z M128,1C128.667,1 129.333,1 130,1 128.882,10.058 122.793,12.326 122,23 126.364,22.028 126.876,21.206 131,22 130,23.333 129,24.667 128,26 110.659,32.752 112.704,45.252 103,59 95.769,69.245 82.761,82.131 72,89 72.621,101.092 82.373,112.463 90,118 90.333,118 90.667,118 91,118 93.274,107.421 107.464,106.386 104,92 101.667,87.667 99.333,83.333 97,79 98,78 99,77 100,76 122.812,77.152 112.786,100.488 115,114 116.666,115.666 118.333,117.333 120,119 127.359,142.373 118.776,160.626 106,168 110.337,176.877 114.918,188.188 121,197 127.441,206.332 140.794,210.508 148,220 146.506,223.067 146.885,223.215 144,225 113.08,236.802 62.376,138.34 36,147 34.077,151.751 32.347,152.761 28,155 17.556,150.255 9.333,141.565 9,127 13.999,120.001 19,112.999 24,106 22.667,102.667 21.333,99.333 20,96 7.555,96.019 4.392,90.889 1,82 1.465,74.486 3.768,68.82 9,66 19.848,56.341 31.922,71.946 38,77 37.406,83.299 36.792,87.413 39,92 41.333,89.667 43.667,87.333 46,85 81.009,67.269 105.228,31.536 128,1z" />

                        <TextBlock x:Name="PART_percentage_text"
                                   VerticalAlignment="Center"
                                   HorizontalAlignment="Center"
                                   FontSize="16"
                                   FontWeight="ExtraBlack"
                                   Foreground="{TemplateBinding TextForeground}"/>


    </style>

</resourcedictionary>using System;
using System.Collections.Generic;
using System.Linq;
using System.Text;
using System.Windows;
using System.Windows.Controls;
using System.Windows.Data;
using System.Windows.Documents;
using System.Windows.Input;
using System.Windows.Media;
using System.Windows.Media.Imaging;
using System.Windows.Navigation;
using System.Windows.Shapes;
namespace WpfCustomProgressControl
{
[TemplatePart(Name = "PART_mask", Type = typeof(Rectangle))]
[TemplatePart(Name = "PART_container", Type = typeof(Grid))]
[TemplatePart(Name = "PART_percentage_text", Type = typeof(TextBlock))]
[TemplatePart(Name = "PART_foreground_P", Type = typeof(Path))]
[TemplatePart(Name = "PART_outline_P", Type = typeof(Path))]
public class CustomProgressControl : ProgressBar
{
static CustomProgressControl()
{
DefaultStyleKeyProperty.OverrideMetadata(typeof(CustomProgressControl), new FrameworkPropertyMetadata(typeof(CustomProgressControl)));
}
Rectangle mask;
Grid container;
TextBlock percentageText;
Path foreground_P;
Path outline_P;
#region TextForeground 文本
public SolidColorBrush TextForeground
{
get { return (SolidColorBrush)GetValue(TextForegroundProperty); }
set { SetValue(TextForegroundProperty, value); }
}
public static readonly DependencyProperty TextForegroundProperty =
DependencyProperty.Register("TextForeground", typeof(SolidColorBrush),
typeof(CustomProgressControl),
new FrameworkPropertyMetadata(new SolidColorBrush(Colors.DarkGray)));
#endregion
public override void OnApplyTemplate()
{
base.OnApplyTemplate();
foreground_P = this.Template.FindName("PART_foreground_P", this) as Path;
outline_P = this.Template.FindName("PART_outline_P", this) as Path;
mask = this.Template.FindName("PART_mask", this) as Rectangle;
container = this.Template.FindName("PART_container", this) as Grid;
percentageText = this.Template.FindName("PART_percentage_text", this) as TextBlock;
if (foreground_P != null)
{
foreground_P.Visibility = Visibility.Visible;
outline_P.Visibility = Visibility.Visible;
}
Width = double.IsNaN(Width) ? 50 : Width;
Height = double.IsNaN(Height) ? 135 : Height;
Minimum = double.IsNaN(Minimum) ? 0 : Minimum;
Maximum = double.IsNaN(Maximum) ? 100 : Maximum;
if (mask != null)
{
var percentageValue = Value / Maximum;
var awayMargin = percentageValue * Height;
var percentageString = string.Empty;
if (percentageValue > 0)
percentageString = (percentageValue * 100).ToString("##");
else if (percentageValue == 0)
percentageString = "0";
percentageText.Text = string.Format("{0}%", string.IsNullOrEmpty(percentageString) ? "0" : percentageString);
mask.Margin = new Thickness(0, 0, 0, awayMargin);
}
container.Clip = new RectangleGeometry
{
Rect = new Rect(0, 0, Width, Height)
};
mask.Width = Width;
mask.Height = Height;
}
protected override void OnValueChanged(double oldValue, double newValue)
{
base.OnValueChanged(oldValue, newValue);
if (Value < Minimum)
{
Value = Minimum;
}
if (Value > Maximum)
{
Value = Maximum;
}
if (mask != null)
{
var percentageValue = Value / Maximum;
var awayMargin = percentageValue * Height;
var percentageString = string.Empty;
if (percentageValue > 0)
percentageString = (percentageValue * 100).ToString("##");
else if (percentageValue == 0)
percentageString = "0";
percentageText.Text = string.Format("{0}%", string.IsNullOrEmpty(percentageString) ? "0" : percentageString);
//蒙板来变更进度
mask.Margin = new Thickness(0, 0, 0, awayMargin);
}
}
}
} <Window
xmlns="http://schemas.microsoft.com/winfx/2006/xaml/presentation"
xmlns:x="http://schemas.microsoft.com/winfx/2006/xaml"
xmlns:ed="http://schemas.microsoft.com/expression/2010/drawing"
x:Class="WpfPSDemo.MainWindow"
x:Name="Window" BorderThickness="0"
Title="MainWindow"
Width="430" Height="480" xmlns:my="clr-namespace:WpfCustomProgressControl;assembly=WpfCustomProgressControl">
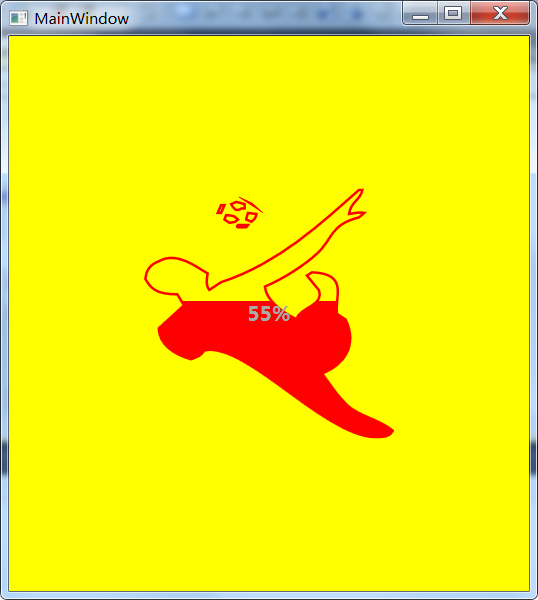
<my:CustomProgressControl Name="customProgressControl1" Width="200" Height="200" Value="50" Background="Yellow" Foreground="Red" BorderBrush="red" />
</Window>更多Photoshop和WPF雙劍配合,打造酷炫個性的進度條控制相關文章請關注PHP中文網!

熱AI工具

Undresser.AI Undress
人工智慧驅動的應用程序,用於創建逼真的裸體照片

AI Clothes Remover
用於從照片中去除衣服的線上人工智慧工具。

Undress AI Tool
免費脫衣圖片

Clothoff.io
AI脫衣器

Video Face Swap
使用我們完全免費的人工智慧換臉工具,輕鬆在任何影片中換臉!

熱門文章

熱工具

記事本++7.3.1
好用且免費的程式碼編輯器

SublimeText3漢化版
中文版,非常好用

禪工作室 13.0.1
強大的PHP整合開發環境

Dreamweaver CS6
視覺化網頁開發工具

SublimeText3 Mac版
神級程式碼編輯軟體(SublimeText3)
 高級Photoshop教程:大師修飾和合成
Apr 17, 2025 am 12:10 AM
Photoshop的高級修圖與合成技術包括:1.使用圖層、蒙版和調整層進行基礎操作;2.通過調整圖像像素值實現修圖效果;3.利用多圖層和蒙版進行複雜合成;4.應用“液化”工具調整面部特徵;5.使用“頻率分離”技術進行細膩修圖,這些技術能提升圖像處理水平並實現專業級效果。
 Photoshop的主要特徵:深度潛水
Apr 19, 2025 am 12:08 AM
Photoshop的關鍵功能包括圖層與蒙版、調整工具、濾鏡與效果。 1.圖層與蒙版允許獨立編輯圖像部分。 2.調整工具如亮度/對比度可修改圖像色調和亮度。 3.濾鏡與效果可快速添加視覺效果。掌握這些功能可以幫助創意專業人士實現創意願景。
 使用Photoshop:創意可能性和實際用途
Apr 22, 2025 am 12:09 AM
Photoshop在實際應用中非常實用且具有創造性。 1)它提供基本編輯、修復和合成功能,適合初學者和專業人士。 2)高級功能如內容識別填充和圖層樣式可提升圖像效果。 3)掌握快捷鍵和優化圖層結構能提高工作效率。
 Photoshop:調查免費試用和折扣選項
Apr 14, 2025 am 12:06 AM
你可以通過以下方式以最經濟的方式獲得Photoshop的使用權:1.利用7天的免費試用期體驗軟件功能;2.尋找學生或教師折扣,以及季節性促銷;3.使用第三方網站上的優惠券;4.訂閱AdobeCreativeCloud的月度或年度計劃。
 Photoshop和數字藝術:繪畫,插圖和合成
Apr 18, 2025 am 12:01 AM
Photoshop在數字藝術中的應用包括繪畫、插圖和圖像合成。 1)繪畫:使用畫筆、鉛筆和混合工具,藝術家可創造逼真效果。 2)插圖:通過矢量和形狀工具,藝術家可精確繪製複雜圖形並添加效果。 3)合成:利用蒙版和圖層混合模式,藝術家可將不同圖像元素無縫融合。
 使用Photoshop進行圖形設計:品牌和更多
Apr 16, 2025 am 12:02 AM
使用Photoshop進行品牌設計的步驟包括:1.使用鋼筆工具繪製基本形狀,2.通過圖層樣式添加陰影和高光,3.調整顏色和細節,4.使用智能對象和動作自動生成不同版本的設計。 Photoshop通過圖層和蒙版的靈活性,幫助設計師創建和優化品牌元素,從簡單的標誌到復雜的品牌指南,確保設計的一致性和專業性。
 攝影師的Photoshop:增強和修飾圖像
Apr 25, 2025 am 12:01 AM
在Photoshop中增強和修飾照片可以通過調整亮度和對比度、使用修復畫筆工具來實現。 1)調整亮度和對比度:通過Image->Adjustments->Brightness/Contrast菜單,增加亮度和對比度以改善曝光不足的照片。 2)使用修復畫筆工具:選擇工具欄中的HealingBrushTool,塗抹以去除圖像中的雜點或疤痕。
 Photoshop最有用的是:常見任務和項目
Apr 23, 2025 am 12:06 AM
Photoshop擅長圖像編輯、圖層和蒙版、數字繪畫及多種設計應用。 1)圖像編輯與修復:去除瑕疵,調整色彩和亮度。 2)圖層與蒙版:非破壞性編輯和創作。 3)數字繪畫與插圖:創作藝術作品。 4)實際應用:平面設計、網頁設計和數字藝術創作。


