上次介紹了用box2dweb創建各種剛體,這次來介紹如何用滑鼠拖曳剛體,剛體之間的碰撞,以及剛體之間的各種連接。
一,滑鼠拖曳剛體
使用lufylegend.js庫件後,拖曳剛體變得很簡單,只需呼叫LSprite的setBodyMouseJoint(true);方法即可,修改上一節的add方法如下
function add(){
	var rand = Math.random();
	if(rand < 0.33){
		cLayer = new LSprite();
		cLayer.x = 50 + Math.random()*700;
		cLayer.y = 50;
		backLayer.addChild(cLayer);
		bitmap = new LBitmap(new LBitmapData(imglist["bird1"]));
		cLayer.addChild(bitmap);
		cLayer.addBodyCircle(bitmap.getWidth()*0.5,bitmap.getHeight()*0.5,bitmap.getWidth()*0.5,1,.5,.4,.5);
		cLayer.setBodyMouseJoint(true);
	}else if(rand < 0.66){
		cLayer = new LSprite();
		backLayer.addChild(cLayer);
		bitmap = new LBitmap(new LBitmapData(imglist["bird2"]));
		cLayer.addChild(bitmap);
		var shapeArray = [
			[[0,54],[27,0],[54,54]]
		];
		cLayer.addBodyVertices(shapeArray,27,27,1,.5,.4,.5);
		cLayer.box2dBody.SetPosition(new LGlobal.box2d.b2Vec2((50 + Math.random()*700)/LGlobal.box2d.drawScale,50/LGlobal.box2d.drawScale));
		cLayer.setBodyMouseJoint(true);
	}else{
		cLayer = new LSprite();
		cLayer.x = 50 + Math.random()*700;
		cLayer.y = 50;
		backLayer.addChild(cLayer);
		bitmap = new LBitmap(new LBitmapData(imglist["stage01"]));
		cLayer.addChild(bitmap);
		cLayer.addBodyPolygon(bitmap.getWidth(),bitmap.getHeight(),1,5,.4,.2);
	}
}可以看到,我只在加入小鳥的時候,加入了滑鼠拖拽,下面是測試連接
http://lufy.netne.net/lufylegend-js/lufylegend-1.4/box2d/sample01/index4.html
#二,碰撞偵測
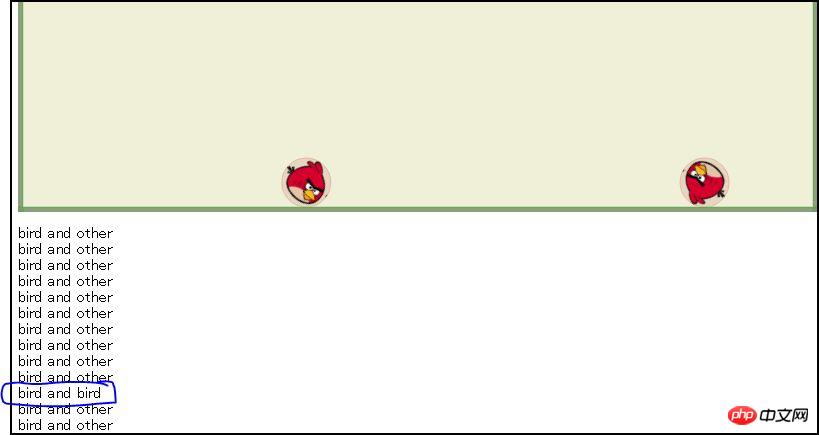
使用以下程式碼來加入碰撞偵測事件
LGlobal.box2d.setEvent(LEvent.BEGIN_CONTACT,beginContact);
這時的碰撞是所有剛體之間的碰撞,包括靜止的和動態的
為了方便,我在這裡使用lufylegend.js中的debug方法來驗證
function beginContact(contact){
	if(contact.GetFixtureA().GetBody().GetUserData().name == "bird" &&
			contact.GetFixtureB().GetBody().GetUserData().name == "bird"){
		trace("bird and bird");
	}
	trace("bird and other");
};以上方法就是碰撞的檢測,意思是當兩隻小鳥之間發生碰撞的時候,輸出"bird and bird",小鳥和其他剛體,或其他剛體之間發生碰撞的時候輸出"bird and other"
這裡是測試連接
##http ://lufy.netne.net/lufylegend-js/lufylegend-1.4/box2d/sample01/index5.html以下是運行結果
#三,剛體之間的各種連結
最後,我們來看看剛體之間的各種連接,這部分目前沒有封裝在lufylegend.js裡,以後會陸續封裝進去,不過現在我們先來看看如何手動實現這些連接##1,距離鏈接(b2DistanceJointDef) b2DistanceJointDef可以用來約束兩個body之間的距離,用法如下
function add(){
	cLayer = new LSprite();
	cLayer.name = "bird";
	cLayer.x = 50 + Math.random()*700;
	cLayer.y = 50;
	backLayer.addChild(cLayer);
	bitmap = new LBitmap(new LBitmapData(imglist["bird1"]));
	cLayer.addChild(bitmap);
	cLayer.addBodyCircle(bitmap.getWidth()*0.5,bitmap.getHeight()*0.5,bitmap.getWidth()*0.5,1,.5,.4,.5);
	cLayer.setBodyMouseJoint(true);
	return cLayer;
}
var bird1 = add();
var bird2 = add();
var distanceJointDef = new LGlobal.box2d.b2DistanceJointDef();
distanceJointDef.Initialize(bird1.box2dBody, bird2.box2dBody, bird1.box2dBody.GetWorldCenter(), bird2.box2dBody.GetWorldCenter());
LGlobal.box2d.world.CreateJoint(distanceJointDef);這裡有測試連接
http://lufy. netne.net/lufylegend-js/lufylegend-1.4/box2d/sample01/index6.html
下面是運行結果

2,旋轉連結(b2RevoluteJointDef)b2RevoluteJointDef可以為兩個body設定一個軸心,讓兩個body繞這個軸心旋轉,用法如下
var bird = new LSprite();
	bird.name = "bird";
	bird.x = 200;
	bird.y = 200;
	backLayer.addChild(bird);
	bitmap = new LBitmap(new LBitmapData(imglist["bird1"]));
	bird.addChild(bitmap);
	bird.addBodyCircle(bitmap.getWidth()*0.5,bitmap.getHeight()*0.5,bitmap.getWidth()*0.5,0);

	var pig = new LSprite();
	pig.name = "pig";
	pig.x = 200;
	pig.y = 150;
	backLayer.addChild(pig);
	bitmap = new LBitmap(new LBitmapData(imglist["pig2"]));
	pig.addChild(bitmap);
	pig.addBodyCircle(bitmap.getWidth()*0.5,bitmap.getHeight()*0.5,bitmap.getWidth()*0.5,1,.5,.4,.5);

	var revoluteJointDef  = new LGlobal.box2d.b2RevoluteJointDef();
	revoluteJointDef .Initialize(pig.box2dBody, bird.box2dBody, bird.box2dBody.GetWorldCenter());
	LGlobal.box2d.world.CreateJoint(revoluteJointDef );
這裡是測試連線
http://lufy.netne.net/lufylegend-js/lufylegend-1.4/box2d/sample01/index7.html
#下面是執行結果

3,滑輪連結(b2PulleyJointDef)b2PulleyJointDef類似滑輪效果,用法如下
var bird = new LSprite();
	bird.name = "bird";
	bird.x = 200;
	bird.y = 200;
	backLayer.addChild(bird);
	bitmap = new LBitmap(new LBitmapData(imglist["bird1"]));
	bird.addChild(bitmap);
	bird.addBodyCircle(bitmap.getWidth()*0.5,bitmap.getHeight()*0.5,bitmap.getWidth()*0.5,1,.5,.4,.5);
	bird.setBodyMouseJoint(true);

	var bird01 = new LSprite();
	bird01.name = "bird";
	bird01.x = 400;
	bird01.y = 150;
	backLayer.addChild(bird01);
	bitmap = new LBitmap(new LBitmapData(imglist["bird1"]));
	bird01.addChild(bitmap);
	bird01.addBodyCircle(bitmap.getWidth()*0.5,bitmap.getHeight()*0.5,bitmap.getWidth()*0.5,1,.5,.4,.5);
	bird01.setBodyMouseJoint(true);

	var anchor1 = bird.box2dBody.GetWorldCenter();
    var anchor2 = bird01.box2dBody.GetWorldCenter();

    var groundAnchor1 = new LGlobal.box2d.b2Vec2(anchor1.x, anchor1.y - (100 / LGlobal.box2d.drawScale));
    var groundAnchor2 = new LGlobal.box2d.b2Vec2(anchor2.x, anchor2.y - (100 / LGlobal.box2d.drawScale));

    var ratio = 1.0;

    var pulleyJointDef = new LGlobal.box2d.b2PulleyJointDef();
    pulleyJointDef.Initialize(bird.box2dBody, bird01.box2dBody, groundAnchor1, groundAnchor2, anchor1, anchor2, ratio);
    pulleyJointDef.maxLengthA = 300 / LGlobal.box2d.drawScale;
    pulleyJointDef.maxLengthB = 300 / LGlobal.box2d.drawScale;

LGlobal.box2d.world.CreateJoint(pulleyJointDef);這裡是測試連線
http://lufy.netne.net/lufylegend-js/lufylegend-1.4/box2d/sample01/index8.html
下面是執行結果

其餘的連接還有,b2GearJoint,b2PrismaticJoint,b2LineJoint,b2WeldJoint等多種鏈接,這些等以後封裝到lufylegend.js後再詳細介紹,這裡不細說了,想了解的朋友可以查閱一下相關資料
最後給出這兩次內容的所有原始碼
http://fsanguo.comoj.com/download.php? i=box2d_sample01.rar
注意,上面只是源碼,如果想要在本地運行這些源碼的話,需要自己下載lufylegend.js庫件以及box2dweb,然後進行配置
以上就是HTML5遊戲開發-Box2dWeb應用(二)-碰撞以及各種連結 的內容,更多相關內容請關注PHP中文網(www.php.cn)!


