基本截圖的功能主要靠響應主窗體的滑鼠按下、滑鼠移動、滑鼠抬起幾個事件的功能來實現的。截取的圖片區域使用「Label」元件來顯示,需要重新實作「Label」元件的「Paint」方法。
左鍵點選開始截圖,右鍵點選取消截圖,雙擊滑鼠左鍵完成截圖,將截取的圖片儲存到Windows剪貼簿中。
工具箱」公共元件》雙擊「Label」元件,修改元件屬性:
Name=lbl_CutImage,
AutoSize=False,
##BackColor=Transparent,##Text = “”
“
Form1_Load”事件新增程式碼:this.lbl_CutImage.Hide();
        #region 截图基本变量
        /// <summary>
        /// 用于判断是否已经开始截图,控制信息框是否显示。
        /// </summary>
        private bool isCuting;
        /// <summary>
        /// 鼠标按下的点
        /// </summary>
        private Point beginPoint;
        /// <summary>
        /// 最终确定的绘图基点
        /// </summary>
        private Point endPoint;
        /// <summary>
        /// 用于记录截图显示区域的大小(包括调整块的区域,调整区域边框宽度2px)
        /// </summary>
        private Rectangle cutImageRect = new Rectangle(0, 0, 5, 5);
#endregion /// <summary>
/// 更新UI的模式,用于标记哪些需要显示,哪些需要隐藏;
/// </summary>
[FlagsAttribute]
public enum UpdateUIMode : uint
{
//值得注意的是,如果要使用组合值,那么就不能用连接的数字表示,必须是几何级增长!
None = 0,
ShowTextPro = 1,
ShowPenStyle = 2,
ShowToolBox = 4,
ShowInfoBox = 8,
ShowZoomBox = 16,
ShowCutImage = 32,
HideTextPro = 64,
HidePenStyle = 128,
HideToolBox = 256,
HideInfoBox = 512
} /// <summary>
/// 计算并保存截图的区域框的大小
/// </summary>
private void SaveCutImageSize(Point beginPoint, Point endPoint)
{
// 保存最终的绘图基点,用于截取选中的区域
this.endPoint = beginPoint;
// 计算截取图片的大小
int imgWidth = Math.Abs(endPoint.X - beginPoint.X) + 1;
int imgHeight = Math.Abs(endPoint.Y - beginPoint.Y) + 1;
int lblWidth = imgWidth + 4;
int lblHeight = imgHeight + 4;
// 设置截图区域的位置和大小
this.cutImageRect = new Rectangle(beginPoint.X - 2, beginPoint.Y - 2, lblWidth, lblHeight);
} /// <summary>
/// 执行截图,将选定区域的图片保存到剪贴板
/// </summary>
/// <param name="saveToDisk">
/// 是否将图片保存到磁盘
/// </param>
private void ExecCutImage(bool saveToDisk, bool uploadImage) //bool saveToDisk = false, bool uploadImage = false
{
// 如果图片获取区域不可见,则退出保存图片过程
if (!this.lbl_CutImage.Visible) { return; }
Rectangle srcRect = new Rectangle();
srcRect.X = this.lbl_CutImage.Location.X + 2;
srcRect.Y = this.lbl_CutImage.Location.Y + 2;
srcRect.Width = this.lbl_CutImage.Width - 4;
srcRect.Height = this.lbl_CutImage.Height - 4;
Rectangle destRect = new Rectangle(0, 0, srcRect.Width, srcRect.Height);
Bitmap bmp = new Bitmap(srcRect.Width, srcRect.Height);
Graphics g = Graphics.FromImage(bmp);
g.DrawImage(this.screenImage, destRect, srcRect, GraphicsUnit.Pixel);
Clipboard.SetImage(bmp);
ExitCutImage(true);
} /// <summary>
/// 退出截图过程
/// </summary>
private void ExitCutImage(bool hideWindow) // = true
{
this.lbl_CutImage.Visible = false;
this.isCuting = false;
if (hideWindow)
{
this.screenImage.Dispose();
this.Hide();
}
} /// <summary>
/// 截图窗口鼠标按下事件处理程序
/// </summary>
/// <param name="sender"></param>
/// <param name="e"></param>
private void Form1_MouseDown(object sender, MouseEventArgs e)
{
// 左键单击事件
if (e.Button == MouseButtons.Left && e.Clicks == 1)
{
if (!this.lbl_CutImage.Visible)
{
this.isCuting = true;
this.beginPoint = e.Location;
this.endPoint = e.Location;
SaveCutImageSize(e.Location, e.Location);
UpdateCutInfoLabel(UpdateUIMode.ShowCutImage | UpdateUIMode.ShowInfoBox);
}
}
// 左键双击事件
if (e.Button == MouseButtons.Left && e.Clicks == 2)
{
if (this.lbl_CutImage.Visible)
{
ExecCutImage(false, false);
}
}
// 右键单击事件
if (e.Button == MouseButtons.Right)
{
ExitCutImage(!this.lbl_CutImage.Visible);
}
} /// <summary>
/// 截图窗口鼠标移动事件处理程序
/// </summary>
/// <param name="sender"></param>
/// <param name="e"></param>
private void Form1_MouseMove(object sender, MouseEventArgs e)
{
// 如果截取区域不可见,则退出处理过程
if (!this.lbl_CutImage.Visible)
{
UpdateCutInfoLabel(UpdateUIMode.None);
return;
}
Point pntBgn = this.beginPoint;
Point pntEnd = e.Location;
// 如果是反向拖动,重新设置起始点
if (e.Location.X < this.beginPoint.X && e.Location.Y < this.beginPoint.Y)
{
pntBgn = e.Location;
pntEnd = this.beginPoint;
}
else
{
if (e.Location.X < this.beginPoint.X)
{
pntBgn = new Point(e.Location.X, this.beginPoint.Y);
pntEnd = new Point(this.beginPoint.X, e.Location.Y);
}
else
{
if (e.Location.Y < this.beginPoint.Y)
{
pntBgn = new Point(this.beginPoint.X, e.Location.Y);
pntEnd = new Point(e.Location.X, this.beginPoint.Y);
}
}
}
if (this.isCuting)
{
SaveCutImageSize(pntBgn, pntEnd);
}
UpdateCutInfoLabel(UpdateUIMode.None);
} /// <summary>
/// 截图窗口鼠标抬起事件处理程序
/// </summary>
/// <param name="sender"></param>
/// <param name="e"></param>
private void Form1_MouseUp(object sender, MouseEventArgs e)
{
if (e.Button == MouseButtons.Left)
{
if (this.isCuting)
{
this.isCuting = false;
UpdateCutInfoLabel(UpdateUIMode.None);
}
}
} /// <summary>
/// 截取区域图片的绘制事件处理程序
/// </summary>
/// <param name="sender"></param>
/// <param name="e"></param>
private void lbl_CutImage_Paint(object sender, PaintEventArgs e)
{
int imgWidth = this.lbl_CutImage.Width - 4;
int imgHeight = this.lbl_CutImage.Height - 4;
if (imgWidth < 1) { imgWidth = 1; }
if (imgHeight < 1) { imgHeight = 1; }
// 创建缓存图像,先将要绘制的内容全部绘制到缓存中,最后再一次性绘制到 Label 上,
// 这样可以提高性能,并且可以防止屏幕闪烁的问题
Bitmap bmp_lbl = new Bitmap(this.lbl_CutImage.Width, this.lbl_CutImage.Height);
Graphics g = Graphics.FromImage(bmp_lbl);
// 将要截取的部分绘制到缓存
Rectangle destRect = new Rectangle(2, 2, imgWidth, imgHeight);
Point srcPoint = this.lbl_CutImage.Location;
srcPoint.Offset(2, 2);
Rectangle srcRect = new Rectangle(srcPoint, new System.Drawing.Size(imgWidth, imgHeight));
g.DrawImage(this.screenImage, destRect, srcRect, GraphicsUnit.Pixel);
SolidBrush brush = new SolidBrush(Color.FromArgb(10, 124, 202));
Pen pen = new Pen(brush, 1.0F);
//以下部分(边框和调整块)的绘制放在(编辑内容)的后面,是解决绘制编辑内容会覆盖(边框和调整块)的问题
// 绘制边框外的区域,解决会被编辑内容覆盖的问题
// 上边
destRect = new Rectangle(0, 0, this.lbl_CutImage.Width, 2);
srcPoint = this.lbl_CutImage.Location;
//srcPoint.Offset(2, 2);
srcRect = new Rectangle(srcPoint, new System.Drawing.Size(this.lbl_CutImage.Width, 2));
g.DrawImage(this.BackgroundImage, destRect, srcRect, GraphicsUnit.Pixel);
// 下边
destRect = new Rectangle(0, this.lbl_CutImage.Height - 2, this.lbl_CutImage.Width, 2);
srcPoint = this.lbl_CutImage.Location;
srcPoint.Offset(0, this.lbl_CutImage.Height - 2);
srcRect = new Rectangle(srcPoint, new System.Drawing.Size(this.lbl_CutImage.Width, 2));
g.DrawImage(this.BackgroundImage, destRect, srcRect, GraphicsUnit.Pixel);
// 左边
destRect = new Rectangle(0, 2, 2, this.lbl_CutImage.Height - 4);
srcPoint = this.lbl_CutImage.Location;
srcPoint.Offset(0, 2);
srcRect = new Rectangle(srcPoint, new System.Drawing.Size(2, this.lbl_CutImage.Height - 4));
g.DrawImage(this.BackgroundImage, destRect, srcRect, GraphicsUnit.Pixel);
// 右边
destRect = new Rectangle(this.lbl_CutImage.Width - 2, 2, 2, this.lbl_CutImage.Height - 4);
srcPoint = this.lbl_CutImage.Location;
srcPoint.Offset(this.lbl_CutImage.Width - 2, 2);
srcRect = new Rectangle(srcPoint, new System.Drawing.Size(2, this.lbl_CutImage.Height - 4));
g.DrawImage(this.BackgroundImage, destRect, srcRect, GraphicsUnit.Pixel);
// 绘制边框
g.DrawLine(pen, 2, 2, this.lbl_CutImage.Width - 3, 2);
g.DrawLine(pen, 2, 2, 2, this.lbl_CutImage.Height - 3);
g.DrawLine(pen, this.lbl_CutImage.Width - 3, 2, this.lbl_CutImage.Width - 3, this.lbl_CutImage.Height - 3);
g.DrawLine(pen, 2, this.lbl_CutImage.Height - 3, this.lbl_CutImage.Width - 3, this.lbl_CutImage.Height - 3);
// 绘制四个角的调整块
g.FillRectangle(brush, 0, 0, 4, 5);
g.FillRectangle(brush, this.lbl_CutImage.Width - 4, 0, 4, 5);
g.FillRectangle(brush, 0, this.lbl_CutImage.Height - 5, 4, 5);
g.FillRectangle(brush, this.lbl_CutImage.Width - 4, this.lbl_CutImage.Height - 5, 4, 5);
// 绘制中间的四个调整块
int blockX = this.lbl_CutImage.Width / 2 - 2;
int blockY = this.lbl_CutImage.Height / 2 - 2;
g.FillRectangle(brush, blockX, 0, 4, 5);
g.FillRectangle(brush, 0, blockY, 4, 5);
g.FillRectangle(brush, blockX, this.lbl_CutImage.Height - 5, 4, 5);
g.FillRectangle(brush, this.lbl_CutImage.Width - 4, blockY, 4, 5);
// 绘制到 Label 上
e.Graphics.DrawImage(bmp_lbl, 0, 0);
bmp_lbl.Dispose();
} /// <summary>
/// 截取区域图片的鼠标按下事件处理程序
/// </summary>
/// <param name="sender"></param>
/// <param name="e"></param>
private void lbl_CutImage_MouseDown(object sender, MouseEventArgs e)
{
// 左键双击事件
if (e.Button == MouseButtons.Left && e.Clicks == 2)
{
if (this.lbl_CutImage.Visible)
{
ExecCutImage(false, false);
}
}
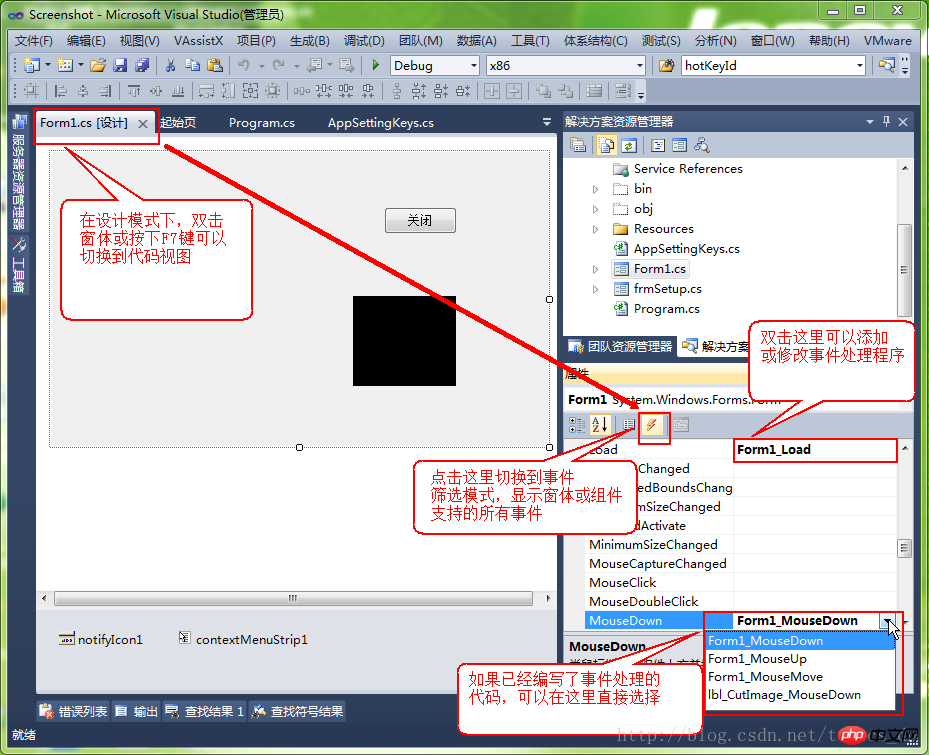
}注意:程式碼都貼完了,別忘了為窗體或元件綁定事件處理程序;例如:截取區域圖片的滑鼠按下事件處理程序“lbl_CutImage_MouseDown”,就是“lbl_CutImage”元件的“MouseDown”事件的處理程序,綁定方法參考下圖:

到此,基本截圖的功能實作已經實現,趕快去截取一張圖片,貼上到QQ的聊天視窗看看吧。
以上是C#開發實例-訂位螢幕截圖工具(四)基本截圖功能實作程式碼的詳細內容。更多資訊請關注PHP中文網其他相關文章!


