這篇文章主要介紹了用JavaScript實現圖片剪切效果,本文給大家介紹的非常詳細,具有參考借鑒價值,需要的朋友可以參考下
學會如何取得滑鼠的座標位置以及監聽滑鼠的按下、拖曳、放開等動作事件,從而實現拖曳滑鼠來改變圖片大小。
也可以學習css中的clip屬性。
一、CSS實作圖片不透明及裁切效果。
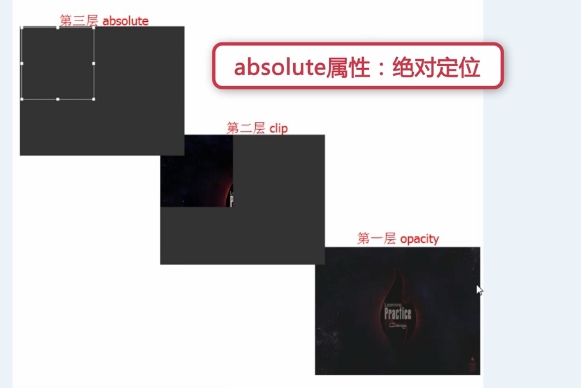
圖片剪下三層結構
1、第一層opacity,給圖層設定透明度
2、第二層clip,clip屬性:對圖片進行裁剪,實現圖像的一部分顯示,其他部分進行隱藏
3、第三層選取框absolute(與第二層重疊的),包括八個觸點的效果

html程式碼:
<p id="box">
 <img src="img/1.jpg" id="img1" />
 <img src="img/1.jpg" id="img2" />
 <p id="main">
  <p class="pmin up-left"></p>
  <p class="pmin up"></p>
  <p class="pmin up-right"></p>
  <p class="pmin right"></p>
  <p class="pmin right-down"></p>
  <p class="pmin down"></p>
  <p class="pmin left-down"></p>
  <p class="pmin left"></p>
 </p>
</p>
css程式碼:
body{
  background: #333;
 }
 #box{
  width: 500px;
  height: 380px;
  position: absolute;
  top: 100px;
  left: 200px;
 }
 #img1,#img2{
  position: absolute;
  top: 0;
  left: 0;
 }
 #img1{
  opacity: 0.3;
 }
 #img2{
  clip: rect(0,200px,200px,0);
 }
 #main{
  position: absolute;/*第三层需用绝对定位浮在上面*/
  width: 200px;
  height: 200px;
  border: 1px solid #fff;
 }
 .pmin{
  position: absolute;
  width: 8px;
  height: 8px;
  background: #fff;
 }
 .up-left{margin-top: -4px;margin-left: -4px;cursor: nw-resize;}
 .up{
  left: 50%;/*父元素盒子main宽度的一半,注意要有绝对定位*/
  margin-left:-4px;
  top: -4px;
  cursor: n-resize;
 }
 .up-right{top: -4px;right: -4px;cursor: ne-resize;}
 .right{top: 50%;margin-top: -4px;right: -4px;cursor: e-resize;}
 .right-down{right: -4px;bottom: -4px;cursor: se-resize;}
 .down{bottom: -4px;left: 50%;margin-left: -4px;cursor: s-resize;}
 .left-down{left: -4px;bottom: -4px;cursor: sw-resize;}
.left{left: -4px;top: 50%;margin-top: -4px;cursor: w-resize;}二、javascript取得選擇框偏移量
選擇框滑鼠拖曳位置詳解:
offsetLeft:元素相對於其父元素左邊界的距離;
clientX:滑鼠位置的橫座標;
clientWidth:元素的寬度;
offsetXY:是該事件發生的盒子模型裡的座標,與捲軸無關。
clientXY:是整個瀏覽器可用部分裡的座標,與捲軸無關,即需要拖曳滾動條才能看到的區域不考慮。
pageXY:是整個網頁裡的座標,與捲軸有關。

建構一個getPosition()函數,用來取得元素相對於螢幕左邊及上邊的距離
js程式碼如下:
//获取元素相对于屏幕左边及上边的距离,利用offsetLeft
 function getPosition(el){
  var left = el.offsetLeft;
  var top = el.offsetTop;
  var parent = el.offsetParent;
  while(parent != null){
   left += parent.offsetLeft;
   top += parent.offsetTop;
   parent = parent.offsetParent;
  }
  return {"left":left,"top":top};
}三、javascript實現控制觸點
#監聽滑鼠的按下、拖曳、放開的事件控制選取框的大小。
注意區別:
Element.clientWidth 屬性表示元素的內部寬度,以像素為單位。此屬性包括內邊距,但不包括垂直捲軸(如果有的話)、邊框和外邊距。
即clientWidth不包含邊框,offsetWidth包含邊框
#1)點選右邊的接點
js程式碼:
var mainp = $('main');
 var rightp = $('right');
 var isDraging = false;
 var contact = "";//表示被按下的触点
 //鼠标按下时
 rightp.onmousedown = function(){
  isDraging = true;
  contact = "right";
 }
 //鼠标松开时
 window.onmouseup = function(){
  isDraging = false;
 }
 //鼠标移动时
 window.onmousemove = function(e){
  if(isDraging == true){
   if(contact == "right"){
    var e = e||window.event;
    var x = e.clientX;//鼠标位置的横坐标
    var widthBefore = mainp.offsetWidth - 2;//选取框变化前的宽度
    //var widthBefore = mainp.clientWidth;
    var addWidth = x - getPosition(mainp).left - widthBefore;//鼠标移动后选取框增加的宽度
    mainp.style.width = widthBefore + addWidth + 'px';//选取框变化后的宽度
   }
  }
 }
//获取id的函数
function $(id){
 return document.getElementById(id);
}2)點選上方觸點
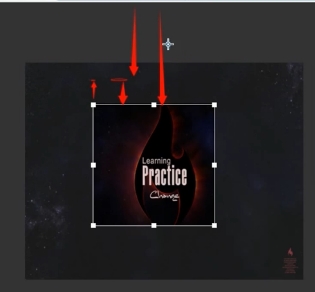
點擊上面中間的接點移動時,選取框的高度和左上角的位置都需要改變。
增加的高度=選取框相對於螢幕上面的距離- 滑鼠位置的縱座標
#選取框左上角的top值要減去增加的高度,因為滑鼠向上移動時高度增加,top值減小,下移時高度減小,top增大。
變化示意圖:

js程式碼:
else if(contact == "up"){
    var y = e.clientY;//鼠标位置的纵坐标
    var heightBefore = mainp.offsetHeight - 2;//选取框变化前的高度
    var addHeight = getPosition(mainp).top - y;//增加的高度
    mainp.style.height = heightBefore + addHeight + 'px';//选取框变化后的宽度
    mainp.style.top = mainp.offsetTop - addHeight + 'px';//相当于变化后左上角的纵坐标,鼠标向上移纵坐标减小,下移增大
}3)點選左邊觸點
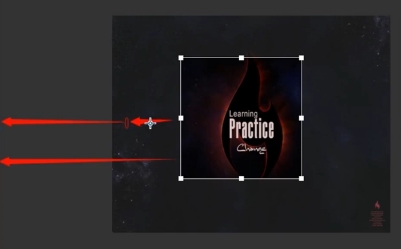
原理同點擊上面觸點,寬度和左邊的位置都會變化
變化示意圖:

js程式碼:
 else if(contact == "left"){
     var widthBefore = mainp.offsetWidth - 2;
      var addWidth = getPosition(mainp).left - e.clientX;//增加的宽度等于距离屏幕左边的距离减去鼠标位置横坐标
      mainp.style.width = widthBefore + addWidth + 'px';
     mainp.style.left = mainp.offsetLeft - addWidth + 'px';//左边的距离(相当于左边位置横坐标)等于选取框距父级元素的距离减去增加的宽度
}4)點選下面觸點
增加的寬度= 滑鼠位置縱座標- 離螢幕上邊的距離- 原先的寬度
#左上角的位置不改變
js程式碼:
else if(contact = "down"){
     var heightBefore = mainp.offsetHeight - 2;
     var addHeight = e.clientY - getPosition(mainp).top - mainp.offsetHeight;
     mainp.style.height = heightBefore + addHeight + 'px';
}5)點四個角落時的變化是高度和寬度變化的疊加,所以最好將上面四個變化的過程封裝成函數,以便於維護和程式碼復用。
若需要以if else 判斷8次,所以改為switch語句來簡化程式碼
修改後的js程式碼如下:
##
window.onmousemove = function(e){
  var e = e||window.event;
  if(isDraging == true){
   switch (contact){
    case "up" : upMove(e);break;
    case "right" : rightMove(e);break;
    case "down" : downMove(e);break;
    case "left" : leftMove(e);break;
    case "up-right" : upMove(e);rightMove(e);break;
    case "down-right" : downMove(e);rightMove(e);break;
    case "down-left" : downMove(e);leftMove(e);break;
    case "up-left" : upMove(e);leftMove(e);break;
   }
  }
 }
//获取id的函数
function $(id){
 return document.getElementById(id);
}
//获取元素相对于屏幕左边及上边的距离,利用offsetLeft
 function getPosition(el){
  var left = el.offsetLeft;
  var top = el.offsetTop;
  var parent = el.offsetParent;
  while(parent != null){
   left += parent.offsetLeft;
   top += parent.offsetTop;
   parent = parent.offsetParent;
  }
  return {"left":left,"top":top};
 }
 //up移动
 function upMove(e){
  var y = e.clientY;//鼠标位置的纵坐标
  var heightBefore = mainp.offsetHeight - 2;//选取框变化前的高度
  var addHeight = getPosition(mainp).top - y;//增加的高度
  mainp.style.height = heightBefore + addHeight + 'px';//选取框变化后的宽度
  mainp.style.top = mainp.offsetTop - addHeight + 'px';//相当于变化后左上角的纵坐标,鼠标向上移纵坐标减小,下移增大
 }
 //right移动
 function rightMove(e){
  var x = e.clientX;//鼠标位置的横坐标
  var widthBefore = mainp.offsetWidth - 2;//选取框变化前的宽度
  //var widthBefore = mainp.clientWidth;
  var addWidth = x - getPosition(mainp).left - widthBefore;//鼠标移动后选取框增加的宽度
  mainp.style.width = widthBefore + addWidth + 'px';//选取框变化后的宽度
 }
 //down移动
 function downMove(e){
  var heightBefore = mainp.offsetHeight - 2;
  var addHeight = e.clientY - getPosition(mainp).top - mainp.offsetHeight;
  mainp.style.height = heightBefore + addHeight + 'px';
 }
 //left移动
 function leftMove(e){
  var widthBefore = mainp.offsetWidth - 2;
  var addWidth = getPosition(mainp).left - e.clientX;//增加的宽度等于距离屏幕左边的距离减去鼠标位置横坐标
  mainp.style.width = widthBefore + addWidth + 'px';
  mainp.style.left = mainp.offsetLeft - addWidth + 'px';//左边的距离(相当于左边位置横坐标)等于选取框距父级元素的距离减去增加的宽度
} 1)選取框內的第二層圖片需重新設定其clip屬性
四個面向圖示:
js程式碼://设置选取框图片区域明亮显示
function setChoice(){
var top = mainp.offsetTop;
var right = mainp.offsetLeft + mainp.offsetWidth;
var bottom = mainp.offsetTop + mainp.offsetHeight;
var left = mainp.offsetLeft;
img2.style.clip = "rect("+top+"px,"+right+"px,"+bottom+"px,"+left+"px)";
}//禁止图片被选中 document.onselectstart = new Function('event.returnValue = false;');
#首先要阻止事件冒泡
js程式碼如下:
//鼠标按下触点时
 rightp.onmousedown = function(e){
  e.stopPropagation();
  isDraging = true;
  contact = "right";
}<p id="preview"> <img src="img/1.jpg" id="img3" /> </p>
css代码:
#preview{
  position: absolute;
  width: 500px;
  height: 380px;
  top: 100px;
  left:710px ;
 }
#preview #img3{position: absolute;}注意:要让clip:rect(top,right,bottom,left) 起作用,必须让作用元素为相对/绝对定位。
js部分同样是利用clip属性,和setChoice()函数同时被调用
同时为了让右边预览区的左上角位置固定,需要设置其top和left的值
//右边图片预览函数
 function setPreview(){
  var top = mainp.offsetTop;
  var right = mainp.offsetLeft + mainp.offsetWidth;
  var bottom = mainp.offsetTop + mainp.offsetHeight;
  var left = mainp.offsetLeft;
  var img3 = $('img3');
  img3.style.top = -top + 'px';
  img3.style.left = -left + 'px';
  img3.style.clip = "rect("+top+"px,"+right+"px,"+bottom+"px,"+left+"px)";
}以上是基於JavaScript實現圖片剪切效果的範例程式碼(圖)的詳細內容。更多資訊請關注PHP中文網其他相關文章!


