HTML5實作-使用css3如何完成google塗鴉動畫的詳解
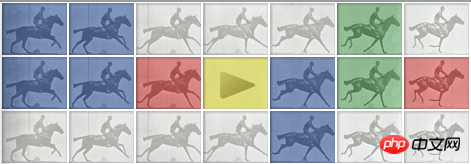
今天我們將介紹,如何使用css3完成google塗鴉動畫。當你點擊demo頁面的【開始】按鈕之後,頁面中的騎手和馬匹將會運動起來,
這裡需要強調的一點是,ie不支持css3的動畫屬性,再次抱怨下萬惡的ie 。但我們不能以此為理由不去擁抱css3。
我們先來看html程式碼。
<!DOCTYPE html>
<html>
<head>
    <title></title>
    <link rel="stylesheet" type="text/css" href="css/google-doodle-animation-in-css3-without-javascript.css"/>
</head>
<body>
<p id="logo">
    <p class="frame">
        <img src="img/muybridge12-hp-v.png"/>
    </p>
    <label for="play_button" id="play_label"></label>
    <input type="checkbox" id="play_button" name="play_button"/>
    <span id="play_image">
        <img src="img/muybridge12-hp-p.jpg"/>
    </span>
    <p class="horse"></p>
    <p class="horse"></p>
    <p class="horse"></p>
</p>
</body>
</html>下面是部分css。
*{margin:0px;padding:0px;}
#logo{position: relative;}
.horse{
    width:469px;
    height:54px;
    background: url('../img/muybridge12-hp-f.jpg');
}
.frame{position:absolute;left:0;top:0;z-index: 1;}

#play_button{display: none;}
#play_label{
    width:67px;
    height:54px;
    display:block;
    position: absolute;
    left:201px;
    top:54px;
    z-index: 2;
}
#play_image{
    position: absolute;
    left:201px;
    top:54px;
    z-index: 0;
    overflow: hidden;
    width: 68px;
    height: 55px;
}
#play_image img{
    position: absolute;
    left: 0;
    top: 0;
}這部分程式碼沒太大難度,我就不做詳細講解了。 css基礎不是很紮實的讀者,也許會疑惑【開始】按鈕是如何實現定位的。可以自行閱讀position屬性,了解absolute具體作用。
以下是上述html和css程式碼完成的頁面效果。

以下我們來介紹如何產生動畫效果。我們首先需要定義關鍵幀,他規定動畫在不同階段的效果。大家可以透過http://www.w3schools.com/css3/css3_animations.asp 來了解更多資訊。
我們創建了一個名為horse-ride的關鍵幀,針對chrome和firefox需要在前面添加-webkit-或者是-moz-前綴。 0%和100%分別程式碼開始和結束,可以依需求增加新的case,例如50%時的動畫效果。
@-webkit-keyframes horse-ride {
    0% {background-position: 0 0;}
    100% {background-position: -804px 0;}
}
@-moz-keyframes horse-ride {
    0% {background-position: 0 0;}
    100% {background-position: -804px 0;}
}下面,我們來為horse添加css3的動畫效果。
#play_button:checked ~.horse{
    -webkit-animation:horse-ride 0.5s steps(12,end) infinite;
    -webkit-animation-delay:2.5s;
    -moz-animation:horse-ride 0.5s steps(12,end) infinite;
    -moz-animation-delay:2.5s;
    background-position: -2412px 0;
    -webkit-transition: all 2.5s cubic-bezier(0.550, 0.055, 0.675, 0.190);
    -moz-transition: all 2.5s cubic-bezier(0.550, 0.055, 0.675, 0.190);
}這裡首先介紹:checked和~,:checked是偽類,指當#play_button選取時的css效果,~指的是#play_button的兄弟節點。
接下來介紹.horse相關的css屬性。 animation中我們使用了4個值,依序代表:關鍵影格(我們上面定義的horse-ride),動畫間隔時間,動畫效果和執行次數。之後我們又透過animation-delay設定動畫延遲時間。透過transition和background-position集合起來,設定背景的過渡動畫。
最後我們為【開始】按鈕加入動畫效果。
#play_button:checked ~#play_image img{
    left:-68px;
    -webkit-transition: all 0.5s ease-in;
    -moz-transition: all 0.5s ease-in;
}以上是HTML5實作-使用css3如何完成google塗鴉動畫的詳解的詳細內容。更多資訊請關注PHP中文網其他相關文章!

熱AI工具

Undresser.AI Undress
人工智慧驅動的應用程序,用於創建逼真的裸體照片

AI Clothes Remover
用於從照片中去除衣服的線上人工智慧工具。

Undress AI Tool
免費脫衣圖片

Clothoff.io
AI脫衣器

Video Face Swap
使用我們完全免費的人工智慧換臉工具,輕鬆在任何影片中換臉!

熱門文章

熱工具

記事本++7.3.1
好用且免費的程式碼編輯器

SublimeText3漢化版
中文版,非常好用

禪工作室 13.0.1
強大的PHP整合開發環境

Dreamweaver CS6
視覺化網頁開發工具

SublimeText3 Mac版
神級程式碼編輯軟體(SublimeText3)


