使用C#為PDF文件新增註解的範例程式碼分享(圖)
本文將實例敘述C#中如何使用免費元件為PDF文件新增文字註解,包括自由文字註解。自由文字註解能允許我們自訂它的風格和外觀,非常具有實用價值
整理文件時,我們可能會需要在一些或一段文字上添加註解加以說明,那如何以程式設計的方式實現呢?本文將實例敘述C#中如何使用免費元件為PDF文件添加文字註釋,包括自由文字註釋。自由文本註釋允許我們自訂它的風格和外觀,非常具有實用價值。
首先,下載這個免費版元件Free Spire.PDF。元件下載安裝後,Visual Studio建立C#控制台項目,新增bin資料夾的.DLL作為引用以及以下命名空間:
using System;
using System.Drawing;
using System.Windows.Forms;
using Spire.Pdf;
using Spire.Pdf.Graphics;
using Spire.Pdf.Annotations;
現在我們就來具體看看如何為新建的文件新增註解的。
步驟1:新建一個PDF文件物件,再新增一個新頁面。
PdfDocument doc = new PdfDocument();
PdfPageBase page = doc.Pages.Add();
步驟2:文件中新增文本,並設定文本的位置、字體大小、顏色。
PdfFont font = new PdfFont(PdfFontFamily.Helvetica, 13);
string text = "HelloWorld";
PointF point = new PointF(200, 100);
page.Canvas.DrawString(text, font, PdfBrushes.Red, point);
步驟3:為文字新增註釋,並設定註釋的邊框、顏色及位置。
PdfTextMarkupAnnotation annotation1 = new PdfTextMarkupAnnotation("管理员", "一般来说,这是每一种计算机编程语言中最基本、最简单的程序", text, new PointF(0, 0), font);
annotation1.Border = new PdfAnnotationBorder(0.75f);
annotation1.TextMarkupColor = Color.Green;
annotation1.Location = new PointF(point.X + doc.PageSettings.Margins.Left, point.Y + doc.PageSettings.Margins.Left);步驟4:將註解新增到頁面,最後儲存文件。
(page as PdfNewPage).Annotations.Add(annotation1);
doc.SaveToFile("result.pdf");這是新增註解後的效果圖:

#全部程式碼:
PdfDocument doc = new PdfDocument();
      PdfPageBase page = doc.Pages.Add();
      PdfFont font = new PdfFont(PdfFontFamily.Helvetica, 13);
      string text = "HelloWorld";
      PointF point = new PointF(200, 100);
      page.Canvas.DrawString(text, font, PdfBrushes.Red, point);

      PdfTextMarkupAnnotation annotation1 = new PdfTextMarkupAnnotation("管理员", "一般来说,这是每一种计算机编程语言中最基本、最简单的程序", text, new PointF(0, 0), font);
      annotation1.Border = new PdfAnnotationBorder(0.75f);
      annotation1.TextMarkupColor = Color.Green;
      annotation1.Location = new PointF(point.X + doc.PageSettings.Margins.Left, point.Y + doc.PageSettings.Margins.Left);
      (page as PdfNewPage).Annotations.Add(annotation1);
      doc.SaveToFile("result.pdf");
System.Diagnostics.Process.Start("result.pdf");新增自由文字註解
同樣,在文件中加入自由文字註解也相對簡單。
步驟1:新建一個PDF文檔對象,並新增一個新頁面。
PdfDocument doc = new PdfDocument();
PdfPageBase page = doc.Pages.Add();
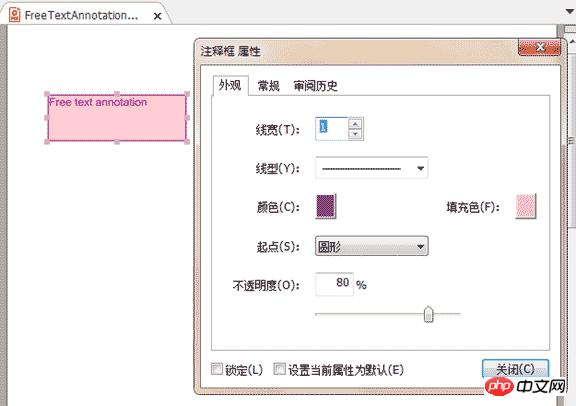
步驟2:初始化一個PdfFreeTextAnnotation,然後自訂註解的文字。
RectangleF rect = new RectangleF(0, 40, 150, 50);
PdfFreeTextAnnotation textAnnotation = new PdfFreeTextAnnotation(rect);
textAnnotation.Text = "Free text annotation ";
步驟3:設定註解的屬性,包括字型、填滿顏色、邊框顏色和透明度。
PdfFont font = new PdfFont(PdfFontFamily.TimesRoman, 10);
PdfAnnotationBorder border = new PdfAnnotationBorder(1f);
textAnnotation.Font = font;
textAnnotation.Border = border;
textAnnotation.BorderColor = Color. Purple;
textAnnotation.LineEndingStyle = PdfLineEndingStyle.Circle;
textAnnotation.Color = Color. Pink;
textAnnotation.Opacity = 0.8f;
步驟4:新增註解到頁面。
page.AnnotationsWidget.Add(textAnnotation);
步驟5:儲存並重新開啟文件。
doc.SaveToFile("FreeTextAnnotation.pdf", FileFormat.PDF);
System.Diagnostics.Process.Start("FreeTextAnnotation.pdf");這是新增自由文字註解的效果圖:

#全部程式碼:
PdfDocument doc = new PdfDocument();
      PdfPageBase page = doc.Pages.Add();

      RectangleF rect = new RectangleF(0, 40, 150, 50);
      PdfFreeTextAnnotation textAnnotation = new PdfFreeTextAnnotation(rect);
      textAnnotation.Text = "Free text annotation ";

      PdfFont font = new PdfFont(PdfFontFamily.TimesRoman, 10);
      PdfAnnotationBorder border = new PdfAnnotationBorder(1f);
      textAnnotation.Font = font;
      textAnnotation.Border = border;
      textAnnotation.BorderColor = Color. Purple;
      textAnnotation.LineEndingStyle = PdfLineEndingStyle.Circle;
      textAnnotation.Color = Color.Pink;
      textAnnotation.Opacity = 0.8f;

      page.AnnotationsWidget.Add(textAnnotation);
      doc.SaveToFile("FreeTextAnnotation.pdf", FileFormat.PDF);
System.Diagnostics.Process.Start("FreeTextAnnotation.pdf");以上是使用C#為PDF文件新增註解的範例程式碼分享(圖)的詳細內容。更多資訊請關注PHP中文網其他相關文章!

熱AI工具

Undresser.AI Undress
人工智慧驅動的應用程序,用於創建逼真的裸體照片

AI Clothes Remover
用於從照片中去除衣服的線上人工智慧工具。

Undress AI Tool
免費脫衣圖片

Clothoff.io
AI脫衣器

Video Face Swap
使用我們完全免費的人工智慧換臉工具,輕鬆在任何影片中換臉!

熱門文章

熱工具

記事本++7.3.1
好用且免費的程式碼編輯器

SublimeText3漢化版
中文版,非常好用

禪工作室 13.0.1
強大的PHP整合開發環境

Dreamweaver CS6
視覺化網頁開發工具

SublimeText3 Mac版
神級程式碼編輯軟體(SublimeText3)
 使用 C# 的活動目錄
Sep 03, 2024 pm 03:33 PM
使用 C# 的 Active Directory 指南。在這裡,我們討論 Active Directory 在 C# 中的介紹和工作原理以及語法和範例。
 c#多線程和異步的區別
Apr 03, 2025 pm 02:57 PM
多線程和異步的區別在於,多線程同時執行多個線程,而異步在不阻塞當前線程的情況下執行操作。多線程用於計算密集型任務,而異步用於用戶交互操作。多線程的優勢是提高計算性能,異步的優勢是不阻塞 UI 線程。選擇多線程還是異步取決於任務性質:計算密集型任務使用多線程,與外部資源交互且需要保持 UI 響應的任務使用異步。
 C#與C:歷史,進化和未來前景
Apr 19, 2025 am 12:07 AM
C#和C 的歷史與演變各有特色,未來前景也不同。 1.C 由BjarneStroustrup在1983年發明,旨在將面向對象編程引入C語言,其演變歷程包括多次標準化,如C 11引入auto關鍵字和lambda表達式,C 20引入概念和協程,未來將專注於性能和系統級編程。 2.C#由微軟在2000年發布,結合C 和Java的優點,其演變注重簡潔性和生產力,如C#2.0引入泛型,C#5.0引入異步編程,未來將專注於開發者的生產力和雲計算。


