react.js 的 批次新增與刪除功能
下面小編就為大家帶來一篇react.js 的 批次新增與刪除功能。小編覺得蠻不錯的,現在就分享給大家,也給大家做個參考。一起跟著小編過來看看吧
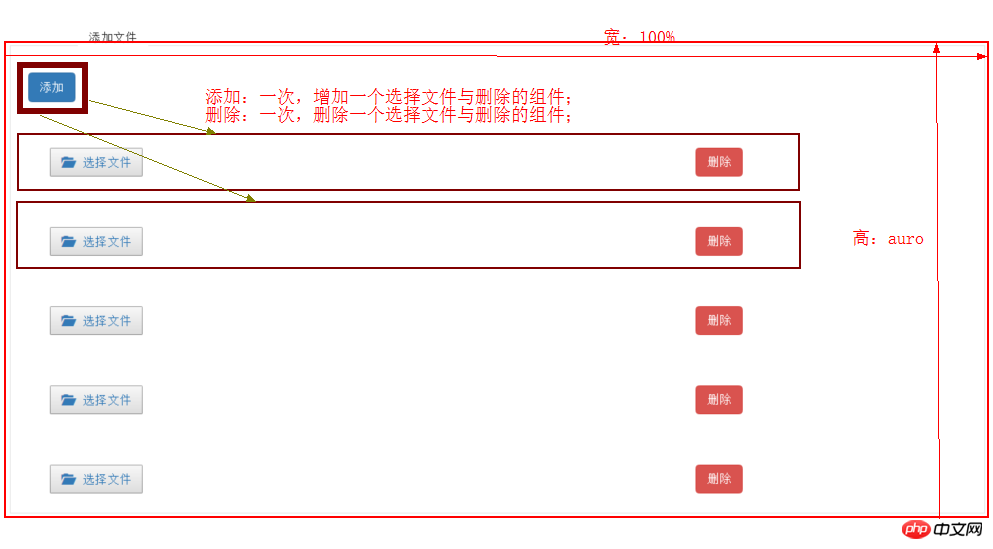
最近做的CMS需要用到批量添加圖片的功能:在添加文件的容器盒內,有兩個內容,分別是:添加按鈕與被新增的選擇檔案組件。

結構分析:
被加入的元件,我們稱為:UploadQiNiuFiles(七牛檔案上傳元件),含一個刪除目前元件的刪除按鈕
新增按鈕的事件
#被加入元件存放的容器
做這個效果只需要明白三個方法的用途就OK:
直接綁定要刪除元件的 deleteType(),它是呼叫刪除index數量的方法 removeContent()
##
//删除{qiniu}与{deleteQiNiu}内容,是把页面上的这两个内容一起删除
  deleteType(){
    let index = this.props.index;
    this.props.callbackParent(index);
}< ;/p>中,為新增按鈕所寫的批次新增addContent() 與刪除removeContent()
//批量添加
  addContent(event) {
    if (this.state.number.length >= this.state.maxNum) {
      return;
    }
    console.log("this.state.number:" + this.state.number);
    this.state.number.push(this.state.number[this.state.number.length - 1] + 1);
    let temp = this.state.number;
    this.setState({
      number: temp
    })
  }

  //删除
  removeContent(index) {
    if (this.state.number.length <= 1) {
      return;
    }
    this.state.number.splice(index, 1);
    this.setState({
      number: this.state.number
    })
}程式碼分析:
新增元件存放的容器
<p className="pBorder">
   {addToBtn} //添加按钮
   {items}   //被添加的组件
</p>.pBorder {
position: relative;
width: 100%;
height: auto;
margin-top: 5%;
border: 1px solid #e3e3e3;
padding: 30px 10px;
margin-bottom: 5%;
-moz-position: relative;
-moz-width: 100%;
-moz-height: auto;
-moz-border: 1px solid #e3e3e3;
-moz-padding: 30px 10px;
-moz-margin-bottom: 5%;
-webkit-position: relative;
-webkit-width: 100%;
-webkit-height: auto;
-webkit-border: 1px solid #e3e3e3;
-webkit-padding: 30px 10px;
-webkit-margin-bottom: 5%;
}被加入的元件:UploadQiNiuFiles 與刪除元件的方法 deleteType()
/**
 * Created by wf on 2016/5/16.
 */
import React,{Component} from 'react';
import {render} from 'react-dom';
import ReactBootstrap , {Input,Button,ButtonToolbar} from 'react-bootstrap';
import style from '../../../../css/meeting_data.css';

//七牛上传公共组件
import QiniuUpload from 'qiniu_uploader';

export default class UploadQiNiuFiles extends Component {
  constructor(props){
    super(props);
  }

  //获取qiniukey
  getQiniuKey(qiniuKey){
    this.props.setQiniuKey(qiniuKey);
  }

  //获取qiniutoken
  getQiniuUptoken() {
    this.props.acquireToken();
  };

  //删除{qiniu}与{deleteQiNiu}内容,是把页面上的这两个内容一起删除,直接绑定要删除的组件
  //这个方法调用的是removeContent(),在下面有介绍
  deleteType(){
    let index = this.props.index;
    this.props.callbackParent(index);
  }

  render(){

    const qiniu = (
      <p className="col-md-8 qiNiuBtn">
        <QiniuUpload containerId="containerId" pickfilesId="pickfilesId" qiniuToken={this.props.meetingState.token} callback={this.getQiniuKey.bind(this)} getQiniuUptoken={this.getQiniuUptoken.bind(this)} />
      </p>
    );

    const deleteQiNiu = (
      <p className="col-md-4">
        <Button bsStyle="danger" className="deleteQiniu" onClick={this.deleteType.bind(this)}>删除</Button>
      </p>

    );

    return(
      <p>
        <p className="uploadBox">
          {qiniu}
          {deleteQiNiu}
        </p>
      </p>
    );
  }
}
在p為pBorder的容器內操作添加事件
##首先要加載,七牛上傳元件:UploadQiNiuFiles,它的載入路徑為webpack中的方法:
#
/**常用组件路径简写为:
  *
  * 例:config: path.join(__dirname,"./build/config.js")
  * config 变量名
  * path.join(__dirname,"./build/config.js") config的路径
  *
  * 使用方法: import {变量} from 'config'
  * //七牛上传公共组件
   import QiniuUpload from 'qiniu_uploader';
  * **/
 resolve: {
  alias: {
   qiniu_uploader: path.join(__dirname,"./public_component/qiniu_upload/QiniuUpload.js"),
   storage: path.join(__dirname,"./utils/Storage.js"),
   config: path.join(__dirname,"./build/config.js")
  }
}##
import React,{Component} from 'react';
import {render} from 'react-dom';
import ReactBootstrap , {Input,Button,ButtonToolbar} from 'react-bootstrap';
import { Link } from 'react-router';
//
import UploadQiNiuFiles from './UploadQiNiuFiles.js';
預設參數為:
constructor(props){
    super(props);
    this.state = {number: [1], maxNum: 10} //最大数据为10条,默认显示1条
}/*获取上个页面传过来的值 let local = this.props.location;
如果从(row,query)中跳转过来的页面,从query中传值过来要这么写:let query = local.query;
如果这个页面是包含在某个大的页面下的,要把query与对应的ID传过去
*/
componentDidMount(){
let local = this.props.location;
let query = local.query;
this.props.setActivityId(query.activityId);
}資料渲染完成之後,需要執行componentDidUpdate(),這是state中所有的資料:
this.props.meetingState.addUploadFolderToFileList; 判斷這裡面的資料是否為空或是undefined。如果這個state有值且新增成功,則下次到這個頁面時清空所有的資料並且點擊儲存按鈕時返回到原來的頁面。 clearInvitation() 的方法是清空所有的業務數據,它的方法寫在action中,data是業務數據,根據實際情況寫:
/* 清空*/

export const CLEAR_INVITATION = 'CLEAR_INVITATION';
 export function clearInvitation(){
  return {
    type: CLEAR_INVITATION,
    data:{
      addInvitationResponse:{},
      Invitations:[],
      deleteInvitationsResponse:{},
      invitationName:'',
      folderName: ''
    }
  }
}componentDidUpdate(){
let addFileToFolderList = this.props.meetingState.addUploadFolderToFileList;
if (typeof(addFileToFolderList) != 'undefined') {
let status = addFileToFolderList.status;
if (200 == status) {
//如果新增成功,则下次添加前清空所有
this.props.clearInvitation();
//点击保存按钮,返回原来的页面
this.props.history.goBack();
}
}
}//批量添加,直接拿来使用
addContent(event) {
if (this.state.number.length >= this.state.maxNum) {
return;
}
console.log("this.state.number:" + this.state.number);
this.state.number.push(this.state.number[this.state.number.length - 1] + 1);
let temp = this.state.number;
this.setState({
number: temp
})
}//删除,直接拿来使用
removeContent(index) {
if (this.state.number.length <= 1) {
return;
}
this.state.number.splice(index, 1);
this.setState({
number: this.state.number
})
}//绑定被删除的组件,直接拿来使用
deleteType(){
let index = this.props.index;
this.props.callbackParent(index); //调用removeContent()方法
}render(){
//将要添加的组件定义为变量为一个数组 items
let items = [];
//从添加的组件数量中遍历,
for(let i = 0; i < this.state.number.length; i++){
//给这个items推送组件
items.push(<UploadQiNiuFiles index={i}
callbackParent={this.removeContent.bind(this)}
key={this.state.number[i]} {...this.props} />)
}
const addToBtn = (
<Button bsStyle="primary" onClick={this.addContent.bind(this)}>添加</Button>
);return (
<p>
<p>
<p className="pTitle">添加文件</p>
<p className="pBorder">
{addToBtn}
{items}
</p>
</p></p>
);
}以上是react.js 的 批次新增與刪除功能的詳細內容。更多資訊請關注PHP中文網其他相關文章!

熱AI工具

Undresser.AI Undress
人工智慧驅動的應用程序,用於創建逼真的裸體照片

AI Clothes Remover
用於從照片中去除衣服的線上人工智慧工具。

Undress AI Tool
免費脫衣圖片

Clothoff.io
AI脫衣器

Video Face Swap
使用我們完全免費的人工智慧換臉工具,輕鬆在任何影片中換臉!

熱門文章

熱工具

記事本++7.3.1
好用且免費的程式碼編輯器

SublimeText3漢化版
中文版,非常好用

禪工作室 13.0.1
強大的PHP整合開發環境

Dreamweaver CS6
視覺化網頁開發工具

SublimeText3 Mac版
神級程式碼編輯軟體(SublimeText3)
 React父元件怎麼呼叫子元件的方法
Dec 27, 2022 pm 07:01 PM
呼叫方法:1、類別元件中的呼叫可以利用React.createRef()、ref的函數式宣告或props自訂onRef屬性來實作;2、函式元件、Hook元件中的呼叫可以利用useImperativeHandle或forwardRef拋出子組件ref來實作。
 深入理解React的自訂Hook
Apr 20, 2023 pm 06:22 PM
React 自訂 Hook 是將元件邏輯封裝在可重複使用函數中的方式,它們提供了一種在不編寫類別的情況下重複使用狀態邏輯的方式。本文將詳細介紹如何自訂封裝 hook。
 怎麼調試React源碼?多種工具下的除錯方法介紹
Mar 31, 2023 pm 06:54 PM
怎麼調試React源碼?以下這篇文章帶大家聊聊多種工具下的調試React源碼的方法,介紹一下在貢獻者、create-react-app、vite專案中如何debugger React的真實源碼,希望對大家有所幫助!
 react怎麼設定div高度
Jan 06, 2023 am 10:19 AM
react設定div高度的方法:1、透過css方式實現div高度;2、在state中宣告一個物件C,並在該物件中存放更換按鈕的樣式,然後取得A並重新設定C中的「marginTop」即可。
 React為什麼不將Vite作為構建應用的首選
Feb 03, 2023 pm 06:41 PM
React為什麼不將Vite作為建置應用的首選?以下這篇文章就來帶大家聊聊React不將Vite當作預設推薦的原因,希望對大家有幫助!
 7 個很棒且實用的React 元件庫(壓箱底分享)
Nov 04, 2022 pm 08:00 PM
這篇文章跟大家整理分享7 個很棒又實用的React 元件庫,日常開發中常會用到的,快來收藏試試看吧!
 聊聊Vuex與Pinia在設計與實作上的差別
Dec 07, 2022 pm 06:24 PM
在進行前端專案開發時,狀態管理始終是一個繞不開的話題,Vue 與 React 框架本身提供了一部分能力去解決這個問題。但在開發大型應用程式時往往有其他考慮,例如需要更規範更完善的操作日誌、整合在開發者工具中的時間旅行能力、服務端渲染等。本文以 Vue 架構為例,介紹 Vuex 與 Pinia 這兩種狀態管理工具在設計與實作上的差異。


