本篇文章主要介紹了Java中多執行緒同步類別 CountDownLatch的相關知識,具有很好的參考價值。下面跟著小編一起來看下吧
在多執行緒開發中,常常遇到希望一組執行緒完成之後在執行之後的操作,java提供了一個多執行緒同步輔助類,可以完成此類需求:
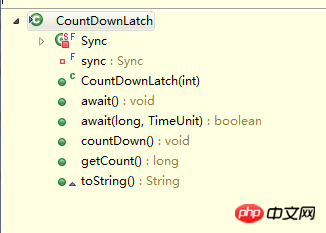
類別中常見的方法:

其中建構方法:
##CountDownLatch(int count)參數count是計數器,一般用要執行線程的數量來賦值。 long getCount():取得目前計數器的值。 void countDown():當計數器的值大於零時,呼叫方法,計數器的數值減少1,當計數器等數零時,釋放所有的執行緒。 void await():調所該方法阻塞目前主線程,直到計數器減少為零。 程式碼範例:執行緒類別:
import java.util.concurrent.CountDownLatch;
public class TestThread extends Thread{
CountDownLatch cd;
String threadName;
public TestThread(CountDownLatch cd,String threadName){
 this.cd=cd;
 this.threadName=threadName;

}
@Override
public void run() {
 System.out.println(threadName+" start working...");
 dowork();
 System.out.println(threadName+" end working and exit...");
 cd.countDown();//告诉同步类完成一个线程操作完成

}
private void dowork(){
 try {
 Thread.sleep(2000);
 System.out.println(threadName+" is working...");
 } catch (InterruptedException e) {
 // TODO Auto-generated catch block
 e.printStackTrace();
 }

}

}測試類別:
import java.util.concurrent.CountDownLatch;
public class TsetCountDownLatch {

 public static void main(String[] args) {
 try {
  CountDownLatch cd = new CountDownLatch(3);// 表示一共有三个线程
  TestThread thread1 = new TestThread(cd, "thread1");
  TestThread thread2 = new TestThread(cd, "thread2");
  TestThread thread3 = new TestThread(cd, "thread3");
  thread1.start();
  thread2.start();
  thread3.start();
  cd.await();//等待所有线程完成
  System.out.println("All Thread finishd");
 } catch (InterruptedException e) {
  // TODO Auto-generated catch block
  e.printStackTrace();
 }
 }
}thread1 start working... thread2 start working... thread3 start working... thread2 is working... thread2 end working and exit... thread1 is working... thread3 is working... thread3 end working and exit... thread1 end working and exit... All Thread finishd
以上是關於多執行緒同步類別 CountDownLatch的詳解的詳細內容。更多資訊請關注PHP中文網其他相關文章!


