
这篇文章主要介绍了bootstrap 表单验证formvalidation 实现表单动态验证功能,需要的朋友可以参考下bootstrap教程
动态添加input并动态添加新验证方式!
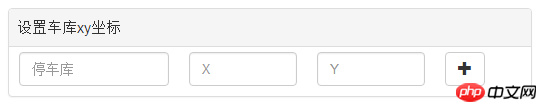
init状态:
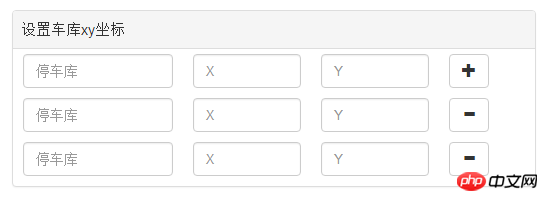
点击“+”后:
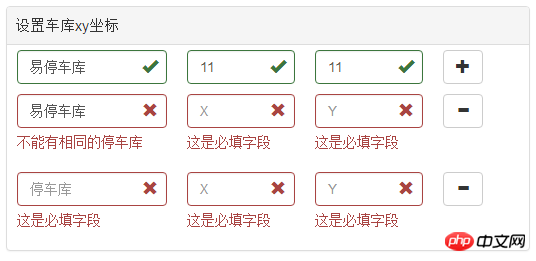
验证后:
知识点:
1 先去官网下载:formvalidation.io/
2 导入文件,注意事项我就不多说了在远程验证那篇我已经讲过。
3 用到的关键字:addField、removeField、different
4注意一点就是官网里的例子他们的name是不一样的。我这里比较偷懒。且项目ajax的时候不是用的form表单提交,而是自己并接成json提交,所以x,y的name的名字一样。
好开始:
首先是在html里面必须要有一个 “+” 标记为addPos,然后有一个“-” 标记为“removPos,
<p id="posXY" class=" panel panel-default ">
<!-- 添加-->
                <p class="panel-heading" >设置车库xy坐标</p>
                <p class="addPos form-group">
                  <p class="col-lg-4 col-sm-4 col-xs-4" >
                    <input type="text" class="form-control text-left" name="garageNo" placeholder="停车库" style="min-width: 150px"/>
                  </p>
                  <p class="col-lg-3 col-sm-3 col-xs-3" >
                    <input type="text" class="form-control" name="posX" placeholder="X"/>
                  </p>
                  <p class="col-lg-3 col-sm-3 col-xs-3" >
                    <input type="text" class="form-control" name="posY" placeholder="Y"/>
                  </p>
                  <p class="col-lg-2 col-sm-2 col-xs-2" >
                    <button type="button" class="btn btn-default addButtonPos"><i class="glyphicon glyphicon-plus"></i></button>
                  </p>
                </p>
                <!-- 删除 -->
                <p class="removPos form-group hide" id="posTemplate">
                  <p class="col-lg-4 col-sm-4 col-xs-4" >
                    <input type="text" class="form-control text-left" name="garageNo" placeholder="停车库" style="min-width: 150px"/>
                  </p>
                  <p class="col-lg-3 col-sm-3 col-xs-3" >
                    <input type="text" class="form-control" name="posX" placeholder="X"/>
                  </p>
                  <p class="col-lg-3 col-sm-3 col-xs-3" >
                    <input type="text" class="form-control" name="posY" placeholder="Y"/>
                  </p>
                  <p class="col-lg-2 col-sm-2 col-xs-2" >
                    <button type="button" class="btn btn-default removeButtonPos"><i class="glyphicon glyphicon-minus"></i></button>
                  </p>
                </p>
</p>然后来个js:
/**
   * pos添加
   * @param $that
   */
  function addButtonPosClick($that){
    var panelId = $that.parents(".topTemplate").attr("id");
    var $form=$('#'+panelId+"form")
//    defaultPanel(panelId)
    var bookIndex=typeObj[panelId]++;
    console.log(panelId,bookIndex)
    var $template = $('#'+panelId+' #posTemplate'),
      $clone =$template
        .clone()
        .removeClass('hide')
        .removeAttr('id')
        .attr('step',bookIndex)
        .insertBefore($template);
    // Update the name attributes
    $clone
      .find('[name="garageNo"]').attr({"step":bookIndex,"name":"garageNo"+bookIndex})
      .click(function(){
        clickBindGarageNo(panelId,bookIndex)
      }).end()
      .find('[name="posX"]').attr("step",bookIndex).end()
      .find('[name="posY"]').attr("step",bookIndex).end()
    // Add new fields
    // Note that we also pass the validator rules for new field as the third parameter
//    $('#defaultForm')
//    gFieldArr.push(panelId+'[' + bookIndex + '].garageNo')
    $form
      .formValidation('addField', "garageNo"+bookIndex, formObj.sameAs(false))
      .formValidation('addField', 'posX', myPosXY)
      .formValidation('addField', 'posY', myPosXY)
  }
 function myFormValidation($form){
//    var $form=$("#"+$panelId+"form")
    $form
        .formValidation({
          framework: 'bootstrap',
          locale: 'zh_CN',
          message: '值无效',
          icon: {
            valid: 'glyphicon glyphicon-ok',
            invalid: 'glyphicon glyphicon-remove',
            validating: 'glyphicon glyphicon-refresh'
          },
          fields:
          {
            myimg:{
              validators: {
                notEmpty: {
                  message: '请选择一个文件上传'
                },
                file: {
                  extension: 'jpeg,jpg,png',
                  type: 'image/jpeg,image/png',
                  maxSize: 1*1024 * 1024,
                  message: '该文件必须为jpeg,jpg,png格式和必须不超过1MB的大小'
                }
              }
            }
          }
        })
        .on('click', '.addButtonPos', function() {
          addButtonPosClick($(this))
        })
        //Remove button click handler
        .on('click', '.removeButtonPos', function() {
          var $that   = $(this)
          var panelId = $that.parents(".topTemplate").attr("id");
//           defaultPanel(panelId)
          var $row = $(this).parents('.form-group'),
              index = $row.attr('step');
//          var myname='[' +index + ']'
          var bookIndex= typeObj[panelId]--;
//          $('#defaultForm')
          $form
                   .formValidation('removeField', $row.find('[name="garageNo'+bookIndex+'"]'))
                   .formValidation('removeField', $row.find('[name="posX"]'))
                   .formValidation('removeField', $row.find('[name="posY"]'))
          // Remove element containing the fields
          $row.remove();
})因为我的项目有多个表单提交。但是业务相似所以都用这几个函数
比如说: var form=(“#”+panelId+”form”)用panelId来区分是多个表单。
上面说到x,y的name用的是一样的。但是细心的就会发现garageNo是不一样的名称。后面添加了bookindex,为什么呢。
因为业务需求。同一个表单中的garageNo的值不可以相同。好比如说每一个人的身份号不可以相同但是你和你同桌都可以是女的也都可以18岁。。。。
上面已经很好的使用了关键字removeField和addField
garageNo的值不可以相同。怎么弄呢。请看下面:
var differentValid= function(diffstr){
    var vv={
      validators: {
        different: {
          field: diffstr,
          message: '不能有相同的停车库'
        }
      }
    }
    return vv
}当用户输入garageNo的值后:
clickBindGarageNo(panelId,idx){
    $form.formValidation('addField', "garageNo"+idx, differentValid(diffArr.toString()))
      var fv =$form.data('formValidation');
      fv.validate();
}这个diffArr.toString(),是啥呢。这个是我遍历了所有条目的garageNo的name的字符串例如:有3条条目,idx=1 焦点在1上。那么diffArr=[“garageNo0”,”garageNo2”,]
注意一个bug:如果用多了input,你会发现有时input不会自动验证。比如说验证日期的时候用了日期插件点击日期回来后input没有验证。
这个时候就需要再手动验证一次。 上面那段代码是 先添加新的验证方式,然后验证整个表单。如果你只是想要验证一个input 请用:
$form.formValidation('revalidateField', "field");还有一个关于提交的细节:
当我们没有设置提交按钮。比起提交按钮在form表单内。他这个插件是会帮你自动提交。但是你也会发现。如果你提交服务失败。他会自动刷新然后你的页面就变成404页面或其他错误页面。
但是有的时候我们不想他刷新。咋办?
网上好多ajax 提交不刷新的教程。。我比较喜欢用一种就是。我不把提交按钮放在form里面。然后:
$btn.click(function(){
//....
retrun false;
)}【相关推荐】
2. Nodejs中常用中间件body-parser的实例详解
3. JavaScript表单验证实现代码_javascript技巧
以上就是Bootstrap 表单验证formValidation 的实例详解的详细内容,更多请关注php中文网其它相关文章!

每个人都需要一台速度更快、更稳定的 PC。随着时间的推移,垃圾文件、旧注册表数据和不必要的后台进程会占用资源并降低性能。幸运的是,许多工具可以让 Windows 保持平稳运行。

 广告
广告


Copyright 2014-2025 https://www.php.cn/ All Rights Reserved | php.cn | 湘ICP备2023035733号


 506
506


