微信開發之微信支付
一、微信後台設定
#1. 新增測試授權目錄和測試白名單:
#在微信後台,設定測試授權目錄,如xxx.sinaapp.com/example/,測試白名單中加入你的微訊號。
注意,這裡的「個人微訊號」既不是qq號也不是個人暱稱。而是登入微信後在「我」介面中的「微訊號」欄位的字串。
支付授權目錄設不設無所謂,因為我們只是測試。
2.清單內容
設定網頁授權網域:
在「開發者中心/介面權限表/網頁帳號/網頁授權取得使用者基本資訊」中進行設定。網頁授權域名設定為測試伺服器的域名,如:xxx.sinaapp.com,不需要http://。
二、商家平台設定
1.下載憑證
在「帳號設定/API安全/API憑證」中下載。需要用到管理員的手機驗證碼。下載後的進行解壓縮,我們需要用到的是apiclient_key.pem和apiclient_cert.pem。
2.產生支付key
在「帳戶設定/API安全/API金鑰」中設定。支付key將在付款時用到,這個值就是原始碼設定檔中的KEY常數。
三、使用官方V3.7的範例程式碼
1、在Wxpay.pub.config.php修改配置,主要是:
    const APPID                 //公众号中“开发者中心”看到的AppID
    const MCHID                     //微信支付商户资料审核成功邮件中的商户号
    const KEY                   //你在商户平台中设置的支付key
    const APPSECRET             //公众号中“开发者中心”看到的AppSecret

    const JS_API_CALL_URL       //设置这个url,可在此页面中获得用户的openid。

    //证书路径,注意应该填写绝对路径
    const SSLCERT_PATH          // apiclient_cert.pem文件url
    const SSLKEY_PATH               // apiclient_key.pem文件url,如’/cert/ apiclient_key.pem’
    const NOTIFY_URL                //异步通知url,可使用demo中的notify_url.php
#2、修改官方程式碼中的bug:
如果出現「curl_setopt() expects parameter 2 to be long」錯誤,是因為WxPayPubHelper.php中有幾個地方將「curl_setopt」拼錯了,拼成「curl_setop ”,將其修改後即可。如果出現“curl_close(): 11 is not a valid”,則是因為錯誤地關閉了一個已經關閉的curl session,可以將curl_close()代碼加上如下判斷:
if(gettype($ch) == 'resource') curl_close($ch);
3、官方demo直接跑不通,我們需要自己搞定它。首先中index.php中增加一個連結:
<a href="pay.php"> 获取openid</a></h4>
3、 然後寫一個pay.php頁面,用於取得使用者openid並發起付款:
<?php
/**
* JS_API支付demo
* ====================================================
* 在微信浏览器里面打开H5网页中执行JS调起支付。接口输入输出数据格式为JSON。
* 成功调起支付需要三个步骤:
* 步骤1:网页授权获取用户openid
* 步骤2:使用统一支付接口,获取prepay_id
* 步骤3:使用jsapi调起支付
*/
include_once ("WxPayPubHelper.php");
$jsApi = new JsApi_pub();
// =========步骤1:网页授权获取用户openid============
// 通过code获得openid
if (! isset($_GET['code'])) {
// 触发微信返回code码
$url = $jsApi->createOauthUrlForCode(WxPayConf_pub::JS_API_CALL_URL);
Header("Location: $url");
} else {
// 获取code码,以获取openid
$code = $_GET['code'];
$jsApi->setCode($code);
$openid = $jsApi->getOpenId();
}
$goods = "test";
// 使用统一支付接口
$unifiedOrder = new UnifiedOrder_pub();
$unifiedOrder->setParameter("openid", "$openid"); // 用户openid
$unifiedOrder->setParameter("body", "$goods"); // 商品描述
// 自定义订单号,此处仅作举例
$timeStamp = time();
$out_trade_no = WxPayConf_pub::APPID . "$timeStamp"; // 商户订单号
$unifiedOrder->setParameter("out_trade_no", "$out_trade_no");
$price = "1";
$unifiedOrder->setParameter("total_fee", "$price"); // 总金额
$unifiedOrder->setParameter("notify_url", WxPayConf_pub::NOTIFY_URL); // 通知地址
$unifiedOrder->setParameter("trade_type", "JSAPI"); // 交易类型
$prepay_id = $unifiedOrder->getPrepayId();
// =========步骤3:使用jsapi调起支付============
$jsApi->setPrepayId($prepay_id);
$jsApiParameters = $jsApi->getParameters();
echo $jsApiParameters;
?>
<html>
<head>
<meta http-equiv="content-type" content="text/html;charset=utf-8" />
<meta name="viewport" content="width=device-width,initial-scale=1.0" />
<title>微信安全支付</title>
<script type="text/javascript">
//调用微信JS api 支付
function jsApiCall()
{
WeixinJSBridge.invoke(
'getBrandWCPayRequest',
<?php echo $jsApiParameters; ?>,
function(res){
WeixinJSBridge.log(res.err_msg);
//alert(res.err_code+res.err_desc+res.err_msg);
}
);
}
function callpay()
{
if (typeof WeixinJSBridge == "undefined"){
if( document.addEventListener ){
document.addEventListener('WeixinJSBridgeReady', jsApiCall, false);
}else if (document.attachEvent){
document.attachEvent('WeixinJSBridgeReady', jsApiCall);
document.attachEvent('onWeixinJSBridgeReady', jsApiCall);
}
}else{
jsApiCall();
}
}
</script>
</head>
<body>
<p> </p>
<p> </p>
<p align="center">
<table border="1">
<tr>
<td>openID</td>
<td><?php echo $openid;?></td>
</tr>
<tr>
<td>商品名称</td>
<td><?php echo $goods;?></td>
</tr>
<tr>
<td>订单号</td>
<td><?php echo $out_trade_no;?></td>
</tr>
<tr>
<td>prepay_id</td>
<td><?php echo $prepay_id;?></td>
</tr>
<tr>
<td>价格</td>
<td><?php echo $price;?></td>
</tr>
</table>
<button data-theme="b" type="button" onclick="callpay()">贡献一下</button>
</p>
</body>
</html>四、使用官方V3的範例程式碼
1、下載官方範例程式碼
最新SDK版本為V3.7,但我們不要去下V3.7的demo(那個例子跑不通),而是要去下V3的例子:
pay.weixin.qq.com/wiki/doc/api/jsapi.php?chapter=11_1
2、將demo解壓縮放到你的web根目錄下。例如,壓縮包解開後的目錄是WxpayAPI_php_v3,你要進入這個目錄後將所有檔案選中,然後複製到你的專案目錄中去。在這個目錄中有一個index.php,那麼到測試時候就需要存取 xxx.sinaapp.com/index.php。
3、將index.php中的標籤的url位址改為你伺服器上的url位址。
4、在你的微信中,隨便打開一個對話窗口,輸入index.php位址,如xxx.sinaapp.com/index.php,然後在對話視窗中點擊這個連結。會出現幾個按鈕,點「JSAPI支付」的按鈕,即可彈出支付金額為1分錢的窗口,輸入收貨人,支付。即會彈出支付成功介面。
到這一步,說明官方的支付代碼是基本上可用的,接下來,我們可以在它的基礎上修改成自己的程式碼。
5、替換cert目錄下的apiclient_key.pem和apiclient_cert.pem成你自己的憑證。
6、修改WxPay.Config.php中的以下幾項成你自己的:
const APPID                 //公众号中“开发者中心”看到的AppID
const MCHID                     //微信支付商户资料审核成功邮件中的商户号
const KEY                   //你在商户平台中设置的支付key
const APPSECRET             //公众号中“开发者中心”看到的AppSecret
7、因為我們使用了sina的sae作為測試伺服器,sae不允許直接寫文件io,因此可以將官網程式碼中的檔案操作進行相應的修改(使用SaeStorage)。也就是需要修改log.php中的CLogFileHandler類別:
class CLogFileHandler implements ILogHandler
{
    private $fn=null;
    private $ss=null;
    public function construct($file = '')
 {
        $this->fn=str_replace("../logs/", "", $file);
        $this->ss=new SaeStorage();
    }
    public function write($msg)
 {
        $bytes = $this->ss->read('log', $this->fn);
        $str = $bytes;
        $this->ss->write('log', $this->fn, "$str\n$msg");
    }
    public function destruct()
 {
        $fn=null;
        $ss=null;
    }
}8、如果出現簽名失敗的錯誤,我們可以使用微信的支付介面偵錯工具來進行測試:pay.weixin.qq.com/wiki /tools/signverify/。
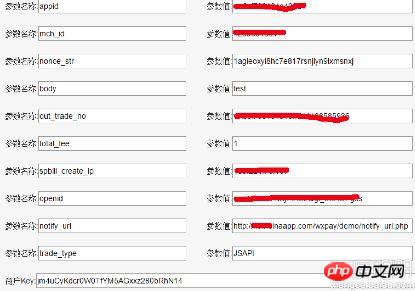
這個工具是雖然是用來驗證「被掃支付」的,但透過它的「增加參數」按鈕和「刪除參數」按鈕,我們也可以用它來測試「公眾號支付」。例如,如果你提交的xml內容如下(可利用Log函數保存提交的xml內容到sae storage,然後下載日誌檔):
<xml><openid><![CDATA[om8888LTHBj99992Qgl_eUAOFgxs]]></openid><body><![CDATA[test]]></body><out_trade_no><![CDATA[wx111196222243ffa1143858aaaa]]></out_trade_no><total_fee>1</total_fee><notify_url><![CDATA[http://xxx.sinaapp.com/wxpay/demo/notify_url.php]]></notify_url><trade_type><![CDATA[JSAPI]]></trade_type><appid><![CDATA[wx000096104a431111]]></appid><mch_id>6666833333</mch_id><spbill_create_ip><![CDATA[10.211.76.107]]></spbill_create_ip><nonce_str><![CDATA[1agieoxyi8hc7e817rsnjlyn9lxmsnxj]]></nonce_str><sign><![CDATA[817034E4DE8E6067EB85CDF7318EF0A1]]></sign></xml>
則你可以中測試工具中這樣填寫表單:

點選「產生簽章」。將得到的簽章和日誌檔中的簽章進行比較,看是否一致,即可排除簽章演算法的問題。
如果2個簽章一致,可以肯定是支付key的問題。要嘛是產品MM搞錯了,要嘛是AppSecret和支付key搞反了(有一次產品MM告訴了為一個錯誤的支付key,浪費了我3天的時間!我反复確認了每一個代碼、每一次後台參數設定之後,最後用「支付介面調試工具」確認簽章無誤,問題就出在支付key上。 ,程式碼一下就通了)
【相關推薦】
1. 微信公眾號平台原始碼下載
#3. 詳解微信支付開發之刷卡支付實例
#4 . 詳解微信小程式支付功能開發錯誤總結
#以上是微信開發之微信支付的詳細內容。更多資訊請關注PHP中文網其他相關文章!

熱AI工具

Undresser.AI Undress
人工智慧驅動的應用程序,用於創建逼真的裸體照片

AI Clothes Remover
用於從照片中去除衣服的線上人工智慧工具。

Undress AI Tool
免費脫衣圖片

Clothoff.io
AI脫衣器

Video Face Swap
使用我們完全免費的人工智慧換臉工具,輕鬆在任何影片中換臉!

熱門文章

熱工具

記事本++7.3.1
好用且免費的程式碼編輯器

SublimeText3漢化版
中文版,非常好用

禪工作室 13.0.1
強大的PHP整合開發環境

Dreamweaver CS6
視覺化網頁開發工具

SublimeText3 Mac版
神級程式碼編輯軟體(SublimeText3)
 百度地圖搭計程車如何支付 搭計程車的付款步驟介紹
Mar 13, 2024 am 10:04 AM
百度地圖APP現在已經都成為了超多用戶們首選的出行導航的軟體,那麼這裡的一些功能全面,都能夠免費的讓大家進行選擇操作哦,解決自己日常出行方面會遇到的一些問題,完全都能夠查詢到自己的一些出行的路線,規劃自己的一些出行的方案,查詢完對應的這一些路線,都能根據自己的需求,選擇合適的一些出行方式,那麼你們不管是選擇一些公共交通,騎行,步行或是搭計程車等,都能滿足你們的,有著對應的一些導航路線,成功的帶領你們去往某地,那麼大家選擇打車的話,都能感到更加的方便,超多的一些司機們都是會在線上接單,搭計程車變得超級
 使用PHP和PayPal API進行支付
Jun 19, 2023 pm 04:13 PM
隨著網路交易的日益普及,支付方式也逐漸多樣化,其中PayPal作為一種廣泛使用的支付方法備受歡迎。如果您想在您的網站或應用程式上使用PayPal來處理交易,那麼您可以使用PHP和PayPalAPI來輕鬆完成付款流程。 PayPalAPI是一組程式設計接口,用於與PayPal進行互動。透過API,您可以接收來自PayPal的通知、查詢最新的交易資訊、發起付款
 uniapp應用程式如何實現支付與訂單管理
Oct 19, 2023 am 10:37 AM
uniapp是一個跨平台的應用程式開發框架,可以同時開發小程式、App和H5。在uniapp應用程式中,實現支付和訂單管理是非常常見的需求。本文將介紹如何在uniapp應用中實現支付功能和訂單管理,並給出具體的程式碼範例。一、實現支付功能支付功能是實現線上交易的關鍵,通常需要整合第三方支付平台的SDK。以下是uniapp中實現支付功能的具體步驟:註冊並取得第三方支付平
 武漢坐公車用什麼支付
Oct 13, 2022 pm 02:17 PM
武漢坐公車的支付方式:1、現金支付,需要提前準備好足額的零錢,直接把錢投入投幣口即可;2、武漢通刷卡,武漢通全稱武漢城市一卡通,是一種集成電路卡,又稱晶片卡;3、支付寶電子公車卡,在支付寶內先領取一張武漢電子公車卡,然後上車時直接掃描二維碼扣款上車即可;4、微信乘車碼支付,打開微信「乘車碼」小程序,開通武漢「乘車碼」就可以直接掃描二維碼扣款上車。
 建立MySQL中買菜系統的訂單支付表
Nov 01, 2023 pm 03:48 PM
建立MySQL中買菜系統的訂單支付表,需要具體程式碼範例隨著網路的發展,購物變得越來越方便。在購物的過程中,訂單支付是購物過程中的重要環節。買菜系統不僅需要有訂單產生功能,還必須擁有完整的支付流程,因為支付成功才能算完成一單交易。本文將講述如何建立MySQL中買菜系統的訂單支付表,並提供具體的程式碼範例。一、訂單支付表設計買菜系統中訂單支付表儲存的是訂單
 paynow支付是什麼意思
Sep 30, 2022 am 11:01 AM
PayNow支付是一種電子轉賬類服務,用戶能夠透過收款方指定的手機號碼、身分證/FIN號、UEN號或PayNow二維碼,直接向該收款方發起即時新幣轉賬,而無須對方銀行帳號資料。
 美團外送極速支付怎麼關閉
Mar 27, 2024 am 10:41 AM
在快節奏的現代生活中,美團外送以其便利的服務和豐富的選擇,深受廣大消費者的喜愛。其中,極速支付功能更是為用戶帶來了極大的便利,一鍵即可完成支付,省去了繁瑣的輸入步驟。不過很多用戶不喜歡不經確認直接付款,所以想關閉這項功能。那麼究竟該如何關閉美團外送的極速支付呢?在下文中本站小編將為大家帶來詳細的步驟設定教程,希望能幫助大家! 1.在手機桌面點選「美團外帶」捷徑圖示。 2.登入手機美團外送app,點選右下角「我的」。 3.在我的介面,點選「進入錢包」。 4.在美團皮夾介面,點選右上角「設定」圖
 PHP微信開發:如何實作訊息加密解密
May 13, 2023 am 11:40 AM
PHP是一種開源的腳本語言,廣泛應用於網頁開發和伺服器端編程,尤其在微信開發中得到了廣泛的應用。如今,越來越多的企業和開發者開始使用PHP進行微信開發,因為它成為了真正的易學易用的開發語言。在微信開發中,訊息的加密和解密是一個非常重要的問題,因為它們涉及資料的安全性。對於沒有加密和解密方式的消息,駭客可以輕鬆取得其中的數據,對用戶造成威脅


