

分享WebApi2 檔案圖片上傳與下載功能實例

這篇文章主要介紹了WebApi2 檔案圖片上傳與下載功能,需要的朋友可以參考下
#Asp.Net Framework webapi2 檔案上傳與下載#前端介面採用Ajax的方式執行
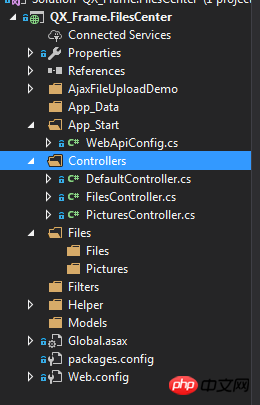
一、專案結構
1.App_Start配置了跨域訪問,以免請求時候因跨域問題不能提交。具體的跨域配置方式如下,了解的朋友請自行略過。
跨網域設定:NewGet安裝dll Microsofg.AspNet.Cors
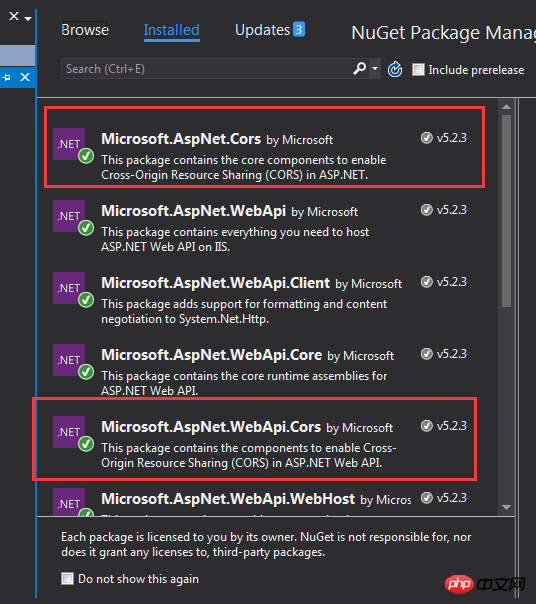
然後在App_Start 資料夾下的WebApiConfig.cs中寫入跨網域設定碼。
public static class WebApiConfig
  {
    public static void Register(HttpConfiguration config)
    {
      // Web API configuration and services
      // Web API routes
      config.MapHttpAttributeRoutes();
      // Web API configuration and services
      //跨域配置 //need reference from nuget
      config.EnableCors(new EnableCorsAttribute("*", "*", "*"));
      config.Routes.MapHttpRoute(
        name: "DefaultApi",
        routeTemplate: "api/{controller}/{id}",
        defaults: new { id = RouteParameter.Optional }
      );
      //if config the global filter input there need not write the attributes
      //config.Filters.Add(new App.WebApi.Filters.ExceptionAttribute_DG());
    }
}跨域就算完成了,請自行測試。
2.新建兩個控制器,一個PicturesController.cs,一個FilesController.cs當然圖片也是文件,這裡圖片和文件以不同的方式處理的,因為圖片的方式文件上傳沒有成功,所以另尋他路,如果在座的有更好的方式,請不吝賜教!
二、專案程式碼
1.我們先說圖片上傳、下載控制器接口,這裡其實沒什麼好說的,就一個Get取得文件,參數是文件全名;Post上傳文件;直接上碼。
using QX_Frame.App.WebApi;
using QX_Frame.FilesCenter.Helper;
using QX_Frame.Helper_DG;
using QX_Frame.Helper_DG.Extends;
using System;
using System.Collections.Generic;
using System.Diagnostics;
using System.IO;
using System.Linq;
using System.Net;
using System.Net.Http;
using System.Net.Http.Headers;
using System.Text;
using System.Threading.Tasks;
using System.Web.Http;
/**
* author:qixiao
* create:2017-5-26 16:54:46
* */
namespace QX_Frame.FilesCenter.Controllers
{
public class PicturesController : WebApiControllerBase
{
//Get : api/Pictures
public HttpResponseMessage Get(string fileName)
{
HttpResponseMessage result = null;
DirectoryInfo directoryInfo = new DirectoryInfo(IO_Helper_DG.RootPath_MVC + @"Files/Pictures");
FileInfo foundFileInfo = directoryInfo.GetFiles().Where(x => x.Name == fileName).FirstOrDefault();
if (foundFileInfo != null)
{
FileStream fs = new FileStream(foundFileInfo.FullName, FileMode.Open);
result = new HttpResponseMessage(HttpStatusCode.OK);
result.Content = new StreamContent(fs);
result.Content.Headers.ContentType = new System.Net.Http.Headers.MediaTypeHeaderValue("application/octet-stream");
result.Content.Headers.ContentDisposition = new ContentDispositionHeaderValue("attachment");
result.Content.Headers.ContentDisposition.FileName = foundFileInfo.Name;
}
else
{
result = new HttpResponseMessage(HttpStatusCode.NotFound);
}
return result;
}
//POST : api/Pictures
public async Task<IHttpActionResult> Post()
{
if (!Request.Content.IsMimeMultipartContent())
{
throw new Exception_DG("unsupported media type", 2005);
}
string root = IO_Helper_DG.RootPath_MVC;
IO_Helper_DG.CreateDirectoryIfNotExist(root + "/temp");
var provider = new MultipartFormDataStreamProvider(root + "/temp");
// Read the form data.
await Request.Content.ReadAsMultipartAsync(provider);
List<string> fileNameList = new List<string>();
StringBuilder sb = new StringBuilder();
long fileTotalSize = 0;
int fileIndex = 1;
// This illustrates how to get the file names.
foreach (MultipartFileData file in provider.FileData)
{
//new folder
string newRoot = root + @"Files/Pictures";
IO_Helper_DG.CreateDirectoryIfNotExist(newRoot);
if (File.Exists(file.LocalFileName))
{
//new fileName
string fileName = file.Headers.ContentDisposition.FileName.Substring(1, file.Headers.ContentDisposition.FileName.Length - 2);
string newFileName = Guid.NewGuid() + "." + fileName.Split('.')[1];
string newFullFileName = newRoot + "/" + newFileName;
fileNameList.Add($"Files/Pictures/{newFileName}");
FileInfo fileInfo = new FileInfo(file.LocalFileName);
fileTotalSize += fileInfo.Length;
sb.Append($" #{fileIndex} Uploaded file: {newFileName} ({ fileInfo.Length} bytes)");
fileIndex++;
File.Move(file.LocalFileName, newFullFileName);
Trace.WriteLine("1 file copied , filePath=" + newFullFileName);
}
}
return Json(Return_Helper.Success_Msg_Data_DCount_HttpCode($"{fileNameList.Count} file(s) /{fileTotalSize} bytes uploaded successfully! Details -> {sb.ToString()}", fileNameList, fileNameList.Count));
}
}
}裡面可能有部分程式碼在Helper幫助類別裡面寫的,其實也只是取得伺服器根路徑和如果判斷資料夾不存在則建立目錄,這兩個程式碼的實作如下:
 public static string RootPath_MVC
     {
       get { return System.Web.HttpContext.Current.Server.MapPath("~"); }
     }
//create Directory
    public static bool CreateDirectoryIfNotExist(string filePath)
    {
      if (!Directory.Exists(filePath))
      {
        Directory.CreateDirectory(filePath);
      }
      return true;
}2.檔案上傳下載介面和圖片大同小異。
using QX_Frame.App.WebApi;
using QX_Frame.FilesCenter.Helper;
using QX_Frame.Helper_DG;
using System.Collections.Generic;
using System.Diagnostics;
using System.IO;
using System.Linq;
using System.Net;
using System.Net.Http;
using System.Net.Http.Headers;
using System.Text;
using System.Threading.Tasks;
using System.Web;
using System.Web.Http;
/**
 * author:qixiao
 * create:2017-5-26 16:54:46
 * */
namespace QX_Frame.FilesCenter.Controllers
{
  public class FilesController : WebApiControllerBase
  {
    //Get : api/Files
    public HttpResponseMessage Get(string fileName)
    {
      HttpResponseMessage result = null;
      DirectoryInfo directoryInfo = new DirectoryInfo(IO_Helper_DG.RootPath_MVC + @"Files/Files");
      FileInfo foundFileInfo = directoryInfo.GetFiles().Where(x => x.Name == fileName).FirstOrDefault();
      if (foundFileInfo != null)
      {
        FileStream fs = new FileStream(foundFileInfo.FullName, FileMode.Open);
        result = new HttpResponseMessage(HttpStatusCode.OK);
        result.Content = new StreamContent(fs);
        result.Content.Headers.ContentType = new System.Net.Http.Headers.MediaTypeHeaderValue("application/octet-stream");
        result.Content.Headers.ContentDisposition = new ContentDispositionHeaderValue("attachment");
        result.Content.Headers.ContentDisposition.FileName = foundFileInfo.Name;
      }
      else
      {
        result = new HttpResponseMessage(HttpStatusCode.NotFound);
      }
      return result;
    }
    //POST : api/Files
    public async Task<IHttpActionResult> Post()
    {
      //get server root physical path
      string root = IO_Helper_DG.RootPath_MVC;
      //new folder
      string newRoot = root + @"Files/Files/";
      //check path is exist if not create it
      IO_Helper_DG.CreateDirectoryIfNotExist(newRoot);
      List<string> fileNameList = new List<string>();
      StringBuilder sb = new StringBuilder();
      long fileTotalSize = 0;
      int fileIndex = 1;
      //get files from request
      HttpFileCollection files = HttpContext.Current.Request.Files;
      await Task.Run(() =>
      {
        foreach (var f in files.AllKeys)
        {
          HttpPostedFile file = files[f];
          if (!string.IsNullOrEmpty(file.FileName))
          {
            string fileLocalFullName = newRoot + file.FileName;
            file.SaveAs(fileLocalFullName);
            fileNameList.Add($"Files/Files/{file.FileName}");
            FileInfo fileInfo = new FileInfo(fileLocalFullName);
            fileTotalSize += fileInfo.Length;
            sb.Append($" #{fileIndex} Uploaded file: {file.FileName} ({ fileInfo.Length} bytes)");
            fileIndex++;
            Trace.WriteLine("1 file copied , filePath=" + fileLocalFullName);
          }
        }
      });
      return Json(Return_Helper.Success_Msg_Data_DCount_HttpCode($"{fileNameList.Count} file(s) /{fileTotalSize} bytes uploaded successfully!   Details -> {sb.ToString()}", fileNameList, fileNameList.Count));
    }
  }
}實現了上述兩個控制器程式碼以後,我們需要前端程式碼來偵錯對接,程式碼如下所示。
<!doctype>
<head>
<script src="jquery-3.2.0.min.js"></script>
<!--<script src="jquery-1.11.1.js"></script>-->
<!--<script src="ajaxfileupload.js"></script>-->
<script>
$(document).ready(function () {
var appDomain = "http://localhost:3997/";
$("#btn_fileUpload").click(function () {
/**
* 用ajax方式上传文件 -----------
* */
//-------asp.net webapi fileUpload
//
var formData = new FormData($("#uploadForm")[0]);
$.ajax({
url: appDomain + 'api/Files',
type: 'POST',
data: formData,
async: false,
cache: false,
contentType: false,
processData: false,
success: function (data) {
console.log(JSON.stringify(data));
},
error: function (data) {
console.log(JSON.stringify(data));
}
});
//----end asp.net webapi fileUpload
//----.net core webapi fileUpload
// var fileUpload = $("#files").get(0);
// var files = fileUpload.files;
// var data = new FormData();
// for (var i = 0; i < files.length; i++) {
// data.append(files[i].name, files[i]);
// }
// $.ajax({
// type: "POST",
// url: appDomain+'api/Files',
// contentType: false,
// processData: false,
// data: data,
// success: function (data) {
// console.log(JSON.stringify(data));
// },
// error: function () {
// console.log(JSON.stringify(data));
// }
// });
//--------end net core webapi fileUpload
/**
* ajaxfileupload.js 方式上传文件
* */
// $.ajaxFileUpload({
// type: 'post',
// url: appDomain + 'api/Files',
// secureuri: false,
// fileElementId: 'files',
// success: function (data) {
// console.log(JSON.stringify(data));
// },
// error: function () {
// console.log(JSON.stringify(data));
// }
// });
});
//end click
})
</script>
</head>
<title></title>
<body>
<article>
<header>
<h2>article-form</h2>
</header>
<p>
<form action="/" method="post" id="uploadForm" enctype="multipart/form-data">
<input type="file" id="files" name="files" placeholder="file" multiple>file-multiple属性可以选择多项<br><br>
<input type="button" id="btn_fileUpload" value="fileUpload">
</form>
</p>
</article>
</body>至此,我們的功能已全部實現,下面我們來測試一下:

可見,檔案上傳成功,按預期格式返回!
下面我們測試單圖上傳->

然後我們按回傳的位址進行存取圖片地址。

發現並無任何壓力!
下面測試多圖片上傳->
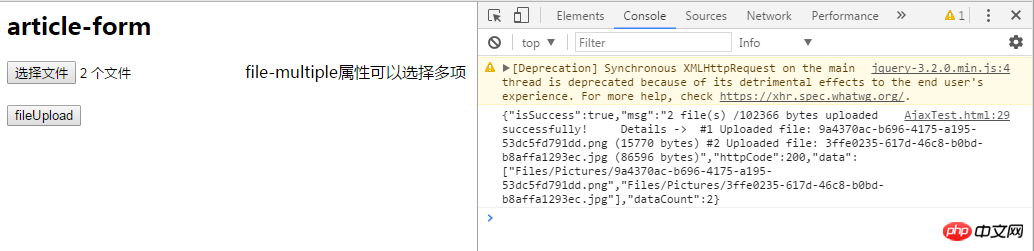
完美~
至此,我們已經實現了WebApi2檔案和圖片上傳,下載的全部功能。
這裡要注意Web.config的設定上傳檔案支援的總大小,我這裡設定的是最大支援的檔案大小為1MB
<requestFiltering>
  <requestLimits maxAllowedContentLength="1048576" />
</requestFiltering>
  <system.webServer>
   <handlers>
    <remove name="ExtensionlessUrlHandler-Integrated-4.0" />
    <remove name="OPTIONSVerbHandler" />
    <remove name="TRACEVerbHandler" />
    <add name="ExtensionlessUrlHandler-Integrated-4.0" path="*." verb="*" type="System.Web.Handlers.TransferRequestHandler" preCondition="integratedMode,runtimeVersionv4.0" />
   </handlers>
   <security>
   <requestFiltering>
    <requestLimits maxAllowedContentLength="1048576" /><!--1MB-->
    </requestFiltering>
  </security>
</system.webServer>【相關推薦】
3. 詳細介紹ASP.NET MVC--控制器(controller)
以上是分享WebApi2 檔案圖片上傳與下載功能實例的詳細內容。更多資訊請關注PHP中文網其他相關文章!

熱AI工具

Undresser.AI Undress
人工智慧驅動的應用程序,用於創建逼真的裸體照片

AI Clothes Remover
用於從照片中去除衣服的線上人工智慧工具。

Undress AI Tool
免費脫衣圖片

Clothoff.io
AI脫衣器

AI Hentai Generator
免費產生 AI 無盡。

熱門文章
熱工具

記事本++7.3.1
好用且免費的程式碼編輯器

SublimeText3漢化版
中文版,非常好用

禪工作室 13.0.1
強大的PHP整合開發環境

Dreamweaver CS6
視覺化網頁開發工具

SublimeText3 Mac版
神級程式碼編輯軟體(SublimeText3)
熱門話題


 紅果短劇怎麼下載劇集
Mar 11, 2024 pm 09:16 PM
紅果短劇怎麼下載劇集
Mar 11, 2024 pm 09:16 PM
紅果短劇不僅是觀賞短劇的平台,更是內容豐富的寶庫,其中也包含了小說等精彩內容。對於許多熱愛閱讀的用戶來說,這無疑是一個巨大的驚喜。然而很多用戶們還不太了解究竟該如何在紅果短劇中下載並觀看這些小說內容,在下文中本站小編就將為大家帶來詳細的下載步驟介紹,希望能幫助到各位有需要的小夥伴們。紅果短劇怎麼下載觀看答案:【紅果短劇】-【聽書】-【文章】-【下載】。具體步驟:1、先打開紅果短劇軟體,進入到首頁中後我們點擊頁面上方的【聽書】按鈕;2、然後在小說的頁面中我們可以看到有很多的文章內容,在這
 wallpaperengine登入別的號碼後下載別人的桌布怎麼辦
Mar 19, 2024 pm 02:00 PM
wallpaperengine登入別的號碼後下載別人的桌布怎麼辦
Mar 19, 2024 pm 02:00 PM
當你在自己電腦上登過別人steam帳號之後,剛好這個別人的帳號也有wallpaper軟體,切換回自己帳號之後steam就會自動下載別人帳號訂閱的桌布,使用者可以透過關閉steam雲端同步解決。 wallpaperengine登入別的號碼後下載別人的桌布怎麼辦1、登陸你自己的steam帳號,在設定裡面找到雲端同步,關閉steam雲端同步。 2.登陸你之前登陸的別人的steam帳號,打開wallpaper創意工坊,找到訂閱內容,然後取消全部訂閱。 (以後防止找不到壁紙,可以先收藏再取消訂閱)3、切換回自己的stea
 115://開頭的連結怎麼下載?下載方法介紹
Mar 14, 2024 am 11:58 AM
115://開頭的連結怎麼下載?下載方法介紹
Mar 14, 2024 am 11:58 AM
最近有很多用戶都在問小編,115://開頭的連結怎麼下載?想要下載115://開頭的連結需要藉助115瀏覽器,大家下載好115瀏覽器後,再來看看下面小編整理好的下載教學。 115://開頭的鏈接下載方法介紹 1、登入115.com,下載115瀏覽器並安裝。 2、在115瀏覽器網址列輸入:chrome://extensions/,進入擴充中心,搜尋Tampermonkey,安裝對應插件。 3、在115瀏覽器網址列輸入: 油猴腳本:https://greasyfork.org/en/
 超級人類(superpeople)遊戲下載安裝方法介紹
Mar 30, 2024 pm 04:01 PM
超級人類(superpeople)遊戲下載安裝方法介紹
Mar 30, 2024 pm 04:01 PM
超級人類(superpeople)遊戲可以透過steam客戶端下載遊戲,這款遊戲的大小在28G左右,下載到安裝通常需要一個半小時,以下為大家帶來具體的下載安裝教學!新的申請全球封閉測試方法1)在Steam商店(steam客戶端下載)搜尋“SUPERPEOPLE”2)點擊“SUPERPEOPLE”商店頁面下方的“請求SUPERPEOPLE封閉測試訪問權限”3)點擊請求訪問權限按鈕後,將在Steam庫中可確認「SUPERPEOPLECBT」遊戲4)在「SUPERPEOPLECBT」中點選安裝按鈕並下
 夸克網盤怎麼下載到本地?夸克網盤下載檔案保存回本地的方法
Mar 13, 2024 pm 08:31 PM
夸克網盤怎麼下載到本地?夸克網盤下載檔案保存回本地的方法
Mar 13, 2024 pm 08:31 PM
不少的用戶們在使用夸克網盤的時候需要將文件下載下來,可我們想讓他保存在本地,那麼這要怎麼設定?以下就讓本站來為使用者來仔細的介紹一下夸克網盤下載檔案保存回本地的方法吧。 夸克網盤下載檔案儲存回本地的方法 1、開啟夸克,登入帳號進去,點選清單圖示。 2、點選圖示之後,選擇網盤。 3、進去夸克網盤之後,點選我的檔案。 4、進去我的文件之後,選擇要下載的文件,點擊三點圖示。 5、勾選要下載的文件,點選下載就行了。
 foobar2000怎麼下載? -foobar2000怎麼使用
Mar 18, 2024 am 10:58 AM
foobar2000怎麼下載? -foobar2000怎麼使用
Mar 18, 2024 am 10:58 AM
foobar2000是一款能隨時收聽音樂資源的軟體,各種音樂無損音質帶給你,增強版本的音樂播放器,讓你得到更全更舒適的音樂體驗,它的設計理念是將電腦端的高級音頻播放器移植到手機上,提供更便捷高效的音樂播放體驗,介面設計簡潔明了易於使用它採用了極簡的設計風格,沒有過多的裝飾和繁瑣的操作能夠快速上手,同時還支持多種皮膚和主題,根據自己的喜好進行個性化設置,打造專屬的音樂播放器支援多種音訊格式的播放,它還支援音訊增益功能根據自己的聽力情況調整音量大小,避免過大的音量對聽力造成損害。接下來就讓小編為大
 夸克網盤在哪下載檔案_夸克網盤下載到本機方法分享
Mar 21, 2024 pm 03:57 PM
夸克網盤在哪下載檔案_夸克網盤下載到本機方法分享
Mar 21, 2024 pm 03:57 PM
夸克作為一款方便實用的網盤工具,能夠幫助使用者輕鬆取得喜歡的資源,如果想將某個檔案下載到本機要如何操作呢?下面就由小編來告訴大家,趕快一起學習吧!夸克網盤下載到本地方法分享1、先打開夸克軟體,進入到首頁之後我們點擊右下方的【雲圖標】;2、然後在夸克網盤的頁面中我們點擊其中的【文檔】功能;3、接著來到文件的頁面中選擇好需要下載的文件之後點選【三點圖示】;4、最後點選過後在彈出的對話框中我們點選【下載】即可;
 貝樂虎兒歌怎麼下載
Mar 28, 2024 am 11:10 AM
貝樂虎兒歌怎麼下載
Mar 28, 2024 am 11:10 AM
貝樂虎兒歌作為孩子們成長過程中不可或缺的陪伴,以其歡快的旋律、生動的畫面和寓教於樂的內容,贏得了無數家長和孩子們的喜愛。為了讓寶貝們能夠隨時隨地享受到兒歌帶來的快樂,許多家長都希望能夠將貝樂虎兒歌下載到手機或平板上方便隨時拿來給孩子聽,但是究竟該如何將貝樂虎的兒歌保存到自己的手機呢,這篇教學就會為大家帶來詳細的內容介紹,還不了解的用戶們就快來跟著本文一起閱讀了解一下吧。貝樂虎兒歌下載兒歌多圖教學:開啟軟體,選擇一首想要下載的兒歌,小編這裡以「經典兒歌」為例2.在兒歌明星的下方點選「下載」按鈕,
