

用Shape做動畫的實例詳解

上一篇幾乎都在說DoubleAnimation的應用,這篇說說PointAnimation。
1. 使用PointAnimation
使用PointAnimation可以讓Shape變形,但其實沒看到多少人會這麼用,畢竟WPF做的軟體多數不需要這麼花俏。
1.1 在XAML上使用PointAnimation
<Storyboard x:Name="Storyboard2" RepeatBehavior="Forever" AutoReverse="True" Duration="0:0:4"><PointAnimation Storyboard.TargetProperty="(Path.Data).(PathGeometry.Figures)[0].(PathFigure.StartPoint)" Storyboard.TargetName="Path2" To="0,0" EnableDependentAnimation="True" /><PointAnimation Storyboard.TargetProperty="(Path.Data).(PathGeometry.Figures)[0].(PathFigure.Segments)[0].(LineSegment.Point)" Storyboard.TargetName="Path2" To="100,0" EnableDependentAnimation="True" /><ColorAnimation To="#FF85C82E" Storyboard.TargetProperty="(Shape.Fill).(SolidColorBrush.Color)" Storyboard.TargetName="Path2" /></Storyboard>…<Path Margin="0,20,0,0" x:Name="Path2" Fill="GreenYellow"><Path.Data><PathGeometry><PathFigure StartPoint="50,0"><LineSegment Point="50,0" /><LineSegment Point="0,100" /><LineSegment Point="0,100" /><LineSegment Point="100,100" /><LineSegment Point="100,100" /></PathFigure></PathGeometry></Path.Data></Path>

在這個範例裡最頭痛的地方是Property-path 語法,如果不能熟記的話最好依賴Blend生成。
1.2 在程式碼中使用PointAnimation
如果Point數量很多,例如圖表,通常會在C#程式碼中使用PointAnimation:
_storyboard = new Storyboard();
Random random = new Random();for (int i = 0; i < _pathFigure.Segments.Count; i++)
{var animation = new PointAnimation { Duration = TimeSpan.FromSeconds(3) };
    Storyboard.SetTarget(animation, _pathFigure.Segments[i]);
    Storyboard.SetTargetProperty(animation, "(LineSegment.Point)");
    animation.EnableDependentAnimation = true;
    animation.EasingFunction = new QuarticEase { EasingMode = EasingMode.EaseOut };
    animation.To = new Point((_pathFigure.Segments[i] as LineSegment).Point.X, (i % 2 == 0 ? 1 : -1) * i * 1.2 + 60);
    _storyboard.Children.Add(animation);
}
_storyboard.Begin();
#因為可以直接SetTarget,所以Property-path語法就可以很簡單。
2. 擴充PointAnimation
上面兩個範例的動畫都還算簡單,如果更複雜些,XAML或C#程式碼都需要寫到很複雜。我參考了這個網頁 想做類似的動畫,但發現需要寫很多XAML所以放棄用PointAnimation實作。這個頁面的動畫核心是這段HTML:
<polygon fill="#FFD41D" points="97.3,0 127.4,60.9 194.6,70.7 145.9,118.1 157.4,185.1 97.3,153.5 37.2,185.1 48.6,118.1 0,70.7     67.2,60.9">
      <animate id="animation-to-check" begin="indefinite" fill="freeze" attributeName="points" dur="500ms" to="110,58.2 147.3,0 192.1,29 141.7,105.1 118.7,139.8 88.8,185.1 46.1,156.5 0,125 23.5,86.6     71.1,116.7"/>
<animate id="animation-to-star" begin="indefinite" fill="freeze" attributeName="points" dur="500ms" to="97.3,0 127.4,60.9 194.6,70.7 145.9,118.1 157.4,185.1 97.3,153.5 37.2,185.1 48.6,118.1 0,70.7 67.2,60.9"/> </polygon>只需一組Point的集合就可以控制所有Point的動畫,確實比PointAnimation高效很多。 在WPF中可以透過繼承Timeline實作一個PointCollectionAnimamtion,具體可以參考這個項目。可惜的是雖然UWP的Timeline類別並不封閉,但完全不知道如何繼承並衍生出一個自訂的Animation。
這時候需要稍微變通一下思維。可以將DoubleAnimation理解成這樣:Storyboard將TimeSpan傳遞給DoubleAnimation,DoubleAnimation透過這個TimeSpan(有時還需要結合EasingFunction)計算出目標屬性的目前值最後傳遞給目標屬性,如下圖所示:

既然這樣,也可以接收到這個計算出來的Double,再透過Converter計算出目標的PointCollection值:
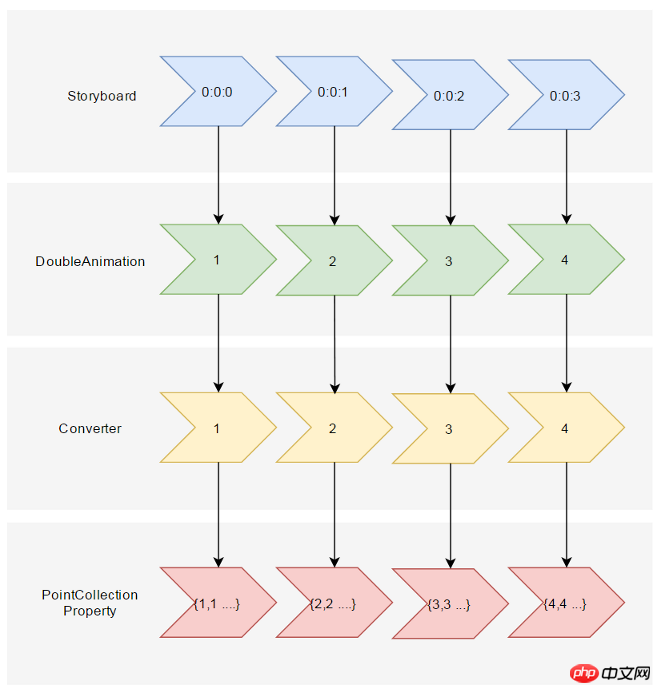
假設告訴這個Converter當傳入的Double值(命名為Progress)為0的時候,PointCollection是{0,0 1,1 …},Progress為100時PointCollection是{1,1 2,2 …},當Progress處於其中任何值時的計算方法則是:
private PointCollection GetCurrentPoints(PointCollection fromPoints, PointCollection toPoints, double percentage)
{var result = new PointCollection();for (var i = 0;
        i < Math.Min(fromPoints.Count, toPoints.Count);
        i++)
    {
        var x = (1 - percentage / 100d) * fromPoints[i].X + percentage / 100d * toPoints[i].X;
        var y = (1 - percentage / 100d) * fromPoints[i].Y + percentage / 100d * toPoints[i].Y;

        result.Add(new Point(x, y));
    }return result;
}這樣就完成了從TimeSpan到PointCollection的轉換過程。然後就是定義在XAML上的使用方式。參考上面PointCollectionAnimation,雖然多了個Converter,但XAML也應該夠簡潔:
<local:ProgressToPointCollectionBridge x:Name="ProgressToPointCollectionBridge"><PointCollection>97.3,0 127.4,60.9 194.6,70.7 145.9,118.1 157.4,185.1 97.3,153.5 37.2,185.1 48.6,118.1 0,70.7 67.2,60.9</PointCollection><PointCollection>110,58.2 147.3,0 192.1,29 141.7,105.1 118.7,139.8 88.8,185.1 46.1,156.5 0,125 23.5,86.6 71.1,116.7</PointCollection></local:ProgressToPointCollectionBridge><Storyboard x:Name="Storyboard1" FillBehavior="HoldEnd"><DoubleAnimation Duration="0:0:2" To="100" FillBehavior="HoldEnd" Storyboard.TargetProperty="(local:ProgressToPointCollectionBridge.Progress)" Storyboard.TargetName="ProgressToPointCollectionBridge" EnableDependentAnimation="True"/></Storyboard>…<Polygon x:Name="polygon" Points="{Binding Source={StaticResource ProgressToPointCollectionBridge},Path=Points}" Stroke="DarkOliveGreen" StrokeThickness="2" Height="250" Width="250" Stretch="Fill" />最後我選擇了將這個Converter命名為ProgressToPointCollectionBridge。可以看出Polygon 將Points綁定到ProgressToPointCollectionBridge,DoubleAnimation 改變ProgressToPointCollectionBridge.Progress,進而改變Points。 XAML的簡潔程度還算令人滿意,如果需要操作多點的話相對於PointAnimation的優勢就很大。
運行結果如下:

完整的XAML:
<UserControl.Resources><local:ProgressToPointCollectionBridge x:Name="ProgressToPointCollectionBridge"><PointCollection>97.3,0 127.4,60.9 194.6,70.7 145.9,118.1 157.4,185.1 97.3,153.5 37.2,185.1 48.6,118.1 0,70.7 67.2,60.9</PointCollection><PointCollection>110,58.2 147.3,0 192.1,29 141.7,105.1 118.7,139.8 88.8,185.1 46.1,156.5 0,125 23.5,86.6 71.1,116.7</PointCollection></local:ProgressToPointCollectionBridge><Storyboard x:Name="Storyboard1" FillBehavior="HoldEnd"><DoubleAnimation Duration="0:0:2" To="100" FillBehavior="HoldEnd" Storyboard.TargetProperty="(local:ProgressToPointCollectionBridge.Progress)" Storyboard.TargetName="ProgressToPointCollectionBridge" EnableDependentAnimation="True"><DoubleAnimation.EasingFunction><ElasticEase EasingMode="EaseInOut" /></DoubleAnimation.EasingFunction></DoubleAnimation><ColorAnimation Duration="0:0:2" To="#FF48F412" Storyboard.TargetProperty="(Shape.Fill).(SolidColorBrush.Color)" Storyboard.TargetName="polygon" d:IsOptimized="True"><ColorAnimation.EasingFunction><ElasticEase EasingMode="EaseInOut" /></ColorAnimation.EasingFunction></ColorAnimation></Storyboard></UserControl.Resources><Grid x:Name="LayoutRoot" Background="White"><Polygon x:Name="polygon" Points="{Binding Source={StaticResource ProgressToPointCollectionBridge},Path=Points}" Stroke="DarkOliveGreen" StrokeThickness="2" Height="250" Width="250" Stretch="Fill" Fill="#FFEBF412" /></Grid>ProgressToPointCollectionBridge:
[ContentProperty(Name = nameof(Children))]public class ProgressToPointCollectionBridge : DependencyObject
{public ProgressToPointCollectionBridge()
    {
        Children = new ObservableCollection<PointCollection>();
    }/// <summary>///     获取或设置Points的值/// </summary>public PointCollection Points
    {get { return (PointCollection) GetValue(PointsProperty); }set { SetValue(PointsProperty, value); }
    }/// <summary>///     获取或设置Progress的值/// </summary>public double Progress
    {get { return (double) GetValue(ProgressProperty); }set { SetValue(ProgressProperty, value); }
    }/// <summary>///     获取或设置Children的值/// </summary>public Collection<PointCollection> Children
    {get { return (Collection<PointCollection>) GetValue(ChildrenProperty); }set { SetValue(ChildrenProperty, value); }
    }protected virtual void OnProgressChanged(double oldValue, double newValue)
    {UpdatePoints();
    }protected virtual void OnChildrenChanged(Collection<PointCollection> oldValue, Collection<PointCollection> newValue)
    {var oldCollection = oldValue as INotifyCollectionChanged;if (oldCollection != null)
            oldCollection.CollectionChanged -= OnChildrenCollectionChanged;var newCollection = newValue as INotifyCollectionChanged;if (newCollection != null)
            newCollection.CollectionChanged += OnChildrenCollectionChanged;UpdatePoints();
    }private void OnChildrenCollectionChanged(object sender, NotifyCollectionChangedEventArgs e)
    {UpdatePoints();
    }private void UpdatePoints()
    {if (Children == null || Children.Any() == false)
        {
            Points = null;
        }else if (Children.Count == 1)
        {var fromPoints = new PointCollection();for (var i = 0; i < Children[0].Count; i++)
                fromPoints.Add(new Point(0, 0));var toPoints = Children[0];
            Points = GetCurrentPoints(fromPoints, toPoints, Progress);
        }else{var rangePerSection = 100d / (Children.Count - 1);var fromIndex = Math.Min(Children.Count - 2, Convert.ToInt32(Math.Floor(Progress / rangePerSection)));
            fromIndex = Math.Max(fromIndex, 0);var toIndex = fromIndex + 1;
            PointCollection fromPoints;if (fromIndex == toIndex)
            {
                fromPoints = new PointCollection();for (var i = 0; i < Children[0].Count; i++)
                    fromPoints.Add(new Point(0, 0));
            }else{
                fromPoints = Children.ElementAt(fromIndex);
            }var toPoints = Children.ElementAt(toIndex);
            var percentage = (Progress / rangePerSection - fromIndex) * 100;

            Points = GetCurrentPoints(fromPoints, toPoints, percentage);
        }
    }private PointCollection GetCurrentPoints(PointCollection fromPoints, PointCollection toPoints, double percentage)
    {var result = new PointCollection();for (var i = 0;
            i < Math.Min(fromPoints.Count, toPoints.Count);
            i++)
        {
            var x = (1 - percentage / 100d) * fromPoints[i].X + percentage / 100d * toPoints[i].X;
            var y = (1 - percentage / 100d) * fromPoints[i].Y + percentage / 100d * toPoints[i].Y;

            result.Add(new Point(x, y));
        }return result;
}#region DependencyProperties#endregion}3. 結語
如果將DoubleAnimation說成“對目標的Double屬性做動畫”,那PointAnimation可以說成“對目標的Point.X和Point.Y兩個Double屬性同時做動畫”,ColorAnimation則是“對目標的Color.A、R、G、B四個Int屬性同時做動畫”。這樣理解的話PointAnimation和ColorAnimation只不過是DoubleAnimation的延伸而已,進一步的說,透過DoubleAnimation應該可以延伸出所有類型屬性的動畫。不過我並不清楚怎麼在UWP上自訂動畫,只能透過本文的折衷方式擴充。雖然XAML需要寫複雜些,但這樣也有它的好處:
不需要了解太多Animation相關類別的知識,只需要有依賴屬性、綁定等基礎知識就夠了。
不會因為動畫API的改變而更改,可以相容於WPF、Silverlight和UWP(大概吧,我沒有真的在WPF上測試這些程式碼)。
程式碼夠簡單,省略了計算TimeSpan及EasingFunction的步驟。 稍微修改下還可以做成泛型的
AnimationBridge < T >,提供PointCollection以外資料型別的支援。
結合上一篇文章再發散一下,總覺得將來遇到什麼UWP沒有提供的功能都可以透過變通的方法實現,Binding和DependencyProperty真是UWP開發者最好的朋友。
4. 參考
How SVG Shape Morphing Works
Gadal MetaSyllabus
以上是用Shape做動畫的實例詳解的詳細內容。更多資訊請關注PHP中文網其他相關文章!

熱AI工具

Undresser.AI Undress
人工智慧驅動的應用程序,用於創建逼真的裸體照片

AI Clothes Remover
用於從照片中去除衣服的線上人工智慧工具。

Undress AI Tool
免費脫衣圖片

Clothoff.io
AI脫衣器

Video Face Swap
使用我們完全免費的人工智慧換臉工具,輕鬆在任何影片中換臉!

熱門文章
熱工具

記事本++7.3.1
好用且免費的程式碼編輯器

SublimeText3漢化版
中文版,非常好用

禪工作室 13.0.1
強大的PHP整合開發環境

Dreamweaver CS6
視覺化網頁開發工具

SublimeText3 Mac版
神級程式碼編輯軟體(SublimeText3)


 crystaldiskmark是什麼軟體? -crystaldiskmark如何使用?
Mar 18, 2024 pm 02:58 PM
crystaldiskmark是什麼軟體? -crystaldiskmark如何使用?
Mar 18, 2024 pm 02:58 PM
CrystalDiskMark是一款適用於硬碟的小型HDD基準測試工具,可快速測量順序和隨機讀取/寫入速度。接下來就讓小編為大家介紹一下CrystalDiskMark,以及crystaldiskmark如何使用吧~一、CrystalDiskMark介紹CrystalDiskMark是一款廣泛使用的磁碟效能測試工具,用於評估機械硬碟和固態硬碟(SSD)的讀取和寫入速度和隨機I/O性能。它是一款免費的Windows應用程序,並提供用戶友好的介面和各種測試模式來評估硬碟效能的不同方面,並被廣泛用於硬體評
 foobar2000怎麼下載? -foobar2000怎麼使用
Mar 18, 2024 am 10:58 AM
foobar2000怎麼下載? -foobar2000怎麼使用
Mar 18, 2024 am 10:58 AM
foobar2000是一款能隨時收聽音樂資源的軟體,各種音樂無損音質帶給你,增強版本的音樂播放器,讓你得到更全更舒適的音樂體驗,它的設計理念是將電腦端的高級音頻播放器移植到手機上,提供更便捷高效的音樂播放體驗,介面設計簡潔明了易於使用它採用了極簡的設計風格,沒有過多的裝飾和繁瑣的操作能夠快速上手,同時還支持多種皮膚和主題,根據自己的喜好進行個性化設置,打造專屬的音樂播放器支援多種音訊格式的播放,它還支援音訊增益功能根據自己的聽力情況調整音量大小,避免過大的音量對聽力造成損害。接下來就讓小編為大
 BTCC教學:如何在BTCC交易所綁定使用MetaMask錢包?
Apr 26, 2024 am 09:40 AM
BTCC教學:如何在BTCC交易所綁定使用MetaMask錢包?
Apr 26, 2024 am 09:40 AM
MetaMask(中文也叫小狐狸錢包)是一款免費的、廣受好評的加密錢包軟體。目前,BTCC已支援綁定MetaMask錢包,綁定後可使用MetaMask錢包進行快速登錄,儲值、買幣等,且首次綁定還可獲得20USDT體驗金。在BTCCMetaMask錢包教學中,我們將詳細介紹如何註冊和使用MetaMask,以及如何在BTCC綁定並使用小狐狸錢包。 MetaMask錢包是什麼? MetaMask小狐狸錢包擁有超過3,000萬用戶,是當今最受歡迎的加密貨幣錢包之一。它可免費使用,可作為擴充功能安裝在網絡
 網易信箱大師怎麼用
Mar 27, 2024 pm 05:32 PM
網易信箱大師怎麼用
Mar 27, 2024 pm 05:32 PM
網易郵箱,作為中國網友廣泛使用的一種電子郵箱,一直以來以其穩定、高效的服務贏得了用戶的信賴。而網易信箱大師,則是專為手機使用者打造的信箱軟體,它大大簡化了郵件的收發流程,讓我們的郵件處理變得更加便利。那麼網易信箱大師該如何使用,具體又有哪些功能呢,下文中本站小編將為大家帶來詳細的內容介紹,希望能幫助到大家!首先,您可以在手機應用程式商店搜尋並下載網易信箱大師應用程式。在應用寶或百度手機助手中搜尋“網易郵箱大師”,然後按照提示進行安裝即可。下載安裝完成後,我們打開網易郵箱帳號並進行登錄,登入介面如下圖所示
 百度網盤app怎麼用
Mar 27, 2024 pm 06:46 PM
百度網盤app怎麼用
Mar 27, 2024 pm 06:46 PM
在如今雲端儲存已成為我們日常生活和工作中不可或缺的一部分。百度網盤作為國內領先的雲端儲存服務之一,憑藉其強大的儲存功能、高效的傳輸速度以及便捷的操作體驗,贏得了廣大用戶的青睞。而且無論你是想要備份重要文件、分享資料,還是在線上觀看影片、聽取音樂,百度網盤都能滿足你的需求。但很多用戶可能對百度網盤app的具體使用方法還不了解,那麼這篇教學就將為大家詳細介紹百度網盤app如何使用,還有疑惑的用戶們就快來跟著本文詳細了解一下吧!百度雲網盤怎麼用:一、安裝首先,下載並安裝百度雲軟體時,請選擇自訂安裝選
 如何使用迅雷下載磁力鏈接
Feb 25, 2024 pm 12:51 PM
如何使用迅雷下載磁力鏈接
Feb 25, 2024 pm 12:51 PM
隨著網路科技的快速發展,我們的生活也得到了極大的便利,其中之一就是能夠透過網路下載和分享各種資源。而在下載資源的過程中,磁力連結成為了一種非常常見且方便的下載方式。那麼,迅雷磁力連結又是如何使用的呢?下面,我將給大家詳細介紹一下。迅雷是一款非常受歡迎的下載工具,它支援多種下載方式,其中包括磁力連結。磁力連結可以理解為一種下載位址,透過它我們可以取得資源的相關
 PHP 函數的擴充和第三方模組
Apr 13, 2024 pm 02:12 PM
PHP 函數的擴充和第三方模組
Apr 13, 2024 pm 02:12 PM
若要擴充PHP函數功能,可以使用擴充和第三方模組。擴充功能提供附加函數和類,可透過pecl套件管理器安裝和啟用。第三方模組提供特定功能,可透過Composer套件管理器安裝。實作案例包括使用擴充解析複雜JSON資料和使用模組驗證資料。
 教你使用 iOS 17.4「失竊裝置保護」新進階功能
Mar 10, 2024 pm 04:34 PM
教你使用 iOS 17.4「失竊裝置保護」新進階功能
Mar 10, 2024 pm 04:34 PM
Apple在周二推出了iOS17.4更新,為iPhone帶來了一系列新功能和修復。這次更新包含了全新的表情符號,同時歐盟用戶也能夠下載其他應用程式商店。此外,更新還加強了對iPhone安全性的控制,引入了更多的「失竊設備保護」設定選項,為用戶提供更多選擇和保障。 "iOS17.3首次引入了「失竊設備保護」功能,為用戶的敏感資料增加了額外的安全保障。當用戶不在家等熟悉地點時,該功能要求用戶首次輸入生物特徵信息,並在一小時後再次輸入資訊才能存取和更改某些數據,如修改AppleID密碼或關閉失竊設備保護功能
