

webpack打包器的簡單介紹

概念
webpack是一個現代javascript應用程式的模組打包器。
當webpack處理你的應用程式時,它會遞歸建立一個依賴圖(包含了你的應用程式所需要每個模組),然後把這些模組打包到少數幾個budle檔案中(通常是只有一個,會被瀏覽器加載,根據項目情況而定)。
這是令人難以置信的配置,但在開始之前,你只需要明白四個核心概念:entry、output、loaders、和plugins。
設定物件選項
webpack.config.js
const path = require('path');

module.exports = {
  // click on the name of the option to get to the detailed documentation
  // click on the items with arrows to show more examples / advanced options

  entry: "./app/entry", // string | object | array
  // Here the application starts executing
  // and webpack starts bundling

  output: {
    // options related to how webpack emits results

    path: path.resolve(__dirname, "dist"), // string
    // the target directory for all output files
    // must be an absolute path (use the Node.js path module)

    filename: "bundle.js?1.1.11", // string
    // the filename template for entry chunks

    publicPath: "/assets/", // string
    // the url to the output directory resolved relative to the HTML page

    library: "MyLibrary", // string,
    // the name of the exported library

    libraryTarget: "umd", // universal module definition
    // the type of the exported library

    /* Advanced output configuration (click to show) */
  },

  module: {
    // configuration regarding modules

    rules: [
      // rules for modules (configure loaders, parser options, etc.)

      {
        test: /\.jsx?$/,
        include: [
          path.resolve(__dirname, "app")
        ],
        exclude: [
          path.resolve(__dirname, "app/demo-files")
        ],
        // these are matching conditions, each accepting a regular expression or string
        // test and include have the same behavior, both must be matched
        // exclude must not be matched (takes preferrence over test and include)
        // Best practices:
        // - Use RegExp only in test and for filename matching
        // - Use arrays of absolute paths in include and exclude
        // - Try to avoid exclude and prefer include

        issuer: { test, include, exclude },
        // conditions for the issuer (the origin of the import)

        enforce: "pre",
        enforce: "post",
        // flags to apply these rules, even if they are overridden (advanced option)

        loader: "babel-loader",
        // the loader which should be applied, it'll be resolved relative to the context
        // -loader suffix is no longer optional in webpack2 for clarity reasons
        // see webpack 1 upgrade guide

        options: {
          presets: ["es2015"]
        },
        // options for the loader
      },

      {
        test: "\.html$",

        use: [
          // apply multiple loaders and options
          "htmllint-loader",
          {
            loader: "html-loader",
            options: {
              /* ... */
            }
          }
        ]
      },

      { oneOf: [ /* rules */ ] },
      // only use one of these nested rules

      { rules: [ /* rules */ ] },
      // use all of these nested rules (combine with conditions to be useful)

      { resource: { and: [ /* conditions */ ] } },
      // matches only if all conditions are matched

      { resource: { or: [ /* conditions */ ] } },
      { resource: [ /* conditions */ ] },
      // matches if any condition is matched (default for arrays)

      { resource: { not: /* condition */ } }
      // matches if the condition is not matched
    ],

    /* Advanced module configuration (click to show) */
  },

  resolve: {
    // options for resolving module requests
    // (does not apply to resolving to loaders)

    modules: [
      "node_modules",
      path.resolve(__dirname, "app")
    ],
    // directories where to look for modules

    extensions: [".js?1.1.11", ".json", ".jsx", ".css?1.1.11"],
    // extensions that are used

    alias: {
      // a list of module name aliases

      "module": "new-module",
      // alias "module" -> "new-module" and "module/path/file" -> "new-module/path/file"

      "only-module$": "new-module",
      // alias "only-module" -> "new-module", but not "module/path/file" -> "new-module/path/file"

      "module": path.resolve(__dirname, "app/third/module.js?1.1.11"),
      // alias "module" -> "./app/third/module.js?1.1.11" and "module/file" results in error
      // modules aliases are imported relative to the current context
    },
    /* alternative alias syntax (click to show) */

    /* Advanced resolve configuration (click to show) */
  },

  performance: {
    hints: "warning", // enum
    maxAssetSize: 200000, // int (in bytes),
    maxEntrypointSize: 400000, // int (in bytes)
    assetFilter: function(assetFilename) {
      // Function predicate that provides asset filenames
      return assetFilename.endsWith('.css') || assetFilename.endsWith('.js');
    }
  },

  devtool: "source-map", // enum
  // enhance debugging by adding meta info for the browser devtools
  // source-map most detailed at the expense of build speed.

  context: __dirname, // string (absolute path!)
  // the home directory for webpack
  // the entry and module.rules.loader option
  //   is resolved relative to this directory

  target: "web", // enum
  // the environment in which the bundle should run
  // changes chunk loading behavior and available modules

  externals: ["react", /^@angular\//],
  // Don't follow/bundle these modules, but request them at runtime from the environment

  stats: "errors-only",
  // lets you precisely control what bundle information gets displayed

  devServer: {
    proxy: { // proxy URLs to backend development server
      '/api': 'http://localhost:3000'
    },
    contentBase: path.join(__dirname, 'public'), // boolean | string | array, static file location
    compress: true, // enable gzip compression
    historyApiFallback: true, // true for index.html upon 404, object for multiple paths
    hot: true, // hot module replacement. Depends on HotModuleReplacementPlugin
    https: false, // true for self-signed, object for cert authority
    noInfo: true, // only errors & warns on hot reload
    // ...
  },

  plugins: [
    // ...
  ],
  // list of additional plugins


  /* Advanced configuration (click to show) */
}本文檔的目的就是要提供這些概念一個高階的大綱,同時提供連結給詳細概念的指定用例。
Entry
webpack會建立一個你所有應用程式的依賴圖。這個依賴圖的起始點就是已知的entry(入口)點。這個入口點告訴webpack從哪裡開始,並且根據已知依賴圖進行打包。你可以把應用程式的入口點當作上下文根或啟動你的應用程式的第一個檔案。
在webpack配置物件的entry屬性中定義入口點。簡單範例如下:
module.exports = {
  entry: './path/to/my/entry/file.js'
};有幾種方式宣告entry屬性:
1、單一entry語法
const config = {
  entry: './path/to/my/entry/file.js'
};

module.exports = config;2、物件語法
#const config = {
entry: {
app: './src/app.js',
vendors: './src/vendors.js'
}
};3、多頁面應用程式
const config = {
  entry: {
    pageOne: './src/pageOne/index.js',
    pageTwo: './src/pageTwo/index.js',
    pageThree: './src/pageThree/index.js'
  }
};Output
一旦你打包所有程式碼,你仍需要告訴webpack打包到哪裡去。 output屬性會告訴webpack如何對待你的程式碼。
const path = require('path');

module.exports = {
  entry: './path/to/my/entry/file.js',
  output: {
    path: path.resolve(__dirname, 'dist'),
    filename: 'my-first-webpack.bundle.js'
  }
};以上這個例子,我們使用output.filename和output.path屬性告訴webpack打包的檔案名稱和路徑
更多設定項
Loaders
這個配置項目的目的是讓webpack專注於你專案的所有程式碼而不是瀏覽器(這並不意味著它們會被打包在一起)。 webpack把每一個檔案(.css, .html, .scss, .jpg, etc.)當作一個模組。然而,webpack只知道javascript。
webpack中的Loaders會轉換這些檔案到模組中,並加入到你的依賴圖中。
在一個較高的水平,在你的webpack配置中有兩個目的:
1、標識什麼檔案應該用一個確定的loader來轉換。
2、轉換後的檔案可以被加入到你的依賴圖中。
const path = require('path');

const config = {
  entry: './path/to/my/entry/file.js',
  output: {
    path: path.resolve(__dirname, 'dist'),
    filename: 'my-first-webpack.bundle.js'
  },
  module: {
    rules: [
      {test: /\.(js|jsx)$/, use: 'babel-loader'}
    ]
  }
};

module.exports = config;以上這個配置定義了一個rulues屬性,用以給一個單獨的模組,這個模組帶有兩個屬性:test和use。這告訴webpack編譯如下事情:
當使用require()或import語句時,路徑中後綴名為.js或.jsx的文件,使用babel-loader來轉換並打包。
更多設定項
Plugins
因為載入器只執行基於每個檔案的轉換,外掛程式是最常用的(但不限於)優化行為,而你可以自訂函數在你打包模組的編輯或區塊中(等等)。
此webpack外掛系統極為強大,可自訂。
為了使用一個插件,你只需要require()並且加入到插件陣列中。更多插件可透過選項自訂。由於你可以在一個配置中多次使用插件來達到不同的目的,因此你需要建立一個新的實例。
const HtmlWebpackPlugin = require('html-webpack-plugin'); //installed via npm
const webpack = require('webpack'); //to access built-in plugins
const path = require('path');

const config = {
  entry: './path/to/my/entry/file.js',
  output: {
    path: path.resolve(__dirname, 'dist'),
    filename: 'my-first-webpack.bundle.js'
  },
  module: {
    rules: [
      {test: /\.txt$/, use: 'raw-loader'}
    ]
  },
  plugins: [
    new webpack.optimize.UglifyJsPlugin(),
    new HtmlWebpackPlugin({template: './src/index.html'})
  ]
};

module.exports = config;webpack提供有許多開箱外掛!可以從我們的插件列表中獲得更多資訊。
在webpack配置中使用外掛程式是簡單的,然而有許多用法值得進一步探討。
更多配置項目
簡單範例
var path = require('path');
var webpack = require('webpack');

var env = process.env.NODE_DEV;

var config = {
    entry: {
        consumer: './consumer/index.js',
        admin: './admin/index.js',
        // jquery: ['jquery']
    },
    output: {
        path: path.resolve(__dirname, 'dist'),
        publicPath: '/dist/',
        filename: '[name].bundle.js'
    },
    module: {
        loaders: [
            { test: /\.css$/, loader: 'style-loader!css-loader' },
            { test: /\.less$/, loader: 'less-loader!style-loader!css-loader' },
            { test: /\.sass$/, loader: 'sass-loader!style-loader!css-loader' },
            { test: /\.(woff|woff2|eot|ttf|otf)$/i, loader: 'url-loader?limit=8192&name=[name].[ext]' },
            { test: /\.(jpe?g|png|gif|svg)$/i, loader: 'url-loader?limit=8192&name=[name].[ext]' },
            {
                test: /\.jsx?$/,
                loader: 'babel-loader',
                exclude: /node_modules/,
                include: __dirname,
                options: {
                    presets: ['es2015', 'react']
                },
            },
            {
                test: /\.tsx?$/,
                loader: 'ts-loader',
                exclude: /node_modules/,
                include: __dirname
            },
            {
                test: /\.coffee$/,
                loader: 'coffee-loader',
                exclude: /node_modules/,
                include: __dirname
            }
        ]
    },
    //devtool: 'source-map',
    //指定根路径
    context: __dirname,
    //这里枚举的后缀名,在require时可以省略
    resolve: {
        extensions: ['.js', '.jsx', '.json', '.ts', '.tsx', '.css']
    },
    plugins: [
        // 这里声明的变量是全局的,可以在所有的js中使用,可以避免写一堆的require
        new webpack.ProvidePlugin({
            $: 'jquery',
            jQuery: 'jquery',
            'window.jQuery': 'jquery',
            'window.$': 'jquery',
            'React': 'react',
            'ReactDOM': 'react-dom'
        }),
        // new webpack.optimize.CommonsChunkPlugin({
        //     // 与 entry 中的 jquery 对应
        //     name: 'jquery',
        //     // 输出的公共资源名称
        //     filename: 'jquery.min.js',
        //     // 对所有entry实行这个规则
        //     minChunks: Infinity
        // }),
        // new webpack.NoEmitOnErrorsPlugin()
    ],
    //在html页面中使用script标签引入库,而不是打包到*.bundle.js文件中
    externals: {
        jquery: 'jQuery',
        react: 'React',
        'react-dom' : 'ReactDOM'
    }
};

//如果是生产环境,要最小化压缩js文件
if (env === 'production') {
    //打包时对js文件进行最小化压缩
    config.plugins.push(new webpack.optimize.UglifyJsPlugin({
        mangle: {
            except: ['$super', '$', 'exports', 'require']
            //以上变量‘$super’, ‘$’, ‘exports’ or ‘require’,不会被混淆
        },
        compress: {
            warnings: false
        }
    }));
    //消除压缩后的文件在界面引用时发出的警告
    config.plugins.push(new webpack.DefinePlugin({
        'process.env': {
            NODE_ENV: JSON.stringify('production')
        }
    }));
}

module.exports = config;以上是webpack打包器的簡單介紹的詳細內容。更多資訊請關注PHP中文網其他相關文章!

熱AI工具

Undresser.AI Undress
人工智慧驅動的應用程序,用於創建逼真的裸體照片

AI Clothes Remover
用於從照片中去除衣服的線上人工智慧工具。

Undress AI Tool
免費脫衣圖片

Clothoff.io
AI脫衣器

Video Face Swap
使用我們完全免費的人工智慧換臉工具,輕鬆在任何影片中換臉!

熱門文章
熱工具

記事本++7.3.1
好用且免費的程式碼編輯器

SublimeText3漢化版
中文版,非常好用

禪工作室 13.0.1
強大的PHP整合開發環境

Dreamweaver CS6
視覺化網頁開發工具

SublimeText3 Mac版
神級程式碼編輯軟體(SublimeText3)


 最簡單的硬碟序號查詢方式
Feb 26, 2024 pm 02:24 PM
最簡單的硬碟序號查詢方式
Feb 26, 2024 pm 02:24 PM
硬碟序號是硬碟的一個重要標識,通常用於唯一標識硬碟以及進行硬體識別。在某些情況下,我們可能需要查詢硬碟序號,例如在安裝作業系統、尋找正確裝置驅動程式或進行硬碟維修等情況下。本文將介紹一些簡單的方法,幫助大家查詢硬碟序號。方法一:使用Windows命令提示字元開啟命令提示字元。在Windows系統中,按下Win+R鍵,輸入"cmd"並按下回車鍵即可開啟命
 值得你花時間看的擴散模型教程,來自普渡大學
Apr 07, 2024 am 09:01 AM
值得你花時間看的擴散模型教程,來自普渡大學
Apr 07, 2024 am 09:01 AM
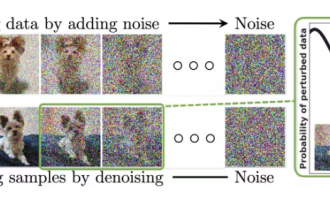
Diffusion不僅可以更好地模仿,而且可以進行「創作」。擴散模型(DiffusionModel)是一種影像生成模型。與先前AI領域大名鼎鼎的GAN、VAE等演算法,擴散模型另闢蹊徑,其主要想法是先對影像增加噪聲,再逐步去噪的過程。其中如何去噪還原原影像是演算法的核心部分。最終演算法能夠從一張隨機的雜訊影像中產生影像。近年來,生成式AI的驚人成長將文字轉換為圖像生成、視訊生成等領域的許多令人興奮的應用提供了支援。這些生成工具背後的基本原理是擴散的概念,這是一種特殊的取樣機制,克服了先前的方法中被
 一鍵生成PPT! Kimi :讓「PPT民工」先浪起來
Aug 01, 2024 pm 03:28 PM
一鍵生成PPT! Kimi :讓「PPT民工」先浪起來
Aug 01, 2024 pm 03:28 PM
Kimi:一句話,十幾秒鐘,一份PPT就新鮮出爐了。 PPT這玩意兒,可太招人煩了!開個碰頭會,要有PPT;寫個週報,要做PPT;拉個投資,要展示PPT;就連控訴出軌,都得發個PPT。大學比較像是學了個PPT專業,上課看PPT,下課做PPT。或許,37年前丹尼斯・奧斯汀發明PPT時也沒想到,有一天PPT竟然如此氾濫成災。嗎嘍們做PPT的苦逼經歷,說起來都是淚。 「一份二十多頁的PPT花了三個月,改了幾十遍,看到PPT都想吐」;「最巔峰的時候,一天做了五個PPT,連呼吸都是PPT」;「臨時開個會,都要做個
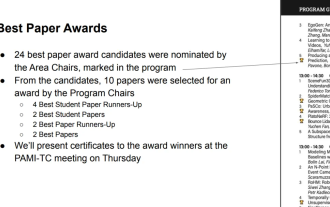 CVPR 2024全部獎項公佈!近萬人線下參會,Google華人研究員獲最佳論文獎
Jun 20, 2024 pm 05:43 PM
CVPR 2024全部獎項公佈!近萬人線下參會,Google華人研究員獲最佳論文獎
Jun 20, 2024 pm 05:43 PM
北京時間6月20日凌晨,在西雅圖舉辦的國際電腦視覺頂會CVPR2024正式公佈了最佳論文等獎項。今年共有10篇論文獲獎,其中2篇最佳論文,2篇最佳學生論文,另外還有2篇最佳論文提名和4篇最佳學生論文提名。電腦視覺(CV)領域的頂級會議是CVPR,每年都會吸引大量研究機構和高校參會。根據統計,今年共提交了11532份論文,2719篇被接收,錄取率為23.6%。根據佐治亞理工學院對CVPR2024的數據統計分析,從研究主題來看,論文數量最多的是圖像和視頻合成與生成(Imageandvideosyn
 從裸機到700億參數大模型,這裡有一個教程,還有現成可用的腳本
Jul 24, 2024 pm 08:13 PM
從裸機到700億參數大模型,這裡有一個教程,還有現成可用的腳本
Jul 24, 2024 pm 08:13 PM
我們知道LLM是在大規模電腦叢集上使用海量資料訓練得到的,本站曾介紹過不少用於輔助和改進LLM訓練流程的方法和技術。而今天,我們要分享的是一篇深入技術底層的文章,介紹如何將一堆連作業系統也沒有的「裸機」變成用來訓練LLM的電腦叢集。這篇文章來自於AI新創公司Imbue,該公司致力於透過理解機器的思維方式來實現通用智慧。當然,將一堆連作業系統也沒有的「裸機」變成用於訓練LLM的電腦叢集並不是一個輕鬆的過程,充滿了探索和試錯,但Imbue最終成功訓練了一個700億參數的LLM,並在此過程中積累
 AI在用 | AI製作獨居女孩生活Vlog,3天狂攬萬點讚量
Aug 07, 2024 pm 10:53 PM
AI在用 | AI製作獨居女孩生活Vlog,3天狂攬萬點讚量
Aug 07, 2024 pm 10:53 PM
機器之能報道編輯:楊文以大模型、AIGC為代表的人工智慧浪潮已經在悄悄改變我們生活及工作方式,但絕大部分人依然不知道該如何使用。因此,我們推出了「AI在用」專欄,透過直覺、有趣且簡潔的人工智慧使用案例,來具體介紹AI使用方法,並激發大家思考。我們也歡迎讀者投稿親自實踐的創新用例。影片連結:https://mp.weixin.qq.com/s/2hX_i7li3RqdE4u016yGhQ最近,獨居女孩的生活Vlog在小紅書上走紅。一個插畫風格的動畫,再配上幾句治癒系文案,短短幾天就能輕鬆狂攬上
 技術入門者必看:C語言和Python難易度解析
Mar 22, 2024 am 10:21 AM
技術入門者必看:C語言和Python難易度解析
Mar 22, 2024 am 10:21 AM
標題:技術入門者必看:C語言和Python難易度解析,需要具體程式碼範例在當今數位化時代,程式設計技術已成為一項越來越重要的能力。無論是想要從事軟體開發、數據分析、人工智慧等領域,還是僅僅出於興趣學習編程,選擇一門合適的程式語言是第一步。而在眾多程式語言中,C語言和Python作為兩種廣泛應用的程式語言,各有其特色。本文將對C語言和Python的難易度進行解析
 細數RAG的12個痛點,英偉達高級架構師親授解決方案
Jul 11, 2024 pm 01:53 PM
細數RAG的12個痛點,英偉達高級架構師親授解決方案
Jul 11, 2024 pm 01:53 PM
檢索增強式產生(RAG)是一種使用檢索提升語言模型的技術。具體來說,就是在語言模型生成答案之前,先從廣泛的文檔資料庫中檢索相關信息,然後利用這些信息來引導生成過程。這種技術能大幅提升內容的準確性和相關性,並能有效緩解幻覺問題,提高知識更新的速度,並增強內容生成的可追溯性。 RAG無疑是最令人興奮的人工智慧研究領域之一。有關RAG的更多詳情請參閱本站專欄文章《專補大模型短板的RAG有哪些新進展?這篇綜述講明白了》。但RAG也並非完美,使用者在使用時也常會遭遇一些「痛點」。近日,英偉達生成式AI高階解決
