
//创建方式3:继承MethodFilterInterceptor 方法过滤拦截器//功能: 定制拦截器拦截的方法.// 定制哪些方法需要拦截.// 定制哪些方法不需要拦截public class MyInterceptor3 extends MethodFilterInterceptor{}//不放行,直接跳转到一个结果页面//不执行后续的拦截器以及Action,直接交给Result处理结果.进行页面跳转return "success";
<!-- 补充知识:定义全局结果集 --><global-results><result name="toLogin" type="redirect" >/login.jsp</result></global-results>

JAVAEE-自訂攔截器、struts2標籤、登陸功能和校驗登陸攔截器的實現
一、自訂攔截器
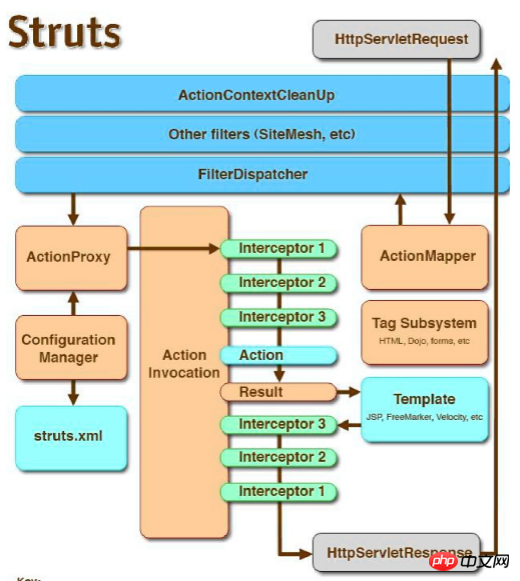
1.架構
2.攔截器建立
2.攔截器建立
//拦截器:第一种创建方式//拦截器生命周期:随项目的启动而创建,随项目关闭而销毁public class MyInterceptor implements Interceptor{}
//创建方式2: 继承AbstractInterceptor -> struts2的体贴//帮我们空实现了init 和 destory方法. 我们如果不需要实现这两个方法,就可以只实现intercept方法public class MyInterceptor2 extends AbstractInterceptor{}
//创建方式3:继承MethodFilterInterceptor 方法过滤拦截器//功能: 定制拦截器拦截的方法.// 定制哪些方法需要拦截.// 定制哪些方法不需要拦截public class MyInterceptor3 extends MethodFilterInterceptor{}登入後複製
//创建方式3:继承MethodFilterInterceptor 方法过滤拦截器//功能: 定制拦截器拦截的方法.// 定制哪些方法需要拦截.// 定制哪些方法不需要拦截public class MyInterceptor3 extends MethodFilterInterceptor{}3.攔截器api
//放行String result = invocation.invoke();
//前处理System.out.println("MyInterceptor3 的前处理!");//放行String result = invocation.invoke();//后处理System.out.println("MyInterceptor3 的后处理!");
//不放行,直接跳转到一个结果页面//不执行后续的拦截器以及Action,直接交给Result处理结果.进行页面跳转return "success";
登入後複製
//不放行,直接跳转到一个结果页面//不执行后续的拦截器以及Action,直接交给Result处理结果.进行页面跳转return "success";
4.攔截器設定
    <package name="inter" namespace="/" extends="struts-default" ><interceptors><!-- 1.注册拦截器 --><interceptor name="myInter3" class="cn.itcast.a_interceptor.MyInterceptor3"></interceptor><!-- 2.注册拦截器栈 --><interceptor-stack name="myStack"><!-- 自定义拦截器引入(建议放在20个拦截器之前) --><interceptor-ref name="myInter3"><!-- 指定哪些方法不拦截
                 <param name="excludeMethods">add,delete</param> --> <!-- 指定哪些方法需要拦截 --> <param name="includeMethods">add,delete</param></interceptor-ref><!-- 引用默认的拦截器栈(20个) --><interceptor-ref name="defaultStack"></interceptor-ref></interceptor-stack>    </interceptors><!-- 3.指定包中的默认拦截器栈 --><default-interceptor-ref name="myStack"></default-interceptor-ref><action name="Demo1Action_*" class="cn.itcast.a_interceptor.Demo1Action" method="{1}" ><!-- 为Action单独指定走哪个拦截器(栈)
            <interceptor-ref name="myStack"></interceptor-ref>--><result name="success" type="dispatcher" >/index.jsp</result></action></package>
<!-- 补充知识:定义全局结果集 --><global-results><result name="toLogin" type="redirect" >/login.jsp</result></global-results>
登入後複製
<!-- 补充知识:定义全局结果集 --><global-results><result name="toLogin" type="redirect" >/login.jsp</result></global-results>
二、struts2標籤


準備Action然後到jsp練習struts2標籤
public class Demo2Action extends ActionSupport {public String execute() throws Exception {

        List<String> list = new ArrayList<>();
        list.add("tom");
        list.add("jerry");
        list.add("jack");
        list.add("rose");
        list.add("hqy");

        ActionContext.getContext().put("list", list);return SUCCESS;
    }

}開始練習控制標籤:
##
<%@ taglib prefix="s" uri="/struts-tags" %><!-- 遍历标签 iterator --><!-- ------------------------------------- --><s:iterator value="#list" ><s:property /><br></s:iterator><!-- ------------------------------------- --><hr><s:iterator value="#list" var="name" ><s:property value="#name" /><br></s:iterator><!-- ------------------------------------- --><hr><s:iterator begin="1" end="100" step="1" ><s:property />|</s:iterator><!-- ------------------if else elseif------------------- --><hr><s:if test="#list.size()==4">list长度为4!</s:if><s:elseif test="#list.size()==3">list长度为3!</s:elseif><s:else>list不3不4!</s:else>
#
<!-- ------------------property 配合ognl表达式页面取值 ------------------- --><hr><s:property value="#list.size()" /><s:property value="#session.user.name" />
6.非表單標籤
<!-- struts2表单标签 --><!-- 好处1: 内置了一套样式. --><!-- 好处2: 自动回显,根据栈中的属性 --><!-- theme:指定表单的主题
xhtml:默认
simple:没有主题 --><s:form action="Demo3Action" namespace="/" theme="xhtml" ><s:textfield name="name" label="用户名" ></s:textfield><s:password name="password" label="密码" ></s:password><s:radio list="{'男','女'}" name="gender" label="性别" ></s:radio><s:radio list="#{1:'男',0:'女'}" name="gender" label="性别" ></s:radio><s:checkboxlist list="#{2:'抽烟',1:'喝酒',0:'烫头'}" name="habits" label="爱好" ></s:checkboxlist><s:select list="#{2:'大专',1:'本科',0:'硕士'}" headerKey="" headerValue="---请选择---" name="edu" label="学历" ></s:select><s:file name="photo" label="近照" ></s:file><s:textarea name="desc" label="个人简介" ></s:textarea><s:submit value="提交" ></s:submit></s:form>#
this.addActionError("我是错误信息 哈哈哈");## 取出錯誤訊息
<s:actionerror/>
登入後複製

##三、練習:登陸功能
<s:actionerror/>

核心程式碼:
public class UserAction extends ActionSupport implements ModelDriven<User> {private User user = new User();private UserService us  = new UserServiceImpl();    public String login() throws Exception {//1 调用Service 执行登陆操作User u = us.login(user);//2 将返回的User对象放入session域作为登陆标识ActionContext.getContext().getSession().put("user", u);//3 重定向到项目的首页return "toHome";
    }

    @Overridepublic User getModel() {return user;
    }
}
登入後複製
public class UserAction extends ActionSupport implements ModelDriven<User> {private User user = new User();private UserService us = new UserServiceImpl(); public String login() throws Exception {//1 调用Service 执行登陆操作User u = us.login(user);//2 将返回的User对象放入session域作为登陆标识ActionContext.getContext().getSession().put("user", u);//3 重定向到项目的首页return "toHome";
}
@Overridepublic User getModel() {return user;
}
}public class UserServiceImpl implements UserService {private UserDao ud = new UserDaoImpl();
@Overridepublic User login(User user) {//打开事务 HibernateUtils.getCurrentSession().beginTransaction();//1.调用Dao根据登陆名称查询User对象User existU = ud .getByUserCode(user.getUser_code());//提交事务 HibernateUtils.getCurrentSession().getTransaction().commit(); if(existU==null){//获得不到=>抛出异常提示用户名不存在throw new RuntimeException("用户名不存在!");
}//2 比对密码是否一致if(!existU.getUser_password().equals(user.getUser_password())){//不一致=>抛出异常提示密码错误throw new RuntimeException("密码错误!");
}//3 将数据库查询的User返回return existU;
}
}Dao層代碼:
#
Dao層代碼:
public class UserDaoImpl implements UserDao {
    @Overridepublic User getByUserCode(String user_code) {//HQL查询//1.获得SessionSession session = HibernateUtils.getCurrentSession();//2 书写HQLString hql = "from User where user_code = ? ";//3 创建查询对象Query query = session.createQuery(hql);//4 设置参数query.setParameter(0, user_code);//5 执行查询User u = (User) query.uniqueResult();return u;
    }
}核心程式碼:
### struts.xml設定檔代碼:######<?xml version="1.0" encoding="UTF-8"?><!DOCTYPE struts PUBLIC
"-//Apache Software Foundation//DTD Struts Configuration 2.3//EN"
"http://struts.apache.org/dtds/struts-2.3.dtd"><struts><!-- 指定struts2是否以开发模式运行
1.热加载主配置.(不需要重启即可生效)
2.提供更多错误信息输出,方便开发时的调试 --><constant name="struts.devMode" value="true"></constant><package name="crm" namespace="/" extends="struts-default" ><interceptors><!-- 注册拦截器 --><interceptor name="loginInterceptor" class="cn.itheima.web.interceptor.LoginInterceptor"></interceptor><!-- 注册拦截器栈 --><interceptor-stack name="myStack"><interceptor-ref name="loginInterceptor"><param name="excludeMethods">login</param></interceptor-ref><interceptor-ref name="defaultStack"></interceptor-ref></interceptor-stack></interceptors><!-- 指定包中的默认拦截器栈 --><default-interceptor-ref name="myStack"></default-interceptor-ref><!-- 定义全局结果集 --><global-results><result name="toLogin" type="redirect" >/login.jsp</result></global-results><global-exception-mappings><!-- 如果出现java.lang.RuntimeException异常,就将跳转到名为error的结果 --><exception-mapping result="error" exception="java.lang.RuntimeException"></exception-mapping></global-exception-mappings>
<action name="CustomerAction_*" class="cn.itheima.web.action.CustomerAction" method="{1}" ><result name="list" >/jsp/customer/list.jsp</result><result name="toList" type="redirectAction"> <param name="actionName">CustomerAction_list</param> <param name="namespace">/</param> </result></action><action name="UserAction_*" class="cn.itheima.web.action.UserAction" method="{1}" ><result name="toHome" type="redirect" >/index.htm</result><result name="error" >/login.jsp</result></action></package></struts><script type="text/javascript">window.onload=function(){ if(window.parent != window){// 如果是在框架中//就让框架页面跳转到登陆页面window.parent.location.href = "${pageContext.request.contextPath}/login.jsp";
}
};</script>以上是JAVAEE-自訂攔截器、struts2標籤、登陸功能和校驗登陸攔截器的實現的詳細內容。更多資訊請關注PHP中文網其他相關文章!

熱AI工具

Undresser.AI Undress
人工智慧驅動的應用程序,用於創建逼真的裸體照片

AI Clothes Remover
用於從照片中去除衣服的線上人工智慧工具。

Undress AI Tool
免費脫衣圖片

Clothoff.io
AI脫衣器

AI Hentai Generator
免費產生 AI 無盡。

熱門文章
熱工具

記事本++7.3.1
好用且免費的程式碼編輯器

SublimeText3漢化版
中文版,非常好用

禪工作室 13.0.1
強大的PHP整合開發環境

Dreamweaver CS6
視覺化網頁開發工具

SublimeText3 Mac版
神級程式碼編輯軟體(SublimeText3)
熱門話題


 如何在Netflix中快速設定自訂頭像
Feb 19, 2024 pm 06:33 PM
如何在Netflix中快速設定自訂頭像
Feb 19, 2024 pm 06:33 PM
Netflix上的頭像是你串流媒體身分的視覺化代表。使用者可以超越預設的頭像來展現自己的個性。繼續閱讀這篇文章,了解如何在Netflix應用程式中設定自訂個人資料圖片。如何在Netflix中快速設定自訂頭像在Netflix中,沒有內建功能來設定個人資料圖片。不過,您可以透過在瀏覽器上安裝Netflix擴充功能來實現此目的。首先,在瀏覽器上安裝Netflix擴充功能的自訂個人資料圖片。你可以在Chrome商店買到它。安裝擴充功能後,在瀏覽器上開啟Netflix並登入您的帳戶。導航至右上角的個人資料,然後點擊
 如何從防護角度看Struts2歷史漏洞
May 13, 2023 pm 05:49 PM
如何從防護角度看Struts2歷史漏洞
May 13, 2023 pm 05:49 PM
一、前言Struts2漏洞是一個經典的漏洞系列,根源在於Struts2引入了OGNL表達式使得框架具有靈活的動態性。隨著整體框架的修補程式完善,現在想挖掘新的Struts2漏洞會比以前困難很多,從實際了解的情況來看,大部分用戶早就修復了歷史的高風險漏洞。目前在做滲透測試時,Struts2漏洞主要也是碰運氣,或是打到內網之後用來攻擊沒修補的系統會比較有效。網路上的分析文章主要從攻擊利用的角度來分析這些Struts2漏洞。作為新華三攻防團隊,我們的部分工作是維護ips產品的規則庫,今天回顧這個系
 Win11如何自訂背景圖片
Jun 30, 2023 pm 08:45 PM
Win11如何自訂背景圖片
Jun 30, 2023 pm 08:45 PM
Win11如何自訂背景圖片?在最新發布的win11系統中,裡面有許多的自訂功能,但是很多小夥伴不知道應該如何使用這些功能。就有小夥伴覺得背景圖片比較單調,想要自訂背景圖,但是不知道如何操作自訂背景圖,如果你不知道如何定義背景圖片,小編下面整理了Win11自訂背景圖片步驟,感興趣的話一起往下看看把! Win11自訂背景圖片步驟1、點選桌面win按鈕,在彈出的選單中點選設定,如圖所示。 2、進入設定選單,點選個性化,如圖所示。 3、進入個人化,點選背景,如圖所示。 4.進入背景設置,點選瀏覽圖片
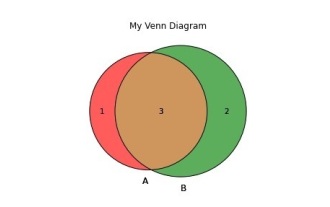 如何在Python中建立和自訂Venn圖?
Sep 14, 2023 pm 02:37 PM
如何在Python中建立和自訂Venn圖?
Sep 14, 2023 pm 02:37 PM
維恩圖是用來表示集合之間關係的圖。要建立維恩圖,我們將使用matplotlib。 Matplotlib是一個在Python中常用的資料視覺化函式庫,用於建立互動式的圖表和圖形。它也用於製作互動式的圖像和圖表。 Matplotlib提供了許多函數來自訂圖表和圖形。在本教程中,我們將舉例說明三個範例來自訂Venn圖。 Example的中文翻譯為:範例這是一個建立兩個維恩圖交集的簡單範例;首先,我們導入了必要的函式庫並導入了venns。然後我們將資料集建立為Python集,之後,我們使用「venn2()」函數創
 如何在CakePHP中建立自訂分頁?
Jun 04, 2023 am 08:32 AM
如何在CakePHP中建立自訂分頁?
Jun 04, 2023 am 08:32 AM
CakePHP是一個強大的PHP框架,為開發人員提供了許多有用的工具和功能。其中之一是分頁,它可以幫助我們將大量資料分成幾頁,從而簡化瀏覽和操作。預設情況下,CakePHP提供了一些基本的分頁方法,但有時你可能需要建立一些自訂的分頁方法。這篇文章將向您展示如何在CakePHP中建立自訂分頁。步驟1:建立自訂分頁類別首先,我們需要建立一個自訂分頁類別。這個
 如何在裝有 iOS 17 的 iPhone 上的 Apple Music 中啟用和自訂交叉淡入淡出
Jun 28, 2023 pm 12:14 PM
如何在裝有 iOS 17 的 iPhone 上的 Apple Music 中啟用和自訂交叉淡入淡出
Jun 28, 2023 pm 12:14 PM
适用于iPhone的iOS17更新为AppleMusic带来了一些重大变化。这包括在播放列表中与其他用户协作,在使用CarPlay时从不同设备启动音乐播放等。这些新功能之一是能够在AppleMusic中使用交叉淡入淡出。这将允许您在曲目之间无缝过渡,这在收听多个曲目时是一个很棒的功能。交叉淡入淡出有助于改善整体聆听体验,确保您在音轨更改时不会受到惊吓或退出体验。因此,如果您想充分利用这项新功能,以下是在iPhone上使用它的方法。如何為AppleMusic啟用和自定Crossfade您需要最新的
 Eclipse中自訂快捷鍵設定的方法
Jan 28, 2024 am 10:01 AM
Eclipse中自訂快捷鍵設定的方法
Jan 28, 2024 am 10:01 AM
如何在Eclipse中自訂快捷鍵設定?身為開發人員,在使用Eclipse進行編碼時,熟練快捷鍵是提高效率的關鍵之一。 Eclipse作為一個強大的整合開發環境,不僅提供了許多預設的快捷鍵,還允許使用者根據自己的偏好進行個人化的客製化。本文將介紹如何在Eclipse中自訂快捷鍵設置,並給出具體的程式碼範例。打開Eclipse首先,打開Eclipse,並進入
 Vue3中的render函數:自訂渲染函數
Jun 18, 2023 pm 06:43 PM
Vue3中的render函數:自訂渲染函數
Jun 18, 2023 pm 06:43 PM
Vue是一款流行的JavaScript框架,它提供了許多方便的功能和API以幫助開發者建立互動的前端應用程式。隨著Vue3的發布,render函數成為了一個重要的更新。本文將介紹Vue3中render函數的概念、用途和如何使用它自訂渲染函數。什麼是render函數在Vue中,template是最常用的渲染方式,但在Vue3中,可以用另一種方式:r
