詳解hibernate5.2的基本配置
目標:將Student實體物件加入資料庫
1.首先需要下載三個東西:hibernate,slf4j,mysql。
2.分別取他們的套件導入新建的專案中,我這裡的版本是:hibernate-release-5.2.10裡面lib目錄下的required中的全部檔案 slf4j-1.7.25下的受slf4j-nop-1.7.25.jar mysql的mysql-connector-java-5.1.42-bin.jar
3.在src下設定hibernate.cfg.xml(建議直接去文件複製然後改
<?xml version='1.0' encoding='utf-8'?> <!DOCTYPE hibernate-configuration PUBLIC"-//Hibernate/Hibernate Configuration DTD 3.0//EN" "http://www.hibernate.org/dtd/hibernate-configuration-3.0.dtd"> <hibernate-configuration> <session-factory> <!-- Database connection settings --> <property name="connection.driver_class">com.mysql.jdbc.Driver</property> <property name="connection.url">jdbc:mysql://localhost/text02</property><property name="connection.username">root</property> <property name="connection.password">6530033197</property> <!-- JDBC connection pool (use the built-in) --> <!-- <property name="connection.pool_size">1</property> --> <!-- SQL dialect --> <property name="dialect">org.hibernate.dialect.MySQLDialect</property> <!-- Enable Hibernate's automatic session context management --> <!-- <property name="current_session_context_class">thread</property> --> <!-- Disable the second-level cache --> <property name="cache.provider_class">org.hibernate.cache.internal.NoCacheProvider</property> <!-- Echo all executed SQL to stdout --> <property name="show_sql">true</property> <!-- Drop and re-create the database schema on startup --> <!-- <property name="hbm2ddl.auto">update</property> --> <mapping resource="student/Student.hbm.xml"/> </session-factory> </hibernate-configuration>
4.在mysql中建立student表,欄位:id age name
5.建立自己的實體類別在src下建套件student,然後建立Class:Student.java
package student;public class Student {private int id;private int age;private String name;public int getId() {return id;
}public void setId(int id) {this.id = id;
}public int getAge() {return age;
}public void setAge(int age) {this.age = age;
}public String getName() {return name;
}public void setName(String name) {this.name = name;
}public Student(int id, int age, String name) {super();this.id = id;this.age = age;this.name = name;
}public Student() {// TODO Auto-generated constructor stub}

}
6.在對應package即student下設定檔:Student.hbm.xml
<?xml version="1.0"?>
<!DOCTYPE hibernate-mapping PUBLIC"-//Hibernate/Hibernate Mapping DTD 3.0//EN"
"http://www.hibernate.org/dtd/hibernate-mapping-3.0.dtd">

<hibernate-mapping package="student">
<class name="Student" table="student">
<id name="id" column="id">
</id>
<property name="name" type="string" column="name"/>
<property name="age" type="int" column="age"/>
</class>
</hibernate-mapping>
7.建立測試類別:StudentText.java
package student;import org.hibernate.Session;import org.hibernate.SessionFactory;import org.hibernate.cfg.Configuration;public class StudentText {public static void main(String[] args) {
Student stu = new Student();
stu.setId(4);
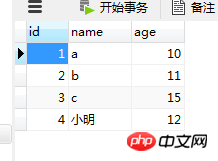
stu.setName("小明");
stu.setAge(12);

Configuration con = new Configuration();
SessionFactory sf = con.configure().buildSessionFactory();
Session s = sf.openSession();
s.beginTransaction();
s.save(stu);
s.getTransaction().commit();
s.close();
sf.close();

}

}
#輸出結果,完成:
以上是詳解hibernate5.2的基本配置的詳細內容。更多資訊請關注PHP中文網其他相關文章!

熱AI工具

Undresser.AI Undress
人工智慧驅動的應用程序,用於創建逼真的裸體照片

AI Clothes Remover
用於從照片中去除衣服的線上人工智慧工具。

Undress AI Tool
免費脫衣圖片

Clothoff.io
AI脫衣器

Video Face Swap
使用我們完全免費的人工智慧換臉工具,輕鬆在任何影片中換臉!

熱門文章

熱工具

記事本++7.3.1
好用且免費的程式碼編輯器

SublimeText3漢化版
中文版,非常好用

禪工作室 13.0.1
強大的PHP整合開發環境

Dreamweaver CS6
視覺化網頁開發工具

SublimeText3 Mac版
神級程式碼編輯軟體(SublimeText3)
 公司安全軟件導致應用無法運行?如何排查和解決?
Apr 19, 2025 pm 04:51 PM
公司安全軟件導致部分應用無法正常運行的排查與解決方法許多公司為了保障內部網絡安全,會部署安全軟件。 ...
 如何將姓名轉換為數字以實現排序並保持群組中的一致性?
Apr 19, 2025 pm 11:30 PM
將姓名轉換為數字以實現排序的解決方案在許多應用場景中,用戶可能需要在群組中進行排序,尤其是在一個用...
 如何使用MapStruct簡化系統對接中的字段映射問題?
Apr 19, 2025 pm 06:21 PM
系統對接中的字段映射處理在進行系統對接時,常常會遇到一個棘手的問題:如何將A系統的接口字段有效地映�...
 IntelliJ IDEA是如何在不輸出日誌的情況下識別Spring Boot項目的端口號的?
Apr 19, 2025 pm 11:45 PM
在使用IntelliJIDEAUltimate版本啟動Spring...
 如何優雅地獲取實體類變量名構建數據庫查詢條件?
Apr 19, 2025 pm 11:42 PM
在使用MyBatis-Plus或其他ORM框架進行數據庫操作時,經常需要根據實體類的屬性名構造查詢條件。如果每次都手動...
 Java對像如何安全地轉換為數組?
Apr 19, 2025 pm 11:33 PM
Java對象與數組的轉換:深入探討強制類型轉換的風險與正確方法很多Java初學者會遇到將一個對象轉換成數組的�...
 如何利用Redis緩存方案高效實現產品排行榜列表的需求?
Apr 19, 2025 pm 11:36 PM
Redis緩存方案如何實現產品排行榜列表的需求?在開發過程中,我們常常需要處理排行榜的需求,例如展示一個�...
 電商平台SKU和SPU數據庫設計:如何兼顧用戶自定義屬性和無屬性商品?
Apr 19, 2025 pm 11:27 PM
電商平台SKU和SPU表設計詳解本文將探討電商平台中SKU和SPU的數據庫設計問題,特別是如何處理用戶自定義銷售屬...


