LNMP簡介
LAMP(Linux apache mysql php##---比較早的web服務。
LNMP(Linux nginx mysql php)---比較潮流,新的webn服務,使用率上升趨勢(國內非常流行)。
Nginx(Engine X),是俄羅斯人發展的,開源的www 服務軟體,軟體一共780K(非常小),是一款靜態(html#,js,css,#jpg等)#www軟體,靜態小檔案高並發,同時佔用資源很少。
Nginx使用平台(linux unix windows都可以)和apache一樣。
Nginx的功能:
#a.www web服務---http 80
b.負載平衡(反向代理proxy)
c.web cachenginx
的優點:
1.配置簡單,靈活。 2.高並發(靜態小檔案),靜態1-2W。
3.佔用資源少,2W並發開#10個執行緒服務,記憶體消耗數百兆。
4.功能種類比較多(web cache proxy代理程式),每個功能都不是很強。
5.支援epoll模型,使得nginx#支援高並發。
6.nginx配合動態服務和apache有差別。
7.利用nginx可以對IP限速。可以限制連線數。
實作原理:nginx(apache)##- -》php--」mysql
nginx
的應用場合:1.
靜態服務(圖片,影片),另一個lighttpd(社群不活躍)。並發:1-3W,html#、js##、css、.flv
2.動態服務:nginx+fastcgi方式執行php,jsp。並發:500-1500#,類似於apache+php,lighttpd+fcgi php
3.反向代理,負載平衡。日PV2000W以下,都可以用nginx#做代理程式。 haproxy,F5,a10
##4.緩存服務,SQUID,VARNI.
nginx和其它##web伺服器對比:
##1)apache
a.穩定強大
b.Prefork模式取消了進程建立開銷,效能很高。
c.處理動態業務資料時,因關聯到後端的引擎和資料庫,瓶頸不在apache本身
d.高並發時消耗系統資源相對來說多一些
e.基於傳統的select模型
2)nginx
a.基於非同步IO模型(epoll#,kqueue),性能強,能夠支援上萬並發
b.對小檔案支援很好,效能很高(限靜態小檔)
c.程式碼優美,擴充函式庫必須編譯進行主程式
d.消耗資源相對低
3)Lighttpd(百度貼吧,豆瓣)
a.基於非同步IO模型,效能和nginx相似
#b.擴充功能是SO模式,比nginx要靈活
c.全球使用率較低,安全性沒有apache以及nginx好
d.透過外掛程式(mod secdownload)可實現檔案##URL位址加密
企業生產場景如何選擇web伺服器(建議):
靜態業務:高並發,用nginx或lighttpd
#動態業務:採用nginx和#apache 皆可
既有動態又有靜態業務:nginx和apache都可以,單選
對外業務nginx,對內部業務apache
##安裝,設定
nginx
1.安裝準備:
#[root@localhost ~]# yum install pcre* -y# ### [root@localhost ~]# yum install openssl* -y######2.###編譯:#########./configure --prefix=/application/nginx1. 12.0 \######--user=nginx \######--group=nginx \######--with-http_stub_status_module \######--with-http_ssl_module# #####3.###啟動檢查:########[root@localhost application]# /application/nginx/sbin/nginx -t###nginx: the configuration file /application/nginx1.12.0/conf/nginx.conf syntax is ok
nginx: configuration file /application/nginx1.12.0/conf/nginx.conf test#is successful
##[root@localhost application]# /application/nginx/sbin/nginx[root@localhost application]# netstat -lntup|grep nginx(另外#80 埠也可以檢查)

##[root@localhost application]# vim /application/nginx/html/index.html 修改首頁內容
#4.關於 nginx模組
1)Nginx core modules(必須的),包括Main Events
#2)Standard HTTP modules(雖然不是必須的,但缺省都會安裝,不建議改變),包括Core Acess FastCGI Gzip(壓縮模組,效能最佳化) LOG(日誌模組) Proxy Rewrite(# URL重寫模組) Upstream(負載平衡模組)等等
提示:預設條件下,這兩組模組都會安裝。修改配置文件,主要是根據這2組模組的功能來修改模組的參數。官網能夠查看模組的參數。
5.nginx的設定
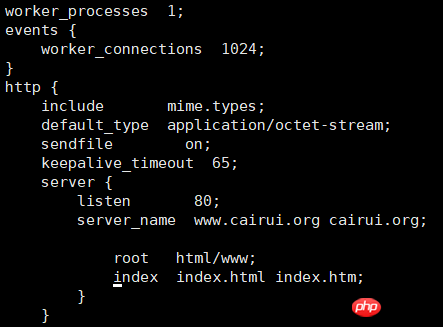
[root@localhost conf]# egrep -v "#|^$" nginx. conf.default >nginx.conf(去掉註解##行)
[root@localhost conf]# vim nginx.conf(cairui.org是別名)
# 
[root@localhost conf ]# mkdir /application/nginx/html/www
[root@localhost conf]# touch /application/nginx/html/www/index.html
#[root@localhost conf]# vim /application/nginx/html/www/index.html
[root@localhost conf]# /application/nginx/sbin/nginx -t
nginx: the configuration file /application/ nginx1.12.0/conf/nginx.conf syntax is ok
nginx: configuration file /application/nginx1.12.0/conf/nginx.conf test is successful
[root@localhost conf]# /application/nginx/sbin/nginx -s reload
修改windows本地hosts文件,保證在win指令提示字元內能##ping通來自虛擬主機,再上網頁檢視
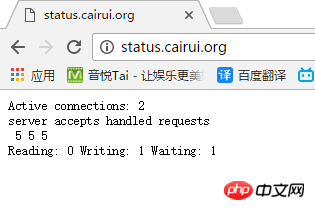
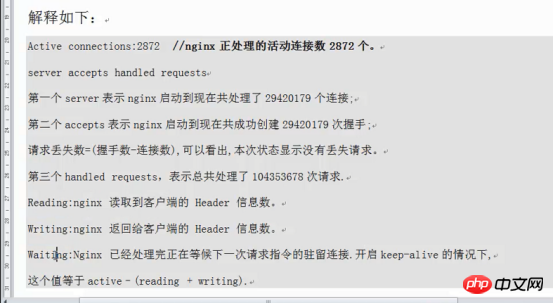
新增狀態的server標籤:
[root@localhost conf]# vim /application/nginx/conf/nginx.conf#
1
location/ { off;}}在
win本地
hosts檔案中也要加入,


#「解決惡意網域綁定:
# #[root@localhost conf]# vim /application/nginx/conf/nginx.conf
(必須放在第一個##server)
#server { listen 80;
#}

(找到日誌格式)
#log_format main '$remote_addr - $remote_user [$time_local] 「$request" $status $body_bytes_sent "$http_referer" ' # )"$http_ /access.log main;#拷貝到nginx.conf下,去掉註解#
錯誤日誌格式放在最頂端
分析nginx日誌的軟體:syslog,rsyslog,
Awstats,scribe,#kafka Mysqlmysql安裝方法:
5.1---編譯安裝
#configure,
make
,
make install
5.5---編譯安裝
cmake,make,
make install
(可以直接用二進位套件安裝,解壓縮即可)

1.
安裝mysql
[root@localhost conf]# useradd mysql -s /sbin/ nologin -M[root@localhost tools]# tar xf mysql-5.5.32-linux2.6-x86_64.tar.gz
#[root@localhost tools]# mv mysql-5.5 .32-linux2.6-x86_64 /application/mysql5.5.32[root@localhost tools]# ln -s /application/mysql5.5.32/ /application/mysql##[root@ localhost tools]# chown -R mysql.mysql /application/mysql/data/[root@localhost mysql]# ./scripts/mysql_install_db --user=mysql --basedir=/application/my/ - -datadir=/application/mysql/data/(編譯前需要安裝libaio
)
 [root@localhost mysql]# cp support -files/mysql.server /etc/init.d/mysqld
[root@localhost mysql]# service mysqld start
Starting MySQL.. SUCCESS!
#[root@localhost mysql]# mysql
資料庫最佳化:
mysql> show databases
mysql> drop Database test;
mysql> select user,host from mysql.user;
#mysql> drop user''@localhost;
[root@localhost mysql]# mysql -uroot -pnew-password
#修改密碼(進入# mysql修改)mysql> set password for root@localhost = password('123');
#PHP
# LNMP下的php:
#apache----」libphp5.so
nginx---》fcgi php-fpm port9000(百度)
##在安裝php之前確保mysql,nginx運行正常##[root@localhost mysql]# netstat -lntup|egrep "nginx|mysql"1.
需要安裝的軟體安裝
libiconv(./configure --prefix=/usr/local/libiconv)
安裝libmcrypt (不是必須,建議安裝)是一個加密的函式庫./configure
make
make install
sleep2
/sbin/ldconfig
cd libltdl/
./configure --enable-ltdl-install
make
make install
cd ../../cd
安裝
mhash./configure
make
make install
sleep 2
cd ../
rm -fr /usr/lib64/libmcrypt.*
rm -fr /usr/lib64/libmhash*
ln -s /usr/local/lib64/libmcrypt.la /usr/lib64/libmcrypt.la
#ln -s /usr/ local/lib64/libmcrypt.so /usr/lib64/libmcrypt.so
ln -s /usr/local/lib64/libmcrypt.so.4 /usr/lib64/libmcrypt.so.4
ln -s /usr/local/lib64/libmcrypt.so.4.4.8 /usr/lib64/libmcrypt.so.4.4.8
ln -s /usr/local/lib64/libmhash.a /usr/lib64/libmhash.a
ln -s /usr/local/lib64/libmhash.la /usr/lib64/libmhash.la
ln -s /usr/local/lib64/ libmhash.so /usr/lib64/libmhash.so
ln -s /usr/local/lib64/libmhash.so.2 /usr/lib64/libmhash.so.2
#ln -
##ln - s /usr/local/lib64/libmhash.so.2.0.1 /usr/lib64/libmhash.so.2.0.1ln -s /usr/local/bin/libmcrypt-config /usr/bin /libmcrypt-config已安裝mcrypt
/sbin/ldconfig./configure LD_LIBRARY_PATH=/usr/local/ libmakemake installcd ../sleep 2 2.安裝php
[root@localhost tools]# yum install libxslt* -y./configure \--prefix=/application/php5. 6.30 \--with-mysql=/application/mysql \#--with-iconv-dir=/usr/local/libiconv \#--with- freetype-dir \--with-jpeg-dir \--with-png-dir \--with-zlib \
。 --with-libxml-dir=/usr \
 --enable-xml \
#--disable-rpath \
--enable-safe-mode \
--enable-bcmath \
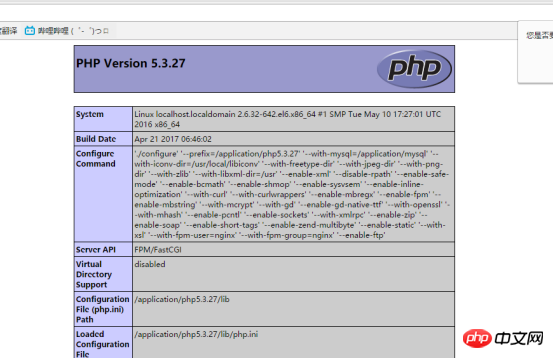
###--enable-shmop \######--enable-sysvsem \######--enable-inline-optimization \# #####--with-curl \######--with-curlwrappers \#######--enable-mbregx \######--enable-fpm \#### ###--enable-mbstring \######--with-mcrypt \######--with-gd \######--enable-gd-native-ttf \# #####--with-openssl \######--with-mhash \######--enable-pcntl \######--enable-sockets \#### ###--with-xmlrpc \######--enable-zip \######--enable-soap \######--enable-short-tags \### ###--enable-zend-multibyte \######--enable-static \######--with-xsl \#####--with-fpm-user=nginx \######--with-fpm-group=nginx \######--enable-ftp \######--enable-opcache=no######ln - s /application/mysql/lib/libmysqlclient.so.18 /usr/lib64######錯誤處理:######,,############### # #####3.php###設定#########[root@localhost php-5.3.27]# cp php.ini-production /application/php/lib/php.ini## ############# ######直接上傳######[root@localhost etc]# /application/php/sbin/php-fpm -t###[root@localhost etc]# /application/php/sbin/php-fpm
開機啟動
cat >>/etc/rc.local< #nginx+php-fpm by cairui at 2017 /etc/init.d/mysqld start /application/php/sbin/php-fpm /application/nginx/sbin/nginx EOF [root@134 extra]# cat /application/nginx/conf/extra/bbs.conf server { listen 80; server_name html/bbs; index index.html index.htmi index.php; location ~ .*\.(php|php5)?$ #{}#.內不指定目錄的話就直接讀取上面html/bbs下的php檔案 { fastcgi_pass 127.0.0.1:9000; # include fastcgi.conf; # } } [root@localhost conf]# cd /application/nginx/html/www/ [root@localhost www]# vim index.php [root@localhost www]# /application/nginx/sbin/nginx -t [root@localhost www]# /application/nginx/sbin/nginx -s reload ##wiki##軟體 mysql> create database wiki; 下載 #HDwiki) [root@localhost www]# wget (注意#www [root@localhost www ]# unzip download.php\?n\=HDWiki-v6.0GBK-20170209.zip[root@localhost www]# rm -f download.php\?n\=HDWiki-v6.0GBK- 20170209.zip[root@localhost www]# mv hdwiki/* . [root@localhost www]# cd ../ [root@localhost html] # chown -R nginx.nginx www/ 以上是linux+Nginx+Mysql+Php圖示,操作步驟詳解!的詳細內容。更多資訊請關注PHP中文網其他相關文章!


