SSH中三大框架整合詳解
SSH說的上是javaweb經典框架,不能說100%要會SSH框架,但是大部分公司都在用,說到框架,都會提到ssh吧,這次就以很簡單的註冊例子來整合SSH框架。整合框架要注意的是先每個框架單獨測通後再整合,不然整合後出現問題比較難排查。
環境:windows + MyEclipse + JDK1.7 + Tomcat7 + MySQL
程式碼已經測通,如果有報錯可能是我某些地方沒描述清楚,請留言。
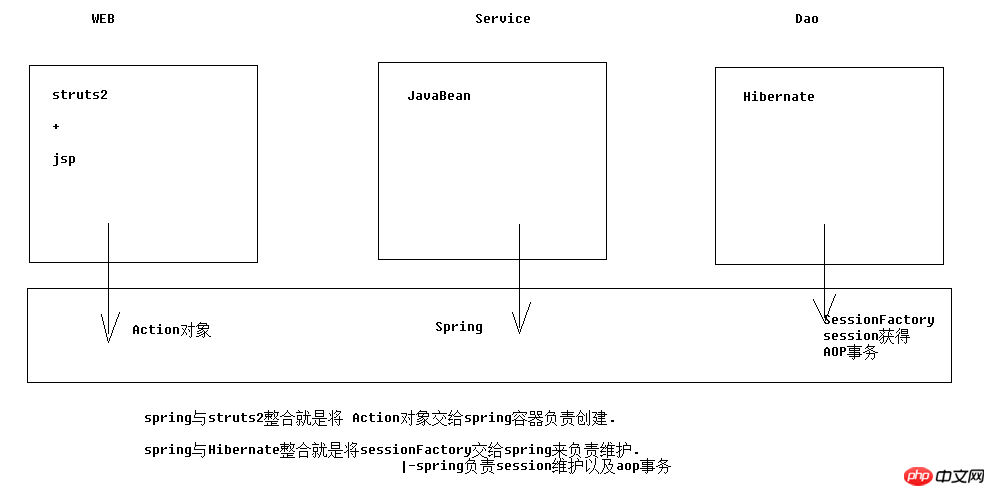
一、整合原理

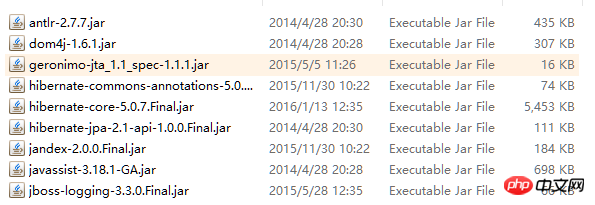
二、導包(41個)
1.hibernate
# (1)hibernate/lib/required

(2)hibernate/lib/jpa | java persist api java的持久化規格(介面)

(3)資料庫驅動程式

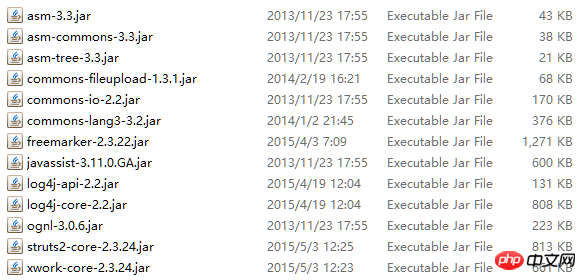
2.struts2
# (1)struts-blank.war/WEB-INF /lib/*
注意:javassist-3.18.1-GA.jar套件與hibernate中的重複(只保留高版本即可)

# (2)struts整合spring插件包
注意:這個包一旦導入,那麼struts2在啟動時就會尋找spring容器.找不到將會拋出異常

3.spring
(1)基本:4+2
core | beans | context | expression | logging | log4j
(2)整合web (2)整合web (2)整合web (2)整合web (2)整合web (2)整合web (2)。 :web套件
spring-web
(3)整合aop:4個
spring-aop | spring-aspect | aop聯盟| aopweaving
(4)整合Hibernate和事務:4個
spring-jdbc | spring-tx | c3p0 | spring-orm
(5)整合junit4測試:test包
(5)整合junit4測試:test包
1.建立applicationContextContext .xml,並導入約束(4個) beans | context | aop | tx
<?xml version="1.0" encoding="UTF-8"?><beans xmlns:xsi="http://www.w3.org/2001/XMLSchema-instance"xmlns="http://www.springframework.org/schema/beans"
        xmlns:context="http://www.springframework.org/schema/context"xmlns:aop="http://www.springframework.org/schema/aop"
        xmlns:tx="http://www.springframework.org/schema/tx"xsi:schemaLocation="http://www.springframework.org/schema/beans
                             http://www.springframework.org/schema/context/spring-context-4.2.xsd
                             http://www.springframework.org/schema/aop/spring-aop-4.2.xsd
http://www.springframework.org/schema/tx/spring-tx-4.2.xsd "><bean name="userAction" class="cn.xyp.web.action.UserAction"></bean></beans><!-- 让spring随web启动而创建的监听器 --> <listener> <listener-class>org.springframework.web.context.ContextLoaderListener</listener-class> </listener> <!-- 配置spring配置文件位置参数 --> <context-param> <param-name>contextConfigLocation</param-name> <param-value>classpath:applicationContext.xml</param-value> </context-param>

<?xml version="1.0" encoding="UTF-8"?>
  <!DOCTYPE struts PUBLIC
    "-//Apache Software Foundation//DTD Struts Configuration 2.3//EN"
"http://struts.apache.org/dtds/struts-2.3.dtd"><struts><package name="crm" namespace="/" extends="struts-default"><action name="UserAction_*" class="cn.xyp.web.action.UserAction" method="{1}"><result name="success">/success.jsp</result></action></package></struts><!-- struts2核心过滤器 --> <filter> <filter-name>struts2</filter-name> <filter-class>org.apache.struts2.dispatcher.ng.filter.StrutsPrepareAndExecuteFilter</filter-class> </filter> <filter-mapping> <filter-name>struts2</filter-name> <url-pattern>/*</url-pattern> </filter-mapping>
五、struts2與spring整合
struts2-spring-plugin-2.3.24.jar
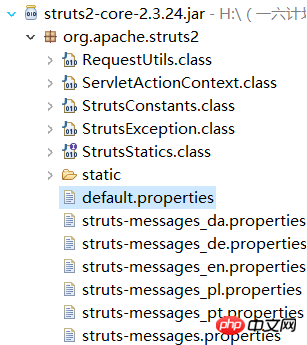
2.配置常量 查看默認配置文件從31行開始找到要配置的變數。
### if specified, the default object factory can be overridden here
### Note: short-hand notation is supported in some cases, such as "spring"
###       Alternatively, you can provide a com.opensymphony.xwork2.ObjectFactory subclass name here
# struts.objectFactory = spring

### specifies the autoWiring logic when using the SpringObjectFactory.
### valid values are: name, type, auto, and constructor (name is the default)
struts.objectFactory.spring.autoWire = name
    <!-- #  struts.objectFactory = spring    将action的创建交给spring容器
            struts.objectFactory.spring.autoWire = name spring负责装配Action依赖属性--><constant name="struts.objectFactory" value="spring"></constant>
        <!-- 整合方案1:class属性上仍然配置action的完整类名
struts2仍然创建action,由spring负责组装Action中的依赖属性 --><action name="UserAction_*" class="cn.xyp.web.action.UserAction" method="{1}" ><result name="toHome" type="redirect" >/index.htm</result><result name="error" >/login.jsp</result></action>4.整合方案2:spring負責創建action以及組裝.(推薦)
applicationContext.xml:<!-- action --><!-- 注意:Action对象作用范围一定是多例的.这样才符合struts2架构 --><bean name="userAction" class="cn.itcast.web.action.UserAction" scope="prototype" ><property name="userService" ref="userService" ></property></bean>
 ##
## <!--
整合方案2:class属性上填写spring中action对象的BeanName
完全由spring管理action生命周期,包括Action的创建
注意:需要手动组装依赖属性 --><action name="UserAction_*" class="userAction" method="{1}" ><result name="toHome" type="redirect" >/index.htm</result><result name="error" >/login.jsp</result></action>package cn.xyp.web.domain;import java.util.HashSet;import java.util.Set;public class User {private Long user_id;private String user_code;private String user_name;private String user_password;private Character user_state;public Long getUser_id() {return user_id;
}public void setUser_id(Long user_id) {this.user_id = user_id;
}public String getUser_code() {return user_code;
}public void setUser_code(String user_code) {this.user_code = user_code;
}public String getUser_name() {return user_name;
}public void setUser_name(String user_name) {this.user_name = user_name;
}public String getUser_password() {return user_password;
}public void setUser_password(String user_password) {this.user_password = user_password;
}public Character getUser_state() {return user_state;
}public void setUser_state(Character user_state) {this.user_state = user_state;
}
@Overridepublic String toString() {return "User [user_id=" + user_id + ", user_code=" + user_code + ", user_name=" + user_name + ", user_password="
+ user_password + "]";
}
}<?xml version="1.0" encoding="UTF-8"?><!DOCTYPE hibernate-mapping PUBLIC
"-//Hibernate/Hibernate Mapping DTD 3.0//EN"
"http://www.hibernate.org/dtd/hibernate-mapping-3.0.dtd"><hibernate-mapping package="cn.xyp.domain" ><class name="User" table="sys_user" ><id name="user_id" ><generator class="native"></generator></id><property name="user_code" ></property><property name="user_name" ></property><property name="user_password" ></property><property name="user_state" ></property></class></hibernate-mapping><?xml version="1.0" encoding="UTF-8"?><!DOCTYPE hibernate-configuration PUBLIC
"-//Hibernate/Hibernate Configuration DTD 3.0//EN"
"http://www.hibernate.org/dtd/hibernate-configuration-3.0.dtd"><hibernate-configuration><session-factory>
<!-- 数据库驱动 --><property name="hibernate.connection.driver_class">com.mysql.jdbc.Driver</property> <!-- 数据库url --><property name="hibernate.connection.url">jdbc:mysql:///crm_32</property> <!-- 数据库连接用户名 --><property name="hibernate.connection.username">root</property> <!-- 数据库连接密码 --><property name="hibernate.connection.password">1234</property><!-- 数据库方言
注意: MYSQL在选择方言时,请选择最短的方言. --><property name="hibernate.dialect">org.hibernate.dialect.MySQLDialect</property>
<!-- 将hibernate生成的sql语句打印到控制台 --><property name="hibernate.show_sql">true</property><!-- 将hibernate生成的sql语句格式化(语法缩进) --><property name="hibernate.format_sql">true</property><!--
自动导出表结构. 自动建表 --><property name="hibernate.hbm2ddl.auto">update</property>
<!-- 引入实体配置文件 --><mapping resource="cn/xyp/domain/Customer.hbm.xml" /><mapping resource="cn/xypt/domain/LinkMan.hbm.xml" /><mapping resource="cn/xyp/domain/User.hbm.xml" /></session-factory></hibernate-configuration><!-- 加载配置方案1:仍然使用外部的hibernate.cfg.xml配置信息 --><bean name="sessionFactory" class="org.springframework.orm.hibernate5.LocalSessionFactoryBean" ><property name="configLocation" value="classpath:hibernate.cfg.xml" ></property></bean>
七、spring整合hibernate
1.整合原理
将sessionFactory对象交给spring容器管理
2.在spring中配置sessionFactory
(1)配置方案一:(了解)
<!-- 加载配置方案1:仍然使用外部的hibernate.cfg.xml配置信息 --><bean name="sessionFactory" class="org.springframework.orm.hibernate5.LocalSessionFactoryBean" ><property name="configLocation" value="classpath:hibernate.cfg.xml" ></property></bean>
(2)配置方案二:(推荐)
<!-- 加载配置方案2:在spring配置中放置hibernate配置信息 --><bean name="sessionFactory" class="org.springframework.orm.hibernate5.LocalSessionFactoryBean" ><!-- 将连接池注入到sessionFactory, hibernate会通过连接池获得连接 --><property name="dataSource" ref="dataSource" ></property><!-- 配置hibernate基本信息 --><property name="hibernateProperties"><props><!-- 必选配置 --><prop key="hibernate.connection.driver_class" >com.mysql.jdbc.Driver</prop><prop key="hibernate.connection.url" >jdbc:mysql:///crm_32</prop><prop key="hibernate.connection.username" >root</prop><prop key="hibernate.connection.password" >1234</prop> <prop key="hibernate.dialect" >org.hibernate.dialect.MySQLDialect</prop><!-- 可选配置 --><prop key="hibernate.show_sql" >true</prop><prop key="hibernate.format_sql" >true</prop><prop key="hibernate.hbm2ddl.auto" >update</prop></props></property><!-- 引入orm元数据,指定orm元数据所在的包路径,spring会自动读取包中的所有配置 --><property name="mappingDirectoryLocations" value="classpath:cn/itcast/domain" ></property></bean>
八、spring整合c3p0连接池
1.配置db.properties
jdbc.jdbcUrl=jdbc:mysql:///xyp_crm
jdbc.driverClass=com.mysql.jdbc.Driver
jdbc.user=root
jdbc.password=123456
2.引入连接池到spring中
<!-- 读取db.properties文件 --><context:property-placeholder location="classpath:db.properties" /><!-- 配置c3p0连接池 --><bean name="dataSource" class="com.mchange.v2.c3p0.ComboPooledDataSource" ><property name="jdbcUrl" value="${jdbc.jdbcUrl}" ></property><property name="driverClass" value="${jdbc.driverClass}" ></property><property name="user" value="${jdbc.user}" ></property><property name="password" value="${jdbc.password}" ></property></bean>3.将连接池注入给SessionFactory
<bean name="sessionFactory" class="org.springframework.orm.hibernate5.LocalSessionFactoryBean" ><!-- 将连接池注入到sessionFactory, hibernate会通过连接池获得连接 --><property name="dataSource" ref="dataSource" ></property>
九、spring整合hibernate环境操作数据库
1.Dao类创建:继承HibernateDaoSupport
注意:项目中要确保使用统一版本。

//HibernateDaoSupport 为dao注入sessionFactorypublic class UserDaoImpl extends HibernateDaoSupport implements UserDao {2.hibernate模板的操作
(1)execute
    @Overridepublic User getByUserCode(final String usercode) {//HQLreturn getHibernateTemplate().execute(new HibernateCallback<User>() {
            @Overridepublic User doInHibernate(Session session) throws HibernateException {
                    String hql = "from User where user_code = ? ";
                    Query query = session.createQuery(hql);
                    query.setParameter(0, usercode);
                    User user = (User) query.uniqueResult();return user;
            }
});(2)findByCriteria
        //CriteriaDetachedCriteria dc = DetachedCriteria.forClass(User.class);

        dc.add(Restrictions.eq("user_code", usercode));

        List<User> list = (List<User>) getHibernateTemplate().findByCriteria(dc);            if(list != null && list.size()>0){return list.get(0);
        }else{return null;
}3.spring中配置dao
<!-- Dao --><bean name="userDao" class="cn.xyp.dao.impl.UserDaoImpl" ><!-- 注入sessionFactory --><property name="sessionFactory" ref="sessionFactory"></property></bean>
十、spring的aop事务
1.准备工作
<!-- 核心事务管理器 --><bean name="transactionManager" class="org.springframework.orm.hibernate5.HibernateTransactionManager" ><property name="sessionFactory" ref="sessionFactory" ></property></bean>
2.xml配置aop事务
(1)配置通知
    <!-- 配置通知 --><tx:advice id="txAdvice" transaction-manager="transactionManager" >
    <tx:attributes><tx:method name="save*" isolation="REPEATABLE_READ" propagation="REQUIRED" read-only="false" />
    <tx:method name="persist*" isolation="REPEATABLE_READ" propagation="REQUIRED" read-only="false" />
    <tx:method name="update*" isolation="REPEATABLE_READ" propagation="REQUIRED" read-only="false" />
    <tx:method name="modify*" isolation="REPEATABLE_READ" propagation="REQUIRED" read-only="false" />
    <tx:method name="delete*" isolation="REPEATABLE_READ" propagation="REQUIRED" read-only="false" />
    <tx:method name="remove*" isolation="REPEATABLE_READ" propagation="REQUIRED" read-only="false" />
    <tx:method name="get*" isolation="REPEATABLE_READ" propagation="REQUIRED" read-only="true" />
    <tx:method name="find*" isolation="REPEATABLE_READ" propagation="REQUIRED" read-only="true" />
    </tx:attributes>
    </tx:advice>
(2)配置织入
    <!-- 配置将通知织入目标对象
    配置切点
    配置切面 --><aop:config>
    <aop:pointcut expression="execution(* cn.itcast.service.impl.*ServiceImpl.*(..))" id="txPc"/>
    <aop:advisor advice-ref="txAdvice" pointcut-ref="txPc" />
</aop:config>3.注解配置aop事务
(1)开启注解事务
<!-- 开启注解事务 --><tx:annotation-driven transaction-manager="transactionManager" />
(2)Service类中使用注解
@Transactional(isolation=Isolation.REPEATABLE_READ,propagation=Propagation.REQUIRED,readOnly=true)public class UserServiceImpl implements UserService{ @Override
@Transactional(isolation=Isolation.REPEATABLE_READ,propagation=Propagation.REQUIRED,readOnly=false)public void saveUser(User u) {
ud.save(u);
}
十一、扩大session作用范围
1.配置filter
为了避免使用懒加载时出现no-session问题.需要扩大session的作用范围。
  <!-- 扩大session作用范围
      注意: 任何filter一定要在struts的filter之前调用
      因为struts是不会放行的   -->
   <filter>  <filter-name>openSessionInView</filter-name>  <filter-class>org.springframework.orm.hibernate5.support.OpenSessionInViewFilter</filter-class>
  </filter>

  <filter-mapping>  <filter-name>openSessionInView</filter-name>  <url-pattern>/*</url-pattern>
  </filter-mapping>
十二、练习:用户登录
1.struts.xml核心配置
<struts><!-- #  struts.objectFactory = spring    将action的创建交给spring容器
            struts.objectFactory.spring.autoWire = name spring负责装配Action依赖属性--><constant name="struts.objectFactory" value="spring"></constant><package name="crm" namespace="/" extends="struts-default" ><global-exception-mappings><exception-mapping result="error" exception="java.lang.RuntimeException"></exception-mapping></global-exception-mappings> <!--
             整合方案:class属性上填写spring中action对象的BeanName
                 完全由spring管理action生命周期,包括Action的创建
注意:需要手动组装依赖属性 --><action name="UserAction_*" class="userAction" method="{1}" ><result name="toHome" type="redirect" >/index.htm</result><result name="error" >/login.jsp</result></action></package></struts>2.Action代码
public class UserAction extends ActionSupport implements ModelDriven<User> {private User user = new User();    private UserService userService ;    public void setUserService(UserService userService) {this.userService = userService;
    }
    public String login() throws Exception {
    //
    1 调用Service执行登陆逻辑User u = userService.getUserByCodePassword(user);
    //
    2 将返回的User对象放入session域ActionContext.getContext().getSession().put("user", u);//
    3 重定向到项目首页return "toHome";
    }

    @Overridepublic User getModel() {return user;
    }

}2.Service核心代码
    public User getUserByCodePassword(User u) {
    // 1 根据登陆名称查询登陆用户User existU = ud.getByUserCode(u.getUser_code());// 2 判断用户是否存在.不存在=>抛出异常,提示用户名不存在if (existU == null) {throw new RuntimeException("用户名不存在!");
        }
        // 3 判断用户密码是否正确=>不正确=>抛出异常,提示密码错误if (!existU.getUser_password().equals(u.getUser_password())) {throw new RuntimeException("密码错误!");
        }
        // 4 返回查询到的用户对象return existU;
}3.Dao核心代码
    public User getByUserCode(final String usercode) {
    //CriteriaDetachedCriteria dc = DetachedCriteria.forClass(User.class);
        dc.add(Restrictions.eq("user_code", usercode));
        List<User> list = (List<User>) getHibernateTemplate().findByCriteria(dc);        if(list != null && list.size()>0){return list.get(0);
        }else{return null;
        }
}以上是SSH中三大框架整合詳解的詳細內容。更多資訊請關注PHP中文網其他相關文章!

熱AI工具

Undresser.AI Undress
人工智慧驅動的應用程序,用於創建逼真的裸體照片

AI Clothes Remover
用於從照片中去除衣服的線上人工智慧工具。

Undress AI Tool
免費脫衣圖片

Clothoff.io
AI脫衣器

Video Face Swap
使用我們完全免費的人工智慧換臉工具,輕鬆在任何影片中換臉!

熱門文章

熱工具

記事本++7.3.1
好用且免費的程式碼編輯器

SublimeText3漢化版
中文版,非常好用

禪工作室 13.0.1
強大的PHP整合開發環境

Dreamweaver CS6
視覺化網頁開發工具

SublimeText3 Mac版
神級程式碼編輯軟體(SublimeText3)
 Spring Boot與NoSQL資料庫的整合使用
Jun 22, 2023 pm 10:34 PM
隨著網路的發展,大數據分析和即時資訊處理成為了企業的重要需求。為了滿足這樣的需求,傳統的關係型資料庫已經不再滿足業務和技術發展的需要。相反,使用NoSQL資料庫已經成為了一個重要的選擇。在這篇文章中,我們將討論SpringBoot與NoSQL資料庫的整合使用,以實現現代應用程式的開發和部署。什麼是NoSQL資料庫?NoSQL是notonlySQL
 java和javaee區別
Nov 02, 2023 am 10:50 AM
java和javaee在定義和用途、元件和功能、平台和環境、應用範圍和開發模式等。詳細介紹:1、定義和用途,Java是一種物件導向的程式語言,由Sun Microsystems於1995年推出,Java具有跨平台、可移植性、安全性和簡單性等特點,廣泛用於開發各種應用程序,而Java EE是Java平台的企業級擴展,旨在開發和部署大規模、可擴展、可靠的企業級應用程式等等。
 使用Docker Container部署JavaEE應用程式
Jun 05, 2024 pm 08:29 PM
使用Docker容器部署JavaEE應用程式:建立Dockerfile定義映像、建置映像、運行容器並映射端口,然後在瀏覽器中存取應用程式。範例JavaEE應用程式:RESTAPI與資料庫交互,透過Docker部署後可在localhost存取。
 UniApp實作Vue.js框架的完美整合
Jul 04, 2023 pm 08:49 PM
UniApp實作Vue.js框架的完美整合引言:UniApp是一種基於Vue.js框架的跨平台開發工具,它能夠將一個Vue.js專案編譯成多個不同平台的應用程序,如iOS、Android、小程序等。 UniApp的優點在於能讓開發者只寫一套程式碼,就能夠同時適配多個平台,加快開發效率並降低開發成本。以下將介紹如何使用UniApp實作Vue.js框架的完美整合
 PHPcms與其他系統整合的實用技巧
Mar 15, 2024 am 08:18 AM
PHPcms與其他系統整合的實用技巧隨著網路技術的不斷發展,網站開發領域也變得愈加多樣化和複雜化。在實際的專案中,我們常常會面對不同系統之間需要整合的情況,這就需要我們具備一定的技巧和經驗來解決這些問題。本文將針對PHPcms系統與其他系統整合的情況,介紹一些實用的技巧和具體的程式碼範例,幫助開發者更好地應對挑戰。一、整合基本原理在進行系統整合時,首先需
 Vue3相較於Vue2的變化:更強大的網路請求庫整合
Jul 08, 2023 pm 08:34 PM
Vue3相较于Vue2的变化:更强大的网络请求库整合随着Vue.js的持续发展和更新,Vue3作为Vue.js的下一个版本,带来了一些令人兴奋的变化和改进。其中一个最显著的变化就是更强大的网络请求库整合。在Vue2中,我们通常使用如axios等第三方库来进行网络请求,而在Vue3中,Vue开发团队已经提供了一个内置的网络请求库,它为我们提供了更直观和灵活的方
 PHP WebDriver整合:從入門到精通
Jun 15, 2023 am 09:52 AM
隨著網路的快速發展,Web應用程式的需求也不斷增加,而軟體測試作為保障企業應用程式品質的重要部分,也隨之變得越來越重要。然而,傳統的手工測試方法既費時又費力,而且容易出錯。自動化測試是解決這個問題的一種方法,其中Web應用程式的自動化測試已經成為一種常見的測試方式,其中,使用WebDriver進行Web應用程式自動化測試是一種非常受歡迎的方式。本文
 JavaEE與容器技術的兼容性問題
Jun 03, 2024 pm 05:11 PM
使用JavaEE容器化應用程式時,可能會遇到相容性問題,例如會話狀態管理、相依性注入、資源池和安全性。解決這些問題的方案包括使用外部會話儲存、配置JNDI、管理資源池和配置安全,確保JavaEE應用程式與容器技術無縫集成,獲得容器化的優勢。


