建置簡單spring boot 專案實例
簡介
Spring Boot是由Pivotal團隊提供的全新框架,其設計目的是用來簡化新Spring應用的初始建置以及開發流程。該框架使用了特定的方式來進行配置,使開發人員不再需要定義樣板化的配置。透過這種方式,Spring Boot致力於在蓬勃發展的快速應用開發領域(rapid application development)成為領導者的。
在先前的spring專案中,都會面對大量繁瑣的配置,使用的時候基本上都是大量的複製貼上。而Spring Boot 則能讓我們在不需要過多的配置下,輕鬆快速地搭建Spring Web應用,開箱即用,沒有程式碼生成,也無需XML配置,從而快速使用spring框架。
開始
版本:java 1.8.0_51 & spring boot 1.5.4
##一、建立簡單spring boot 專案這裡官網提供的生成器SPRING INITIALIZR 來創建簡單的spring boot 專案。 1. 造訪http://start.spring.io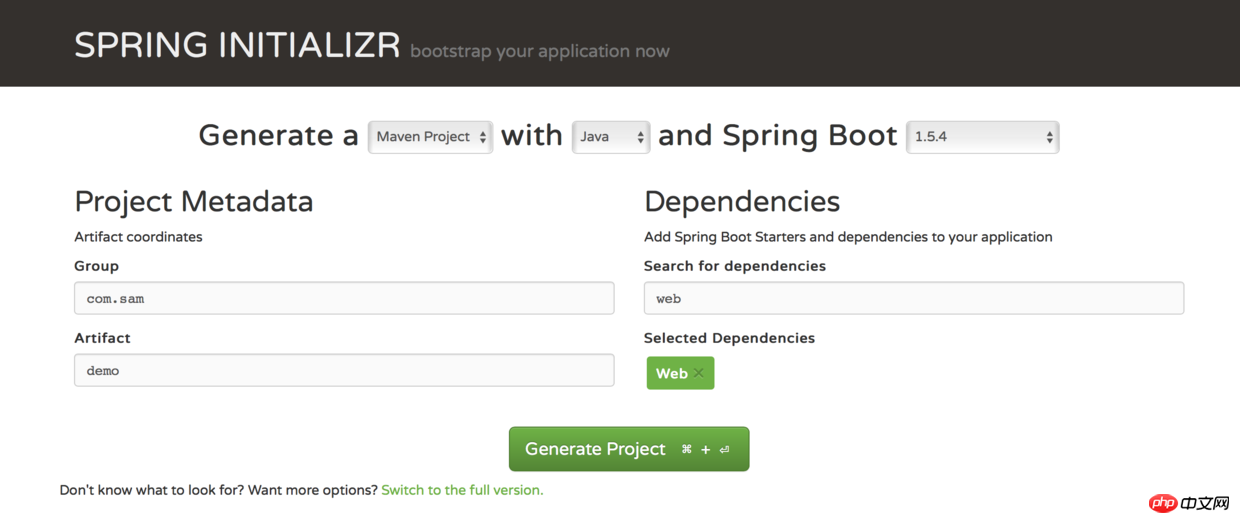
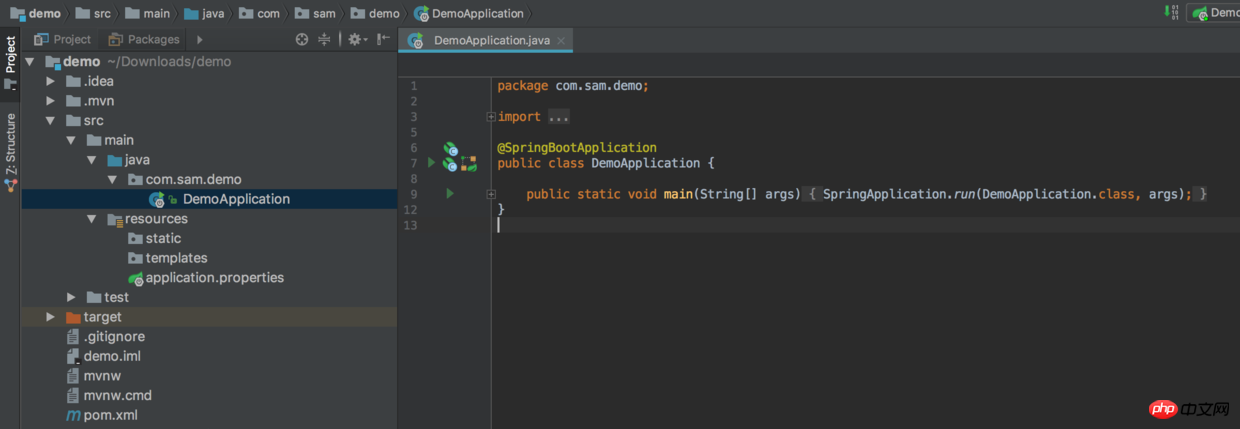
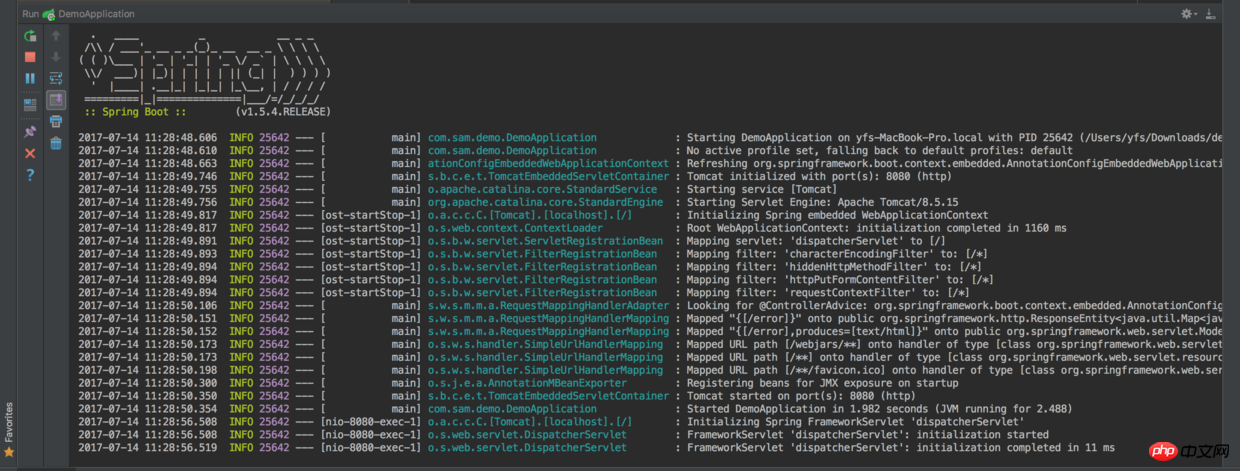

 <!-- 继承 spring boot 父包-->
<parent>
    <groupid>org.springframework.boot</groupid>
    <artifactid>spring-boot-starter-parent</artifactid>
    <version>1.5.4.RELEASE</version>
    <relativepath></relativepath> <!-- lookup parent from repository -->
</parent>
<!-- 构建web项目模块 包括了Tomcat和spring-webmvc -->
<!-- spring-boot-starter-web 默认依赖了tomcat的starter 所以使得项目可以直接运行而不需要部署到tomcat中-->
<dependency>
    <groupId>org.springframework.boot</groupId>
    <artifactId>spring-boot-starter-web</artifactId>
</dependency><dependency>
<groupId>org.springframework.boot</groupId>
<artifactId>spring-boot-starter-test</artifactId>
<scope>test</scope>
</dependency>方式命名,指明了具體的模組。 spring-boot生態中提供了豐富的starter供開發者使用(參考:)
這種模組化的依賴,簡化了大量的依賴配置。使用starter的依賴方式,可以把對應需要依賴的套件一起依賴到專案中,而不像傳統的Spring 需要各自依賴套件。 如在spring-boot中web模組,在傳統的Spring配置中需要依賴org.springframework spring-web 等web服務的包,在spring-boot中,只需要依賴spring-boot-starter- web 就能把對應的套件一併依賴進來,極大的簡化了配置。補充上面講解了可以從http://start.spring.io 直接建構spring-boot專案下面講解直接在IntelliJ IDEA中建置spring-boot專案1. 開啟IDEA ,新建專案
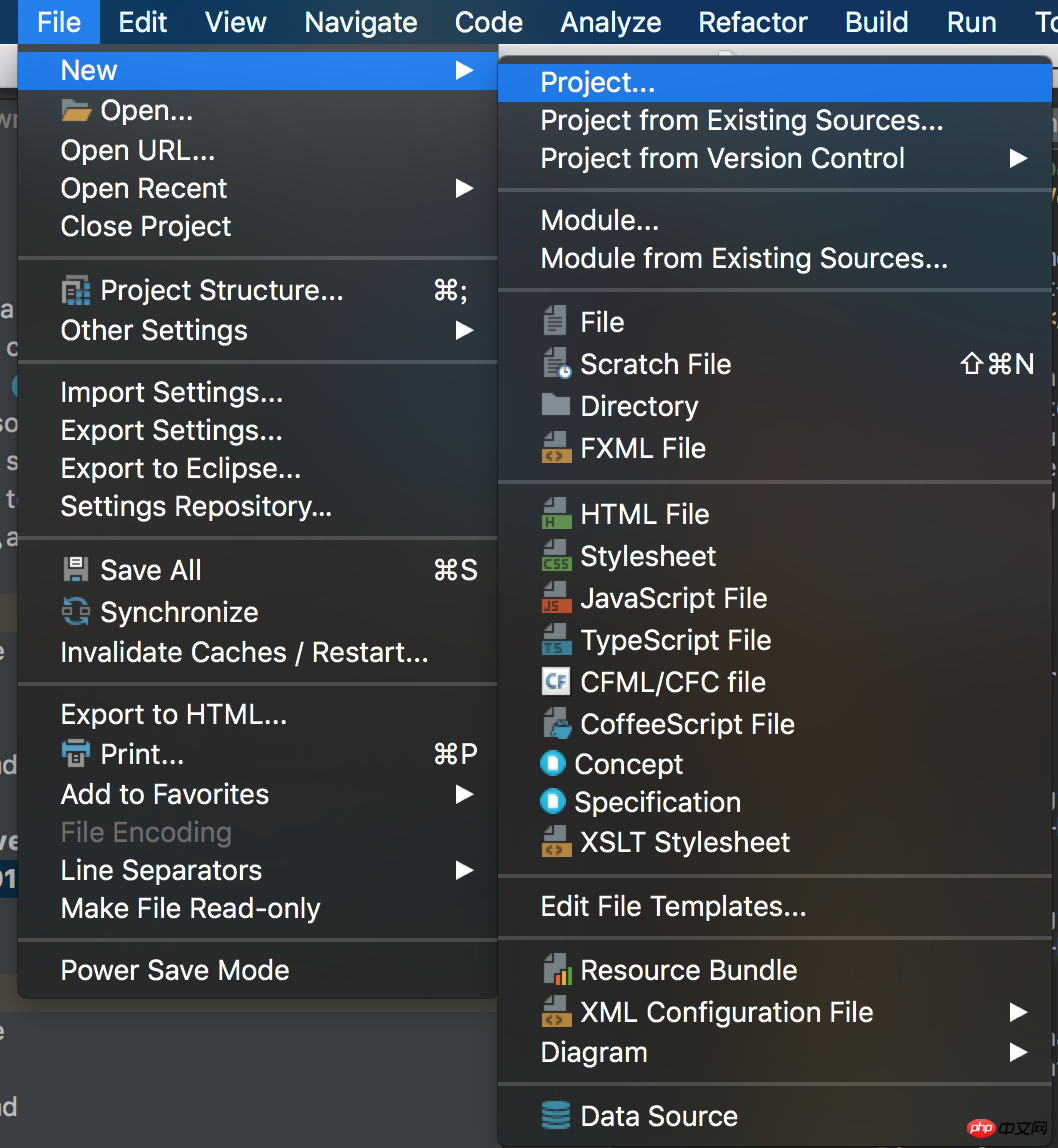
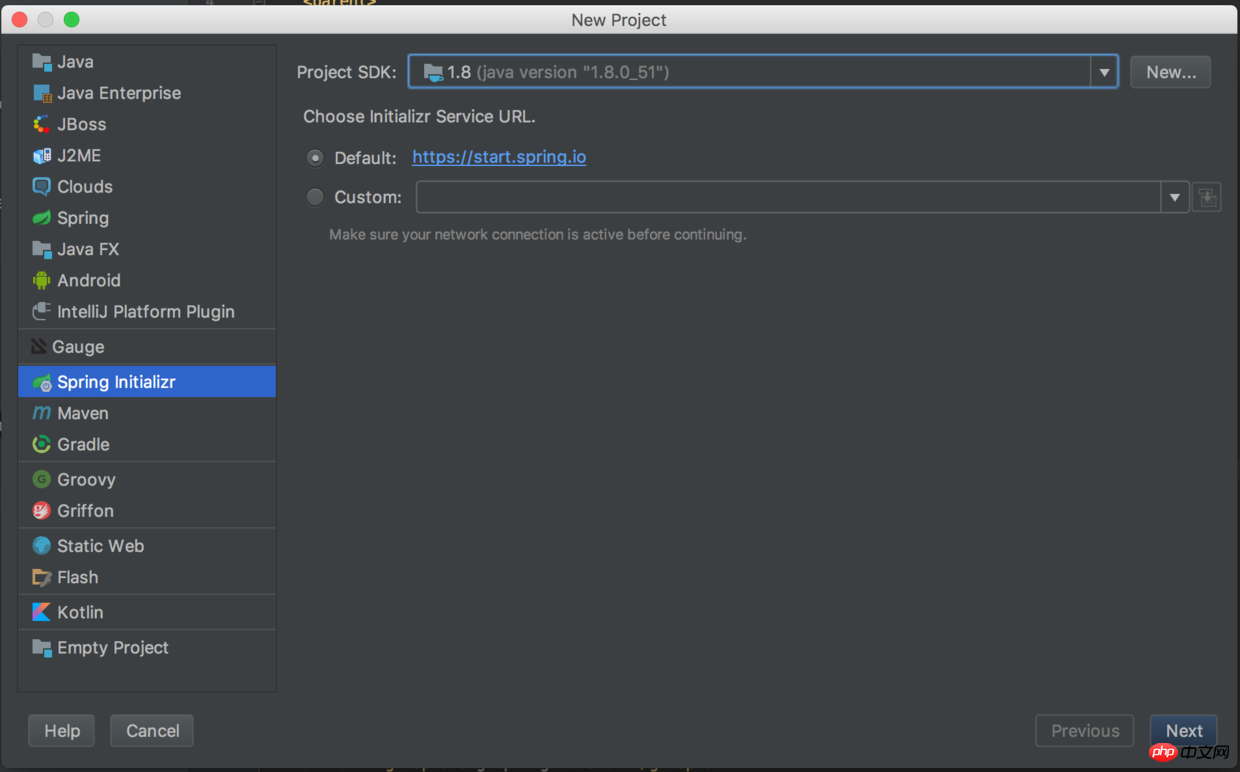
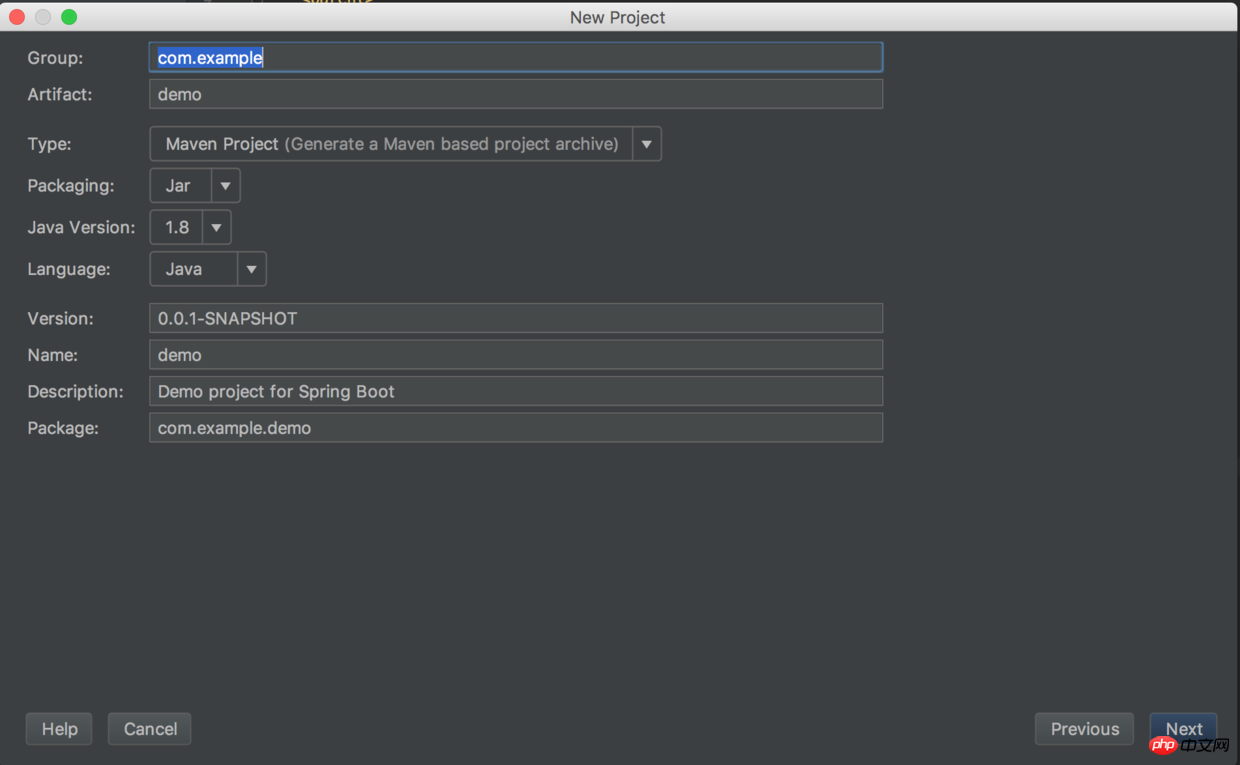
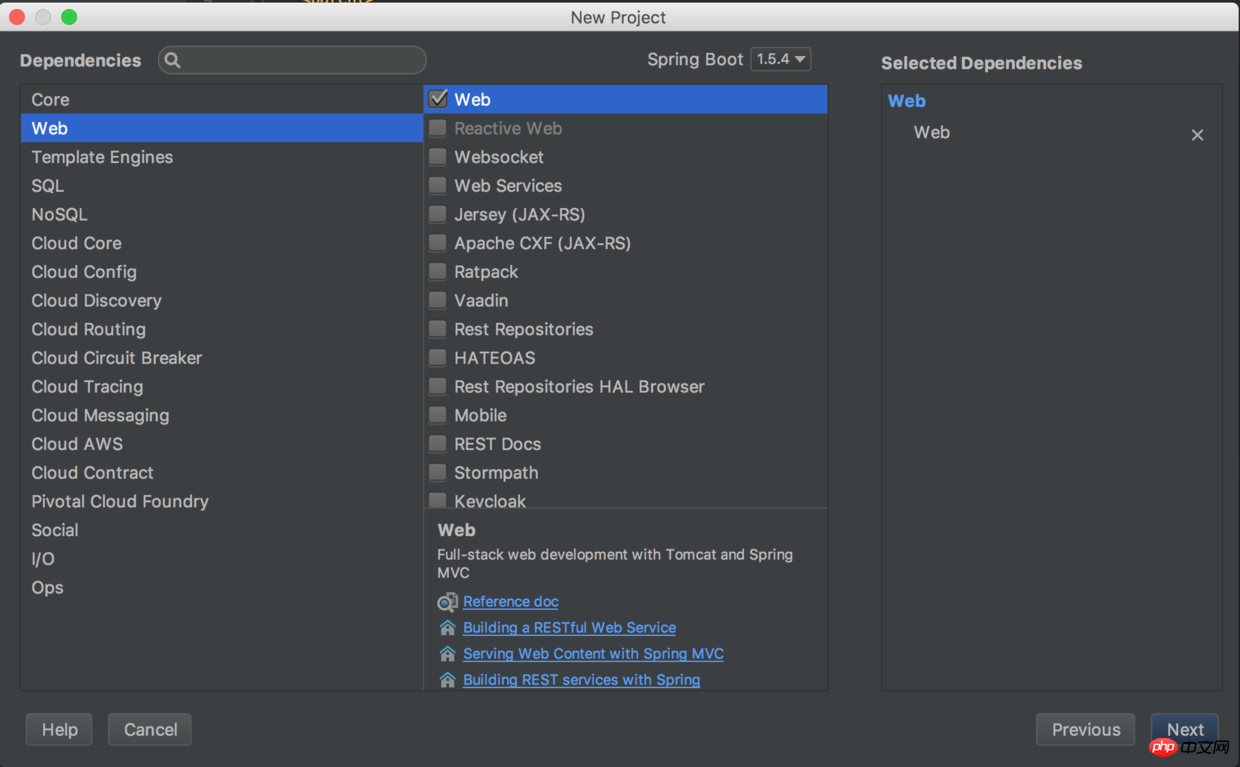
以上是建置簡單spring boot 專案實例的詳細內容。更多資訊請關注PHP中文網其他相關文章!

熱AI工具

Undresser.AI Undress
人工智慧驅動的應用程序,用於創建逼真的裸體照片

AI Clothes Remover
用於從照片中去除衣服的線上人工智慧工具。

Undress AI Tool
免費脫衣圖片

Clothoff.io
AI脫衣器

Video Face Swap
使用我們完全免費的人工智慧換臉工具,輕鬆在任何影片中換臉!

熱門文章

熱工具

記事本++7.3.1
好用且免費的程式碼編輯器

SublimeText3漢化版
中文版,非常好用

禪工作室 13.0.1
強大的PHP整合開發環境

Dreamweaver CS6
視覺化網頁開發工具

SublimeText3 Mac版
神級程式碼編輯軟體(SublimeText3)
 值得你花時間看的擴散模型教程,來自普渡大學
Apr 07, 2024 am 09:01 AM
Diffusion不僅可以更好地模仿,而且可以進行「創作」。擴散模型(DiffusionModel)是一種影像生成模型。與先前AI領域大名鼎鼎的GAN、VAE等演算法,擴散模型另闢蹊徑,其主要想法是先對影像增加噪聲,再逐步去噪的過程。其中如何去噪還原原影像是演算法的核心部分。最終演算法能夠從一張隨機的雜訊影像中產生影像。近年來,生成式AI的驚人成長將文字轉換為圖像生成、視訊生成等領域的許多令人興奮的應用提供了支援。這些生成工具背後的基本原理是擴散的概念,這是一種特殊的取樣機制,克服了先前的方法中被
 一鍵生成PPT! Kimi :讓「PPT民工」先浪起來
Aug 01, 2024 pm 03:28 PM
Kimi:一句話,十幾秒鐘,一份PPT就新鮮出爐了。 PPT這玩意兒,可太招人煩了!開個碰頭會,要有PPT;寫個週報,要做PPT;拉個投資,要展示PPT;就連控訴出軌,都得發個PPT。大學比較像是學了個PPT專業,上課看PPT,下課做PPT。或許,37年前丹尼斯・奧斯汀發明PPT時也沒想到,有一天PPT竟然如此氾濫成災。嗎嘍們做PPT的苦逼經歷,說起來都是淚。 「一份二十多頁的PPT花了三個月,改了幾十遍,看到PPT都想吐」;「最巔峰的時候,一天做了五個PPT,連呼吸都是PPT」;「臨時開個會,都要做個
 利用Spring Boot以及Spring AI建構生成式人工智慧應用
Apr 28, 2024 am 11:46 AM
Spring+AI作為行業領導者,透過其強大、靈活的API和先進的功能,為各種行業提供了領先性的解決方案。在本專題中,我們將深入探討Spring+AI在各領域的應用範例,每個案例都將展示Spring+AI如何滿足特定需求,實現目標,並將這些LESSONSLEARNED擴展到更廣泛的應用。希望這個專題能對你有所啟發,更深入地理解和利用Spring+AI的無限可能。 Spring框架在軟體開發領域已經有超過20年的歷史,自SpringBoot1.0版本發布以來已有10年。現在,無人會質疑,Spring
 CVPR 2024全部獎項公佈!近萬人線下參會,Google華人研究員獲最佳論文獎
Jun 20, 2024 pm 05:43 PM
北京時間6月20日凌晨,在西雅圖舉辦的國際電腦視覺頂會CVPR2024正式公佈了最佳論文等獎項。今年共有10篇論文獲獎,其中2篇最佳論文,2篇最佳學生論文,另外還有2篇最佳論文提名和4篇最佳學生論文提名。電腦視覺(CV)領域的頂級會議是CVPR,每年都會吸引大量研究機構和高校參會。根據統計,今年共提交了11532份論文,2719篇被接收,錄取率為23.6%。根據佐治亞理工學院對CVPR2024的數據統計分析,從研究主題來看,論文數量最多的是圖像和視頻合成與生成(Imageandvideosyn
 從裸機到700億參數大模型,這裡有一個教程,還有現成可用的腳本
Jul 24, 2024 pm 08:13 PM
我們知道LLM是在大規模電腦叢集上使用海量資料訓練得到的,本站曾介紹過不少用於輔助和改進LLM訓練流程的方法和技術。而今天,我們要分享的是一篇深入技術底層的文章,介紹如何將一堆連作業系統也沒有的「裸機」變成用來訓練LLM的電腦叢集。這篇文章來自於AI新創公司Imbue,該公司致力於透過理解機器的思維方式來實現通用智慧。當然,將一堆連作業系統也沒有的「裸機」變成用於訓練LLM的電腦叢集並不是一個輕鬆的過程,充滿了探索和試錯,但Imbue最終成功訓練了一個700億參數的LLM,並在此過程中積累
 AI在用 | AI製作獨居女孩生活Vlog,3天狂攬萬點讚量
Aug 07, 2024 pm 10:53 PM
機器之能報道編輯:楊文以大模型、AIGC為代表的人工智慧浪潮已經在悄悄改變我們生活及工作方式,但絕大部分人依然不知道該如何使用。因此,我們推出了「AI在用」專欄,透過直覺、有趣且簡潔的人工智慧使用案例,來具體介紹AI使用方法,並激發大家思考。我們也歡迎讀者投稿親自實踐的創新用例。影片連結:https://mp.weixin.qq.com/s/2hX_i7li3RqdE4u016yGhQ最近,獨居女孩的生活Vlog在小紅書上走紅。一個插畫風格的動畫,再配上幾句治癒系文案,短短幾天就能輕鬆狂攬上
 技術入門者必看:C語言和Python難易度解析
Mar 22, 2024 am 10:21 AM
標題:技術入門者必看:C語言和Python難易度解析,需要具體程式碼範例在當今數位化時代,程式設計技術已成為一項越來越重要的能力。無論是想要從事軟體開發、數據分析、人工智慧等領域,還是僅僅出於興趣學習編程,選擇一門合適的程式語言是第一步。而在眾多程式語言中,C語言和Python作為兩種廣泛應用的程式語言,各有其特色。本文將對C語言和Python的難易度進行解析
 入門學習C語言的五款程式設計軟體
Feb 19, 2024 pm 04:51 PM
C語言作為一門廣泛應用的程式語言,對於想從事電腦程式設計的人來說是必學的基礎語言之一。然而,對於初學者來說,學習新的程式語言可能會有些困難,尤其是缺乏相關的學習工具和教材。在本文中,我將介紹五款幫助初學者入門C語言的程式設計軟體,幫助你快速上手。第一款程式軟體是Code::Blocks。 Code::Blocks是一個免費的開源整合開發環境(IDE),適用於


