

Node.js各種擴充方法程式碼實例匯總

Node.js擴充
Init方法
為了建立一個Node.js擴展,我們需要寫一個繼承node ::ObjectWrap的C++類別。 ObjectWrap 實作了讓我們更容易與Javascript互動的公共方法
我們先來寫類別的基本架構:
#include <v8.h> // v8 is the Javascript engine used by QNode
#include <node.h>
// We will need the following libraries for our GTK+ notification
#include <string>
#include <gtkmm.h>
#include <libnotifymm.h>

using namespace v8;

class Gtknotify : node::ObjectWrap {
 private:
 public:
  Gtknotify() {}
  ~Gtknotify() {}
  static void Init(Handle<Object> target) {
   // This is what Node will call when we load the extension through require(), see boilerplate code below.
  }
};

/*
 * WARNING: Boilerplate code ahead.
 * Thats it for actual interfacing with v8, finally we need to let Node.js know how to dynamically load our code.
 * Because a Node.js extension can be loaded at runtime from a shared object, we need a symbol that the dlsym function can find,
 * so we do the following:
 */

v8::Persistent<FunctionTemplate> Gtknotify::persistent_function_template;
extern "C" { // Cause of name mangling in C++, we use extern C here
 static void init(Handle<Object> target) {
  Gtknotify::Init(target);
 }
 NODE_MODULE(gtknotify, init);
}現在,我們必須把下面的程式碼寫到我們的Init()方法中:
宣告建構函數,並將其綁定到我們的目標變數。 var n = require("notification");將綁定notification() 到n:n.notification().
// Wrap our C++ New() method so that it's accessible from Javascript
  // This will be called by the new operator in Javascript, for example: new notification();
  v8::Local<FunctionTemplate> local_function_template = v8::FunctionTemplate::New(New);

  // Make it persistent and assign it to persistent_function_template which is a static attribute of our class.
  Gtknotify::persistent_function_template = v8::Persistent<FunctionTemplate>::New(local_function_template);

  // Each JavaScript object keeps a reference to the C++ object for which it is a wrapper with an internal field.
  Gtknotify::persistent_function_template->InstanceTemplate()->SetInternalFieldCount(1); // 1 since a constructor function only references 1 object
  // Set a "class" name for objects created with our constructor
  Gtknotify::persistent_function_template->SetClassName(v8::String::NewSymbol("Notification"));

  // Set the "notification" property of our target variable and assign it to our constructor function
target->Set(String::NewSymbol("notification"), Gtknotify::persistent_function_template->GetFunction());宣告屬性:n.title 和n.icon.
  // Set property accessors
  // SetAccessor arguments: Javascript property name, C++ method that will act as the getter, C++ method that will act as the setter
  Gtknotify::persistent_function_template->InstanceTemplate()->SetAccessor(String::New("title"), GetTitle, SetTitle);
  Gtknotify::persistent_function_template->InstanceTemplate()->SetAccessor(String::New("icon"), GetIcon, SetIcon);
// For instance, n.title = "foo" will now call SetTitle("foo"), n.title will now call GetTitle()宣告原型方法:n.send()
  // This is a Node macro to help bind C++ methods to Javascript methods (see https://github.com/joyent/node/blob/v0.2.0/src/node.h#L34)
  // Arguments: our constructor function, Javascript method name, C++ method name
  NODE_SET_PROTOTYPE_METHOD(Gtknotify::persistent_function_template, "send", Send);
現在我們的Init()方法看起來應該是這樣的:
// Our constructor
static v8::Persistent<FunctionTemplate> persistent_function_template;

static void Init(Handle<Object> target) {
 v8::HandleScope scope; // used by v8 for garbage collection

 // Our constructor
 v8::Local<FunctionTemplate> local_function_template = v8::FunctionTemplate::New(New);
 Gtknotify::persistent_function_template = v8::Persistent<FunctionTemplate>::New(local_function_template);
 Gtknotify::persistent_function_template->InstanceTemplate()->SetInternalFieldCount(1); // 1 since this is a constructor function
 Gtknotify::persistent_function_template->SetClassName(v8::String::NewSymbol("Notification"));

 // Our getters and setters
 Gtknotify::persistent_function_template->InstanceTemplate()->SetAccessor(String::New("title"), GetTitle, SetTitle);
 Gtknotify::persistent_function_template->InstanceTemplate()->SetAccessor(String::New("icon"), GetIcon, SetIcon);

 // Our methods
 NODE_SET_PROTOTYPE_METHOD(Gtknotify::persistent_function_template, "send", Send);

 // Binding our constructor function to the target variable
 target->Set(String::NewSymbol("notification"), Gtknotify::persistent_function_template->GetFunction());
}剩下要做的就是寫我們在Init方法中用的C++方法:New,GetTitle,SetTitle,GetIcon,SetIcon,Send
建構子方法: New()
New() 方法建立了我們自訂類別的新實例(一個Gtknotify 物件),並設定一些初始值,然後傳回該物件的JavaScript 處理。這是 JavaScript 使用 new 運算子呼叫建構函數的期望行為。
 std::string title;
std::string icon;

// new notification()
static Handle<Value> New(const Arguments& args) {
 HandleScope scope;
 Gtknotify* gtknotify_instance = new Gtknotify();
 // Set some default values
 gtknotify_instance->title = "Node.js";
 gtknotify_instance->icon = "terminal";

 // Wrap our C++ object as a Javascript object
 gtknotify_instance->Wrap(args.This());

 return args.This();
}
getters 和 setters: GetTitle(), SetTitle(), GetIcon(), SetIcon()下面主要是一些樣板程式碼,可以歸結為 C++ 和 JavaScript (v8) 之間的值轉換。
// this.title
static v8::Handle<Value> GetTitle(v8::Local<v8::String> property, const v8::AccessorInfo& info) {
 // Extract the C++ request object from the JavaScript wrapper.
 Gtknotify* gtknotify_instance = node::ObjectWrap::Unwrap<Gtknotify>(info.Holder());
 return v8::String::New(gtknotify_instance->title.c_str());
}
// this.title=
static void SetTitle(Local<String> property, Local<Value> value, const AccessorInfo& info) {
 Gtknotify* gtknotify_instance = node::ObjectWrap::Unwrap<Gtknotify>(info.Holder());
 v8::String::Utf8Value v8str(value);
 gtknotify_instance->title = *v8str;
}
// this.icon
static v8::Handle<Value> GetIcon(v8::Local<v8::String> property, const v8::AccessorInfo& info) {
 // Extract the C++ request object from the JavaScript wrapper.
 Gtknotify* gtknotify_instance = node::ObjectWrap::Unwrap<Gtknotify>(info.Holder());
 return v8::String::New(gtknotify_instance->icon.c_str());
}
// this.icon=
static void SetIcon(Local<String> property, Local<Value> value, const AccessorInfo& info) {
 Gtknotify* gtknotify_instance = node::ObjectWrap::Unwrap<Gtknotify>(info.Holder());
 v8::String::Utf8Value v8str(value);
 gtknotify_instance->icon = *v8str;
}原型方法: Send()
首先我們抽取 C++ 物件的 this 引用,然後使用物件的屬性建立通知並顯示。
// this.send()
static v8::Handle<Value> Send(const Arguments& args) {
 v8::HandleScope scope;
 // Extract C++ object reference from "this"
 Gtknotify* gtknotify_instance = node::ObjectWrap::Unwrap<Gtknotify>(args.This());

 // Convert first argument to V8 String
 v8::String::Utf8Value v8str(args[0]);

 // For more info on the Notify library: http://library.gnome.org/devel/libnotify/0.7/NotifyNotification.html
 Notify::init("Basic");
 // Arguments: title, content, icon
 Notify::Notification n(gtknotify_instance->title.c_str(), *v8str, gtknotify_instance->icon.c_str()); // *v8str points to the C string it wraps
 // Display the notification
 n.show();
 // Return value
 return v8::Boolean::New(true);
}編譯擴展
node-waf 是一個建置工具,用來編譯 Node 的擴展,這是 waf 的基本封裝。建置過程可透過名為 wscript 的檔案進行設定。
def set_options(opt):
 opt.tool_options("compiler_cxx")

def configure(conf):
 conf.check_tool("compiler_cxx")
 conf.check_tool("node_addon")
 # This will tell the compiler to link our extension with the gtkmm and libnotifymm libraries.
 conf.check_cfg(package='gtkmm-2.4', args='--cflags --libs', uselib_store='LIBGTKMM')
 conf.check_cfg(package='libnotifymm-1.0', args='--cflags --libs', uselib_store='LIBNOTIFYMM')

def build(bld):
 obj = bld.new_task_gen("cxx", "shlib", "node_addon")
 obj.cxxflags = ["-g", "-D_FILE_OFFSET_BITS=64", "-D_LARGEFILE_SOURCE", "-Wall"]
 # This is the name of our extension.
 obj.target = "gtknotify"
 obj.source = "src/node_gtknotify.cpp"
obj.uselib = ['LIBGTKMM', 'LIBNOTIFYMM']現在我們已經準備好要開始建置了,在頂層目錄下執行以下指令:
node-waf configure && node-waf build
#如果一切正常,我們將得到編譯過的擴展,位於:./build/default/gtknotify.node ,來試試:
$ node
> var notif = require('./build/default/gtknotify.node');
> n = new notif.notification();
{ icon: 'terminal', title: 'Node.js' }
> n.send("Hello World!");
true上述的程式碼將在你的螢幕右上方顯示一個通知資訊。
打成npm套件
這是非常酷的, 但是怎樣與Node社群分享你的努力的成果呢? 這才是npm主要的用途: 使它更容易擴展和分發.
打npm的擴充包是非常簡單的. 你所要做的就是在你的頂級目錄中創建一個包含你的擴展信息的文件package.json :
#{
// 扩展的名称 (不要在名称中包含node 或者 js, 这是隐式关键字).
// 这是通过require() 导入扩展的名称.
"name" : "notify",
// Version should be http://semver.org/ compliant
"version" : "v0.1.0"
// 这些脚本将在调用npm安装和npm卸载的时候运行.
, "scripts" : {
"preinstall" : "node-waf configure && node-waf build"
, "preuninstall" : "rm -rf build/*"
}
// 这是构建我们扩展的相对路径.
, "main" : "build/default/gtknotify.node"
// 以下是可选字段:
, "description" : "Description of the extension...."
, "homepage" : "https://github.com/olalonde/node-notify"
, "author" : {
"name" : "Olivier Lalonde"
, "email" : "olalonde@gmail.com"
, "url" : "http://www.syskall.com/"
}
, "repository" : {
"type" : "git"
, "url" : "https://github.com/olalonde/node-notify.git"
}
}關於package.json 格式的更多細節, 可以通過npm help json 獲取文檔. 注意大多數字段都是可選的.
你現在可以在你的頂級目錄中通過運行npm install 來安裝你的新的npm包了. 如果一切順利的話, 應該可以簡單的加載你的擴展var notify = require('你的包名');. 另外一個比較有用的命令式npm link 通過這個命令你可以創建一個到你開發目錄的鏈接,當你的代碼發生變化時不必每次都去安裝/卸載.
#假設你寫了一個很酷的擴展, 你可能想要在中央npm庫發佈到網上. 首先你要先創建一個帳戶:
$ npm adduser
下一步, 回到你的根目錄編碼並且運行:
$ npm publish
就是這樣, 你的套件現在已經可以被任何人透過npm install 你的套件名稱指令來安裝了.
以上是Node.js各種擴充方法程式碼實例匯總的詳細內容。更多資訊請關注PHP中文網其他相關文章!

熱AI工具

Undresser.AI Undress
人工智慧驅動的應用程序,用於創建逼真的裸體照片

AI Clothes Remover
用於從照片中去除衣服的線上人工智慧工具。

Undress AI Tool
免費脫衣圖片

Clothoff.io
AI脫衣器

Video Face Swap
使用我們完全免費的人工智慧換臉工具,輕鬆在任何影片中換臉!

熱門文章
熱工具

記事本++7.3.1
好用且免費的程式碼編輯器

SublimeText3漢化版
中文版,非常好用

禪工作室 13.0.1
強大的PHP整合開發環境

Dreamweaver CS6
視覺化網頁開發工具

SublimeText3 Mac版
神級程式碼編輯軟體(SublimeText3)


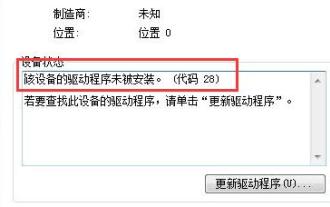 解決win7驅動程式碼28的方法
Dec 30, 2023 pm 11:55 PM
解決win7驅動程式碼28的方法
Dec 30, 2023 pm 11:55 PM
有的用戶在安裝設備的時候遇到了錯誤,提示錯誤代碼28,其實這主要是由於驅動程式的原因,我們只要解決win7驅動程式碼28的問題就可以了,下面就一起來看一下應該怎麼來操作吧。 win7驅動程式碼28怎麼辦:首先,我們需要點擊螢幕左下角的開始選單。接著,在彈出的選單中找到並點擊“控制面板”選項。這個選項通常位於選單的底部或附近。點擊後,系統會自動開啟控制面板介面。在控制面板中,我們可以進行各種系統設定和管理操作。這是懷舊大掃除關卡中的第一步,希望對大家有幫助。然後,我們需要繼續操作,進入系統和
 藍色畫面代碼0x0000001怎麼辦
Feb 23, 2024 am 08:09 AM
藍色畫面代碼0x0000001怎麼辦
Feb 23, 2024 am 08:09 AM
藍屏代碼0x0000001怎麼辦藍屏錯誤是電腦系統或硬體出現問題時的一種警告機制,代碼0x0000001通常表示出現了硬體或驅動程式故障。當使用者在使用電腦時突然遇到藍色畫面錯誤,可能會感到驚慌失措。幸運的是,大多數藍色畫面錯誤都可以透過一些簡單的步驟來排除和處理。本文將為讀者介紹一些解決藍屏錯誤代碼0x0000001的方法。首先,當遇到藍色畫面錯誤時,我們可以嘗試重
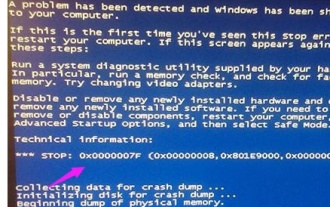
 電腦頻繁藍屏而且每次代碼不一樣
Jan 06, 2024 pm 10:53 PM
電腦頻繁藍屏而且每次代碼不一樣
Jan 06, 2024 pm 10:53 PM
win10系統是一款非常優秀的高智慧系統強大的智慧可以為使用者帶來最好的使用體驗,一般正常的情況下使用者的win10系統電腦都不會出現任何的問題!但在優秀的電腦也難免會出現各種故障最近一直有小伙伴們反應自己的win10系統遇到了頻繁藍屏的問題!今天小編就為大家帶來了win10電腦頻繁藍屏不同代碼的解決方法讓我們一起來看看吧。電腦頻繁藍屏而且每次代碼不一樣的解決辦法:造成各種故障碼的原因以及解決建議1、0×000000116故障原因:應該是顯示卡驅動不相容。解決建議:建議更換廠商原帶驅動。 2、
 解決代碼0xc000007b錯誤
Feb 18, 2024 pm 07:34 PM
解決代碼0xc000007b錯誤
Feb 18, 2024 pm 07:34 PM
終止代碼0xc000007b在使用電腦時,有時會遇到各種各樣的問題和錯誤代碼。其中,終止代碼最為令人困擾,尤其是終止代碼0xc000007b。這個程式碼表示某個應用程式無法正常啟動,給用戶帶來了不便。首先,我們來了解終止碼0xc000007b的意思。這個程式碼是Windows作業系統的錯誤代碼,通常發生在32位元應用程式嘗試在64位元作業系統上執行時。它表示應
 詳解0x0000007f藍屏代碼的原因及解決方案
Dec 25, 2023 pm 02:19 PM
詳解0x0000007f藍屏代碼的原因及解決方案
Dec 25, 2023 pm 02:19 PM
藍屏是我們在系統使用的時候常常會碰到的問題,根據錯誤代碼的不同,會有很多中不一樣的原因和解決方法。例如我們在使用時遇到stop:0x0000007f的問題,可能是硬體或軟體錯誤,下面就跟著小編一起來看看解決方法吧。 0x000000c5藍色畫面代碼原因:答:記憶體、CPU、顯示卡突然超頻,或軟體運作錯誤。解決方法一:1.開機時不斷按F8進入,選擇安全模式,回車進入。 2.進入安全模式後,按win+r開啟運行窗口,輸入cmd,回車。 3.在指令提示窗口,輸入“chkdsk/f/r”,回車,然後按y鍵。 4、
 GE通用遠端程式碼可在任何裝置上編程
Mar 02, 2024 pm 01:58 PM
GE通用遠端程式碼可在任何裝置上編程
Mar 02, 2024 pm 01:58 PM
如果您需要遠端編程任何設備,這篇文章會為您帶來幫助。我們將分享編程任何設備的頂級GE通用遠端代碼。通用電氣的遙控器是什麼? GEUniversalRemote是一款遙控器,可用於控制多個設備,如智慧電視、LG、Vizio、索尼、藍光、DVD、DVR、Roku、AppleTV、串流媒體播放器等。 GEUniversal遙控器有各種型號,具有不同的功能和功能。 GEUniversalRemote最多可以控制四台設備。頂級通用遙控器代碼,可在任何裝置上編程GE遙控器配備一組代碼,使其能夠與不同設備配合。您可
 藍色畫面代碼0x000000d1代表什麼問題?
Feb 18, 2024 pm 01:35 PM
藍色畫面代碼0x000000d1代表什麼問題?
Feb 18, 2024 pm 01:35 PM
0x000000d1藍屏程式碼是什麼意思近年來,隨著電腦的普及和網路的快速發展,作業系統的穩定性和安全性問題也日益凸顯。一個常見的問題是藍色畫面錯誤,代碼0x000000d1是其中之一。藍色畫面錯誤,或稱為“藍色畫面死機”,是當電腦遇到嚴重系統故障時發生的情況。當系統無法從錯誤中恢復時,Windows作業系統會顯示一個藍色的螢幕,並在螢幕上顯示錯誤代碼。這些錯誤代
 學習Python繪圖的速成指南:繪製冰墩墩的程式碼實例
Jan 13, 2024 pm 02:00 PM
學習Python繪圖的速成指南:繪製冰墩墩的程式碼實例
Jan 13, 2024 pm 02:00 PM
快速上手Python繪圖:畫出冰墩墩的程式碼範例Python是一種簡單易學且功能強大的程式語言,透過使用Python的繪圖庫,我們可以輕鬆實現各種繪圖需求。在本篇文章中,我們將使用Python的繪圖庫matplotlib來畫出冰墩墩的簡單圖形。冰墩墩是一隻擁有可愛形象的熊貓,非常受小朋友的喜愛。首先,我們需要安裝matplotlib函式庫。你可以透過在終端運行
