首頁 > 微信小程式 > 小程式開發 > 微信小程式中關於movable-view移動圖片與雙指縮放的實例詳解

微信小程式中關於movable-view移動圖片與雙指縮放的實例詳解

黄舟
發布: 2017-09-12 11:29:15
原創
5340 人瀏覽過

movable-area是微信小程式的新元件,可以用來移動視圖區域movable-view。這篇文章主要介紹了微信小程式movable view移動圖片和雙指縮放實例程式碼,需要的朋友可以參考下

movable-area是微信小程式的新元件,可以用來移動視圖區域movable -view。移動方向可選擇任何、垂直和平行。可移動區域包含其他文字、圖片、按鈕等組件。可移動區域可綁定touchend等事件。 movable-view的參數可調整動畫效果。

先從movable-view開始說起吧. movable-view是小程式自訂的元件.其描述為:"可移動的視圖容器,在頁面中可以拖曳滑動". 

#值得注意的是文件中有一段備註: "當movable-view小於movable-area時,movable-view的移動範圍是在movable-area內;當movable-view大於movable-area時,movable-view的移動範圍必須包含movable-area(x軸方向和y軸方向分開考慮)". 也就是說父容器movable-area是可以比子容器movable-view小的,但是子容器的移動範圍必須包括父容器.

先看官方實例程式碼:


1

2

3

4

5

6

7

8

9

10

11

12

13

14

15

<view class="section">

 <view class="section__title">movable-view区域小于movable-area</view>

 <movable-area style="height: 200px;width: 200px;background: red;">

 <movable-view style="height: 50px; width: 50px; background: blue;" x="{{x}}" y="{{y}}" direction="all">

 </movable-view>

 </movable-area>

 <view class="btn-area">

 <button size="mini" bindtap="tap">click me to move to (30px, 30px)</button>

 </view>

 <view class="section__title">movable-view区域大于movable-area</view>

 <movable-area style="height: 100px;width: 100px;background: red;" direction="all">

 <movable-view style="height: 200px; width: 200px; background: blue;">

 </movable-view>

 </movable-area>

</view>

登入後複製

這裡面有個錯誤,應該是編寫人的一點小失誤吧. 第二個movable-area的屬性direction應該寫在movable-view上.


1

2

3

4

<movable-area style="height: 100px;width: 100px;background: red;" >

 <movable-view style="height: 200px; width: 200px; background: blue;" direction="all">

 </movable-view>

</movable-area>

登入後複製

看下效果:

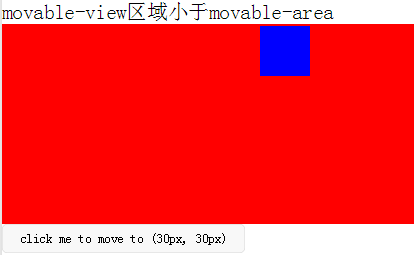
1) 當movable-view區域小於movable -area時,子容器movable-view只能在父容器內移動.  下圖的效果是設定了屬性out-of-bounds="true"的效果. out-of-bounds可以染子容器到達父容器邊界時有個超出邊界然後回彈的動畫. 並不是真正能讓子容器移動到父容器以外.

2) 當movable-view區域大於movable-area時,子容器移動的範圍必須包括父容器.               地   

第二種情況,把父容器看做手機螢幕視覺區域,子容器看做要查看的長圖,大圖. 就可以實現拖動查看圖片的效果. 如果圖片時動態加載的,不是固定的圖片,就要兼容圖片寬高小於屏幕可視寬高和圖片寬高大於可視屏幕寬高的可能性,也就是要考慮到以上兩種情況.我們要在movable組件加載的同時設置好movable-view的寬高,因為movable組件加載成功後再去改變movable-view的大小,可移動區域是不會變的. 我們可以透過頁面中要查看的圖片的onload事件中獲取圖片寬高(目前我只發現bindload事件能獲取到圖片寬高),然後儲存起來imgWidth和imgHeight. 當使用者點擊圖片時,在bindtap事件中設定好movable-view的寬高,同時將movable-area的彈窗wx;if設定為true.
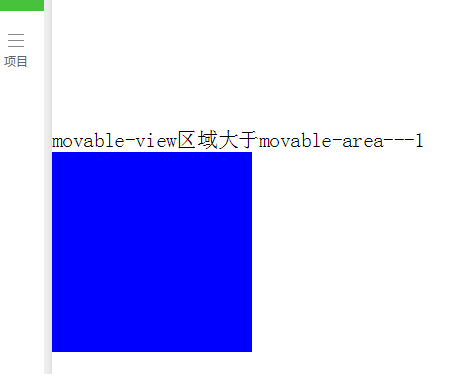
#

1

2

3

4

5

6

<!-- 要查看的图片列表 -->

  <view class="flex-wrap flex-pic">

    <view class="picList">  

    <image wx:for="{{item.imglist}}" wx:for-item="itemImg" wx:key="*this" id="{{&#39;rfnd_&#39;+index}}" bindload="imageOnload" src="{{ itemImg}}" bindtap="showResizeModal" src="{{itemImg}}"></image>  

   </view>

  </view>

登入後複製

因為要查看的是一個圖片列表, 我用了一個數組去存儲每個圖片的寬高,然後通過圖片id來關聯

1

2

3

4

5

6

7

8

9

10

11

12

13

14

15

16

17

18

19

20

21

22

23

24

25

26

27

28

29

30

31

32

33

34

35

36

37

38

39

40

41

42

43

44

45

46

47

48

49

50

51

/**

 * 加载图片

 */

 imageOnload:function(e){

 var id = e.currentTarget.id

 this.data.imgIdList[id] = {

  width:e.detail.width,

  height:e.detail.height

 }

 },

 模板页面

<!--components/resizePicModal/resizePicModal.wxml-->

<template name="resizePic">

 <scroll-view class="backdrop">

 <view class="close-icon" bindtap="closeResizeModal">

  取消预览

 </view>

 <movable-area style="width:100%;height:100%;" >

  <movable-view direction="all"

  out-of-bounds="true" x="{{img.x}}" y="{{img.y}}" >

  <image mode="widthFix" class="dtl-img" src="{{img.currentSrc}}"></image>

  </movable-view>

 </movable-area>

 </scroll-view>

 </template>

 /**

 * 打开弹窗

 */

 showResizeModal: function (e) {

 var src = e.currentTarget.dataset.src;

 var x = 0

 var y =0

 try {

  var width = this.imgIdList[e.currentTarget.id].width; //图片原宽

  var height = this.imgIdList[e.currentTarget.id].height; //图片原高


  //小程序默认固定宽320px,获取top和left值,使图片居中显示

  height = height * (320 / width);

  width = 320;


  x = (app.windowWidth - width) / 2

  y = (app.windowHeight - height) / 2


 } catch (e) { }

 var img = {

  x: x,

  y: y,26  currentSrc: src,

 };

 this.setData({ img: img, isCheckDtl: true });


 },

登入後複製

  部分CSS代碼

1

2

3

4

5

6

7

8

.backdrop{

 background: rgba(0, 0, 0, 1);

 width:100%;

 height: 100%;

 position: fixed;

 top:0;

 left:0;

}

登入後複製

以上基本上可以完成一個點擊查看圖片的需求.

#然而如果再支持雙指縮放的話, movable-view實現不了.我暫沒想出來怎麼實現,如果有人知道,希望能夠指點迷津. 主要原因是因為還是我上文提到的那句話:"movable組件加載成功後再去改變movable-view的大小,可移動區域是不會變的".縮放後圖片大小肯定會改變的. 縮小還好,一旦放大,可移動區域還是原來的不會改變.想像一下,如果一張寬度剛好時屏幕可視寬度的圖片,放大後,這張圖片就只能在螢幕可視寬度windowWidth的範圍中移動,看不到左也看不到右邊超出的部分.

所以如果既要可移動圖片又要可縮放,就不能用movable-view組件了,自己寫個吧. 原來bindtouchmove會觸發頁面的滾動條,但是現在微信好像已經修復了這個BUG,我今天在真機上測試沒有出現這個問題.


 自訂控制項 resizePicModal.wxml:

1

2

3

4

5

6

7

8

9

10

11

<!-- 缩放 -->

<template name="resizePic">

 <scroll-view class="backdrop" catchtouchmove="bindTouchMove" catchtouchend="bindTouchEnd" bindtouchstart="bindTouchStart" >

 <view class="close-icon" bindtap="closeResizeModal">

  取消预览

 </view>

  <image catchtouchmove="bindTouchMove" bindtouchend="bindTouchEnd" bindtouchstart="bindTouchStart"

  style=" transform: scale({{img.baseScale}}); position:absolute; top:{{img.top}}px; left:{{img.left}}px; "

  mode="widthFix" class="dtl-img" src="{{img.currentSrc}}"></image>

 </scroll-view>

 </template>

登入後複製

 JS:resizePicModal.js

#

1

2

3

4

5

6

7

8

9

10

11

12

13

14

15

16

17

18

19

20

21

22

23

24

25

26

27

28

29

30

31

32

33

34

35

36

37

38

39

40

41

42

43

44

45

46

47

48

49

50

51

52

53

54

55

56

57

58

59

60

61

62

63

64

65

66

67

68

69

70

71

72

73

74

75

76

77

78

79

80

81

82

83

84

85

86

87

88

89

90

91

92

93

94

95

96

97

98

99

100

101

102

103

104

105

106

107

108

109

110

111

112

113

114

115

116

117

118

119

120

121

122

123

124

/**

 * 使用方法:

 * 1) WXHTML要缩放的图片 必须 传入 src 以及绑定 bindtap事件,

 * e.g: 

 * <image bindtap="toggleDtl" src="{{item}}" wx:for="{{productCard.arrImg}}" wx:key="*this" src="{{item}}" style="width:100%" mode="widthFix"></image>

 * 2) WXHTML 要引入Modal模板(isCheckDtl无需再定义):

 *  <view wx:if="{{isCheckDtl}}">

 *  <import src="/components/resizePicModal/resizePicModal.wxml"/>

 *  <template is="resizePic" data="{{img}}"></template>

 *  </view>

 * 3) JS页面要引入JS文件,覆盖当前页面的事件:

 * var resizePicModalService = require (&#39;../../components/resizePicModal/resizePicModal.js&#39;)

 * var resizePicModal = {}

 * 4) 在onLoad事件中,实例化ResizePicModal

 *  resizePicModal = new resizePicModalService.ResizePicModal()

 */

var app = getApp()

let modalEvent = {

 distanceList: [0, 0],//存储缩放时,双指距离.只有两个数据.第一项为old distance.最后一项为new distance

 disPoint: { x: 0, y: 0 },//手指touch图片时,在图片上的位置

 imgIdList:{},

 /**

 * 打开弹窗

 */

 showResizeModal: function (e) {

 var src = e.currentTarget.dataset.src;

 var x = 0

 var y =0

 try {

  var width = this.imgIdList[e.currentTarget.id].width; //图片原宽

  var height = this.imgIdList[e.currentTarget.id].height; //图片原高

  //小程序固定宽320px

  height = height * (320 / width);

  width = 320;

  x = (app.windowWidth - width) / 2 //> 0 ? (app.windowWidth - width) / 2 : 0;

  y = (app.windowHeight - height) / 2// > 0 ? (app.windowHeight - height) / 2 : 0;

 } catch (e) { }

 var img = {

  top: y,

  left: x,

  x: x, y: y,

  width: &#39;100%&#39;,

  baseScale: 1,

  currentSrc: src,

 };

 this.setData({ img: img, isCheckDtl: true });

 },

 /**

 * 关闭弹窗

 */

 closeResizeModal:function(){

 this.setData({ isCheckDtl: false })

 },

 /**

 * 加载图片

 */

 imageOnload:function(e){

 var id = e.currentTarget.id

 this.imgIdList[id] = {

  width:e.detail.width,

  height:e.detail.height

 }

 },

 /**

 * bindtouchmove

 */

 bindTouchMove: function (e) {

 if (e.touches.length == 1) {//一指移动当前图片

  this.data.img.left = e.touches[0].clientX - this.disPoint.x

  this.data.img.top = e.touches[0].clientY - this.disPoint.y

  this.setData({ img: this.data.img })

 }

 if (e.touches.length == 2) {//二指缩放

  var xMove = e.touches[1].clientX - e.touches[0].clientX

  var yMove = e.touches[1].clientY - e.touches[0].clientY

  var distance = Math.sqrt(xMove * xMove + yMove * yMove);//开根号

  this.distanceList.shift()

  this.distanceList.push(distance)

  if (this.distanceList[0] == 0) { return }

  var distanceDiff = this.distanceList[1] - this.distanceList[0]//两次touch之间, distance的变化. >0,放大图片.<0 缩小图片

  // 假设缩放scale基数为1: newScale = oldScale + 0.005 * distanceDiff

  var baseScale = this.data.img.baseScale + 0.005 * distanceDiff

  if(baseScale>0){

  this.data.img.baseScale = baseScale

  var imgWidth = baseScale * parseInt(this.data.img.imgWidth)

  var imgHeight = baseScale * parseInt(this.data.img.imgHeight)

  this.setData({ img: this.data.img })

  }else{

  this.data.img.baseScale = 0

  this.setData({ img: this.data.img })

  }

 }

 },

 /**

 * bindtouchend

 */

 bindTouchEnd: function (e) {

 if (e.touches.length == 2) {//二指缩放

  this.setData({ isCheckDtl: true })

 }

 },

 /**

 * bindtouchstart

 */

 bindTouchStart: function (e) {

 this.distanceList = [0, 0]//回复初始值

 this.disPoint = { x: 0, y: 0 }

 if (e.touches.length == 1) {

  this.disPoint.x = e.touches[0].clientX - this.data.img.left

  this.disPoint.y = e.touches[0].clientY - this.data.img.top

 }

 }

}

function ResizePicModal(){

 let pages = getCurrentPages()

 let curPage = pages[pages.length - 1]

 Object.assign(curPage, modalEvent)//覆盖原生页面事件

 this.page = curPage

 curPage.resizePicModal = this

 return this

}

module.exports = {

 ResizePicModal

}

登入後複製

業務頁面wxml:引入自訂控制項範本


1

2

3

4

5

6

7

8

9

10

<view class="flex-wrap flex-pic">

    <view class="picList">  

     <image wx:for="{{item.imglist}}" wx:for-item="itemImg" wx:key="*this" id="{{&#39;rfnd_&#39;+index}}" bindload="imageOnload" src="{{ itemImg}}" bindtap="showResizeModal" src="{{itemImg}}"></image>  

    </view>

 </view>

<!-- 缩放 -->

 <view wx:if="{{isCheckDtl}}">

 <import src="/components/resizePicModal/resizePicModal.wxml"/>

 <template is="resizePic" data="{{img}}"></template>

 </view>

登入後複製

业务页面js,引用js文件,实例化resizePicModal


1

2

3

4

5

6

7

8

9

10

var that

 var resizePicModal = {}

 var app = getApp()

 var resizePicModalService = require(&#39;../../components/resizePicModal/resizePicModal.js&#39;)

 /**

  * 生命周期函数--监听页面加载

  */

 onLoad: function (options) {

  that = this 8  resizePicModal = new resizePicModalService.ResizePicModal()

 }

登入後複製

总结

以上是微信小程式中關於movable-view移動圖片與雙指縮放的實例詳解的詳細內容。更多資訊請關注PHP中文網其他相關文章!

相關標籤:
本網站聲明
本文內容由網友自願投稿,版權歸原作者所有。本站不承擔相應的法律責任。如發現涉嫌抄襲或侵權的內容,請聯絡admin@php.cn
最新問題
$this->view->assign()中為什麼可以加view
來自於 1970-01-01 08:00:00
0
0
0
angular.js - angularjs ng-view和ui-view的差別?
來自於 1970-01-01 08:00:00
0
0
0
laravel中view的名稱是否可以包含點
來自於 1970-01-01 08:00:00
0
0
0
無法載入控制器View
來自於 1970-01-01 08:00:00
0
0
0
熱門教學
更多>
最新下載
更多>
網站特效
網站源碼
網站素材
前端模板