

C#編寫Windows服務程式的圖文詳解

本文介绍了如何用C#创建、安装、启动、监控、卸载简单的Windows Service 的内容步骤和注意事项,需要的朋友可以参考下
一、创建一个Windows Service
1)创建Windows Service项目
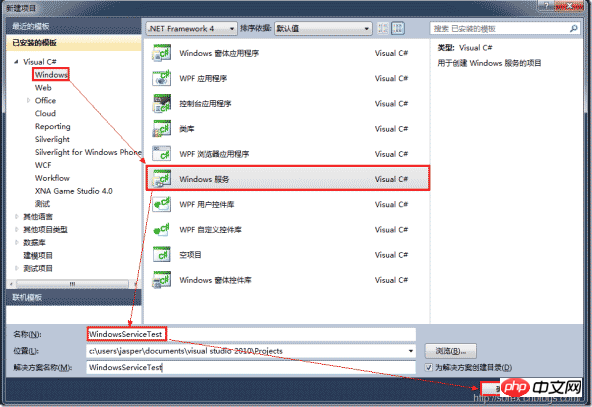
2)对Service重命名
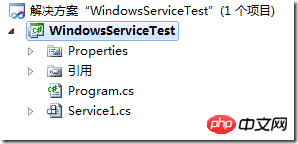
将Service1重命名为你服务名称,这里我们命名为ServiceTest。
二、创建服务安装程序
1)添加安装程序
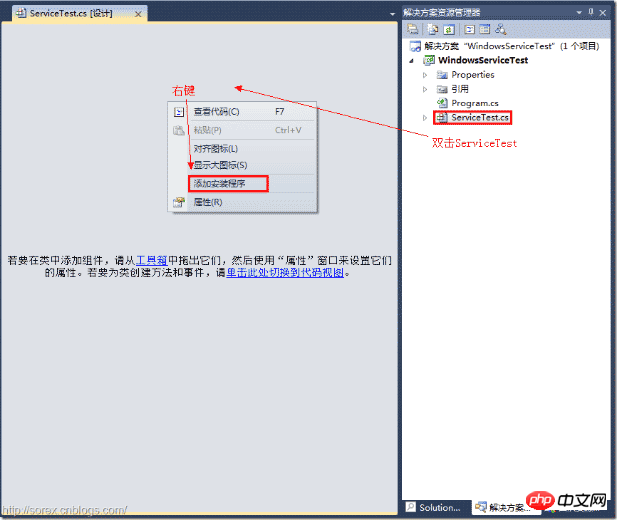
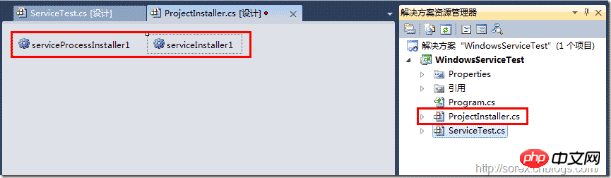
之后我们可以看到上图,自动为我们创建了ProjectInstaller.cs以及2个安装的组件。
2)修改安装服务名
右键serviceInsraller1,选择属性,将ServiceName的值改为ServiceTest。

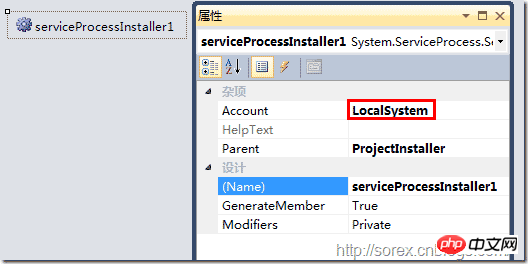
3)修改安装权限
右键serviceProcessInsraller1,选择属性,将Account的值改为LocalSystem。
三、写入服务代码
1)打开ServiceTest代码
右键ServiceTest,选择查看代码。
2)写入Service逻辑
添加如下代码:
using System;
using System.Collections.Generic;
using System.ComponentModel;
using System.Data;
using System.Diagnostics;
using System.Linq;
using System.ServiceProcess;
using System.Text;
namespace WindowsServiceTest
{
	public partial class ServiceTest : ServiceBase
	{
		public ServiceTest()
		{
			InitializeComponent();
		}
		protected override void OnStart(string[] args)
		{
			using (System.IO.StreamWriter sw = new System.IO.StreamWriter("C:\\log.txt", true))
			{
				sw.WriteLine(DateTime.Now.ToString("yyyy-MM-dd HH:mm:ss ") + "Start.");
			}
		}
		protected override void OnStop()
		{
			using (System.IO.StreamWriter sw = new System.IO.StreamWriter("C:\\log.txt", true))
			{
				sw.WriteLine(DateTime.Now.ToString("yyyy-MM-dd HH:mm:ss ") + "Stop.");
			}
		}
	}
}这里我们的逻辑很简单,启动服务的时候写个日志,关闭的时候再写个日志。
四、创建安装脚本
在项目中添加2个文件如下(必须是ANSI或者UTF-8无BOM格式):
1)安装脚本Install.bat
%SystemRoot%\Microsoft.NET\Framework\v4.0.30319\installutil.exe WindowsServiceTest.exe
Net Start ServiceTest
sc config ServiceTest start= auto
2)卸载脚本Uninstall.bat
%SystemRoot%\Microsoft.NET\Framework\v4.0.30319\installutil.exe /u WindowsServiceTest.exe
3)安装脚本说明
第二行为启动服务。
第三行为设置服务为自动运行。
这2行视服务形式自行选择。
4)脚本调试
如果需要查看脚本运行状况,在脚本最后一行加入pause
五、在C#中对服务进行控制
0)配置目录结构
简历一个新WPF项目,叫WindowsServiceTestUI,添加对System.ServiceProcess的引用。
在WindowsServiceTestUI的bin\Debug目录下建立Service目录。
将WindowsServiceTest的生成目录设置为上面创建的Service目录。
生成后目录结构如下图

1)安装
安装时会产生目录问题,所以安装代码如下:
string CurrentDirectory = System.Environment.CurrentDirectory;
System.Environment.CurrentDirectory = CurrentDirectory + "\\Service";
Process process = new Process();
process.StartInfo.UseShellExecute = false;
process.StartInfo.FileName = "Install.bat";
process.StartInfo.CreateNoWindow = true;
process.Start();
System.Environment.CurrentDirectory = CurrentDirectory;
2)卸载
卸载时也会产生目录问题,所以卸载代码如下:
string CurrentDirectory = System.Environment.CurrentDirectory;

System.Environment.CurrentDirectory = CurrentDirectory + "\\Service";
Process process = new Process();
process.StartInfo.UseShellExecute = false;
process.StartInfo.FileName = "Uninstall.bat";
process.StartInfo.CreateNoWindow = true;
process.Start();
System.Environment.CurrentDirectory = CurrentDirectory;
3)启动
代码如下:
using System.ServiceProcess;
ServiceController serviceController = new ServiceController("ServiceTest");
serviceController.Start();4)停止
ServiceController serviceController = new ServiceController("ServiceTest");
if (serviceController.CanStop)
serviceController.Stop();5)暂停/继续
ServiceController serviceController = new ServiceController("ServiceTest");
if (serviceController.CanPauseAndContinue){
if (serviceController.Status == ServiceControllerStatus.Running)
serviceController.Pause();
else if (serviceController.Status == ServiceControllerStatus.Paused)
serviceController.Continue();
}6)检查状态
ServiceController serviceController = new ServiceController("ServiceTest");

string Status = serviceController.Status.ToString();六、调试Windows Service
1)安装并运行服务
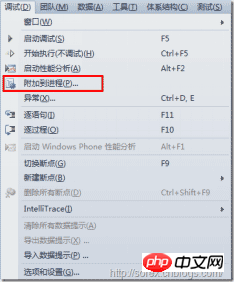
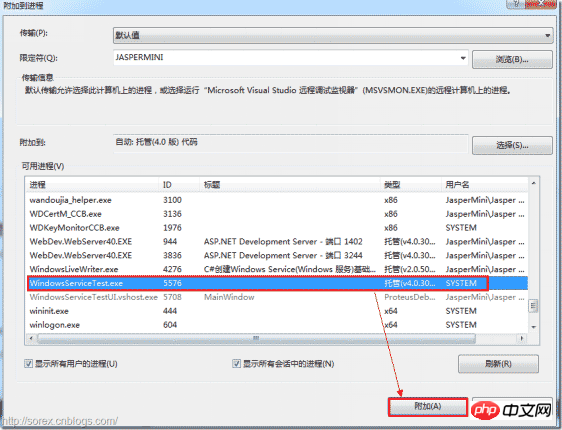
2)附加进程
3)在代码中加入断点进行调试

七、总结
本文对Windows service的上述配置都未做详细解释,但是按上述步骤就可以制作可运行的Windows Service,从而达到了工作的需求。
以上是C#編寫Windows服務程式的圖文詳解的詳細內容。更多資訊請關注PHP中文網其他相關文章!

熱AI工具

Undresser.AI Undress
人工智慧驅動的應用程序,用於創建逼真的裸體照片

AI Clothes Remover
用於從照片中去除衣服的線上人工智慧工具。

Undress AI Tool
免費脫衣圖片

Clothoff.io
AI脫衣器

Video Face Swap
使用我們完全免費的人工智慧換臉工具,輕鬆在任何影片中換臉!

熱門文章
熱工具

記事本++7.3.1
好用且免費的程式碼編輯器

SublimeText3漢化版
中文版,非常好用

禪工作室 13.0.1
強大的PHP整合開發環境

Dreamweaver CS6
視覺化網頁開發工具

SublimeText3 Mac版
神級程式碼編輯軟體(SublimeText3)


 vs code 可以在 Windows 8 中運行嗎
Apr 15, 2025 pm 07:24 PM
vs code 可以在 Windows 8 中運行嗎
Apr 15, 2025 pm 07:24 PM
VS Code可以在Windows 8上運行,但體驗可能不佳。首先確保系統已更新到最新補丁,然後下載與系統架構匹配的VS Code安裝包,按照提示安裝。安裝後,注意某些擴展程序可能與Windows 8不兼容,需要尋找替代擴展或在虛擬機中使用更新的Windows系統。安裝必要的擴展,檢查是否正常工作。儘管VS Code在Windows 8上可行,但建議升級到更新的Windows系統以獲得更好的開發體驗和安全保障。
 如何解決Laravel中復雜的BelongsToThrough關係問題?使用Composer可以!
Apr 17, 2025 pm 09:54 PM
如何解決Laravel中復雜的BelongsToThrough關係問題?使用Composer可以!
Apr 17, 2025 pm 09:54 PM
在Laravel開發中,處理複雜的模型關係一直是個挑戰,特別是當涉及到多層級的BelongsToThrough關係時。最近,我在處理一個多級模型關係的項目中遇到了這個問題,傳統的HasManyThrough關係無法滿足需求,導致數據查詢變得複雜且低效。經過一番探索,我找到了staudenmeir/belongs-to-through這個庫,它通過Composer輕鬆安裝並解決了我的困擾。
 sublime寫好代碼後如何運行
Apr 16, 2025 am 08:51 AM
sublime寫好代碼後如何運行
Apr 16, 2025 am 08:51 AM
在 Sublime 中運行代碼的方法有六種:通過熱鍵、菜單、構建系統、命令行、設置默認構建系統和自定義構建命令,並可通過右鍵單擊項目/文件運行單個文件/項目,構建系統可用性取決於 Sublime Text 的安裝情況。
 c#.net的持續相關性:查看當前用法
Apr 16, 2025 am 12:07 AM
c#.net的持續相關性:查看當前用法
Apr 16, 2025 am 12:07 AM
C#.NET依然重要,因為它提供了強大的工具和庫,支持多種應用開發。 1)C#結合.NET框架,使開發高效便捷。 2)C#的類型安全和垃圾回收機制增強了其優勢。 3).NET提供跨平台運行環境和豐富的API,提升了開發靈活性。
 vscode 無法安裝擴展
Apr 15, 2025 pm 07:18 PM
vscode 無法安裝擴展
Apr 15, 2025 pm 07:18 PM
VS Code擴展安裝失敗的原因可能包括:網絡不穩定、權限不足、系統兼容性問題、VS Code版本過舊、殺毒軟件或防火牆干擾。通過檢查網絡連接、權限、日誌文件、更新VS Code、禁用安全軟件以及重啟VS Code或計算機,可以逐步排查和解決問題。
 laravel安裝代碼
Apr 18, 2025 pm 12:30 PM
laravel安裝代碼
Apr 18, 2025 pm 12:30 PM
要安裝 Laravel,需依序進行以下步驟:安裝 Composer(適用於 macOS/Linux 和 Windows)安裝 Laravel 安裝器創建新項目啟動服務訪問應用程序(網址:http://127.0.0.1:8000)設置數據庫連接(如果需要)
 vscode 可以用於 mac 嗎
Apr 15, 2025 pm 07:36 PM
vscode 可以用於 mac 嗎
Apr 15, 2025 pm 07:36 PM
VS Code 可以在 Mac 上使用。它具有強大的擴展功能、Git 集成、終端和調試器,同時還提供了豐富的設置選項。但是,對於特別大型項目或專業性較強的開發,VS Code 可能會有性能或功能限制。

