python中如何django使用haystack:全文檢索的框架的實例講解
下面小編就為大家帶來一篇python django使用haystack:全文檢索的框架(實例講解)。小編覺得蠻不錯的,現在就分享給大家,也給大家做個參考。一起跟著小編過來看看吧
haystack:全文檢索的框架
whoosh:純Python寫的全文搜尋引擎
jieba:一個免費的中文分詞包
首先安裝這三個套件
pip install django-haystack
pip install whoosh
pip install jieba
1.修改settings.py文件,安裝應用程式haystack ,
2.在settings.py檔案中設定搜尋引擎
HAYSTACK_CONNECTIONS = {
 'default': {
  # 使用whoosh引擎
  'ENGINE': 'haystack.backends.whoosh_cn_backend.WhooshEngine',
  # 索引文件路径
  'PATH': os.path.join(BASE_DIR, 'whoosh_index'),
 }
}
# 当添加、修改、删除数据时,自动生成索引
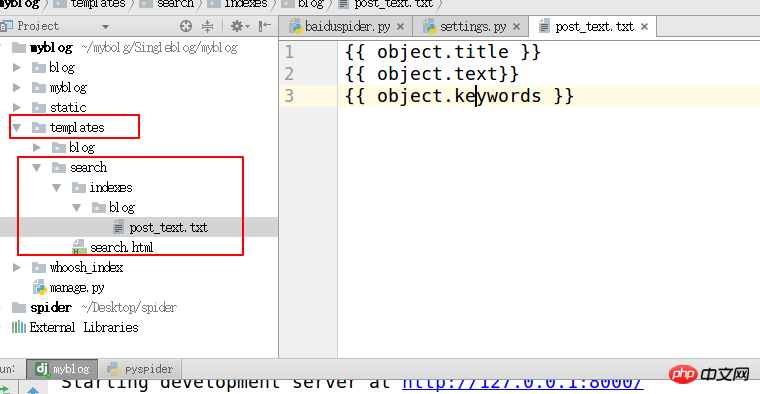
HAYSTACK_SIGNAL_PROCESSOR = 'haystack.signals.RealtimeSignalProcessor'3. 在templates目錄下建立「search/indexes/blog/」目錄採用blog應用程式名稱下方建立一個檔案blog_text.txt
#指定索引的屬性
{{ object.title }}
{{ object.text}}
{{ object.keywords }}

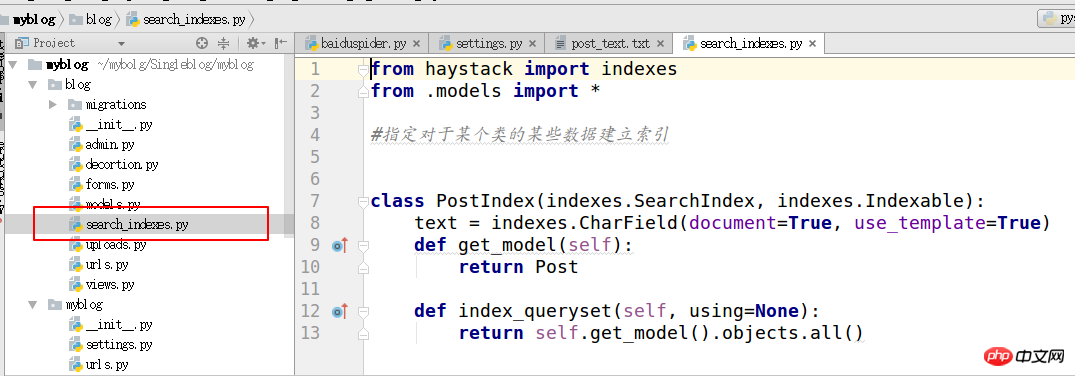
4.在需要搜尋的應用程式下方建立search_indexes
from haystack import indexes
from models import Post #指定对于某个类的某些数据建立索引
class GoodsInfoIndex(indexes.SearchIndex, indexes.Indexable):
 text = indexes.CharField(document=True, use_template=True)
 def get_model(self):
 return Post #搜索的模型类
 def index_queryset(self, using=None):
  return self.get_model().objects.all()

#
import jieba
from whoosh.analysis import Tokenizer, Token
 class ChineseTokenizer(Tokenizer):
 def __call__(self, value, positions=False, chars=False,
     keeporiginal=False, removestops=True,
     start_pos=0, start_char=0, mode='', **kwargs):
  t = Token(positions, chars, removestops=removestops, mode=mode,
     **kwargs)
  seglist = jieba.cut(value, cut_all=True)
  for w in seglist:
   t.original = t.text = w
   t.boost = 1.0
   if positions:
    t.pos = start_pos + value.find(w)
   if chars:
    t.startchar = start_char + value.find(w)
    t.endchar = start_char + value.find(w) + len(w)
   yield t
 def ChineseAnalyzer():
return ChineseTokenizer()class GoodsSearchView(SearchView): def get_context_data(self, *args, **kwargs): context = super().get_context_data(*args, **kwargs) context['iscart']=1 context['qwjs']=2 return context
url('^search/$', views.BlogSearchView.as_view())
以上是python中如何django使用haystack:全文檢索的框架的實例講解的詳細內容。更多資訊請關注PHP中文網其他相關文章!

熱AI工具

Undresser.AI Undress
人工智慧驅動的應用程序,用於創建逼真的裸體照片

AI Clothes Remover
用於從照片中去除衣服的線上人工智慧工具。

Undress AI Tool
免費脫衣圖片

Clothoff.io
AI脫衣器

Video Face Swap
使用我們完全免費的人工智慧換臉工具,輕鬆在任何影片中換臉!

熱門文章

熱工具

記事本++7.3.1
好用且免費的程式碼編輯器

SublimeText3漢化版
中文版,非常好用

禪工作室 13.0.1
強大的PHP整合開發環境

Dreamweaver CS6
視覺化網頁開發工具

SublimeText3 Mac版
神級程式碼編輯軟體(SublimeText3)
 PHP和Python:解釋了不同的範例
Apr 18, 2025 am 12:26 AM
PHP主要是過程式編程,但也支持面向對象編程(OOP);Python支持多種範式,包括OOP、函數式和過程式編程。 PHP適合web開發,Python適用於多種應用,如數據分析和機器學習。
 在PHP和Python之間進行選擇:指南
Apr 18, 2025 am 12:24 AM
PHP適合網頁開發和快速原型開發,Python適用於數據科學和機器學習。 1.PHP用於動態網頁開發,語法簡單,適合快速開發。 2.Python語法簡潔,適用於多領域,庫生態系統強大。
 sublime怎麼運行代碼python
Apr 16, 2025 am 08:48 AM
在 Sublime Text 中運行 Python 代碼,需先安裝 Python 插件,再創建 .py 文件並編寫代碼,最後按 Ctrl B 運行代碼,輸出會在控制台中顯示。
 PHP和Python:深入了解他們的歷史
Apr 18, 2025 am 12:25 AM
PHP起源於1994年,由RasmusLerdorf開發,最初用於跟踪網站訪問者,逐漸演變為服務器端腳本語言,廣泛應用於網頁開發。 Python由GuidovanRossum於1980年代末開發,1991年首次發布,強調代碼可讀性和簡潔性,適用於科學計算、數據分析等領域。
 Python vs. JavaScript:學習曲線和易用性
Apr 16, 2025 am 12:12 AM
Python更適合初學者,學習曲線平緩,語法簡潔;JavaScript適合前端開發,學習曲線較陡,語法靈活。 1.Python語法直觀,適用於數據科學和後端開發。 2.JavaScript靈活,廣泛用於前端和服務器端編程。
 Golang vs. Python:性能和可伸縮性
Apr 19, 2025 am 12:18 AM
Golang在性能和可擴展性方面優於Python。 1)Golang的編譯型特性和高效並發模型使其在高並發場景下表現出色。 2)Python作為解釋型語言,執行速度較慢,但通過工具如Cython可優化性能。
 vscode在哪寫代碼
Apr 15, 2025 pm 09:54 PM
在 Visual Studio Code(VSCode)中編寫代碼簡單易行,只需安裝 VSCode、創建項目、選擇語言、創建文件、編寫代碼、保存並運行即可。 VSCode 的優點包括跨平台、免費開源、強大功能、擴展豐富,以及輕量快速。
 notepad 怎麼運行python
Apr 16, 2025 pm 07:33 PM
在 Notepad 中運行 Python 代碼需要安裝 Python 可執行文件和 NppExec 插件。安裝 Python 並為其添加 PATH 後,在 NppExec 插件中配置命令為“python”、參數為“{CURRENT_DIRECTORY}{FILE_NAME}”,即可在 Notepad 中通過快捷鍵“F6”運行 Python 代碼。


