JavaScript實作檔案異步上傳的方法
下面小編就為大家帶來一篇原生javascript實作檔案非同步上傳的實例講解。小編覺得蠻不錯的,現在就分享給大家,也給大家做個參考。一起跟著小編過來看看吧
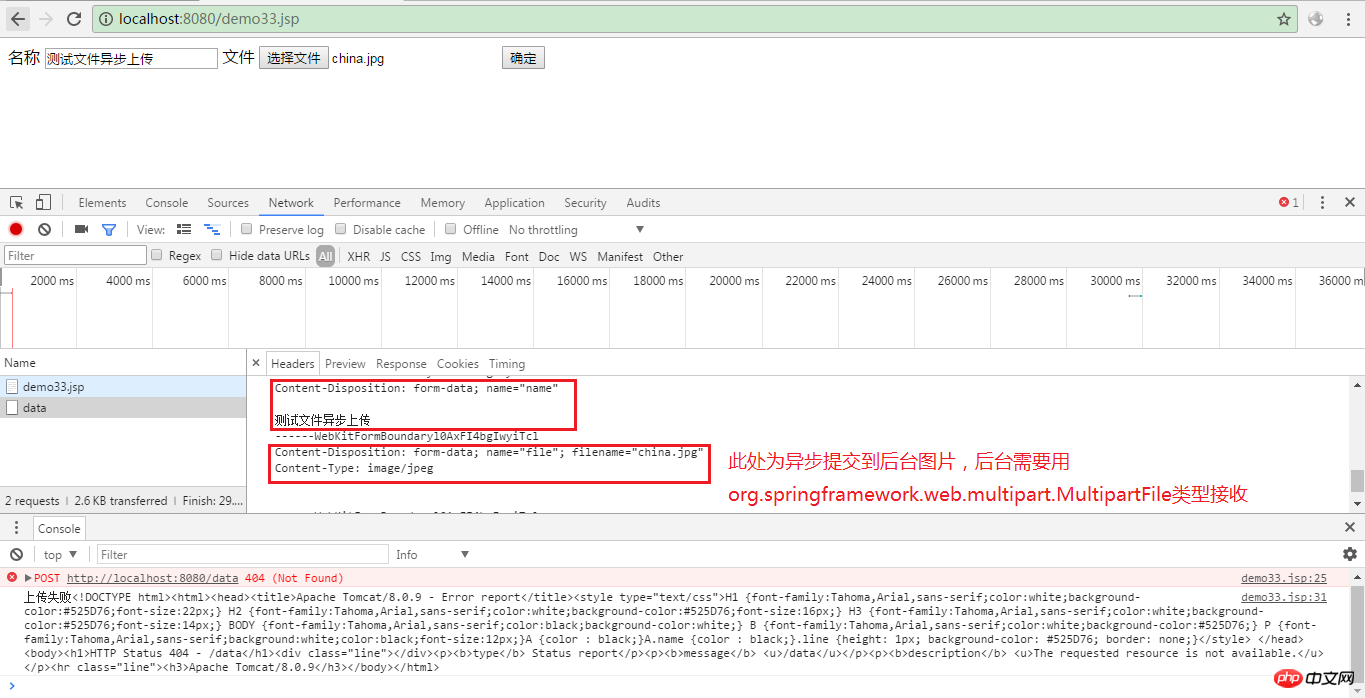
效果圖:

#(demo33.jsp)
<%@ page contentType="text/html;charset=UTF-8" language="java" %>
<html>
<head>
 <title>demo33.jsp</title>
</head>
<body>
<label for="text">名称</label>
<input type="text" id="text" name="name"/>
<label for="file">文件</label>
<input type="file" id="file" name="file"/>
<button type="button" onclick="ajaxUploadFile()">确定</button>
</body>
<script type="text/javascript">
 function ajaxUploadFile() {
  var formData = new FormData();
  var xmlhttp;
  if (window.XMLHttpRequest) {// code for IE7+, Firefox, Chrome, Opera, Safari
   xmlhttp = new XMLHttpRequest();
  }else {// code for IE6, IE5
   xmlhttp = new ActiveXObject("Microsoft.XMLHTTP");
  }
  xmlhttp.open("POST","/data",true);
  xmlhttp.setRequestHeader("X-Requested-With", "XMLHttpRequest");
  formData.append("name",document.getElementById("text").value);
  formData.append("file",document.getElementById("file").files[0]);
  xmlhttp.send(formData);
  xmlhttp.onreadystatechange=function() {
   if (xmlhttp.readyState==4) {
    if (xmlhttp.status==200) {
     console.log("上传成功"+xmlhttp.responseText);
    }else {
     console.log("上传失败"+xmlhttp.responseText);
    }
   }
  }
 }
</script>
</html>以上是JavaScript實作檔案異步上傳的方法的詳細內容。更多資訊請關注PHP中文網其他相關文章!

熱AI工具

Undresser.AI Undress
人工智慧驅動的應用程序,用於創建逼真的裸體照片

AI Clothes Remover
用於從照片中去除衣服的線上人工智慧工具。

Undress AI Tool
免費脫衣圖片

Clothoff.io
AI脫衣器

Video Face Swap
使用我們完全免費的人工智慧換臉工具,輕鬆在任何影片中換臉!

熱門文章

熱工具

記事本++7.3.1
好用且免費的程式碼編輯器

SublimeText3漢化版
中文版,非常好用

禪工作室 13.0.1
強大的PHP整合開發環境

Dreamweaver CS6
視覺化網頁開發工具

SublimeText3 Mac版
神級程式碼編輯軟體(SublimeText3)
 如何使用WebSocket和JavaScript實現線上語音辨識系統
Dec 17, 2023 pm 02:54 PM
如何使用WebSocket和JavaScript實現線上語音辨識系統引言:隨著科技的不斷發展,語音辨識技術已成為了人工智慧領域的重要組成部分。而基於WebSocket和JavaScript實現的線上語音辨識系統,具備了低延遲、即時性和跨平台的特點,成為了廣泛應用的解決方案。本文將介紹如何使用WebSocket和JavaScript來實現線上語音辨識系
 建議:優秀JS開源人臉偵測辨識項目
Apr 03, 2024 am 11:55 AM
人臉偵測辨識技術已經是一個比較成熟且應用廣泛的技術。而目前最廣泛的網路應用語言非JS莫屬,在Web前端實現人臉偵測辨識相比後端的人臉辨識有優勢也有弱勢。優點包括減少網路互動、即時識別,大大縮短了使用者等待時間,提高了使用者體驗;弱勢是:受到模型大小限制,其中準確率也有限。如何在web端使用js實現人臉偵測呢?為了實現Web端人臉識別,需要熟悉相關的程式語言和技術,如JavaScript、HTML、CSS、WebRTC等。同時也需要掌握相關的電腦視覺和人工智慧技術。值得注意的是,由於Web端的計
 WebSocket與JavaScript:實現即時監控系統的關鍵技術
Dec 17, 2023 pm 05:30 PM
WebSocket與JavaScript:實現即時監控系統的關鍵技術引言:隨著互聯網技術的快速發展,即時監控系統在各個領域中得到了廣泛的應用。而實現即時監控的關鍵技術之一就是WebSocket與JavaScript的結合使用。本文將介紹WebSocket與JavaScript在即時監控系統中的應用,並給出程式碼範例,詳細解釋其實作原理。一、WebSocket技
 股票分析必備工具:學習PHP和JS繪製蠟燭圖的步驟
Dec 17, 2023 pm 06:55 PM
股票分析必備工具:學習PHP和JS繪製蠟燭圖的步驟,需要具體程式碼範例隨著網路和科技的快速發展,股票交易已成為許多投資者的重要途徑之一。而股票分析是投資人決策的重要一環,其中蠟燭圖被廣泛應用於技術分析。學習如何使用PHP和JS繪製蠟燭圖將為投資者提供更多直觀的信息,幫助他們更好地做出決策。蠟燭圖是一種以蠟燭形狀來展示股票價格的技術圖表。它展示了股票價格的
 如何在QQ音樂上傳歌詞
Feb 23, 2024 pm 11:45 PM
隨著數位時代的到來,音樂平台成為人們獲取音樂的主要途徑之一。然而,有時候我們在聽歌的時候,發現沒有歌詞是一件十分困擾的事。許多人都希望在聽歌的時候能夠展現歌詞,以便更好地理解歌曲的內容和情感。而QQ音樂作為國內最大的音樂平台之一,也為用戶提供了上傳歌詞的功能,使得用戶可以更好地享受音樂的同時,感受到歌曲的內涵。以下將介紹一下在QQ音樂上如何上傳歌詞。首先
 酷狗上傳自己的音樂的簡單步驟
Mar 25, 2024 pm 10:56 PM
1.打開酷狗音樂,點選個人頭像。 2、點選右上角設定的圖示。 3.點選【上傳音樂作品】。 4.點選【上傳作品】。 5.選擇歌曲,然後點選【下一步】。 6.最後點選【上傳】即可。
 如何利用JavaScript和WebSocket實現即時線上點餐系統
Dec 17, 2023 pm 12:09 PM
如何利用JavaScript和WebSocket實現即時線上點餐系統介紹:隨著網路的普及和技術的進步,越來越多的餐廳開始提供線上點餐服務。為了實現即時線上點餐系統,我們可以利用JavaScript和WebSocket技術。 WebSocket是一種基於TCP協定的全雙工通訊協議,可實現客戶端與伺服器的即時雙向通訊。在即時線上點餐系統中,當使用者選擇菜餚並下訂單
 如何提升電腦上傳速度
Jan 15, 2024 pm 06:51 PM
上傳速度變得非常慢?相信這是很多朋友用電腦上傳東西時候都會遇到的一個問題,在使用電腦傳送檔案的時候如果遇到網路不穩定,上傳的速度就會很慢,那麼該怎麼提高網路上傳速度呢?下面,小編將電腦上傳速度慢的處理方式告訴大家。說到網路速度,我們都知道打開網頁的速度,下載速度,其實還有一個上傳速度也非常關鍵,特別是一些用戶經常需要上傳文件到網盤的,那麼上傳速度快無疑會給你省下不少時間,那上傳速度慢怎麼辦?下面,小編為大夥帶來了電腦上傳速度慢的處理圖文。電腦上傳速度慢怎麼解決點選「開始--執行」或「視窗鍵


