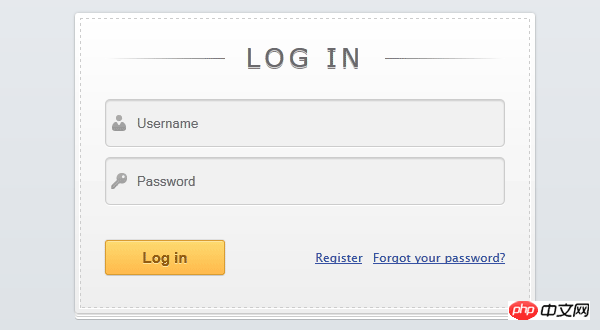
現在很多網站都有註冊頁面和登入頁面,像是淘寶京東微信等這些都需要註冊登入的,那我們要如何用html5和css3寫出這些頁呢?現在就一步一步教大家如何用html和css3寫登入頁面。
login.html程式碼如下:
<form id="login">
    <h1>Log In</h1>
    <fieldset id="inputs">
        <input id="username" type="text" placeholder="Username" autofocus required>
        <input id="password" type="password" placeholder="Password" required>
    </fieldset>
    <fieldset id="actions">
        <input type="submit" id="submit" value="Log in">
        <a href="">Forgot your password?</a><a href="">Register</a>
    </fieldset>
</form>所用到的HTML 5的特性:
placeholder – 輸入框的簡短提示,當輸入框獲得輸入焦點時,此提示訊息會自動消失
required – 指定該輸入元素是否必須提供
autofocus – 指定輸入方塊是否在頁面載入完成自動取得輸入焦點
#type =”password” – 指定密碼輸入(非HTML5專有)
CSS
#在這裡我們用到了CSS3 的一些專有屬性,包括:
Box-shadow可以幫我們製作效果很好的邊框陰影
#login
{
    box-shadow:
          0 0 2px rgba(0, 0, 0, 0.2),
          0 1px 1px rgba(0, 0, 0, .2),
          0 3px 0 #fff,
          0 4px 0 rgba(0, 0, 0, .2),
          0 6px 0 #fff,
          0 7px 0 rgba(0, 0, 0, .2);
}
Stitch effect (缝效果)
#login
{
    position: absolute;
    z-index: 0;
}

#login:before
{
    content: '';
    position: absolute;
    z-index: -1;
    border: 1px dashed #ccc;
    top: 5px;
    bottom: 5px;
    left: 5px;
    right: 5px;
    -moz-box-shadow: 0 0 0 1px #fff;
    -webkit-box-shadow: 0 0 0 1px #fff;
    box-shadow: 0 0 0 1px #fff;
}Subtle gradient lines (微妙的漸層線)
h1
{
    text-shadow: 0 1px 0 rgba(255, 255, 255, .7), 0px 2px 0 rgba(0, 0, 0, .5);
    text-transform: uppercase;
    text-align: center;
    color: #666;
    margin: 0 0 30px 0;
    letter-spacing: 4px;
    font: normal 26px/1 Verdana, Helvetica;
    position: relative;
}

h1:after, h1:before
{
    background-color: #777;
    content: "";
    height: 1px;
    position: absolute;
    top: 15px;
    width: 120px;
}

h1:after
{
    background-image: -webkit-gradient(linear, left top, right top, from(#777), to(#fff));
    background-image: -webkit-linear-gradient(left, #777, #fff);
    background-image: -moz-linear-gradient(left, #777, #fff);
    background-image: -ms-linear-gradient(left, #777, #fff);
    background-image: -o-linear-gradient(left, #777, #fff);
    background-image: linear-gradient(left, #777, #fff);
    right: 0;
}

h1:before
{
    background-image: -webkit-gradient(linear, right top, left top, from(#777), to(#fff));
    background-image: -webkit-linear-gradient(right, #777, #fff);
    background-image: -moz-linear-gradient(right, #777, #fff);
    background-image: -ms-linear-gradient(right, #777, #fff);
    background-image: -o-linear-gradient(right, #777, #fff);
    background-image: linear-gradient(right, #777, #fff);
    left: 0;
}最終結果

以上就是用html5和css3寫出的登入頁面,怎麼樣大家學會了嗎?
以上是用html5和css3寫出登入頁面教學的詳細內容。更多資訊請關注PHP中文網其他相關文章!


