本文主要為大家帶來一篇必看CSS實作Tab佈局的簡單實例。希望能讓大家對CSS Tab佈局有更清楚的認識。
一、佈局方式
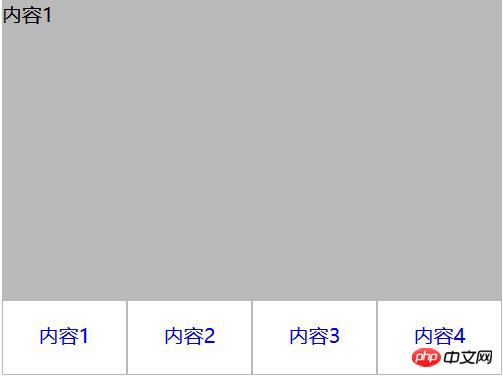
1、內容與tab分離
<p class="container">
   <p class="tab-content">
     <p id="item1" class="item">内容1</p>
     <p id="item2" class="item">内容2</p>
     <p id="item3" class="item">内容3</p>
     <p id="item4" class="item">内容4</p>
   </p>
   <p class="tab-control">
     <ul>
        <li><a href="#item1">内容1</a></li>
        <li><a href="#item2">内容2</a></li>
        <li><a href="#item3">内容3</a></li>
        <li><a href="#item4">内容4</a></li>
     </ul>
   </p>
</p>
ul,li{
  margin:0;
  padding:0;
  list-style:none;
}
.container{
  width:400px;
  height:300px;
  background-color:silver;
}
.tab-content{
  width:100%;
  height:80%;
  overflow:hidden;
}
.tab-content .item{
  width:100%;
  height:100%;
}
.tab-control{
  width:100%;
  height:20%;
}
.tab-control ul{
  height:100%;
}
.tab-control li{
  width:25%;
  height:100%;
  float:left;
  border:1px solid silver;
  box-sizing:border-box;
  background-color:white;
  cursor: pointer;
}
.tab-control li:hover{
  background-color:#7b7474
}
.tab-control a{
  display:inline-block;
  width:100%;
  height:100%;
  line-height:100%;
  text-align:center;
  text-decoration: none;
}
.tab-control a::after{
  content:"";
  display:inline-block;
  height:100%;
  vertical-align:middle;
}
.tab-content .item:target{
  background:yellow;
}

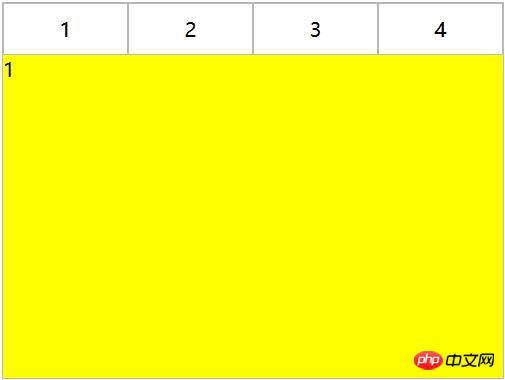
#2、內容與tab一體
<p class="container">
   <ul>
     <li class="item active">
       <p class="title">1</p>
       <p class="content">1</p>
     </li>
     <li class="item">
       <p class="title">2</p>
       <p class="content ml1">2</p>
     </li>
     <li class="item">
       <p class="title">3</p>
       <p class="content ml2">3</p>
     </li>
     <li class="item">
       <p class="title">4</p>
       <p class="content ml3">4</p>
     </li>
   </ul>
</p>
ul,li,p{
  margin:0;
  padding:0;
  list-style:none;
}
.container{
  width:400px;
  height:300px;
  background-color:silver;
  border:1px solid silver;
}
.container ul{
  width:100%;
  height:100%;
  overflow:hidden;
}
.container .item{
  float:left;
  width:25%;
  height:100%;
  background-color:white;
}
.container .item .title{
  line-height:40px;
  border:1px solid silver;
  box-sizing:border-box;
  text-align:center;
  cursor:pointer;
}
.container .item .content{
  width:400%;
  height:100%;
  background-color:yellow;
}
.ml1{
  margin-left:-100%;
}
.ml2{
  margin-left:-200%;
}
.ml3{
  margin-left:-300%;
}
.active{
  position:relative;
  z-index:1
}
.container .item:hover{
  position:relative;
  z-index:1
}
.container .item:hover .title{
  border-bottom:none;
  background-color:yellow;
}<p class="container"> <p class="tab-content"> <p id="item1" class="item">内容1</p> <p id="item2" class="item">内容2</p> <p id="item3" class="item">内容3</p> <p id="item4" class="item">内容4</p> </p> <p class="tab-control"> <ul> <li><a href="#item1">内容1</a></li> <li><a href="#item2">内容2</a></li> <li><a href="#item3">内容3</a></li> <li><a href="#item4">内容4</a></li> </ul> </p> </p>
ul,li{
  margin:0;
  padding:0;
  list-style:none;
}
.container{
  width:400px;
  height:300px;
  background-color:silver;
}
.tab-content{
  width:100%;
  height:80%;
  overflow:hidden;
}
.tab-content .item{
  width:100%;
  height:100%;
}
.tab-control{
  width:100%;
  height:20%;
}
.tab-control ul{
  height:100%;
}
.tab-control li{
  width:25%;
  height:100%;
  float:left;
  border:1px solid silver;
  box-sizing:border-box;
  background-color:white;
  cursor: pointer;
}
.tab-control li:hover{
  background-color:#7b7474
}
.tab-control a{
  display:inline-block;
  width:100%;
  height:100%;
  line-height:100%;
  text-align:center;
  text-decoration: none;
}
.tab-control a::after{
  content:"";
  display:inline-block;
  height:100%;
  vertical-align:middle;
}ul,li{
margin:0;
padding:0;
list-style:none;
}
.container{
width:400px;
height:300px;
background-color:silver;
}
.tab-content{
position:relative;
width:100%;
height:80%;
overflow:hidden;
}
.tab-content .item{
position:absolute;
left:0;
top:0;
width:100%;
height:100%;
}
.tab-control{
width:100%;
height:20%;
}
.tab-control ul{
height:100%;
}
.tab-control li{
width:25%;
height:100%;
float:left;
border:1px solid silver;
box-sizing:border-box;
background-color:white;
cursor: pointer;
}
.tab-control li:hover{
background-color:#7b7474
}
.tab-control a{
display:inline-block;
width:100%;
height:100%;
line-height:100%;
text-align:center;
text-decoration: none;
}
.tab-control a::after{
content:"";
display:inline-block;
height:100%;
vertical-align:middle;
}
.tab-content .item:target{
z-index:1;
background-color:yellow;
}<p class="container"> <ul> <li class="item active" id="item1"> <p class="title"><a href="#item1">1</a></p> <p class="content">1</p> </li> <li class="item" id="item2"> <p class="title"><a href="#item2">2</a></p> <p class="content ml1">2</p> </li> <li class="item" id="item3"> <p class="title"><a href="#item3">3</a></p> <p class="content ml2">3</p> </li> <li class="item" id="item4"> <p class="title"><a href="#item4">4</a></p> <p class="content ml3">4</p> </li> </ul> </p>
ul,
li,
p {
  margin: 0;
  padding: 0;
  list-style: none;
}

.container {
  width: 400px;
  height: 300px;
  background-color: silver;
  border: 1px solid silver;
}

.container ul {
  width: 100%;
  height: 100%;
  overflow: hidden;
}

.container .item {
  float: left;
  width: 25%;
  height: 100%;
  background-color: white;
}

.container .item .title {
  line-height: 40px;
  border: 1px solid silver;
  box-sizing: border-box;
  text-align: center;
  cursor: pointer;
}
.container .item a {
  display:inline-block;
  width:100%;
  height:100%;
  text-decoration: none;
}

.container .item .content {
  width: 400%;
  height: 100%;
  background-color: yellow;
}

.ml1 {
  margin-left: -100%;
}

.ml2 {
  margin-left: -200%;
}

.ml3 {
  margin-left: -300%;
}

.active {
  position: relative;
  z-index: 1
}

.container .item:target {
  position: relative;
  z-index: 1
}

.container .item:target .title {
  border-bottom: none;
  background-color: yellow;
}<p class="container"> <ul> <li class="item active"> <p class="title">1</p> <p class="content">1</p> </li> <li class="item"> <p class="title">2</p> <p class="content ml1">2</p> </li> <li class="item"> <p class="title">3</p> <p class="content ml2">3</p> </li> <li class="item"> <p class="title">4</p> <p class="content ml3">4</p> </li> </ul> </p>
ul,li,p{
  margin:0;
  padding:0;
  list-style:none;
}
.container{
  width:400px;
  height:300px;
  background-color:silver;
  border:1px solid silver;
}
.container ul{
  width:100%;
  height:100%;
  overflow:hidden;
}
.container .item{
  float:left;
  width:25%;
  height:100%;
  background-color:white;
}
.container .item .title{
  line-height:40px;
  border:1px solid silver;
  box-sizing:border-box;
  text-align:center;
  cursor:pointer;
}
.container .item .content{
  width:400%;
  height:100%;
  background-color:yellow;
}
.ml1{
  margin-left:-100%;
}
.ml2{
  margin-left:-200%;
}
.ml3{
  margin-left:-300%;
}
.active{
  position:relative;
  z-index:1
}
.container .item:hover{
  position:relative;
  z-index:1
}
.container .item:hover .title{
  border-bottom:none;
  background-color:yellow;
}<p class="container"> <p class="tab-content"> <input type="radio" name="item" class="radio-item" id="item1" checked/> <p class="item">内容1</p> <input type="radio" name="item" class="radio-item" id="item2" /> <p class="item">内容2</p> <input type="radio" name="item" class="radio-item" id="item3" /> <p class="item">内容3</p> <input type="radio" name="item" class="radio-item" id="item4" /> <p class="item">内容4</p> </p> <p class="tab-control"> <ul> <li><label for="item1">内容1</label></li> <li><label for="item2">内容2</label></li> <li><label for="item3">内容3</label></li> <li><label for="item4">内容4</label></li> </ul> </p> </p>
ul,
li {
  margin: 0;
  padding: 0;
  list-style: none;
}

.container {
  width: 400px;
  height: 300px;
  background-color: silver;
}

.tab-content {
  position: relative;
  width: 100%;
  height: 80%;
  overflow: hidden;
}

input {
  margin: 0;
  width: 0;
}

.tab-content .item {
  position: absolute;
  left: 0;
  top: 0;
  width: 100%;
  height: 100%;
}

.tab-control {
  width: 100%;
  height: 20%;
}

.tab-control ul {
  height: 100%;
}

.tab-control li {
  width: 25%;
  height: 100%;
  float: left;
  border: 1px solid silver;
  box-sizing: border-box;
  background-color: white;
}

.tab-control li:hover {
  background-color: #7b7474
}

.tab-control label {
  display: inline-block;
  width: 100%;
  height: 100%;
  line-height: 100%;
  text-align: center;
  text-decoration: none;
  cursor: pointer;
}

.tab-control label::after {
  content: "";
  display: inline-block;
  height: 100%;
  vertical-align: middle;
}
.tab-content .radio-item{
  display:none;
}
.tab-content .radio-item:checked+.item {
  z-index: 1;
  background-color: yellow;
}<p class="container"> <ul> <li class="item active"> <input type="radio" name="item" class="radio-item" id="item1" checked/> <label class="title" for="item1">1</label> <p class="content">1</p> </li> <li class="item"> <input type="radio" name="item" class="radio-item" id="item2" /> <label class="title" for="item2">2</label> <p class="content ml1">2</p> </li> <li class="item"> <input type="radio" name="item" class="radio-item" id="item3" /> <label class="title" for="item3">3</label> <p class="content ml2">3</p> </li> <li class="item"> <input type="radio" name="item" class="radio-item" id="item4" /> <label class="title" for="item4">4</label> <p class="content ml3">4</p> </li> </ul> </p>
ul,li,p{
  margin:0;
  padding:0;
  list-style:none;
}
.container{
  width:400px;
  height:300px;
  background-color:silver;
  border:1px solid silver;
}
.container ul{
  width:100%;
  height:100%;
  overflow:hidden;
}
.container .item{
  float:left;
  width:25%;
  height:100%;
  background-color:white;
}
.container .item .title{
  display:inline-block;
  width:100%;
  line-height:40px;
  border:1px solid silver;
  box-sizing:border-box;
  text-align:center;
  cursor:pointer;
}
.container .item .content{
  position:relative;
  width:400%;
  height:100%;
  background-color:yellow;
}
.ml1{
  margin-left:-100%;
}
.ml2{
  margin-left:-200%;
}
.ml3{
  margin-left:-300%;
}
.radio-item{
  display:none;
}
.radio-item:checked~.title{
  background-color:yellow;
  border-bottom:none;
}
.radio-item:checked~.content{
  background-color:yellow;
  z-index:1;
}以上是關於實作CSS Tab佈局的簡單實例的詳細內容。更多資訊請關注PHP中文網其他相關文章!


