

實例詳解Angular實現類似部落格評論的遞歸顯示及取得回覆評論的數據

本文主要給大家介紹了關於Angular如何實現類似博客評論的遞歸顯示及獲取回复評論的數據的相關資料,文中通過示例代碼介紹的非常詳細,對大家的學習或者工作具有一定的參考學習價值,需要的朋友們下面隨著小編來一起學習學習吧。
前言
我們在一些技術部落格中會經常看到很多遞歸評論,也即是我們可以回覆博友的評論,且界面很美觀,有梯度的顯示格式,日前在空餘時間寫類似的demo,所以記錄下來,可以給需要的人一些借鏡的作用。
好了,廢話少說,直奔主題。 。 。
思路
我們在寫後台程式的時候,常常會遇到產生類似樹的這種資料結構,我們直覺就是使用遞歸的方法來實現,起初我也是這麼想的,就是寫一個Angular4 的遞歸方法,組成一個字串,然後在介面顯示,類似下面程式碼
@Component({
 selector: "comment",
 template: '{{ comments }}'
})
export class CommentComponent {

 public comments: string = "";

 generateComment(Comment comment) {
 this.comments = this.comments + "<p>" + comment.content + "</p>";
 if (comment.pComment != null) {
  generateComment(comment.pComment);
 }
 }
}很天真的以為可以了,結果一試,標籤不會被解析,才想起已經過了解析標籤的過程了。 。 。
後來想著,現在的前端框架都是以元件化自稱, Angular4 也不例外,那麼一個Component 可以嵌入任何Component,那肯定可以嵌入自己,也就有了類似遞歸的概念了,想到這立馬試試。 。 。
具體實現
思路是這樣子,我定義了資料的格式,是每個評論下面有一個子評論數組,而不是每個評論有一個父評論,資料格式如下:
"comments":
  [
  {
   "id": 1,
   "username": "James1",
   "time": "2017-07-09 21:02:21",
   "content": "哈哈哈1<h1>哈哈哈</h1>",
   "status": 1,
   "email": "1xxxx@xx.com",
   "cComments": [
    {
    "id": 2,
    "username": "James2",
    "time": "2017-07-09 21:02:22",
    "content": "哈哈哈2",
    "status": 1,
    "email": "2xxxx@xx.com",
    "cComments": null
   }
   ]
  }
]CommentComponent 元件實作了評論模組,但是遞歸評論並不在這個元件實現,而是在子元件CommentViewComponent 中實現,因為CommentComponent 還包括一個輸入評論的文字方塊。
評論總模組ComponentComponent 程式碼:
comment.component.ts
@Component({
 selector: 'comment',
 templateUrl: './comment.component.html',
 styleUrls: ['./comment.component.css']
})
export class CommentComponent implements OnInit {

 @Input()
 public comments: Comment[];

 ngOnInit(): void {
 }
}comment.component.html
<p class="container font-small">
 <p class="row">
 <p class="col-lg-8 offset-lg-2 col-md-10 offset-md-1">

  <comment-view [comments]="comments"></comment-view>

  <p class="well" id="comment">
  <h4>{{ 'comment.leaveComment' | translate }}</h4>
  <form role="form">
   <p class="form-group">
   <input type="hidden" [(ngModel)]="id" name="id">
   <textarea [(ngModel)]="content" name="content" class="form-control" rows="5"></textarea>
   </p>
   <button type="submit" class="btn btn-primary">Submit</button>
  </form>
  </p>
 </p>
 </p>
</p>comment.component.css
.media {
 font-size: 14px;
}

.media-object {
 padding-left: 10px;
}子模組ComponentViewComponent 程式碼:
component-view.component.ts
@Component({
 selector: 'comment-view',
 templateUrl: './comment-view.component.html',
 styleUrls: ['./comment-view.component.css']
})
export class CommentViewComponent implements OnInit {
 @Input()
 public comments: Comment[];

 constructor(private router: Router,
    private activateRoute: ActivatedRoute ) {
 }

 ngOnInit(): void {
 }
}component-view.component.html
<p *ngFor="let comment of comments">
 <p class="media">
 <p class="pull-left">
  <span class="media-object"></span>
 </p>
 <p class="media-body">
  <h4 class="media-heading">{{ comment.username }}
  <small class="pull-right">{{ comment.time }} | <a href="#" rel="external nofollow" >{{ 'comment.reply' | translate }}</a></small>
  </h4>
  {{ comment.content }}
  <hr>
  <comment-view *ngIf="comment.cComments != null" [comments]="comment.cComments"></comment-view>
 </p>
 </p>
</p>comonent-view.component.css
.media {
 font-size: 14px;
}

.media-object {
 padding-left: 10px;
}結果
這時的展示結果如下圖所示:
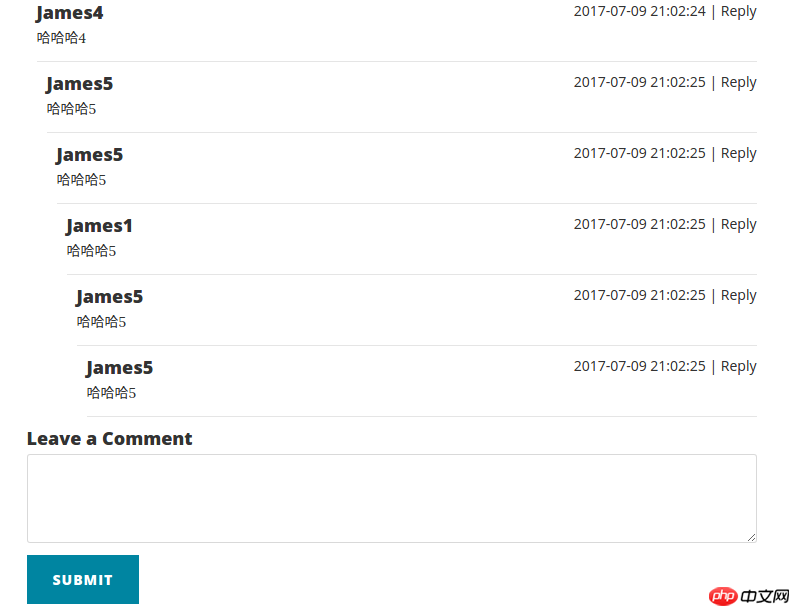
#上面只是說明如何實作註解梯形顯示,在部落格評論中我們經常看到可以回覆某一則評論,本文講述如何實現點擊某一評論的回覆按鈕後,取得該評論的內容並顯示在輸入框中。類似CSDN 部落格評論一樣,點擊回覆後輸入框自動添加了[reply]u011642663[/reply]
思路
依據上一篇文章中的評論梯形顯示,我們還需要實現點擊回覆後,螢幕自動到達輸入框位置,並且取得了點擊回覆的評論的資訊。首先分解這個功能點,在專案中我們也會經常分解功能點,這個功能點有2 個小點:一是在每個評論中加上[回覆] 按鈕,點擊回復後跳到輸入框位置;二是點擊回覆後,取得到點擊回覆的那條評論的資訊。下面我們一一解決。
跳到輸入框
我們接觸前段第一個語言便是 HTML,我們知道 HTML 中有一個 # 定位,下面程式碼簡單解釋一下。
假設這個HTML 程式碼檔案是index.html
<html>
 <head>
 </head>
 <body>
 <a href="index.html#pointer" rel="external nofollow" >Click me to pointer</a>
 <p id="pointer">
  <h1>哈哈哈哈</h1>
 </p>
 </body>
</html>
上面程式碼只要點擊Click me to pointer 這個鏈接,頁面就會跳到id=”pointer” 這個p 的位置。所以我們在實作這個點擊回覆跳到輸入框中就可以使用這個方法。
我們在comment-component.html 中將評論輸入框加入id=”comment”,接下來就是路徑拼接的問題了,我們可以透過Angular 的Router 的url 來取得本頁面的路徑,然後在這個路徑後面加入#comment 就可以實現跳轉了,下面是實現這個跳轉功能的程式碼
新增id=”comment”
#comment-component.html
<!-- Comment -->
<p class="container font-small">
 <p class="row">
 <p class="col-lg-8 offset-lg-2 col-md-10 offset-md-1">

  <comment-view [comments]="comments" (contentEvent)="getReplyComment($event)" ></comment-view>

  <p class="well" id="comment">
  <h4>{{ 'comment.leaveComment' | translate }}</h4>
  <form role="form">
   <p class="form-group">
   <input type="hidden" [(ngModel)]="id" name="id">
   <textarea [(ngModel)]="content" name="content" class="form-control" rows="5"></textarea>
   </p>
   <button type="submit" class="btn btn-primary">Submit</button>
  </form>
  </p>
 </p>
 </p>
</p>新增透過路由取得目前頁面URL
comment-view.component.ts
@Component({
 selector: 'comment-view',
 templateUrl: './comment-view.component.html',
 styleUrls: ['./comment-view.component.css']
})
export class CommentViewComponent implements OnInit {
 @Input()
 public comments: Comment[];

 // 用于跳转到回复输入框的url拼接
 public url: string = "";

 constructor(private router: Router,
    private activateRoute: ActivatedRoute ) {
 }

 ngOnInit(): void {
 this.url = this.router.url;
 this.url = this.url.split("#")[0];
 this.url = this.url + "#comment";
 }
}新增連結href=」「
comment-view.component .html
<p *ngFor="let comment of comments">
 <p class="media">
 <p class="pull-left">
  <span class="media-object"></span>
 </p>
 <p class="media-body">
  <h4 class="media-heading">{{ comment.username }}
  <small class="pull-right">{{ comment.time }} | <a href="{{url}}" rel="external nofollow" rel="external nofollow" (click)="reply(comment)" >{{ 'comment.reply' | translate }}</a></small>
  </h4>
  {{ comment.content }}
  <hr>
  <comment-view *ngIf="comment.cComments != null" [comments]="comment.cComments" (contentEvent)="transferToParent($event)"></comment-view>
 </p>
 </p>
</p>這實現了頁面跳躍的功能點,接下來實現回應的評論的資訊。
取得回覆的評論訊息
有人会说获取回复的评论信息,这不简单么?加个 click 事件不就行了。还记得上一篇文章咱们是如何实现梯形展示评论的么?咱们是通过递归来实现的,怎么添加 click 事件让一个不知道嵌了多少层的组件能够把评论信息传给父组件?首先不具体想怎么实现,我们这个思路是不是对的:把子组件的信息传给父组件?答案是肯定的,我们就是要把不管嵌了多少层的子组件的信息传给 comment.component.ts 这个评论模块的主组件。
Angular 提供了 @Output 来实现子组件向父组件传递信息,我们在 comment-view.component.ts 模块中添加 @Output 向每个调用它的父组件传信息,我们是嵌套的,这样一层一层传出来,直到传给 comment-component.ts 组件。我们看代码怎么实现。
实现代码
comment-view.component.ts
@Component({
 selector: 'comment-view',
 templateUrl: './comment-view.component.html',
 styleUrls: ['./comment-view.component.css']
})
export class CommentViewComponent implements OnInit {
 @Input()
 public comments: Comment[];
 // 点击回复时返回数据
 @Output()
 public contentEvent: EventEmitter<Comment> = new EventEmitter<Comment>();
 // 用于跳转到回复输入框的url拼接
 public url: string = "";

 constructor(private router: Router,
    private activateRoute: ActivatedRoute ) {
 }

 ngOnInit(): void {
 this.url = this.router.url;
 this.url = this.url.split("#")[0];
 this.url = this.url + "#comment";
 }

 reply(comment: Comment) {
 this.contentEvent.emit(comment);
 }

 transferToParent(event) {
 this.contentEvent.emit(event);
 }
}comment-view.component.html
<p *ngFor="let comment of comments">
 <p class="media">
 <p class="pull-left">
  <span class="media-object"></span>
 </p>
 <p class="media-body">
  <h4 class="media-heading">{{ comment.username }}
  <small class="pull-right">{{ comment.time }} | <a href="{{url}}" rel="external nofollow" rel="external nofollow" (click)="reply(comment)" >{{ 'comment.reply' | translate }}</a></small>
  </h4>
  {{ comment.content }}
  <hr>
  <comment-view *ngIf="comment.cComments != null" [comments]="comment.cComments" (contentEvent)="transferToParent($event)"></comment-view>
 </p>
 </p>
</p>comment.component.ts
@Component({
 selector: 'comment',
 templateUrl: './comment.component.html',
 styleUrls: ['./comment.component.css']
})
export class CommentComponent implements OnInit {

 @Input()
 public comments: Comment[];

 // 要回复的评论
 public replyComment: Comment = new Comment();

 public id: number = 0;
 public content: string = "";

 ngOnInit(): void {
 }

 getReplyComment(event) {
 this.replyComment = event;
 this.id = this.replyComment.id;
 this.content = "[reply]" + this.replyComment.username + "[reply]\n";
 }
}comment.component.html
<!-- Comment -->
<p class="container font-small">
 <p class="row">
 <p class="col-lg-8 offset-lg-2 col-md-10 offset-md-1">

  <comment-view [comments]="comments" (contentEvent)="getReplyComment($event)" ></comment-view>

  <p class="well" id="comment">
  <h4>{{ 'comment.leaveComment' | translate }}</h4>
  <form role="form">
   <p class="form-group">
   <input type="hidden" [(ngModel)]="id" name="id">
   <textarea [(ngModel)]="content" name="content" class="form-control" rows="5"></textarea>
   </p>
   <button type="submit" class="btn btn-primary">Submit</button>
  </form>
  </p>
 </p>
 </p>
</p>解释一下代码逻辑:
我们在 comment-view.component.ts 添加以下几点:
定义了@Output() contentEvent
添加了reply(comment: Comment) 事件在点击回复的时候触发的,触发的时候 contentEvent 将 comment 传到父模块
添加 transferToParent(event) 是接受子组件传来的 event, 并且继续将 event 传到父组件
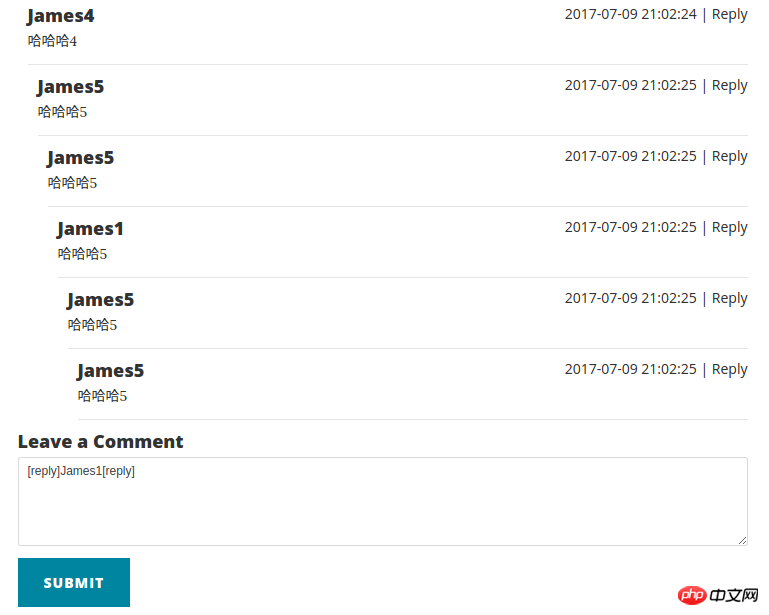
在 comment.component.ts 中定义了 getReplyComment(event) 方法,该方法接收子组件传递来的评论信息,并将信息显示在页面上。大功告成。。。
效果图
相关推荐:
如何PHP制作简易博客
以上是實例詳解Angular實現類似部落格評論的遞歸顯示及取得回覆評論的數據的詳細內容。更多資訊請關注PHP中文網其他相關文章!

熱AI工具

Undresser.AI Undress
人工智慧驅動的應用程序,用於創建逼真的裸體照片

AI Clothes Remover
用於從照片中去除衣服的線上人工智慧工具。

Undress AI Tool
免費脫衣圖片

Clothoff.io
AI脫衣器

Video Face Swap
使用我們完全免費的人工智慧換臉工具,輕鬆在任何影片中換臉!

熱門文章
熱工具

記事本++7.3.1
好用且免費的程式碼編輯器

SublimeText3漢化版
中文版,非常好用

禪工作室 13.0.1
強大的PHP整合開發環境

Dreamweaver CS6
視覺化網頁開發工具

SublimeText3 Mac版
神級程式碼編輯軟體(SublimeText3)


 華為手機如何實現雙微信登入?
Mar 24, 2024 am 11:27 AM
華為手機如何實現雙微信登入?
Mar 24, 2024 am 11:27 AM
華為手機如何實現雙微信登入?隨著社群媒體的興起,微信已成為人們日常生活中不可或缺的溝通工具之一。然而,許多人可能會遇到一個問題:在同一部手機上同時登入多個微信帳號。對於華為手機用戶來說,實現雙微信登入並不困難,本文將介紹華為手機如何實現雙微信登入的方法。首先,華為手機自帶的EMUI系統提供了一個很方便的功能-應用程式雙開。透過應用程式雙開功能,用戶可以在手機上同
 如何在Ubuntu 24.04上安裝Angular
Mar 23, 2024 pm 12:20 PM
如何在Ubuntu 24.04上安裝Angular
Mar 23, 2024 pm 12:20 PM
Angular.js是一種可自由存取的JavaScript平台,用於建立動態應用程式。它允許您透過擴展HTML的語法作為模板語言,以快速、清晰地表示應用程式的各個方面。 Angular.js提供了一系列工具,可協助您編寫、更新和測試程式碼。此外,它還提供了許多功能,如路由和表單管理。本指南將討論在Ubuntu24上安裝Angular的方法。首先,您需要安裝Node.js。 Node.js是一個基於ChromeV8引擎的JavaScript運行環境,可讓您在伺服器端執行JavaScript程式碼。要在Ub
 使用Java編寫程式碼實作愛心動畫
Dec 23, 2023 pm 12:09 PM
使用Java編寫程式碼實作愛心動畫
Dec 23, 2023 pm 12:09 PM
透過Java程式碼實現愛心動畫效果在程式設計領域中,動畫效果是非常常見且受歡迎的。可以透過Java程式碼實現各種各樣的動畫效果,其中之一就是愛心動畫效果。本文將介紹如何使用Java程式碼來實現此效果,並給出具體的程式碼範例。實現愛心動畫效果的關鍵在於繪製心形圖案,並透過改變心形的位置和顏色來實現動畫效果。下面是一個簡單範例的程式碼:importjavax.swing.
 PHP程式設計指南:實作斐波那契數列的方法
Mar 20, 2024 pm 04:54 PM
PHP程式設計指南:實作斐波那契數列的方法
Mar 20, 2024 pm 04:54 PM
程式語言PHP是一種用於Web開發的強大工具,能夠支援多種不同的程式設計邏輯和演算法。其中,實作斐波那契數列是一個常見且經典的程式設計問題。在這篇文章中,將介紹如何使用PHP程式語言來實作斐波那契數列的方法,並附上具體的程式碼範例。斐波那契數列是一個數學上的序列,其定義如下:數列的第一個和第二個元素為1,從第三個元素開始,每個元素的值等於前兩個元素的和。數列的前幾元
 如何在華為手機上實現微信分身功能
Mar 24, 2024 pm 06:03 PM
如何在華為手機上實現微信分身功能
Mar 24, 2024 pm 06:03 PM
如何在華為手機上實現微信分身功能隨著社群軟體的普及和人們對隱私安全的日益重視,微信分身功能逐漸成為人們關注的焦點。微信分身功能可以幫助使用者在同一台手機上同時登入多個微信帳號,方便管理和使用。在華為手機上實現微信分身功能並不困難,只需要按照以下步驟操作即可。第一步:確保手機系統版本和微信版本符合要求首先,確保你的華為手機系統版本已更新至最新版本,以及微信App
 掌握Golang如何實現遊戲開發的可能性
Mar 16, 2024 pm 12:57 PM
掌握Golang如何實現遊戲開發的可能性
Mar 16, 2024 pm 12:57 PM
在現今的軟體開發領域中,Golang(Go語言)作為一種高效、簡潔、並發性強的程式語言,越來越受到開發者的青睞。其豐富的標準庫和高效的並發特性使它成為遊戲開發領域的一個備受關注的選擇。本文將探討如何利用Golang來實現遊戲開發,並透過具體的程式碼範例來展示其強大的可能性。 1.Golang在遊戲開發中的優勢作為靜態類型語言,Golang正在建構大型遊戲系統
 PHP遊戲需求實作指南
Mar 11, 2024 am 08:45 AM
PHP遊戲需求實作指南
Mar 11, 2024 am 08:45 AM
PHP遊戲需求實現指南隨著網路的普及和發展,網頁遊戲的市場也越來越火爆。許多開發者希望利用PHP語言來開發自己的網頁遊戲,而實現遊戲需求是其中一個關鍵步驟。本文將介紹如何利用PHP語言來實現常見的遊戲需求,並提供具體的程式碼範例。 1.創造遊戲角色在網頁遊戲中,遊戲角色是非常重要的元素。我們需要定義遊戲角色的屬性,例如姓名、等級、經驗值等,並提供方法來操作這些
 Angular元件及其顯示屬性:了解非block預設值
Mar 15, 2024 pm 04:51 PM
Angular元件及其顯示屬性:了解非block預設值
Mar 15, 2024 pm 04:51 PM
Angular框架中元件的預設顯示行為不是區塊級元素。這種設計選擇促進了元件樣式的封裝,並鼓勵開發人員有意識地定義每個元件的顯示方式。透過明確設定CSS屬性 display,Angular組件的顯示可以完全控制,從而實現所需的佈局和響應能力。
