用vue做的專案本地是可以的,但部署到伺服器遇到好多問題:資源找不到,直接存取index.html頁面空白,刷新目前路由404。本文我們主要和大家分享vue、react等單一頁面專案部署到伺服器方法,希望能幫助大家。
由於前端路由緣故,單一頁面應用程式應該放到nginx或apache、tomcat等web代理伺服器中,千萬不要直接存取index.html,同時要根據自己伺服器的專案路徑更改react或vue的路由位址。
如果說項目是直接跟在網域後面的,例如:http://www.sosout.com ,根路由就是 '/'。
如果說項目是直接跟在網域後面的子目錄中的,例如:http://www.sosout.com/children ,根路由就是 '/children ',不能直接存取index.html。
以設定Nginx為例,設定過程大致如下:(假設:
1、專案檔目錄: /mnt/html/spa(spa目錄下的檔案就是執行了npm run dist後產生的dist目錄下的檔案)
2、造訪網域名稱:spa.sosout.com)
進入nginx.conf新增如下設定:
server {
    listen 80;
    server_name  spa.sosout.com;
    root /mnt/html/spa;
    index index.html;
    location ~ ^/favicon\.ico$ {
        root /mnt/html/spa;
    }

    location / {
        try_files $uri $uri/ /index.html;
        proxy_set_header   Host             $host;
        proxy_set_header   X-Real-IP        $remote_addr;
        proxy_set_header   X-Forwarded-For  $proxy_add_x_forwarded_for;
        proxy_set_header   X-Forwarded-Proto  $scheme;
    }
    access_log  /mnt/logs/nginx/access.log  main;
}注意事項:1、配置網域的話,需要80端口,成功後,只要訪問網域即可訪問的項目2、如果你使用了react-router的browserHistory 模式或vue-router的history 模式,在nginx設定上還需要重寫路由:
server {
    listen 80;
    server_name  spa.sosout.com;
    root /mnt/html/spa;
    index index.html;
    location ~ ^/favicon\.ico$ {
        root /mnt/html/spa;
    }

    location / {
        try_files $uri $uri/ @fallback;
        index index.html;
        proxy_set_header   Host             $host;
        proxy_set_header   X-Real-IP        $remote_addr;
        proxy_set_header   X-Forwarded-For  $proxy_add_x_forwarded_for;
        proxy_set_header   X-Forwarded-Proto  $scheme;
    }
    location @fallback {
        rewrite ^.*$ /index.html break;
    }
    access_log  /mnt/logs/nginx/access.log  main;
}為什麼要重寫路由? 因為我們的專案只有一個根入口,當輸入類似/home的url時,如果找不到對應的頁面,nginx會嘗試載入index.html,這是透過react-router就能正確的配對我們輸入的/home路由,從而顯示正確的home頁面,如果browserHistory模式或history模式的項目沒有配置上述內容,會出現404的情況。
簡單舉兩個例子,一個vue專案一個react專案:
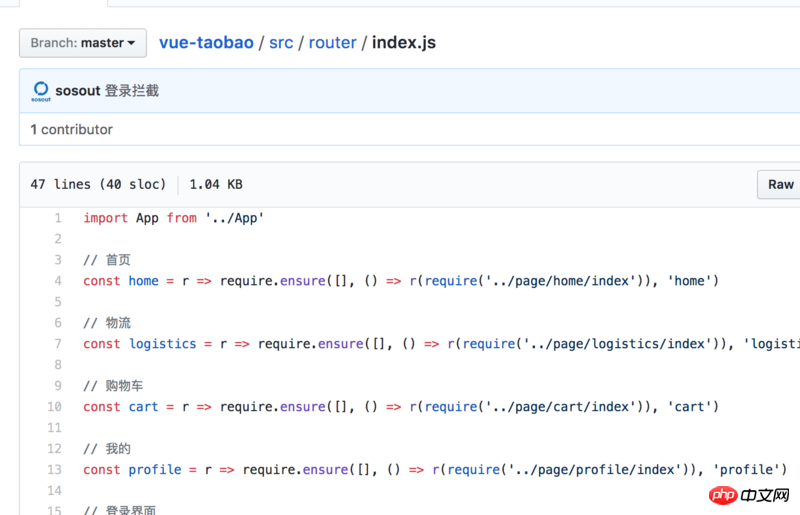
vue專案:
網域:http://tb .sosout.com

import App from '../App'

// 首页
const home = r => require.ensure([], () => r(require('../page/home/index')), 'home')

// 物流
const logistics = r => require.ensure([], () => r(require('../page/logistics/index')), 'logistics')

// 购物车
const cart = r => require.ensure([], () => r(require('../page/cart/index')), 'cart')

// 我的
const profile = r => require.ensure([], () => r(require('../page/profile/index')), 'profile')

// 登录界面
const login = r => require.ensure([], () => r(require('../page/user/login')), 'login')

export default [{
  path: '/',
  component: App, // 顶层路由,对应index.html
  children: [{
    path: '/home', // 首页
    component: home
  }, {
    path: '/logistics', // 物流
    component: logistics,
    meta: {
      login: true
    }
  }, {
    path: '/cart', // 购物车
    component: cart,
    meta: {
      login: true
    }
  }, {
    path: '/profile', // 我的
    component: profile
  }, {
    path: '/login', // 登录界面
    component: login
  }, {
    path: '*',
    redirect: '/home'
  }]
}]
############
# 其他配置
############

http {
    ############
    # 其他配置
    ############
    server {
        listen 80;
        server_name  tb.sosout.com;
        root /mnt/html/tb;
        index index.html;
        location ~ ^/favicon\.ico$ {
            root /mnt/html/tb;
        }

        location / {
            try_files $uri $uri/ @fallback;
            index index.html;
            proxy_set_header   Host             $host;
            proxy_set_header   X-Real-IP        $remote_addr;
            proxy_set_header   X-Forwarded-For  $proxy_add_x_forwarded_for;
            proxy_set_header   X-Forwarded-Proto  $scheme;
        }
        location @fallback {
            rewrite ^.*$ /index.html break;
        }
        access_log  /mnt/logs/nginx/access.log  main;
    }
    ############
    # 其他配置
    ############
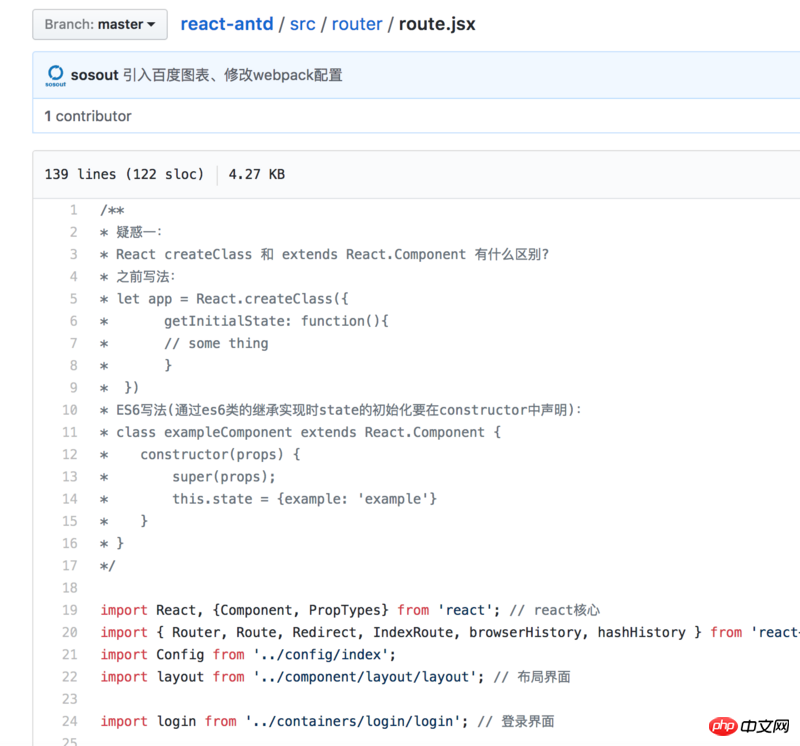
}react專案:
網域:http://antd.sosout.com

/**
* 疑惑一:
* React createClass 和 extends React.Component 有什么区别?
* 之前写法:
* let app = React.createClass({
*      getInitialState: function(){
*        // some thing
*      }
*  })
* ES6写法(通过es6类的继承实现时state的初始化要在constructor中声明):
* class exampleComponent extends React.Component {
*    constructor(props) {
*        super(props);
*        this.state = {example: 'example'}
*    }
* }
*/

import React, {Component, PropTypes} from 'react'; // react核心
import { Router, Route, Redirect, IndexRoute, browserHistory, hashHistory } from 'react-router'; // 创建route所需
import Config from '../config/index';
import layout from '../component/layout/layout'; // 布局界面

import login from '../containers/login/login'; // 登录界面

/**
 * (路由根目录组件,显示当前符合条件的组件)
 *
 * @class Roots
 * @extends {Component}
 */
class Roots extends Component {
    render() {
        // 这个组件是一个包裹组件,所有的路由跳转的页面都会以this.props.children的形式加载到本组件下
        return (
            <p>{this.props.children}</p>
        );
    }
}

// const history = process.env.NODE_ENV !== 'production' ? browserHistory : hashHistory;

// 快速入门
const home = (location, cb) => {
    require.ensure([], require => {
        cb(null, require('../containers/home/homeIndex').default)
    }, 'home');
}

// 百度图表-折线图
const chartLine = (location, cb) => {
    require.ensure([], require => {
        cb(null, require('../containers/charts/lines').default)
    }, 'chartLine');
}

// 基础组件-按钮
const button = (location, cb) => {
    require.ensure([], require => {
        cb(null, require('../containers/general/buttonIndex').default)
    }, 'button');
}

// 基础组件-图标
const icon = (location, cb) => {
    require.ensure([], require => {
        cb(null, require('../containers/general/iconIndex').default)
    }, 'icon');
}

// 用户管理
const user = (location, cb) => {
    require.ensure([], require => {
        cb(null, require('../containers/user/userIndex').default)
    }, 'user');
}

// 系统设置
const setting = (location, cb) => {
    require.ensure([], require => {
        cb(null, require('../containers/setting/settingIndex').default)
    }, 'setting');
}

// 广告管理
const adver = (location, cb) => {
    require.ensure([], require => {
        cb(null, require('../containers/adver/adverIndex').default)
    }, 'adver');
}

// 组件一
const oneui = (location, cb) => {
    require.ensure([], require => {
        cb(null, require('../containers/ui/oneIndex').default)
    }, 'oneui');
}

// 组件二
const twoui = (location, cb) => {
    require.ensure([], require => {
        cb(null, require('../containers/ui/twoIndex').default)
    }, 'twoui');
}

// 登录验证
const requireAuth = (nextState, replace) => {
    let token = (new Date()).getTime() - Config.localItem('USER_AUTHORIZATION');
    if(token > 7200000) { // 模拟Token保存2个小时
        replace({
            pathname: '/login',
            state: { nextPathname: nextState.location.pathname }
        });
    }
}

const RouteConfig = (
    <Router history={browserHistory}>
        <Route path="/home" component={layout} onEnter={requireAuth}>
            <IndexRoute getComponent={home} onEnter={requireAuth} /> // 默认加载的组件,比如访问www.test.com,会自动跳转到www.test.com/home
            <Route path="/home" getComponent={home} onEnter={requireAuth} />
            <Route path="/chart/line" getComponent={chartLine} onEnter={requireAuth} />
            <Route path="/general/button" getComponent={button} onEnter={requireAuth} />
            <Route path="/general/icon" getComponent={icon} onEnter={requireAuth} />
            <Route path="/user" getComponent={user} onEnter={requireAuth} />
            <Route path="/setting" getComponent={setting} onEnter={requireAuth} />
            <Route path="/adver" getComponent={adver} onEnter={requireAuth} />
            <Route path="/ui/oneui" getComponent={oneui} onEnter={requireAuth} />
            <Route path="/ui/twoui" getComponent={twoui} onEnter={requireAuth} />
        </Route>
        <Route path="/login" component={Roots}> // 所有的访问,都跳转到Roots
            <IndexRoute component={login} /> // 默认加载的组件,比如访问www.test.com,会自动跳转到www.test.com/home
        </Route>
        <Redirect from="*" to="/home" />
    </Router>
);

export default RouteConfig; ##
##
############
# 其他配置
############

http {
    ############
    # 其他配置
    ############
    server {
        listen 80;
        server_name  antd.sosout.com;
        root /mnt/html/reactAntd;
        index index.html;
        location ~ ^/favicon\.ico$ {
            root /mnt/html/reactAntd;
        }

        location / {
            try_files $uri $uri/ @router;
            index index.html;
            proxy_set_header   Host             $host;
            proxy_set_header   X-Real-IP        $remote_addr;
            proxy_set_header   X-Forwarded-For  $proxy_add_x_forwarded_for;
            proxy_set_header   X-Forwarded-Proto  $scheme;
        }
        location @router {
            rewrite ^.*$ /index.html break;
        }
        access_log  /mnt/logs/nginx/access.log  main;
    }

    ############
    # 其他配置
    ############
}
#
以上是vue、react等單一頁面項目部署到伺服器方法的詳細內容。更多資訊請關注PHP中文網其他相關文章!


