

通用的等速運動框架如何打造

本文主要為大家帶來一篇打造通用的勻速運動框架(實例講解)。小編覺得蠻不錯的,現在就分享給大家,也給大家做個參考。一起跟著小編過來看看吧,希望能幫助大家。
本文,是接著上基於勻速運動的實例講解(側邊欄,淡入淡出) 繼續的,在這篇文章的最後,我們做了2個小實例:側側邊欄與改變透明度的淡入淡出效果,本文我們把上文的animate函數,繼續改造,讓他變得更加的通用與強大:
1,支援多個物體的運動
2,同時運動
3,順序運動
這三種運動方式也是jquery中animate函數支援的
#一、animate函數中怎麼區分變化不同的樣式?
上文中,側邊欄效果用的animate函數改變的是left值
function animate(obj, target, speed) {
 clearInterval(timer);
 timer = setInterval(function () {
 if (obj.offsetLeft == target) {
  clearInterval(timer);
 } else {
  obj.style.left = obj.offsetLeft + speed + 'px';
 }
 }, 30);
}淡入淡出效果用的animate函數改變的是透明度
function animate(obj, target, speed) {
  clearInterval(timer);
  var cur = 0;
  timer = setInterval(function () {
   cur = css( obj, 'opacity') * 100;
   if( cur == target ){
   clearInterval( timer );
   }else {
   cur += speed;
   obj.style.opacity = cur / 100;
   obj.style.filter = "alpha(opacity:" + cur + ")";
   }
  }, 30);
}而我們封裝的函數,要變成通用的,首先面臨的問題就是這個函數要同時支援left值和透明度的變化,更通用的做法應該是要支援所有的樣式變化,例如輪播功能,他有左右滑動,也有上下滑動。
我們可以在取得樣式和改變樣式的時候,做判斷就好了,判斷分2類就能達到目的,因為其他樣式( margin, left, top, right, font-size等等)都是px,而透明度沒有px單位
function animate(obj, attr, target, speed) {
 clearInterval(timer);
 var cur = 0;
 timer = setInterval(function () {
 if (attr == 'opacity') {
  cur = css(obj, 'opacity') * 100;
 } else {
  cur = parseInt(css(obj, attr));
 }

 if (cur == target) {
  clearInterval(timer);
 } else {
  if (attr == 'opacity') {
  obj.style.opacity = ( cur + speed ) / 100;
  obj.style.filter = "alpha(opacity:" + (cur + speed) + ")";
  } else {
  obj.style[attr] = cur + speed + "px";
  }
 }
 }, 30);
}合併之後的animate相比之前多了一個參數attr, 這個參數就是變化的樣式,obj: 變化的對象, target: 樣式需要變化到的目標值. speed: 樣式每次變化的大小
如:
oImg.onmouseover = function () {
  animate(this, 'opacity', 100, 10);
}oImg是獲取到的圖片物件. 這裡各參數意思如下:
this:當前圖片物件
opacity: 變化的樣式是透明度
100: 滑鼠移到圖片上時,透明度變成100
10: 透明度每次在原來的基礎上加10
<!doctype html>
<html lang="en">
<head>
<meta charset="UTF-8">
<title>合并的运动 - by ghostwu</title>
<style>
img {
border: none;
opacity: 0.3;
filter: alpha(opacity:30);
position: absolute;
left: 200px;
}
#box {
width: 150px;
height: 300px;
background: red;
position: absolute;
left: -150px;
top: 50px;
}
#box p {
width: 28px;
height: 100px;
position: absolute;
right: -28px;
top: 100px;
background: green;
}
</style>
<script>
window.onload = function () {
var oImg = document.getElementById("img"),
oBox = document.getElementById("box"),
timer = null;
oImg.onmouseover = function () {
animate(this, 'opacity', 100, 10);
}
oImg.onmouseout = function () {
animate(this, 'opacity', 30, -10);
}
oBox.onmouseover = function () {
animate(this, 'left', 0, 10);
}
oBox.onmouseout = function () {
animate(this, 'left', -150, -10);
}
function animate(obj, attr, target, speed) {
clearInterval(timer);
var cur = 0;
timer = setInterval(function () {
if (attr == 'opacity') {
cur = css(obj, 'opacity') * 100;
} else {
cur = parseInt(css(obj, attr));
}
if (cur == target) {
clearInterval(timer);
} else {
if (attr == 'opacity') {
obj.style.opacity = ( cur + speed ) / 100;
obj.style.filter = "alpha(opacity:" + (cur + speed) + ")";
} else {
obj.style[attr] = cur + speed + "px";
}
}
}, 30);
}
function css(obj, attr) {
if (obj.currentStyle) {
return obj.currentStyle[attr];
} else {
return getComputedStyle(obj, false)[attr];
}
}
}
</script>
</head>
<body>
<p id="box">
<p>分享到</p>
</p>
<img src="./img/h4.jpg" alt="" id="img"/>
</body>
</html>上述就是完整的程式碼實例。
當你分別測試這兩個功能的時候:
移動到圖片上然後移出來
移動到分享到,然後移出來
#這樣是沒有問題的
如果你這樣測試:
移動到分享到,然後迅速又移動到圖片上, 這個時候你會發現分享到停下來了,這就不符合邏輯了! 照道理來說,滑鼠移動到圖片上,相當於觸發了「分享到」 的mouseout( 滑鼠移出事件),那麼"分享到" 這個時候要隱藏,並不是停止。 為什麼會這樣呢?因為這兩個運動共享了一個定時器,當滑鼠移動到圖片上,開啟定時器的時候,把「分享到」的定時器給停了。那麼再做多物體運動的時候,我們要把定時器拆分,每個物件都要有一個定時器,怎麼做呢? 非常簡單,不要定義一個簡單的timer變量,我們只要把timer加在obj物件上,那麼每個物件都有一個timer屬性,就達到計時器的分離效果了
#修改之後的完整程式碼如下,請自行展開:
<!doctype html>
<html lang="en">
<head>
<meta charset="UTF-8">
<title>Document</title>
<style>
img {
border: none;
opacity: 0.3;
filter: alpha(opacity:30);
position: absolute;
left: 200px;
}
#box {
width: 150px;
height: 300px;
background: red;
position: absolute;
left: -150px;
top: 50px;
}
#box p {
width: 28px;
height: 100px;
position: absolute;
right: -28px;
top: 100px;
background: green;
}
</style>
<script>
window.onload = function () {
var oImg = document.getElementById("img"),
oBox = document.getElementById("box");
oImg.onmouseover = function () {
animate(this, 'opacity', 100, 10);
}
oImg.onmouseout = function () {
animate(this, 'opacity', 30, -10);
}
oBox.onmouseover = function () {
animate(this, 'left', 0, 10);
}
oBox.onmouseout = function () {
animate(this, 'left', -150, -10);
}
function animate(obj, attr, target, speed) {
clearInterval(obj.timer);
var cur = 0;
obj.timer = setInterval(function () {
if (attr == 'opacity') {
cur = css(obj, 'opacity') * 100;
} else {
cur = parseInt(css(obj, attr));
}
if (cur == target) {
clearInterval(obj.timer);
} else {
if (attr == 'opacity') {
obj.style.opacity = ( cur + speed ) / 100;
obj.style.filter = "alpha(opacity:" + (cur + speed) + ")";
} else {
obj.style[attr] = cur + speed + "px";
}
}
}, 30);
}
function css(obj, attr) {
if (obj.currentStyle) {
return obj.currentStyle[attr];
} else {
return getComputedStyle(obj, false)[attr];
}
}
}
</script>
</head>
<body>
<p id="box">
<p>分享到</p>
</p>
<img src="./img/h4.jpg" alt="" id="img"/>
</body>
</html>至此,我們就完成了多物體運動與不同樣式的修改
##二、讓animate函數支援多個樣式同時改變
例如:
#
oBox.onmouseover = function(){
  animate( this, { "width" : 500, "height" : 400 }, 10 );
}<!doctype html>
<html lang="en">
<head>
<meta charset="UTF-8">
<title>Document</title>
<style>
p {
width: 200px;
height: 200px;
background: red;
}
</style>
<script>
window.onload = function () {
var oBox = document.getElementById("box");
oBox.onmouseover = function(){
// animate( this, { "width" : 500, "height" : 500 }, 10 );
animate( this, { "width" : 500, "height" : 400 }, 10 );
}
function animate(obj, attr, speed) {
clearInterval(obj.timer);
var cur = 0;
obj.timer = setInterval(function () {
for ( var key in attr ) {
if (key == 'opacity') {
cur = css(obj, 'opacity') * 100;
} else {
cur = parseInt(css(obj, key));
}
var target = attr[key];
if (cur == target) {
clearInterval(obj.timer);
} else {
if (key == 'opacity') {
obj.style.opacity = ( cur + speed ) / 100;
obj.style.filter = "alpha(opacity:" + (cur + speed) + ")";
} else {
obj.style[key] = cur + speed + "px";
}
}
}
}, 30);
}
function css(obj, attr) {
if (obj.currentStyle) {
return obj.currentStyle[attr];
} else {
return getComputedStyle(obj, false)[attr];
}
}
}
</script>
</head>
<body>
<p id="box"></p>
</body>
</html>var target = attr[key]; console.log( key, cur, target );
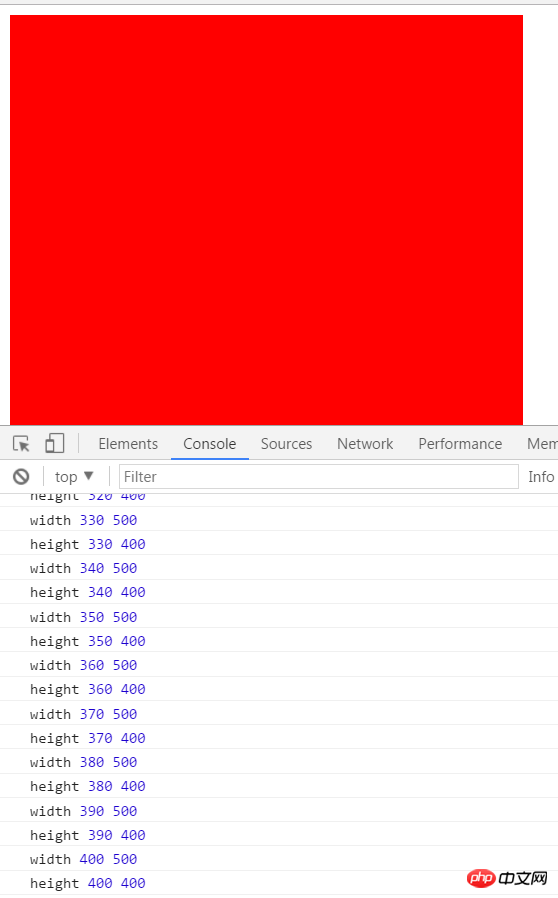
从上图可以看出,height已经达到了400px,但是width停在了410px,为什么不是400px ? 因为width = 400的时候, 就是( cur == 500 ) 相当于( 400 == 500 ) 不成立,所以执行了else语句,width = cur + 10 = 400 + 10 = 410,然后height到达400px停止了定时器,所以width停在了410px.
那么我们怎么解决这个问题呢?
其实也好办,就是height = 400的时候 不要把定时器关了,应该等width = 500的时候再关闭定时器,不就在同一时间,完成了同时到达目标的效果吗?
修改后的代码如下:
<!doctype html>
<html lang="en">
<head>
<meta charset="UTF-8">
<title>Document</title>
<style>
p {
width: 200px;
height: 200px;
background: red;
}
</style>
<script>
window.onload = function () {
var oBox = document.getElementById("box");
oBox.onmouseover = function(){
animate( this, { "width" : 500, "height" : 400 }, 10 );
}
function animate(obj, attr, speed) {
clearInterval(obj.timer);
var cur = 0;
obj.timer = setInterval(function () {
var bFlag = true;
for ( var key in attr ) {
if (key == 'opacity') {
cur = css(obj, 'opacity') * 100;
} else {
cur = parseInt(css(obj, key));
}
var target = attr[key];
if (cur != target) {
bFlag = false;
if (key == 'opacity') {
obj.style.opacity = ( cur + speed ) / 100;
obj.style.filter = "alpha(opacity:" + (cur + speed) + ")";
} else {
obj.style[key] = cur + speed + "px";
}
}
}
if ( bFlag ) {
clearInterval( obj.timer );
}
}, 30);
}
function css(obj, attr) {
if (obj.currentStyle) {
return obj.currentStyle[attr];
} else {
return getComputedStyle(obj, false)[attr];
}
}
}
</script>
</head>
<body>
<p id="box"></p>
</body>
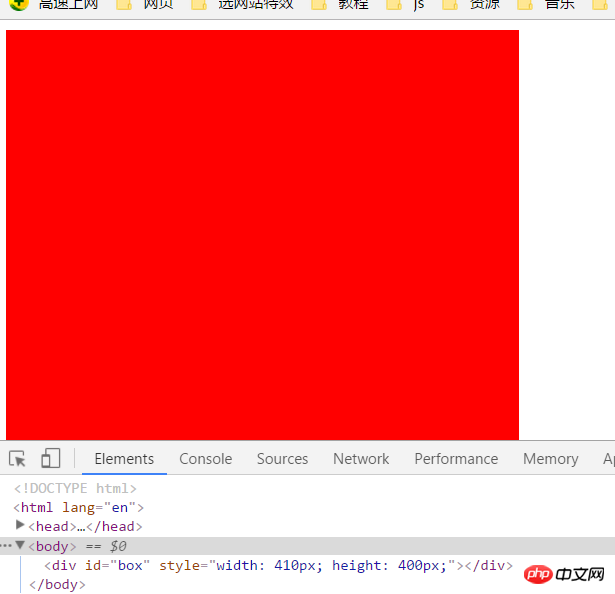
</html>声明一个变量,每次变化完一次( width, height )样式 把bFlag = true, 只要在for循环中有一个没有到达目标,bFlag的值都是false,这样就不会关闭定时器。当两个都到达目标,才关闭定时器.
三、顺序运动
如样式变化,按顺序来,不是同时变化, 如:
oBox.onmouseover = function(){
//回调函数: 把函数当做参数传递给另一个函数
  animate( this, { 'width' : 500 }, 10, function(){
    animate( this, { 'height' : 500 }, 10 );
  } );
}当把width变成500px的时候,如果传递了回调函数, 再接着执行回调函数里面的运动
修改后的完整代码:
<!DOCTYPE html>
<html>
<head lang="en">
<meta charset="UTF-8">
<title>通用的匀速运动框架 - by ghostwu</title>
<style>
p {
width: 200px;
height: 200px;
background: red;
}
</style>
<script>
window.onload = function () {
var oBox = document.getElementById("box");
oBox.onmouseover = function(){
//回调函数: 把函数当做参数传递给另一个函数
animate( this, { 'width' : 500 }, 10, function(){
animate( this, { 'height' : 500 }, 10 );
} );
}
function animate(obj, attr, speed, fn ) {
clearInterval(obj.timer);
var cur = 0;
obj.timer = setInterval(function () {
var bFlag = true;
for (var key in attr) {
if (key == 'opacity') {
cur = css(obj, 'opacity') * 100;
} else {
cur = parseInt(css(obj, key));
}
var target = attr[key];
if (cur != target) {
bFlag = false;
if (key == 'opacity') {
obj.style.opacity = ( cur + speed ) / 100;
obj.style.filter = "alpha(opacity:" + (cur + speed) + ")";
} else {
obj.style[key] = cur + speed + "px";
}
}
}
if (bFlag) {
clearInterval(obj.timer);
fn && fn.call( obj );
}
}, 30);
}
function css(obj, attr) {
if (obj.currentStyle) {
return obj.currentStyle[attr];
} else {
return getComputedStyle(obj, false)[attr];
}
}
}
</script>
</head>
<body>
<p id="box"></p>
</body>
</html>相关推荐:
浅谈Javascript如何实现匀速运动_javascript技巧
以上是通用的等速運動框架如何打造的詳細內容。更多資訊請關注PHP中文網其他相關文章!

熱AI工具

Undresser.AI Undress
人工智慧驅動的應用程序,用於創建逼真的裸體照片

AI Clothes Remover
用於從照片中去除衣服的線上人工智慧工具。

Undress AI Tool
免費脫衣圖片

Clothoff.io
AI脫衣器

Video Face Swap
使用我們完全免費的人工智慧換臉工具,輕鬆在任何影片中換臉!

熱門文章
熱工具

記事本++7.3.1
好用且免費的程式碼編輯器

SublimeText3漢化版
中文版,非常好用

禪工作室 13.0.1
強大的PHP整合開發環境

Dreamweaver CS6
視覺化網頁開發工具

SublimeText3 Mac版
神級程式碼編輯軟體(SublimeText3)


 如何評估Java框架商業支援的性價比
Jun 05, 2024 pm 05:25 PM
如何評估Java框架商業支援的性價比
Jun 05, 2024 pm 05:25 PM
評估Java框架商業支援的性價比涉及以下步驟:確定所需的保障等級和服務等級協定(SLA)保證。研究支持團隊的經驗和專業知識。考慮附加服務,如昇級、故障排除和效能最佳化。權衡商業支援成本與風險緩解和提高效率。
 PHP 框架的學習曲線與其他語言框架相比如何?
Jun 06, 2024 pm 12:41 PM
PHP 框架的學習曲線與其他語言框架相比如何?
Jun 06, 2024 pm 12:41 PM
PHP框架的學習曲線取決於語言熟練度、框架複雜性、文件品質和社群支援。與Python框架相比,PHP框架的學習曲線較高,而與Ruby框架相比,則較低。與Java框架相比,PHP框架的學習曲線中等,但入門時間較短。
 Java框架的效能比較
Jun 04, 2024 pm 03:56 PM
Java框架的效能比較
Jun 04, 2024 pm 03:56 PM
根據基準測試,對於小型、高效能應用程序,Quarkus(快速啟動、低記憶體)或Micronaut(TechEmpower優異)是理想選擇。 SpringBoot適用於大型、全端應用程序,但啟動時間和記憶體佔用稍慢。
 PHP 框架的輕量級選項如何影響應用程式效能?
Jun 06, 2024 am 10:53 AM
PHP 框架的輕量級選項如何影響應用程式效能?
Jun 06, 2024 am 10:53 AM
輕量級PHP框架透過小體積和低資源消耗提升應用程式效能。其特點包括:體積小,啟動快,記憶體佔用低提升響應速度和吞吐量,降低資源消耗實戰案例:SlimFramework創建RESTAPI,僅500KB,高響應性、高吞吐量
 golang框架文件最佳實踐
Jun 04, 2024 pm 05:00 PM
golang框架文件最佳實踐
Jun 04, 2024 pm 05:00 PM
編寫清晰全面的文件對於Golang框架至關重要。最佳實踐包括:遵循既定文件風格,例如Google的Go程式設計風格指南。使用清晰的組織結構,包括標題、子標題和列表,並提供導覽。提供全面且準確的信息,包括入門指南、API參考和概念。使用程式碼範例說明概念和使用方法。保持文件更新,追蹤變更並記錄新功能。提供支援和社群資源,例如GitHub問題和論壇。建立實際案例,如API文件。
 如何為不同的應用場景選擇最佳的golang框架
Jun 05, 2024 pm 04:05 PM
如何為不同的應用場景選擇最佳的golang框架
Jun 05, 2024 pm 04:05 PM
根據應用場景選擇最佳Go框架:考慮應用類型、語言特性、效能需求、生態系統。常見Go框架:Gin(Web應用)、Echo(Web服務)、Fiber(高吞吐量)、gorm(ORM)、fasthttp(速度)。實戰案例:建構RESTAPI(Fiber),與資料庫互動(gorm)。選擇框架:效能關鍵選fasthttp,靈活Web應用選Gin/Echo,資料庫互動選gorm。
 零零科技推出 8K 運動飛行相機:哈浮飛行相機 X1 PRO 與 X1 PROMAX
Aug 28, 2024 pm 03:31 PM
零零科技推出 8K 運動飛行相機:哈浮飛行相機 X1 PRO 與 X1 PROMAX
Aug 28, 2024 pm 03:31 PM
飛行相機開創者零零科技宣布推出哈浮飛行相機X1PRO與X1PROMAX,並已於北京時間8月27日凌晨在Indiegogo開啟眾籌,上線145分鐘,眾籌金額即突破百萬美金,創造了飛行相機新紀錄。兩款產品作為全球首款也是最先進的飛行運動相機,重新定義了飛行拍攝體驗,特別適合運動愛好者與專業內容創作者。哈浮飛行相機X1PRO和X1PROMAX可折疊設計,無需遙控器互動體驗。 X1PROMAX:1/1.3吋CMOS感測器,客製7層鏡頭。 8K視頻,14檔動態範圍,107°廣角視野。可自訂的ND濾鏡。 X
 Java框架學習路線圖:不同領域中的最佳實踐
Jun 05, 2024 pm 08:53 PM
Java框架學習路線圖:不同領域中的最佳實踐
Jun 05, 2024 pm 08:53 PM
針對不同領域的Java框架學習路線圖:Web開發:SpringBoot和PlayFramework。持久層:Hibernate和JPA。服務端響應式程式設計:ReactorCore和SpringWebFlux。即時計算:ApacheStorm和ApacheSpark。雲端運算:AWSSDKforJava和GoogleCloudJava。
