

Angular結合zTree非同步載入節點資料實例分享

本文主要和大家分享了Angular結合zTree非同步載入節點資料的困難點以及方法,有這方面需求的朋友參考下吧,希望能幫助到大家。
1 前提準備
1.1 新建一個angular4專案

1.2 去zTree官網下載zTree
zTree官網:點選前往
三少使用的版本:點選前往

#2 程式設計步驟
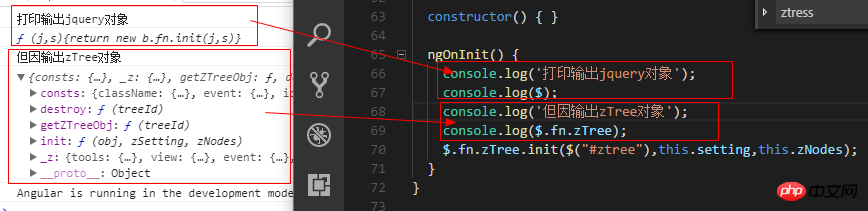
##從列印出zTree物件可以看出,zTree物件利用init方法來實作zTree結構;init方法接收三個參數
參數1:一個ul標籤的DOM節點物件
參數2:基本配置物件
參數3:標題資訊陣列
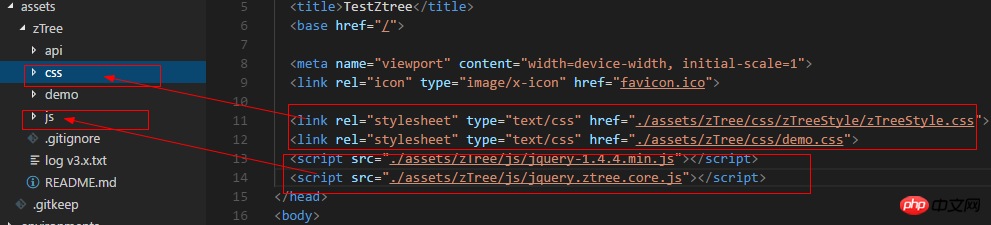
2.1 在index.html中引入相關js、css
##
<!doctype html>
<html lang="en">
<head>
 <meta charset="utf-8">
 <title>TestZtree</title>
 <base href="/" rel="external nofollow" >

 <meta name="viewport" content="width=device-width, initial-scale=1">
 <link rel="icon" type="image/x-icon" href="favicon.ico" rel="external nofollow" >

 <link rel="stylesheet" type="text/css" href="./assets/zTree/css/zTreeStyle/zTreeStyle.css" rel="external nofollow" >
 <link rel="stylesheet" type="text/css" href="./assets/zTree/css/demo.css" rel="external nofollow" >
 <script src="./assets/zTree/js/jquery-1.4.4.min.js"></script>
 <script src="./assets/zTree/js/jquery.ztree.core.js"></script>
</head>
<body>
 <app-root></app-root>
</body>
</html>
declare var $ : any;
import { Component, OnInit } from '@angular/core';
declare var $ : any;
@Component({
selector: 'app-root',
templateUrl: './app.component.html',
styleUrls: ['./app.component.scss']
})
export class AppComponent implements OnInit {
// setting = {
// view: {
// showLine: true,
// showIcon: true,
// fontCss: this.getFont
// },
// data: {
// simpleData: {
// enable: true,
// idKey: 'id',
// pIdKey: 'pId'
// }
// },
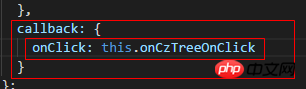
// callback: {
// onClick: this.onCzTreeOnClick
// }
// };
// zNodes = [
// {id: 1, pId: 0, name: '1 一级标题', open: true, iconOpen:"assets/zTree/css/zTreeStyle/img/diy/1_open.png", iconClose:"assets/zTree/css/zTreeStyle/img/diy/1_close.png"},
// {id: 11, pId: 1, name: '1.1 二级标题', open: true, font:{'background-color':'skyblue', 'color':'white'}},
// {id: 111, pId: 11, name: '1.1.1 三级标题 -> 博客园', url: 'http://www.cnblogs.com/NeverCtrl-C/'},
// {id: 112, pId: 11, name: '1.1.2 三级标题 -> 单击', click: "alert('你单击了')"},
// {id: 12, pId: 1, name: '1.2 二级标题'},
// {id: 2, pId: 0, name: '2 一级标题'}
// ]
// getFont(treeId, node) {
// return node.font ? node.font : {};
// }
// onCzTreeOnClick(event, treeId, treeNode, clickFlag) {
// alert(treeNode.name);
// }
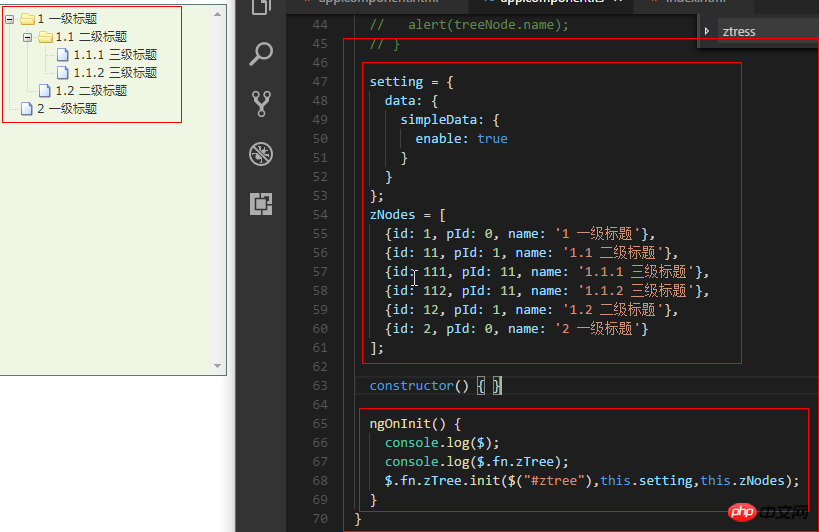
setting = {
data: {
simpleData: {
enable: true
}
}
};
zNodes = [
{id: 1, pId: 0, name: '1 一级标题'},
{id: 11, pId: 1, name: '1.1 二级标题'},
{id: 111, pId: 11, name: '1.1.1 三级标题'},
{id: 112, pId: 11, name: '1.1.2 三级标题'},
{id: 12, pId: 1, name: '1.2 二级标题'},
{id: 2, pId: 0, name: '2 一级标题'}
];
constructor() { }
ngOnInit() {
console.log($);
console.log($.fn.zTree);
$.fn.zTree.init($("#ztree"),this.setting,this.zNodes);
}
}<ul class="ztree"><ul></ul>
 ##3.1.2 程式設計步驟
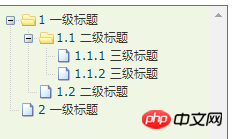
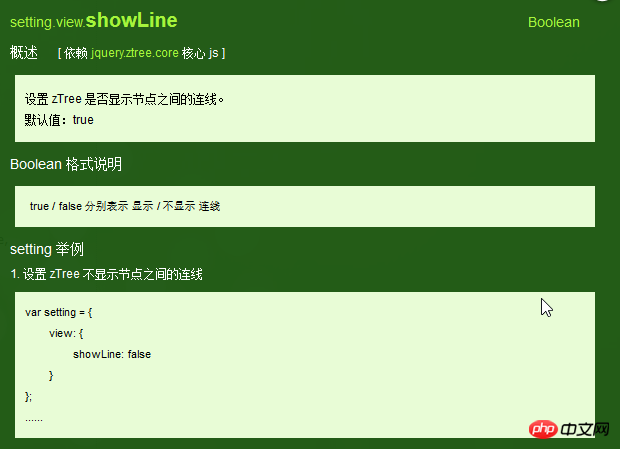
在基本設定物件中指定showLine屬性的值為false即可
 setting = {
 data: {
 simpleData: {
 enable: true
 }
 },
 view: {
 showLine: false
 }
};3.2 不顯示節點圖示
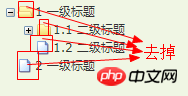
3.2.1 官方文件
去掉節點前面的圖示
 3.2.2 程式設計步驟
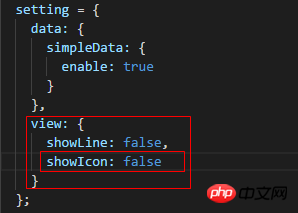
將基本設定物件的showIcon屬性設為false即可
setting = {
 data: {
 simpleData: {
 enable: true
 }
 },
 view: {
 showLine: false,
 showIcon: false
 }
};View Code
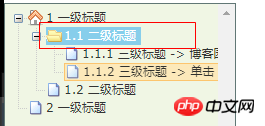
3.3 自訂節點圖示
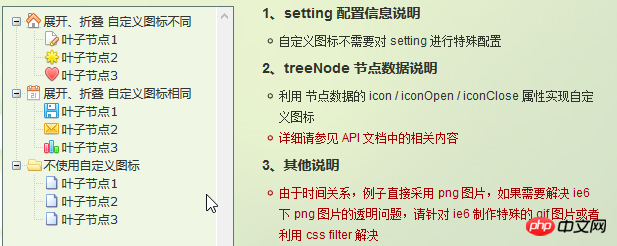
3.3.1 官方文件
更改節點的圖示
 #3.3.2 程式設計步驟
為treeNode節點資料設定icon/iconOpen /iconClose屬性即可
 3.4 自訂字體
3.4.1 官方文件
更改節點字體的樣式
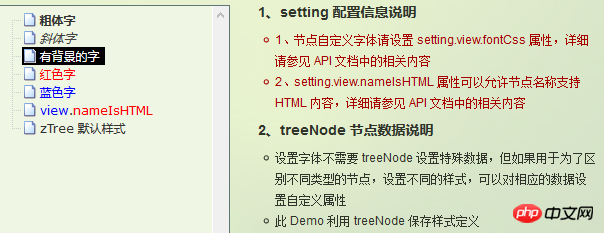 #3.4.2 程式設計步驟
為treeNode節點資料設定font屬性即可,font屬性的值是一個對象,該物件的內容和style的資料一樣
 3.4.3 效果展示
 #3.5 超連結
3.5.1 官方文件
點擊節點標題就會自動跳到對應的url
注意01:click屬性只能進行最簡單的click 事件操作。相當於 的內容。 如果操作較複雜,請使用 onClick 事件回呼函數。
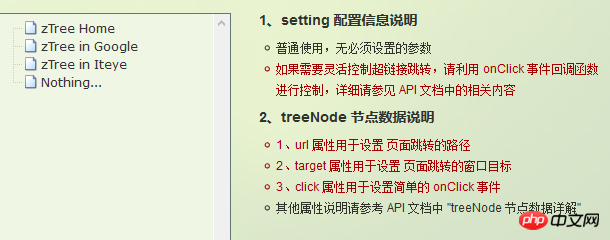 3.5.2 程式設計步驟
為treeNode節點資料設定url、click屬性即可
技巧01:設定click屬性時,屬性值必須是一些簡單的onClick事件
技巧02:設定target屬性時,屬性值有_blank 和_self
_blank -> 用一個新視窗開啟
_self -> 在原來的視窗開啟

 zNodes = [
 {id: 1, pId: 0, name: '1 一级标题', open: true, iconOpen:"assets/zTree/css/zTreeStyle/img/diy/1_open.png", iconClose:"assets/zTree/css/zTreeStyle/img/diy/1_close.png"},
 {id: 11, pId: 1, name: '1.1 二级标题', open: true, font:{'background-color':'skyblue', 'color':'white'}},
 {id: 111, pId: 11, name: '1.1.1 三级标题 -> 博客园1', url: 'http://www.cnblogs.com/NeverCtrl-C/', target: '_blank'},
 {id: 113, pId: 11, name: '1.1.1 三级标题 -> 博客园2', url: 'http://www.cnblogs.com/NeverCtrl-C/', target: '_self'},
 {id: 112, pId: 11, name: '1.1.2 三级标题 -> 单击', click: "alert('你单击了')"},
 {id: 12, pId: 1, name: '1.2 二级标题'},
 {id: 2, pId: 0, name: '2 一级标题'}
]View Code
3.6 點選控制
3.6.1 官方文件
點擊節點標題時觸發對應的方法
技巧01:在angular中可以利用這個用法來實現路由跳轉
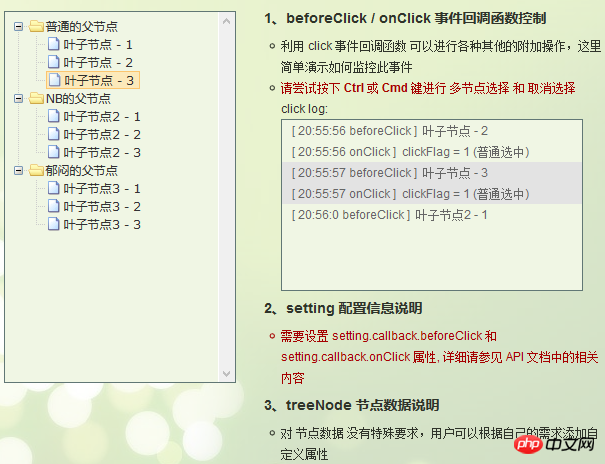
3.6.2 编程步骤
设置基本配置对象的onClick属性
技巧01:onClick属性值是一个方法的引用,我们需要自己编写这个方法
 setting = {
 view: {
 showLine: true,
 showIcon: true,
 fontCss: this.getFont
 },
 data: {
 simpleData: {
 enable: true,
 idKey: 'id',
 pIdKey: 'pId'
 }
 },
 callback: {
 onClick: this.onCzTreeOnClick
 }
};View Code
编写onClick触发方法

 onCzTreeOnClick(event, treeId, treeNode, clickFlag) {
 alert(treeNode.name);
}View Code
3.6.3 代码汇总
import { Component, OnInit } from '@angular/core';
declare var $ : any;
@Component({
 selector: 'app-root',
 templateUrl: './app.component.html',
 styleUrls: ['./app.component.scss']
})
export class AppComponent implements OnInit {
 setting = {
 view: {
 showLine: true,
 showIcon: true,
 fontCss: this.getFont
 },
 data: {
 simpleData: {
 enable: true,
 idKey: 'id',
 pIdKey: 'pId'
 }
 },
 callback: {
 onClick: this.onCzTreeOnClick
 },
 // async: {
 // enable: true,
 // url:"http://localhost:3000/data",
 // type: "get",
 // // autoParam:["id", "name=n", "level=lv"],
 // // otherParam:{"otherParam":"zTreeAsyncTest"},
 // dataFilter: this.filter
 // }
 };
 zNodes = [
 {id: 1, pId: 0, name: '1 一级标题', open: true, iconOpen:"assets/zTree/css/zTreeStyle/img/diy/1_open.png", iconClose:"assets/zTree/css/zTreeStyle/img/diy/1_close.png"},
 {id: 11, pId: 1, name: '1.1 二级标题', open: true, font:{'background-color':'skyblue', 'color':'white'}},
 {id: 111, pId: 11, name: '1.1.1 三级标题 -> 博客园1', url: 'http://www.cnblogs.com/NeverCtrl-C/', target: '_blank'},
 {id: 113, pId: 11, name: '1.1.1 三级标题 -> 博客园2', url: 'http://www.cnblogs.com/NeverCtrl-C/', target: '_self'},
 {id: 112, pId: 11, name: '1.1.2 三级标题 -> 单击', click: "alert('你单击了')"},
 {id: 12, pId: 1, name: '1.2 二级标题'},
 {id: 2, pId: 0, name: '2 一级标题'}
 ]
 getFont(treeId, node) {
 return node.font ? node.font : {};
 }
 // filter(treeId, parentNode,responseData) {
 // console.log(responseData);
 // if (responseData) {
 // for(var i =0; i < responseData.length; i++) {
 // responseData[i].name += "动态节点数据" + responseData[i].id;
 // }
 // }
 // return responseData;
 // }
 onCzTreeOnClick(event, treeId, treeNode, clickFlag) {
 alert(treeNode.name);
 }
 constructor() { }
 ngOnInit() {
 console.log('打印输出jquery对象');
 console.log($);
 console.log('但因输出zTree对象');
 console.log($.fn.zTree);
 $.fn.zTree.init($("#ztree"),this.setting,this.zNodes);
 // $.fn.zTree.init($("#ztree"),this.setting);
 }
}View Code
3.7 异步加载节点数据
3.7.1 官方文档
节点的数据是从后台进行获取的
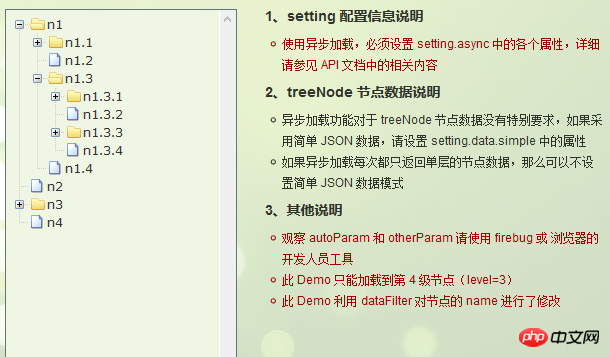
3.7.2 编程步骤
技巧01:异步加载节点数据时init方法不用传递第三个参数

> 准备一个后台用于返回JSON格式的数据
技巧01:返回的JSON数据是一个列表,格式为
[
 {
 "id": 1,
 "pId": 0,
 "name": "1 one"
 },
 {
 "id": 2,
 "pId": 0,
 "name": "2 two"
 }
]技巧02:三少偷懒,是利用json-server模拟的后台数据,哈哈;json-server
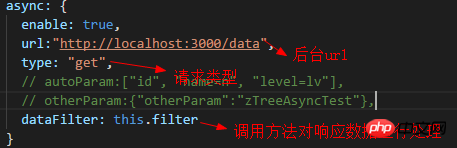
> 设置基本配置对象的async属性
 setting = {
 view: {
 showLine: true,
 showIcon: true,
 fontCss: this.getFont
 },
 data: {
 simpleData: {
 enable: true,
 idKey: 'id',
 pIdKey: 'pId'
 }
 },
 callback: {
 onClick: this.onCzTreeOnClick
 },
 async: {
 enable: true,
 url:"http://localhost:3000/data",
 type: "get",
 // autoParam:["id", "name=n", "level=lv"],
 // otherParam:{"otherParam":"zTreeAsyncTest"},
 dataFilter: this.filter
 }
};View Code
> 编写响应数据处理方法
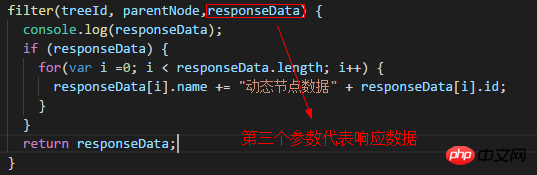
filter(treeId, parentNode,responseData) {
console.log(responseData);
if (responseData) {
for(var i =0; i < responseData.length; i++) {
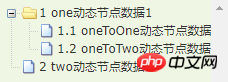
responseData[i].name += "动态节点数据" + responseData[i].id;
}
}
return responseData;
}View Code
3.7.3 代码总汇
{
 "data":
 [
 {
 "id": 1,
 "pId": 0,
 "name": "1 one"
 },
 {
 "id": 11,
 "pId": 1,
 "name": "1.1 oneToOne"
 },
 {
 "id": 12,
 "pId": 1,
 "name": "1.2 oneToTwo"
 },
 {
 "id": 2,
 "pId": 0,
 "name": "2 two"
 }
 ]
}模拟后台响应数据
<ul class="ztree"><ul></ul>
HTML
import { Component, OnInit } from '@angular/core';
declare var $ : any;

@Component({
 selector: 'app-root',
 templateUrl: './app.component.html',
 styleUrls: ['./app.component.scss']
})
export class AppComponent implements OnInit {

 setting = {
 view: {
 showLine: true,
 showIcon: true,
 fontCss: this.getFont
 },
 data: {
 simpleData: {
 enable: true,
 idKey: 'id',
 pIdKey: 'pId'
 }
 },
 callback: {
 onClick: this.onCzTreeOnClick
 },
 async: {
 enable: true,
 url:"http://localhost:3000/data",
 type: "get",
 // autoParam:["id", "name=n", "level=lv"],
 // otherParam:{"otherParam":"zTreeAsyncTest"},
 dataFilter: this.filter
 }
 };

 // zNodes = [
 // {id: 1, pId: 0, name: '1 一级标题', open: true, iconOpen:"assets/zTree/css/zTreeStyle/img/diy/1_open.png", iconClose:"assets/zTree/css/zTreeStyle/img/diy/1_close.png"},
 // {id: 11, pId: 1, name: '1.1 二级标题', open: true, font:{'background-color':'skyblue', 'color':'white'}},
 // {id: 111, pId: 11, name: '1.1.1 三级标题 -> 博客园1', url: 'http://www.cnblogs.com/NeverCtrl-C/', target: '_blank'},
 // {id: 113, pId: 11, name: '1.1.1 三级标题 -> 博客园2', url: 'http://www.cnblogs.com/NeverCtrl-C/', target: '_self'},
 // {id: 112, pId: 11, name: '1.1.2 三级标题 -> 单击', click: "alert('你单击了')"},
 // {id: 12, pId: 1, name: '1.2 二级标题'},
 // {id: 2, pId: 0, name: '2 一级标题'}
 // ]

 getFont(treeId, node) {
 return node.font ? node.font : {};
 }

 filter(treeId, parentNode,responseData) {
 console.log(responseData);
 if (responseData) {
 for(var i =0; i < responseData.length; i++) {
 responseData[i].name += "动态节点数据" + responseData[i].id;
 }
 }
 return responseData;
 }

 onCzTreeOnClick(event, treeId, treeNode, clickFlag) {
 alert(treeNode.name);
 }

 constructor() { }

 ngOnInit() {
 console.log('打印输出jquery对象');
 console.log($);
 console.log('但因输出zTree对象');
 console.log($.fn.zTree);
 // $.fn.zTree.init($("#ztree"),this.setting,this.zNodes);
 $.fn.zTree.init($("#ztree"),this.setting);
 }
}TS
3.7.4 效果展示
相关推荐:
以上是Angular結合zTree非同步載入節點資料實例分享的詳細內容。更多資訊請關注PHP中文網其他相關文章!

熱AI工具

Undresser.AI Undress
人工智慧驅動的應用程序,用於創建逼真的裸體照片

AI Clothes Remover
用於從照片中去除衣服的線上人工智慧工具。

Undress AI Tool
免費脫衣圖片

Clothoff.io
AI脫衣器

Video Face Swap
使用我們完全免費的人工智慧換臉工具,輕鬆在任何影片中換臉!

熱門文章
熱工具

記事本++7.3.1
好用且免費的程式碼編輯器

SublimeText3漢化版
中文版,非常好用

禪工作室 13.0.1
強大的PHP整合開發環境

Dreamweaver CS6
視覺化網頁開發工具

SublimeText3 Mac版
神級程式碼編輯軟體(SublimeText3)


![在Illustrator中載入插件時出錯[修復]](https://img.php.cn/upload/article/000/465/014/170831522770626.jpg?x-oss-process=image/resize,m_fill,h_207,w_330) 在Illustrator中載入插件時出錯[修復]
Feb 19, 2024 pm 12:00 PM
在Illustrator中載入插件時出錯[修復]
Feb 19, 2024 pm 12:00 PM
啟動AdobeIllustrator時是否會彈出載入插件時出錯的訊息?一些Illustrator用戶在打開該應用程式時遇到了此錯誤。訊息後面緊跟著一系列有問題的插件。此錯誤提示表示已安裝的插件有問題,但也可能是由於VisualC++DLL檔案損壞或首選項檔案受損等其他原因所引起。如果遇到此錯誤,我們將在本文中指導您修復問題,請繼續閱讀以下內容。在Illustrator中載入外掛程式時出錯如果您在嘗試啟動AdobeIllustrator時收到「載入外掛程式時出錯」的錯誤訊息,您可以使用以下用途:以管理員身
 如何在Ubuntu 24.04上安裝Angular
Mar 23, 2024 pm 12:20 PM
如何在Ubuntu 24.04上安裝Angular
Mar 23, 2024 pm 12:20 PM
Angular.js是一種可自由存取的JavaScript平台,用於建立動態應用程式。它允許您透過擴展HTML的語法作為模板語言,以快速、清晰地表示應用程式的各個方面。 Angular.js提供了一系列工具,可協助您編寫、更新和測試程式碼。此外,它還提供了許多功能,如路由和表單管理。本指南將討論在Ubuntu24上安裝Angular的方法。首先,您需要安裝Node.js。 Node.js是一個基於ChromeV8引擎的JavaScript運行環境,可讓您在伺服器端執行JavaScript程式碼。要在Ub


 Stremio字幕不工作;載入字幕時出錯
Feb 24, 2024 am 09:50 AM
Stremio字幕不工作;載入字幕時出錯
Feb 24, 2024 am 09:50 AM
字幕在你的WindowsPC上不能在Stremio上運行嗎?一些Stremio用戶報告說,影片中沒有顯示字幕。許多用戶報告說他們遇到了一條錯誤訊息,上面寫著「載入字幕時出錯」。以下是與此錯誤一起顯示的完整錯誤訊息:載入字幕時出錯載入字幕失敗:這可能是您正在使用的插件或您的網路有問題。正如錯誤訊息所說,可能是您的網路連線導致了錯誤。因此,請檢查您的網路連接,並確保您的網路運作正常。除此之外,這個錯誤的背後可能還有其他原因,包括字幕加載項衝突、特定影片內容不支援字幕以及Stremio應用程式過時。如
 淺析angular中怎麼使用monaco-editor
Oct 17, 2022 pm 08:04 PM
淺析angular中怎麼使用monaco-editor
Oct 17, 2022 pm 08:04 PM
angular中怎麼使用monaco-editor?以下這篇文章記錄下最近的一次業務中用到的 monaco-editor 在 angular 中的使用,希望對大家有幫助!
 如何使用PHP和Angular進行前端開發
May 11, 2023 pm 04:04 PM
如何使用PHP和Angular進行前端開發
May 11, 2023 pm 04:04 PM
隨著網路的快速發展,前端開發技術也不斷改進與迭代。 PHP和Angular是兩種廣泛應用於前端開發的技術。 PHP是一種伺服器端腳本語言,可以處理表單、產生動態頁面和管理存取權限等任務。而Angular是一種JavaScript的框架,可以用來開發單一頁面應用程式和建構元件化的網頁應用程式。本篇文章將介紹如何使用PHP和Angular進行前端開發,以及如何將它們
 PHP實作無限滾動加載
Jun 22, 2023 am 08:30 AM
PHP實作無限滾動加載
Jun 22, 2023 am 08:30 AM
隨著互聯網的發展,越來越多的網頁需要支援滾動加載,而無限滾動加載是其中的一種。它可以讓頁面不斷載入新的內容,使用戶可以更流暢地瀏覽網頁。在這篇文章中,我們將介紹如何使用PHP實現無限滾動載入。一、什麼是無限滾動載入?無限滾動載入是一種基於捲軸的網頁內容載入方式。它的原理是當使用者捲動至頁面底部時,透過AJAX非同步調取後台數據,實現不斷載入新的內容。這種載入方
