

Bootstrap實作表格合併儲存格範例

本文主要和大家介紹Bootstrap實現的表格合併單元格,涉及bootstrap介面佈局相關操作技巧,需要的朋友可以參考下,希望能幫助到大家。
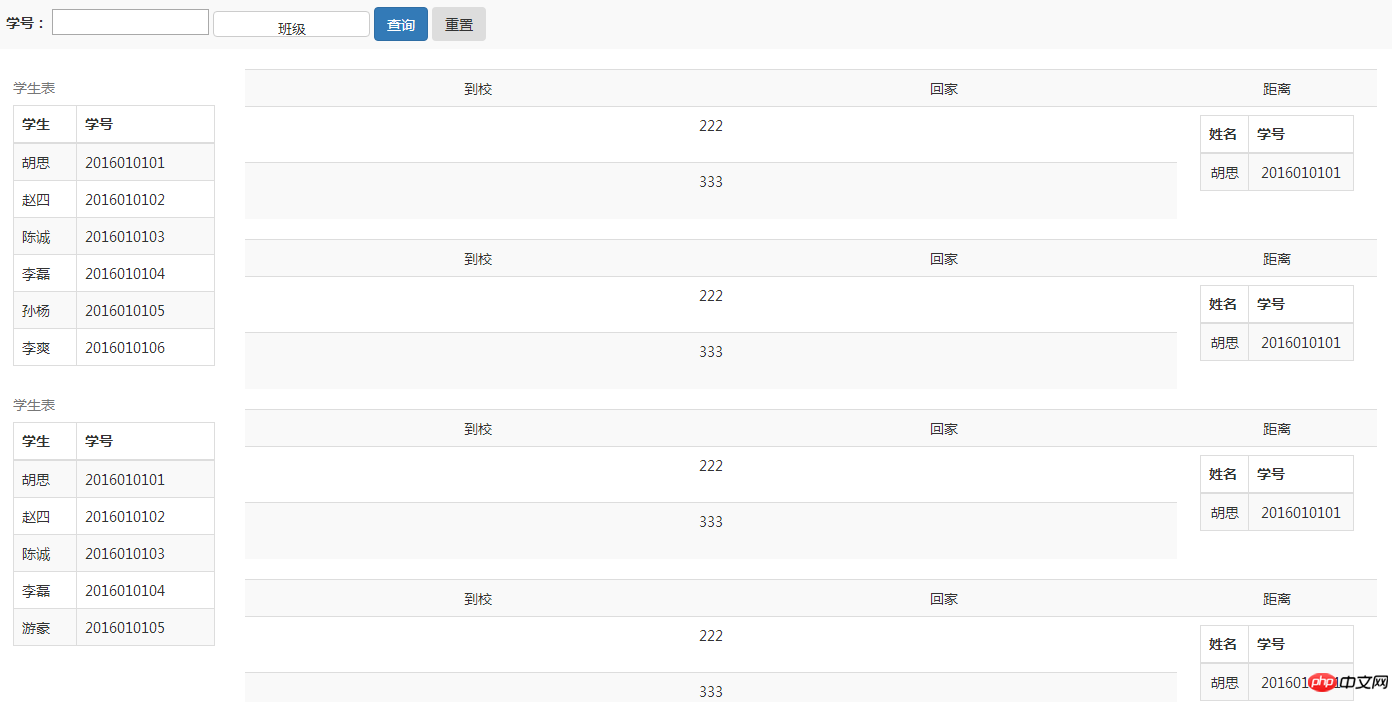
1、問題背景
利用Bootstrap設計表格,且表格需要合併儲存格
2、實作原始碼
<!DOCTYPE html>
<html>
  <head>
    <meta charset="utf-8">
    <meta http-equiv="X-UA-Compatible" content="IE=edge">
    <meta name="viewport" content="width=device-width, initial-scale=1">
    <meta name="description" content="">
    <meta name="author" content="">
    <title>Bootstrap-表格合并单元格</title>
    <link rel="stylesheet" href="https://cdn.bootcss.com/bootstrap/3.3.5/css/bootstrap.css" rel="external nofollow" />
    <script src="http://libs.baidu.com/jquery/2.0.0/jquery.min.js"></script>
    <script type="text/javascript" src="https://cdn.bootcss.com/bootstrap/3.3.5/js/bootstrap.js" ></script>
    <style>
      body,html{
        width: 99%;
        height: 98%;
        font-family: "微软雅黑";
        font-size: 14px;
      }
      table{
        width: 100%;
      }
    </style>
    <script>
    </script>
  </head>
  <body>
    <p class="row">
      <p class="col-xs-12">
        <table class="table table-striped">
          <tr>
            <td>
              <label for="stuNo">学号:</label>
              <input type="text" id="stuNo" />
              <p class="btn-group" style="width: 157px; height: 26px;">
                <button type="button" class="btn btn-default dropdown-toggle" data-toggle="dropdown" style="width: 157px; height: 26px;">
                  班级
                </button>
                <ul class="dropdown-menu" role="menu">
                 <li><a href="#" rel="external nofollow" rel="external nofollow" rel="external nofollow" rel="external nofollow" rel="external nofollow" >一班</a></li>
                 <li><a href="#" rel="external nofollow" rel="external nofollow" rel="external nofollow" rel="external nofollow" rel="external nofollow" >二班</a></li>
                 <li><a href="#" rel="external nofollow" rel="external nofollow" rel="external nofollow" rel="external nofollow" rel="external nofollow" >三班</a></li>
                 <li><a href="#" rel="external nofollow" rel="external nofollow" rel="external nofollow" rel="external nofollow" rel="external nofollow" >四班</a></li>
                 <li><a href="#" rel="external nofollow" rel="external nofollow" rel="external nofollow" rel="external nofollow" rel="external nofollow" >五班</a></li>
                </ul>
              </p>
              <button type="button" class="btn btn-primary">查询</button>
              <button type="button" class="btn">重置</button>
            </td>
          </tr>
        </table>
      </p>
      <p class="col-xs-12">
        <p class="col-xs-2">
          <table class="table table-striped table-bordered">
            <caption>学生表</caption>
            <thead>
              <tr>
                <th>学生</th>
                <th>学号</th>
              </tr>
            </thead>
            <tbody>
              <tr>
                <td>胡思</td>
                <td>2016010101</td>
              </tr>
              <tr>
                <td>赵四</td>
                <td>2016010102</td>
              </tr>
              <tr>
                <td>陈诚</td>
                <td>2016010103</td>
              </tr>
              <tr>
                <td>李磊</td>
                <td>2016010104</td>
              </tr>
              <tr>
                <td>孙杨</td>
                <td>2016010105</td>
              </tr>
              <tr>
                <td>李爽</td>
                <td>2016010106</td>
              </tr>
            </tbody>
          </table>
          <table class="table table-striped table-bordered">
            <caption>学生表</caption>
            <thead>
              <tr>
                <th>学生</th>
                <th>学号</th>
              </tr>
            </thead>
            <tbody>
              <tr>
                <td>胡思</td>
                <td>2016010101</td>
              </tr>
              <tr>
                <td>赵四</td>
                <td>2016010102</td>
              </tr>
              <tr>
                <td>陈诚</td>
                <td>2016010103</td>
              </tr>
              <tr>
                <td>李磊</td>
                <td>2016010104</td>
              </tr>
              <tr>
                <td>游豪</td>
                <td>2016010105</td>
              </tr>
            </tbody>
          </table>
        </p>
        <p class="col-xs-10">
          <table class="table table-striped">
            <tr style="text-align: center;">
              <td>到校</td>
              <td>回家</td>
              <td>距离</td>
            </tr>
            <tr style="text-align: center;">
              <td colspan="2" style="text-align: center;">222</td>
              <td rowspan="2" style="width: 200px;">
                <p class="col-xs-12">
                  <table class="table table-striped table-bordered">
                    <thead>
                      <tr>
                        <th>姓名</th>
                        <th>学号</th>
                      </tr>
                    </thead>
                    <tbody>
                      <tr>
                        <td>胡思</td>
                        <td>2016010101</td>
                      </tr>
                    </tbody>
                  </table>
                </p>
              </td>
            </tr>
            <tr>
              <td colspan="2" style="text-align: center;">333</td>
            </tr>
          </table>
        </p>
      </p>
    </p>
  </body>
</html>3、實作結果
#相關推薦:
table合併單元格與img圖片鋪滿整個td的html的方法
#以上是Bootstrap實作表格合併儲存格範例的詳細內容。更多資訊請關注PHP中文網其他相關文章!

熱AI工具

Undresser.AI Undress
人工智慧驅動的應用程序,用於創建逼真的裸體照片

AI Clothes Remover
用於從照片中去除衣服的線上人工智慧工具。

Undress AI Tool
免費脫衣圖片

Clothoff.io
AI脫衣器

Video Face Swap
使用我們完全免費的人工智慧換臉工具,輕鬆在任何影片中換臉!

熱門文章
熱工具

記事本++7.3.1
好用且免費的程式碼編輯器

SublimeText3漢化版
中文版,非常好用

禪工作室 13.0.1
強大的PHP整合開發環境

Dreamweaver CS6
視覺化網頁開發工具

SublimeText3 Mac版
神級程式碼編輯軟體(SublimeText3)


 vue中怎麼用bootstrap
Apr 07, 2025 pm 11:33 PM
vue中怎麼用bootstrap
Apr 07, 2025 pm 11:33 PM
在 Vue.js 中使用 Bootstrap 分為五個步驟:安裝 Bootstrap。在 main.js 中導入 Bootstrap。直接在模板中使用 Bootstrap 組件。可選:自定義樣式。可選:使用插件。
 bootstrap搜索欄怎麼獲取
Apr 07, 2025 pm 03:33 PM
bootstrap搜索欄怎麼獲取
Apr 07, 2025 pm 03:33 PM
如何使用 Bootstrap 獲取搜索欄的值:確定搜索欄的 ID 或名稱。使用 JavaScript 獲取 DOM 元素。獲取元素的值。執行所需的操作。
 bootstrap垂直居中怎麼弄
Apr 07, 2025 pm 03:21 PM
bootstrap垂直居中怎麼弄
Apr 07, 2025 pm 03:21 PM
使用 Bootstrap 實現垂直居中:flexbox 法:使用 d-flex、justify-content-center 和 align-items-center 類,將元素置於 flexbox 容器內。 align-items-center 類法:對於不支持 flexbox 的瀏覽器,使用 align-items-center 類,前提是父元素具有已定義的高度。
 bootstrap怎麼設置框架
Apr 07, 2025 pm 03:27 PM
bootstrap怎麼設置框架
Apr 07, 2025 pm 03:27 PM
要設置 Bootstrap 框架,需要按照以下步驟:1. 通過 CDN 引用 Bootstrap 文件;2. 下載文件並將其託管在自己的服務器上;3. 在 HTML 中包含 Bootstrap 文件;4. 根據需要編譯 Sass/Less;5. 導入定製文件(可選)。設置完成後,即可使用 Bootstrap 的網格系統、組件和样式創建響應式網站和應用程序。
 bootstrap怎麼寫分割線
Apr 07, 2025 pm 03:12 PM
bootstrap怎麼寫分割線
Apr 07, 2025 pm 03:12 PM
創建 Bootstrap 分割線有兩種方法:使用 標籤,可創建水平分割線。使用 CSS border 屬性,可創建自定義樣式的分割線。
 bootstrap怎麼插入圖片
Apr 07, 2025 pm 03:30 PM
bootstrap怎麼插入圖片
Apr 07, 2025 pm 03:30 PM
在 Bootstrap 中插入圖片有以下幾種方法:直接插入圖片,使用 HTML 的 img 標籤。使用 Bootstrap 圖像組件,可以提供響應式圖片和更多樣式。設置圖片大小,使用 img-fluid 類可以使圖片自適應。設置邊框,使用 img-bordered 類。設置圓角,使用 img-rounded 類。設置陰影,使用 shadow 類。調整圖片大小和位置,使用 CSS 樣式。使用背景圖片,使用 background-image CSS 屬性。
 bootstrap按鈕怎麼用
Apr 07, 2025 pm 03:09 PM
bootstrap按鈕怎麼用
Apr 07, 2025 pm 03:09 PM
如何使用 Bootstrap 按鈕?引入 Bootstrap CSS創建按鈕元素並添加 Bootstrap 按鈕類添加按鈕文本
 bootstrap怎麼調整大小
Apr 07, 2025 pm 03:18 PM
bootstrap怎麼調整大小
Apr 07, 2025 pm 03:18 PM
要調整 Bootstrap 中元素大小,可以使用尺寸類,具體包括:調整寬度:.col-、.w-、.mw-調整高度:.h-、.min-h-、.max-h-
