PHP裝飾器模式詳解
裝飾器模式又叫裝飾者模式。裝飾模式是在不必改變原始類別檔案和使用繼承的情況下,動態地擴展一個物件的功能。它是透過創造一個包裝對象,也就是裝飾來包裹真實的對象。本文主要和大家介紹PHP設計模式之裝飾器模式,簡單介紹了裝飾器模式的概念、功能並結合實例形式詳細分析了php實現與使用裝飾器模式的相關操作技巧,需要的朋友可以參考下,希望能幫助大家。
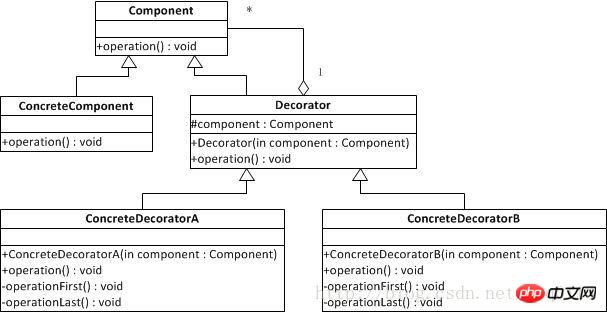
UML類別圖:

角色:
元件物件的介面:可以給這些物件動態的新增職責
所有裝飾器的父類別:需要定義一個與元件介面一致的接口,並持有一個Component對象,該對像其實就是被裝飾的對象。
具體的裝飾器類別:實作具體要新增到被裝飾物件的功能。用來裝飾具體的組件物件或另外一個具體的裝飾器物件。
具體程式碼:
<?php
/**
 * Created by PhpStorm.
 * User: Jiang
 * Date: 2015/5/3
 * Time: 11:11
 */
/**组件对象接口
 * Interface IComponent
 */
interface IComponent
{
  function Display();
}
/**待装饰对象
 * Class Person
 */
class Person implements IComponent
{
  private $name;
  function __construct($name)
  {
    $this->name=$name;
  }
  function Display()
  {
    echo "装扮的:{$this->name}<br/>";
  }
}
/**所有装饰器父类
 * Class Clothes
 */
class Clothes implements IComponent
{
  protected $component;
  function Decorate(IComponent $component)
  {
    $this->component=$component;
  }
  function Display()
  {
    if(!empty($this->component))
    {
      $this->component->Display();
    }
  }
}
//------------------------------具体装饰器----------------
class PiXie extends Clothes
{
  function Display()
  {
    echo "皮鞋 ";
    parent::Display();
  }
}
class QiuXie extends Clothes
{
  function Display()
  {
    echo "球鞋 ";
    parent::Display();
  }
}
class Tshirt extends Clothes
{
  function Display()
  {
    echo "T恤 ";
    parent::Display();
  }
}
class Waitao extends Clothes
{
  function Display()
  {
    echo "外套 ";
    parent::Display();
  }
}呼叫客戶端測試程式碼:
header("Content-Type:text/html;charset=utf-8");
//------------------------装饰器模式测试代码------------------
require_once "./Decorator/Decorator.php";
$Yaoming=new Person("姚明");
$aTai=new Person("A泰斯特");
$pixie=new PiXie();
$waitao=new Waitao();
$pixie->Decorate($Yaoming);
$waitao->Decorate($pixie);
$waitao->Display();
echo "<hr/>";
$qiuxie=new QiuXie();
$tshirt=new Tshirt();
$qiuxie->Decorate($aTai);
$tshirt->Decorate($qiuxie);
$tshirt->Display();適用場景:
1. 需要動態的為物件新增功能,這些功能可以再動態的撤銷。
2. 需要增加一些基本功能的排列組合而產生的非常大量的功能,從而使繼承關係變的不切實際。
3. 當無法採用產生子類別的方法進行擴充時。一種情況是,可能有大量獨立的擴展,為支持每種組合將產生大量的子類,使得子類數目呈爆炸性增長。另一種情況可能是因為類別定義被隱藏,或類別定義不能用來產生子類別。
相關推薦:
Javascript的裝飾器模式與php、python比較用法詳解
#以上是PHP裝飾器模式詳解的詳細內容。更多資訊請關注PHP中文網其他相關文章!

熱AI工具

Undresser.AI Undress
人工智慧驅動的應用程序,用於創建逼真的裸體照片

AI Clothes Remover
用於從照片中去除衣服的線上人工智慧工具。

Undress AI Tool
免費脫衣圖片

Clothoff.io
AI脫衣器

Video Face Swap
使用我們完全免費的人工智慧換臉工具,輕鬆在任何影片中換臉!

熱門文章

熱工具

記事本++7.3.1
好用且免費的程式碼編輯器

SublimeText3漢化版
中文版,非常好用

禪工作室 13.0.1
強大的PHP整合開發環境

Dreamweaver CS6
視覺化網頁開發工具

SublimeText3 Mac版
神級程式碼編輯軟體(SublimeText3)
 PHP與Python:了解差異
Apr 11, 2025 am 12:15 AM
PHP和Python各有優勢,選擇應基於項目需求。 1.PHP適合web開發,語法簡單,執行效率高。 2.Python適用於數據科學和機器學習,語法簡潔,庫豐富。
 PHP:網絡開發的關鍵語言
Apr 13, 2025 am 12:08 AM
PHP是一種廣泛應用於服務器端的腳本語言,特別適合web開發。 1.PHP可以嵌入HTML,處理HTTP請求和響應,支持多種數據庫。 2.PHP用於生成動態網頁內容,處理表單數據,訪問數據庫等,具有強大的社區支持和開源資源。 3.PHP是解釋型語言,執行過程包括詞法分析、語法分析、編譯和執行。 4.PHP可以與MySQL結合用於用戶註冊系統等高級應用。 5.調試PHP時,可使用error_reporting()和var_dump()等函數。 6.優化PHP代碼可通過緩存機制、優化數據庫查詢和使用內置函數。 7
 PHP和Python:比較兩種流行的編程語言
Apr 14, 2025 am 12:13 AM
PHP和Python各有優勢,選擇依據項目需求。 1.PHP適合web開發,尤其快速開發和維護網站。 2.Python適用於數據科學、機器學習和人工智能,語法簡潔,適合初學者。
 PHP行動:現實世界中的示例和應用程序
Apr 14, 2025 am 12:19 AM
PHP在電子商務、內容管理系統和API開發中廣泛應用。 1)電子商務:用於購物車功能和支付處理。 2)內容管理系統:用於動態內容生成和用戶管理。 3)API開發:用於RESTfulAPI開發和API安全性。通過性能優化和最佳實踐,PHP應用的效率和可維護性得以提升。
 PHP的持久相關性:它還活著嗎?
Apr 14, 2025 am 12:12 AM
PHP仍然具有活力,其在現代編程領域中依然佔據重要地位。 1)PHP的簡單易學和強大社區支持使其在Web開發中廣泛應用;2)其靈活性和穩定性使其在處理Web表單、數據庫操作和文件處理等方面表現出色;3)PHP不斷進化和優化,適用於初學者和經驗豐富的開發者。
 PHP和Python:解釋了不同的範例
Apr 18, 2025 am 12:26 AM
PHP主要是過程式編程,但也支持面向對象編程(OOP);Python支持多種範式,包括OOP、函數式和過程式編程。 PHP適合web開發,Python適用於多種應用,如數據分析和機器學習。
 PHP與其他語言:比較
Apr 13, 2025 am 12:19 AM
PHP適合web開發,特別是在快速開發和處理動態內容方面表現出色,但不擅長數據科學和企業級應用。與Python相比,PHP在web開發中更具優勢,但在數據科學領域不如Python;與Java相比,PHP在企業級應用中表現較差,但在web開發中更靈活;與JavaScript相比,PHP在後端開發中更簡潔,但在前端開發中不如JavaScript。
 PHP和Python:代碼示例和比較
Apr 15, 2025 am 12:07 AM
PHP和Python各有優劣,選擇取決於項目需求和個人偏好。 1.PHP適合快速開發和維護大型Web應用。 2.Python在數據科學和機器學習領域佔據主導地位。


