CKEditor即大名鼎鼎的FCKeditor,該公司的另一個產品為CKFinder(一個Ajax檔案管理器)。 ckeditor是一款功能強大的富文本編輯工具,這篇文章主要為大家詳細介紹了ckeditor自訂插件的使用方法,具有一定的參考價值,有興趣的小伙伴們可以參考一下
ckeditor是一款功能很強大的富文本編輯的工具,給我們提供了絕大多數功能,滿足我們日常開發所用,但由於特殊情況,可能會需要修改ckeditor的插件。 ckeditor提供了給我們很方便擴充插件的介面。
最經由於專案的需要,需要重寫ckeditor的上傳圖片的功能,以下是自訂圖片上傳功能的部分程式碼:
1、在ckeditor/plugins/目錄下新建editorupload目錄,用來存放自訂插件;在該目錄下新建目錄images用來存放自定以圖片,在images目錄下放入插件圖片image.png.
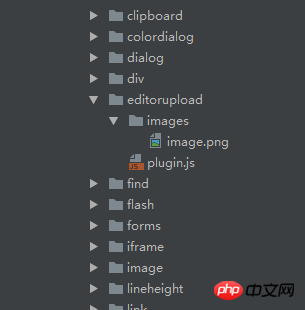
2、在editorupload目錄下新建plugin.js:
#(function () {
var a = {
exec: function (editor) {
//调用jsp中的函数弹出上传框,
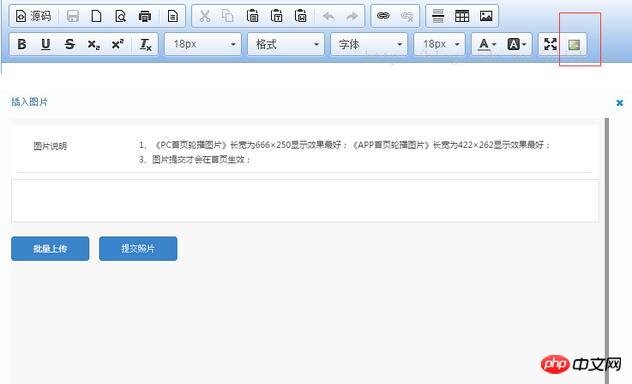
var url = '../view/fileupload/upload.jsp';
openDialog({ //openDialog打开一个新窗口
title: '插入图片',
url: url,
height: 600,
width: 900,
callback:function(){
}
});
}
},
b = 'editorupload';
CKEDITOR.plugins.add('editorupload', {
init: function (editor) {
editor.addCommand(b, a);
editor.ui.addButton('editorupload', {
label: '添加图片', //鼠标悬停在插件上时显示的名字
icon: 'plugins/editorupload/images/image.png', //自定义图标的路径
command: b
});
}
});
})();在上面程式碼中,新建了一個upload.jsp頁面用來上傳圖片,使用了openDialog彈出一個新的窗口,設定了彈出框的高度和寬度。
CKEDITOR.plugins.add將自訂的editorupload加入ckeditor中。
下面是部分upload.jsp頁面程式碼:
<p id="mainContent">
</p>
<p class=" box">
<table class=" m-table">
<colgroup>
<col width="20%"/>
<col width="80%"/>
</colgroup>
<tr>
<td style="vertical-align:top;"><label class="module-name">图片说明</label></td>
<td>
<ul>
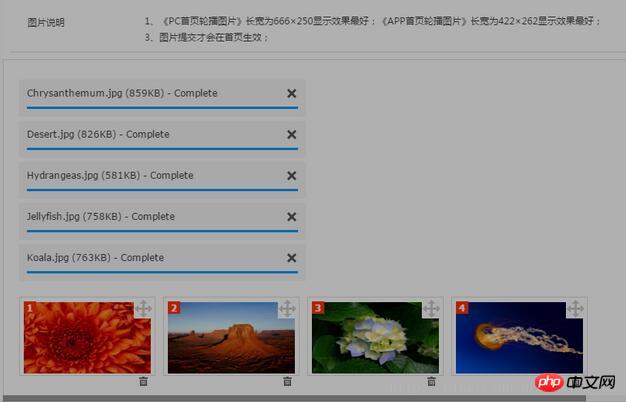
<li>1、《PC首页轮播图片》长宽为666×250显示效果最好;《APP首页轮播图片》长宽为422×262显示效果最好;</li>
<li>3、图片提交才会在首页生效;</li>
</ul>
</td>
</tr>
</table>
</p>
<p id="Pictures" class="detailWraper nopadding" style="display: none;height: auto;">
<input id="hidPicturesStatus" type="hidden" value="0"/>
<input id="hidCurrPictures" type="hidden" value=''/>
<input id="hidDictSuggestion" type="hidden" value=''/>
<table>
<tr>
<td>
<p id="fileQueue"></p>
<p id="picWrapper"></p>
<a id="fake-dlg-bigPic" href="javascript:void(0)" style="display: none;"></a>
<p id="dlg-bigPic" class="popImg" style="display: none;">
<a class="leftBtn" href="javascript:void(0)"></a>
<a class="rightBtn" href="javascript:void(0)"></a>
<a class="closeImgBtn" href="javascript:void(0)"></a>
<p class="imgList">
<ul></ul>
</p>
</p>
<p class="validation-summary-valid">
<ul>
<li style="display: none"></li>
</ul>
</p>
</td>
</tr>
</table>
</p>
<p>
<button id="fileUpload">批量上传</button>
<button id="submit" class="btn btn-primary" style="vertical-align: top;line-height:23px;width:112px;height: 35px;">提交照片
</button>
</p>
</p>upload.jps頁面部分的js程式碼:
//提交照片
photoTaskDetail.submit = function () {
var pictures = window.picManager._getPictures();
if (pictures.length < 1) {
alert('请至少上传1张图片');
return false;
}
for (var i in pictures) {
var imgPath = "<img src='" + staticFileRoot + pictures[i].URL + "'/>";
var element = window.parent.CKEDITOR.dom.element.createFromHtml(imgPath);
window.parent.CKEDITOR.instances.editorContent.insertElement(element);
}
parent.closeDialog(false);
}上面程式碼中,可以上傳多張照片,分別將照片放入ckeditor中。
設定ckeditor的config.js:
config.extraPlugins += (config.extraPlugins ? ',editorupload' : 'editorupload');
CKEDITOR.editorConfig = function( config ) {
  config.font_names= '宋体/宋体;黑体/黑体;仿宋/仿宋_GB2312;楷体/楷体_GB2312;隶书/隶书;幼圆/幼圆;微软雅黑/微软雅黑;'+ config.font_names;
  config.language = 'zh-cn';
  config.extraPlugins += (config.extraPlugins ? ',lineheight' : 'lineheight');
  config.extraPlugins += (config.extraPlugins ? ',editorupload' : 'editorupload');
  CKEDITOR.config.lineheight_sizes = CKEDITOR.config.lineheight_sizes +  '30px';
  config.height = 650;
  config.toolbarCanCollapse = true;
  config.uiColor = '#90B8E9';
  config.toolbar = 'Full';
  config.toolbar_Full = [
   { name: 'document',  items: [ 'Source','-','Save','NewPage','DocProps','Preview','Print','-','Templates' ] },
   { name: 'clipboard',  items: [ 'Cut','Copy','Paste','PasteText','PasteFromWord','-','Undo','Redo' ] },
   { name: 'links',    items:['Link','Unlink']},
   { name: 'insert',   items:['HorizontalRule','Table','Image'] },
   '/',
   { name: 'basicstyles', items: [ 'Bold','Underline','Strike','Subscript','Superscript','-','RemoveFormat'] },
   { name: 'paragraph',  items: [ 'list', 'indent', 'blocks', 'align', 'bidi' ] },
   { name: 'styles',items: ['lineheight','Format','Font','FontSize']},
   { name: 'colors',items: ['TextColor', 'BGColor']},
   { name: 'tools', items : [ 'Maximize','editorupload'] }
];將editorupload外掛程式加入ckeditor。
以下是實現的部分截圖:
# 實作總結:在自訂插件過程中,必須把原插件的圖片插入的功能給打開,負責上傳的圖片不會被放入到ckeditor中,圖片地址會被自動的過濾掉。這可能是ckeditor版本的bug導致。有解決方案的歡迎指導。
以上就是本文的全部內容,希望對大家的學習有所幫助,也希望大家多多支持php中文網。
Python的Flask框架中整合CKeditor富文本編輯器
以上是ckeditor自訂外掛程式使用方法解析的詳細內容。更多資訊請關注PHP中文網其他相關文章!


