這次帶給大家Nodejs視圖與模型的開發,Nodejs視圖與模型的開發的注意事項有哪些,下面就是實戰案例,一起來看一下。
導航
前端佈局使用bootstrap,從官網下載後置於public資料夾下。打開layout.jade 先做一個導航.
doctype html
html
  head
    meta(name='viewport', content='width=device-width, initial-scale=1.0')
    title= title
    link(rel='stylesheet', href='/bootstrap/css/bootstrap.css')
    link(rel='stylesheet', href='/stylesheets/style.css')
  body
    nav.navbar.navbar-default.navbar-fixed-top.navbar-inverse
     .container
      .navbar-header
        a.navbar-brand(href='/') ReadingClub
      .collapse.navbar-collapse
       ul.nav.navbar-nav.pull-right
         li
          a(href='/') 首页
         li
          a(href='/Books') 读物
         li
          a(href='/About') 关于
         li
          a(href='/Register') 注册
         li
          a(href='/Login') 登录
     #bodycontent.container        block content
   footer.container
       .row
          .col-xs-12
            small © stoneniqiu 2016
    script(src='/javascripts/jquery-1.11.1.min.js')
    script(src='/bootstrap/js/bootstrap.min.js')
block content 上文有介紹,可以理解成一個佔位符。因為現在還用不慣stylus,就直接寫css了,這樣vs還有智慧提示。
style.css


body {
 font: 14px "Lucida Grande", Helvetica, Arial, sans-serif;
    background: gainsboro;
}a {
  color: #00b7ff;
}.navbar-default {
  background-color: #444;
  border-color: black;
}.navbar-default .navbar-nav > li > a:hover, .navbar-default .navbar-nav > li > a:focus {
    color: #ffffff;
    background-color:#222;
}.navbar-default .navbar-nav > li > a{
    color:  #ccc;
}a.navbar-brand{color: #fff !important}View Code
運行起來,看到導航條

如果存取註冊和登錄,因為之前沒有設定對應的頁面就會報404。
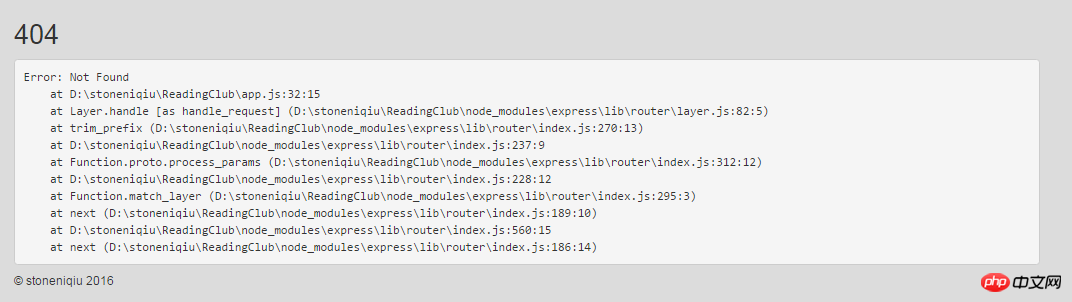
出現這樣的頁面是因為在上文中,在app.js中有過設定
app.use(function (req, res, next) {    var err = new Error('Not Found');
    err.status = 404;
    next(err);
});回頭看layout.jade 沒有一個 html標籤,直接是元素名稱或樣式名稱開始,這種寫法和sublime中寫html相似,屬性寫在括號裡,文字內容用空格隔開。元素的嵌套關係 透過嚴格的縮進來控制,這樣的好處是程式碼量更少,層次更分明,但是程式碼一長,很不容易判斷縮排的準確位置,沒對齊很容易造成意外的嵌套。我現在的經驗是從左往右的寫,而不是從上往下寫。也就是說,用jade寫html的時候,先寫好最外層的元素,然後在逐步寫裡面的子元素。而不是從上往下一個一個的寫,這樣就會出現縮進來帶的困擾。
模型與視圖
回到home.js,我們用JavaScript建立一個books模型,包含title,info,rating,img和tags。因為還沒有使用資料庫,這裡直接建立。
books:
var books = [
{
    id: 0,
    title: "深入浅出Node.js",
    info: "朴灵 / 人民邮电出版社 / 2013-12-1 / CNY 69.00",
    rating: 5,
    img: "https://img3.doubanio.com/mpic/s27269296.jpg",
    tags: ["node", "深入浅出"],
    brief: '本书从不同的视角介绍了 Node 内在的特点和结构。由首章Node 介绍为索引,涉及Node 的各个方面,主要内容包含模块机制的揭示、异步I/O 实现原理的展现、异步编程的探讨、内存控制的介绍、二进制数据Buffer 的细节、Node 中的网络编程基础、Node 中的Web 开发、进程间的消息传递、Node 测试以及通过Node 构建产品需要的注意事项。最后的附录介绍了Node 的安装、调试、编码规范和NPM 仓库等事宜。本书适合想深入了解 Node 的人员阅读。'
    ,ISBN: 9787115335500
    },
{
    id: 1,
    title: "程序员修炼之道 : 从小工到专家",
    info: "Andrew Hunt、David Thomas / 马维达 / 电子工业出版社 / 2005-1 / 48.00元",
    rating: 5,
    img: "https://img3.doubanio.com/mpic/s3957863.jpg",
    tags: ["程序人生", "软件开发"],
    brief: '《程序员修炼之道》由一系列的独立的部分组成,涵盖的主题从个人责任、职业发展,直到用于使代码保持灵活、并且易于改编和复用的各种架构技术。利用许多富有娱乐性的奇闻轶事、有思想性的例子以及有趣的类比,全面阐释了软件开发的许多不同方面的最佳实践和重大陷阱。无论你是初学者,是有经验的程序员,还是软件项目经理,本书都适合你阅读。'
    ,ISBN: 9787505397194
    },
{
    id: 2,
    title: "Getting MEAN with Mongo, Express, Angular, and Node",
    info: "Simon Holmes / Manning Publications / 2015-11-26 / USD 44.99",
    rating: 4,
    img: "https://img3.doubanio.com/mpic/s27676844.jpg",
    tags: ["node", "web开发", "编程"],
    brief: 'MEAN栈开发,比较详尽的的应用开发书籍'
    , ISBN: 9781617292033
    }
];
 res.render('books', { title: 'Books', books: books });
jade
模型其实就是一个json对象,接下来我们修改books页面的布局。这里用左右布局,稍加调整
extends layout
block content
  .row
   .col-md-9.page
     each book in books
       .row.booklist
         .col-md-2
          img(src='#{book.img}')
         .col-md-10
            p
             a(href="/Detail/#{book.id}")=book.title
            p=book.info
            p            - for (var i = 1; i <= book.rating; i++)
                span.glyphicon.glyphicon-star            - for (i = book.rating; i < 5; i++)
                span.glyphicon.glyphicon-star-empty
            p.tags
             each tag in book.tags
              span=tag
   .col-md-3
     .userinfo
p stoneniqiuView Code
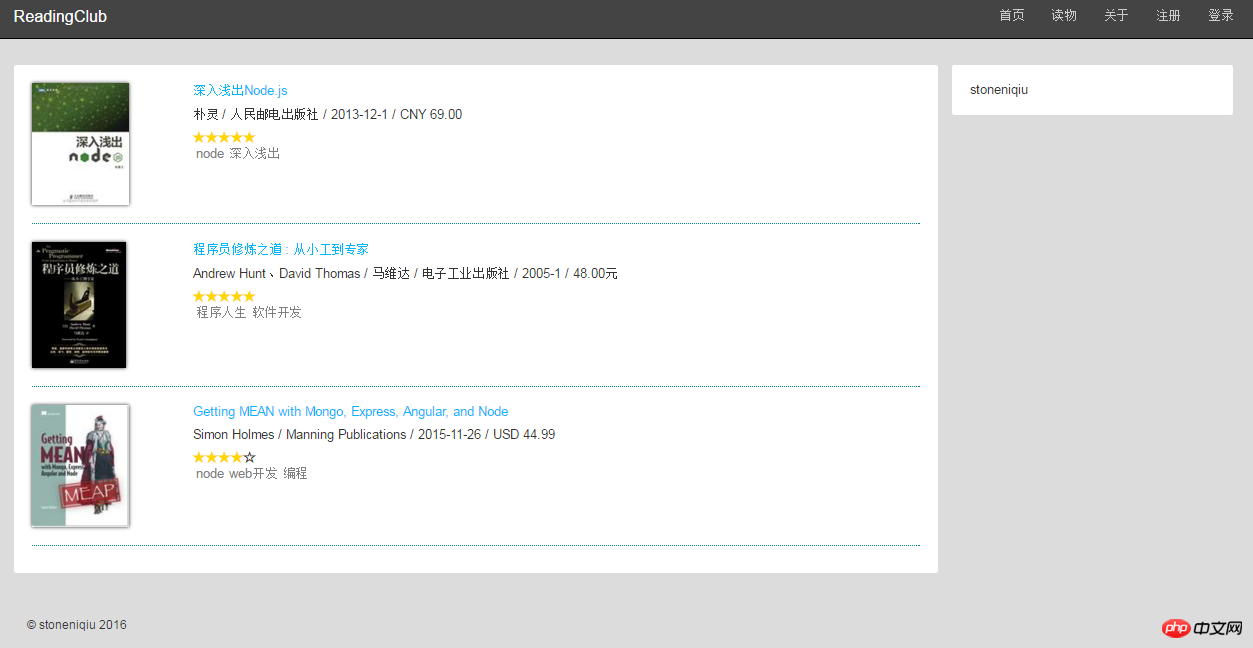
res.render('books', { title: 'Books', books: books });在home.js加入books,模型其實就是一個json對象,接下來我們修改books頁面的版面。這裡用左右佈局,稍加調整,
extends layout
block content
  .row
   .col-md-9.page
     each book in books
       .row.booklist
         .col-md-2
          img(src='#{book.img}')
         .col-md-10
            p
             a(href="/Detail/#{book.id}")=book.title
            p=book.info
            p
            - for (var i = 1; i <= book.rating; i++)
                span.glyphicon.glyphicon-star
            - for (i = book.rating; i < 5; i++)
                span.glyphicon.glyphicon-star-empty
            p.tags
             each tag in book.tags
              span=tag
   .col-md-3
     .userinfo
p stoneniqiu得到效果:
# 當然這些都還是靜態的,接下來介紹下jade引擎。 jade是一個高效能的模板引擎,用於node。
借助bootstrap的柵欄佈局,分成左右兩部分。 extends layout 表示引入layout母版頁,而layout中的block content 就會被目前頁面的block content中的內容取代掉。同樣可以定義多個block
//- layout.jade
doctype html
html
  head    block title
      title Default title
body block content引用頁:
//- index.jade
extends layout
block title
  title Article Title
block content
  h1 My Article
產生的html:
<!doctype html><html>
  <head>
    <title>Article Title</title>
  </head>
  <body>
    <h1>My Article</h1>
  </body></html>
each book in books
表示循環輸出模型,在在Asp.net MVC的視圖中,需要先定義Model的類型。 jade省掉了這個model,直接取得模型的屬性。同樣也支援for迴圈,前面的‘-’號不可少。
- for (var i = 1; i <= book.rating; i++)
         span.glyphicon.glyphicon-star- for (i = book.rating; i < 5; i++)
span.glyphicon.glyphicon-star-empty空格賦值,這個空格不能少,不然jade會把ptext當成一個元素。空格後方都認為是字串。
p text 输出 <p>text<p>
所以如果是輸出變量,一定要用‘=’賦值。
a(href="/Detail/")=book.title
但如果是字串組合輸入,應該用#{}
 img(src='#{book.img}')
p 读过#{book.title}如果不想轉義內容!{},- var 表示定義變數 ,相當於Razor中的@{}
- var riskyBusiness = "<em>Some of the girls are wearing my mother's clothing.</em>";
.quote
p Joel: !{riskyBusiness}輸出
<p class="quote">
  <p>Joel: <em>Some of the girls are wearing my mother's clothing.</em></p></p>
如果是增加元素屬性,則更在元素後面的括號裡完成
#a(href="/Detail/")=book.title
輸出:
<a href="/Detail/">深入浅出Node.js</a>
如果是多个属性用逗号隔开,也可以换行
a(class='button', href='google.com')
input(
  type='checkbox'
  name='agreement'
  checked
)
还可以加入表达式
- var authenticated = true
body(class=authenticated ? 'authed' : 'anon')
而Razor要在元素里面写表达式就有点丑陋。
@{ var ischeck = true;
}<input type="checkbox" @if (ischeck)
{ @Html.Raw("class='selected'")
}
/>更多特性请看:http://jade-lang.com/reference/attributes/
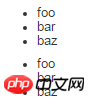
这里用子视图还不太准确,我们已经知道通过extends 和 block 来引入母版页,并按模块取代内容。而子视图主要是强调复用,是嵌入到别的视图文件中。jade是用mixin(混合)定义一个部分视图,用‘+’使用 例如:
mixin list
  ul
    li foo
    li bar
    li baz

       +list
       +list
输出
比如把页面上显示星星的部分提出来,在view文件夹下建一个_include文件夹,并创建一个rating.jade文件:
mixin outputRating(rating)  - for (var i = 1; i <= rating; i++)
    span.glyphicon.glyphicon-star  - for (i = rating; i < 5; i++)
    span.glyphicon.glyphicon-star-empty
这样在页面上引用
include _includes/rating
然后在指定位置输出,主要有‘+’号。
p +outputRating(book.rating)
这里的mixin就相当于是一个JavaScript函数,可以传递多个参数。 更多内容可以移步 http://jade-lang.com/ jade官网。
同理创建了detail.jade 和index.jade
detail.jade
extends layout
include _includes/rating
block content
  .row
   .col-md-9.page.bookdetail
     h3=book.title
     .row
      .col-md-2
           img(src='#{book.img}')
      .col-md-10
            p=book.info
            p
             +outputRating(book.rating)
            p.tags
             each tag in book.tags
              span=tag
            p ISBN:#{book.ISBN}
     h3 内容简介
     p.brief=book.brief
   .col-md-3
     .userinfo
p stoneniqiuView Code
index.jade
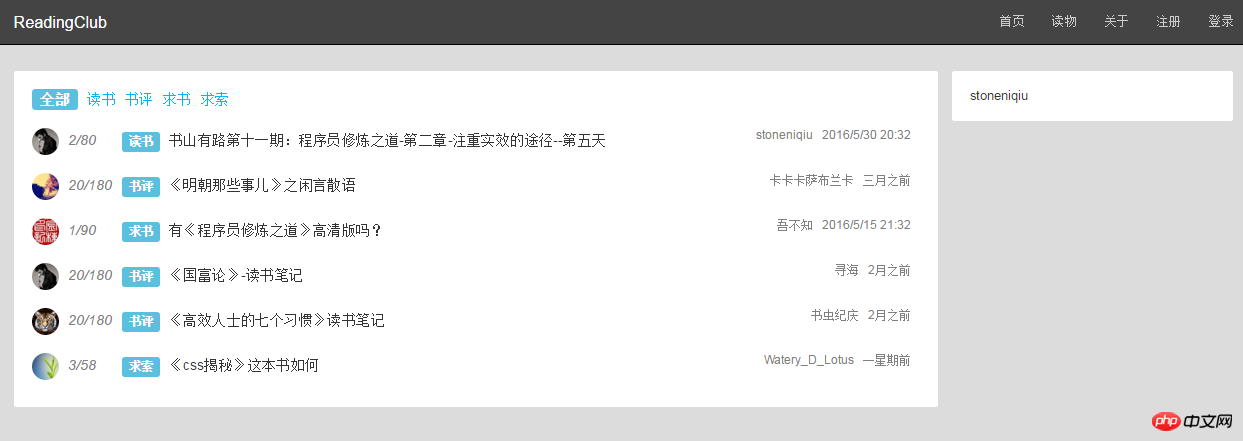
extends layout
block content
  .row
   .col-md-9.page
     .row.topictype
       a.label.label-info(href='/')  全部
       a(href='/') 读书
       a(href='/') 书评
       a(href='/') 求书
       a(href='/') 求索
     each topic in topics
       .row.topiclist
         img(src='#{topic.img}')
         span.count
            i.coment=topic.commentCount
            i /
            i=topic.visitedCount
         span.label.label-info=topic.type
         a(href='/')=topic.title
         span.pull-right=topic.postTime
         a.pull-right.author(href='/')=topic.author
   .col-md-3
     .userinfo
p stoneniqiuView Code
至此,我们创建了三个静态页面,基本熟悉了jade语法。当然jade不止这些,后期随着项目的深入再不断的探索。
目前我已经将代码提交到github上,然后部署在heroku上。
github:https://github.com/stoneniqiu/ReadingClub 有兴趣的朋友可以一起开发学习。
观摩请戳:https://stoneniqiu-mean.herokuapp.com/

heroku提供了三百兆的免费空间,还有个规则的域名,如何部署请移步:三步将Node应用部署到Heroku上
相信看了本文案例你已经掌握了方法,更多精彩请关注php中文网其它相关文章!
推荐阅读:
以上是Nodejs視圖與模型的開發的詳細內容。更多資訊請關注PHP中文網其他相關文章!


